Flight to Mars: non-Gomanov trajectory, aero braking and landing difficulties in a rarefied atmosphere
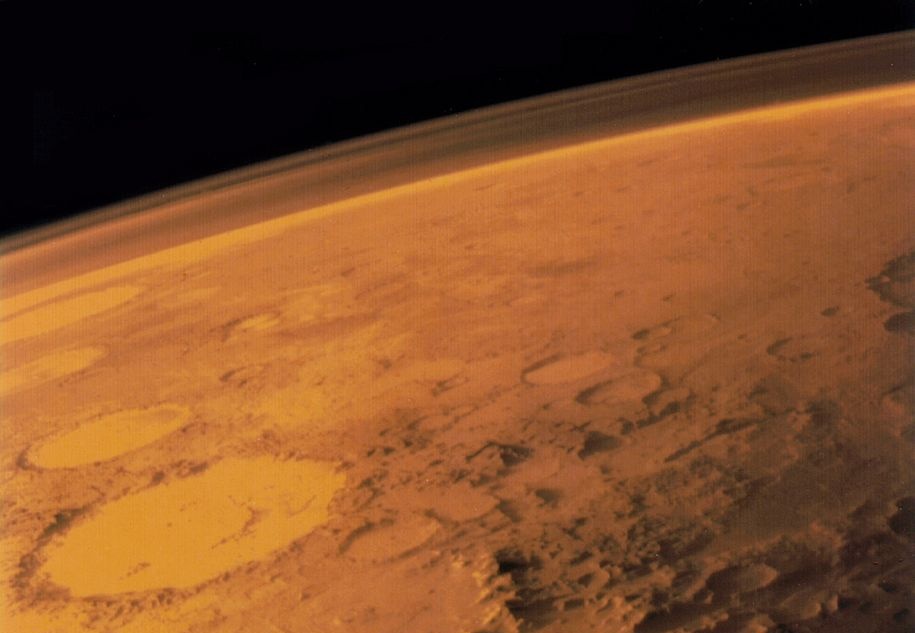
Autumn, sadness, nostalgia. It's time to unwind, arrange yourself an educational quest, flying to Mars. Virtually, of course, in Orbiter. And in order to make it more interesting, we will slow down at Mars not with engines, but with friction against the atmosphere.
Flight plan
For the greatest clarity and convenience, our flight will be divided into simple steps:
- Start from the Earth.
- The combination of the planes of the orbits.
- Acceleration to Mars.
- Trajectory corrections on the way to Mars.
- Entrance corridor
- Braking in the atmosphere.
- Preparing for landing.
- Flying in the atmosphere and landing
Flight preparation
In addition to Orbiter itself, we only need AerobrakeMFD (just unpack the archive into the folder of the installed simulator).
')
Definitions used
If you have not read the previous publications of the series, it is worth deploying.
The apocenter is the highest point of the orbit. For the orbit around the Earth, the name "apogee" is also used.
The pericenter is the lowest point of the orbit. For the orbit around the Earth, the name perigee is also used.
The inclination of the orbit - the angle between the plane of the orbit and the other plane (the plane passing through the equator of the Earth or the plane of the orbit of another body)
The ascending node is the point at which the orbit intersects the plane of the Earth's equator or the plane of the orbit of another body, being “above” it. “Above” and “below” are determined by the conditional north and south poles.
The descending node is the point at which the orbit intersects the plane of the Earth's equator or the plane of the orbit of another body, being “below” it. “Above” and “below” are determined by the conditional north and south poles.
For example, if we are talking about the orbit of the moon around the earth, the picture will be as follows:
Stage 1. Starting from Earth
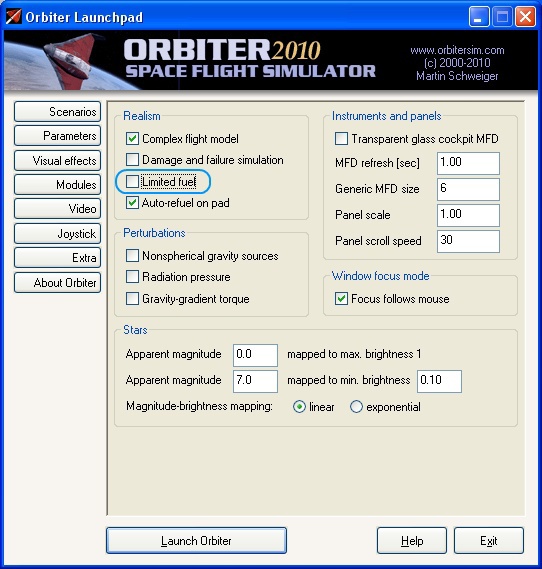
First of all, in the "Parameters" section, you need to turn on the "infinite fuel" mode by unchecking
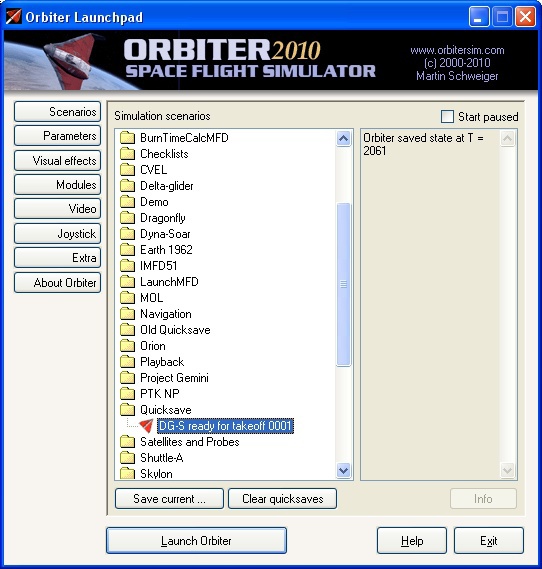
The script we need is “DG-S ready for takeoff” in the Delta-glider folder. In it, our ship is already on the runway at Cape Canaveral, ready for takeoff.

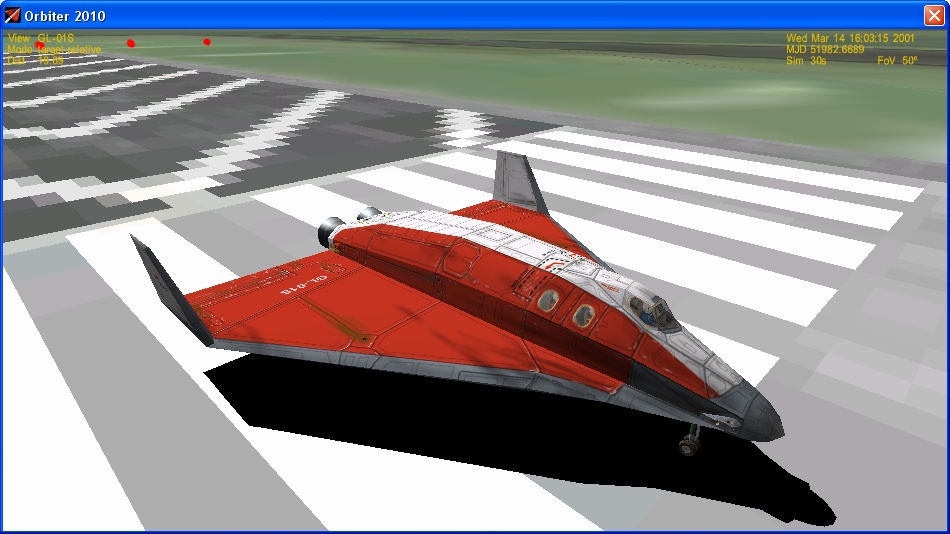
Delta glider - Orbiter's workhorse
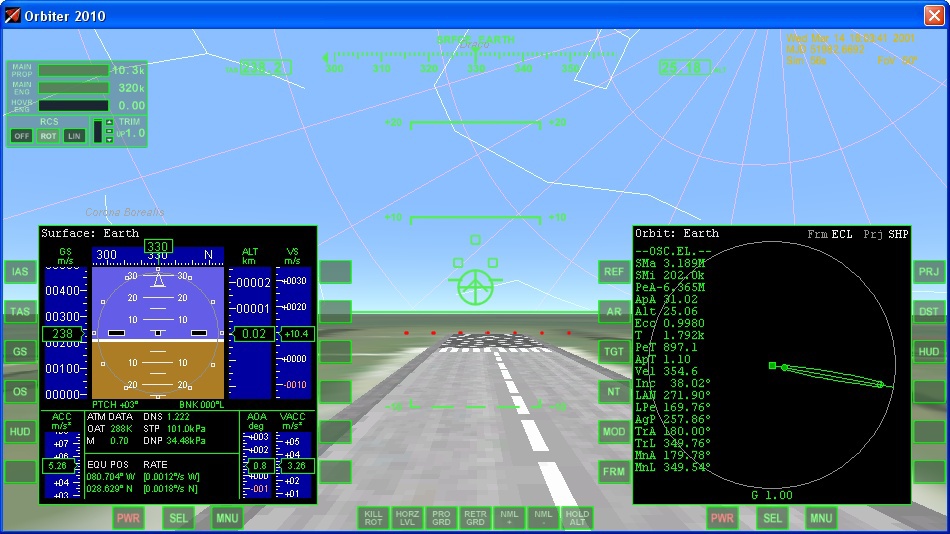
Pressing F1, go to the "view from the cockpit." Press F8 to switch the view to the "glass cockpit" mode.
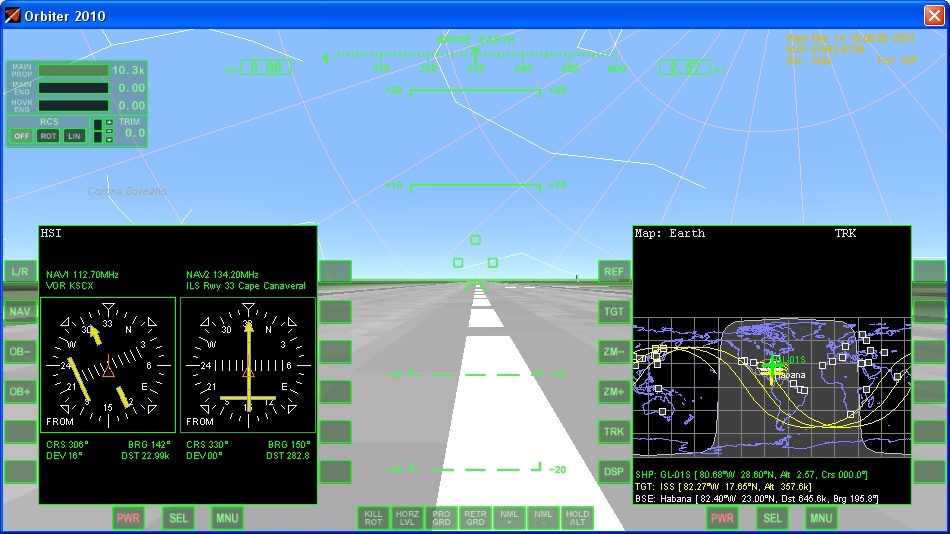
Multifunctional displays (MFD, MFD) are located on the left and right. On these displays we will display various devices that we will need in flight. MFD hot keys are used with the left and right Shift previously pressed for the left and right MFD, respectively. The MFD selection menu is called by pressing Shift-F1 or by clicking the mouse on the MNU button under the MFD. The cockpit is interactive, if you are too lazy to memorize hot keys, you can click a button with a mouse click. Switch the left MFD to the “Surface” mode by pressing Shift - F1 , Shift - S , and the right one to the “Orbit” mode by pressing Shift - O. For ease of display, we will change the projection mode on the right MFD from ecliptic to ship pressing Shift - P (MFD replace ECL with SHP in its right upper part) and change the height measurement mode from the center of a celestial body to height from the surface with a combination of Shift - D (MFD replace distance pericenter and apocenter PeR and ApR at the height of the pericenter and apocenter PeA and ApA).
I recommend to remember one key combination - Ctrl - P. On it you can always pause the simulator.
The second very useful set of hot keys controls time - R - slows down time by 10 times, T - speeds up by 10 times.
Before taking off, you must also turn on the engines of the orientation system ( Ctrl - / on the numeric keypad) and set the trimmer all the way up while holding the Delete button over the block of cursor keys.
Turn on and fix the main engines (press Num + , then Ctrl , release Num + , release Ctrl ). We start the run. When the trimmer is properly installed, the ship will begin to detach from the strip on its own:
We remove the chassis (the G button) and, controlling from the numeric keypad, expand the ship on a course of 90 °. By controlling the trimmer ( Insert Down, Delete Up) and the KillRot rotation stop mode ( Num 5 ), we start acceleration, maintaining a pitch angle of 20-30 °.
Starting from a height of ~ 30 km, trimmers and KillRot mode will no longer cope. You can not interfere with the management (in this case there will be areas of a small decrease), you can switch to 2D cockpit mode (by pressing F8 ) and change the thrust vector of the cruise engines , and it will not hurt to go into orbit. Accelerate until the apocenter of the orbit reaches 200 km.
Turn off the sustainer with the Num * button. We occupy a position along the orbital velocity vector (PROGRD mode [ ) and wait for the apocenter. In the area of the apocentre, we turn on the main engine again and raise the pericenter to ~ 200 km.

So, we are in a circular reference orbit ~ 200 km. For the convenience of further flight, open the sash of the brake engines ( Ctrl - Spacebar , Retro Doors - Open). Let's translate the indicator on the windshield (HUD) to the orbital mode by pressing the H button.
Stage 1 successfully completed. Save by pressing Ctlr-S . The saved game will be in the Quicksave folder and can be downloaded in exactly the same way as the script at the beginning:
I don’t know about you, but it seems to me that psi-ambient suits perfectly to such flights:
Stage 2. Combining the planes of the orbits
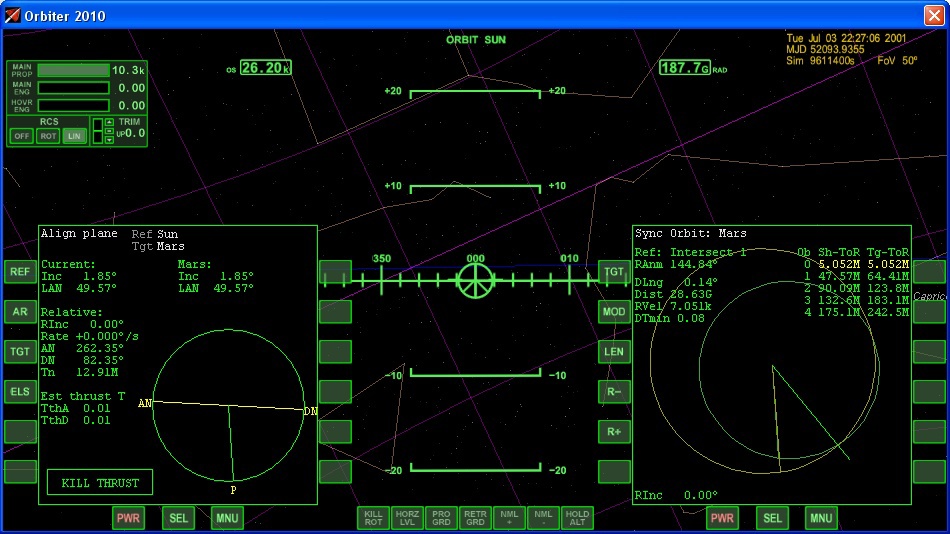
In order for us to accelerate normally to Mars, it is necessary to combine the plane of our orbit with the plane of the orbit of Mars. To do this, we need the MFD “Combination of the orbit planes” ( Shift - A ). Select Mars as target ( Shift - T , in the menu choose Celestial Bodies - Mars):
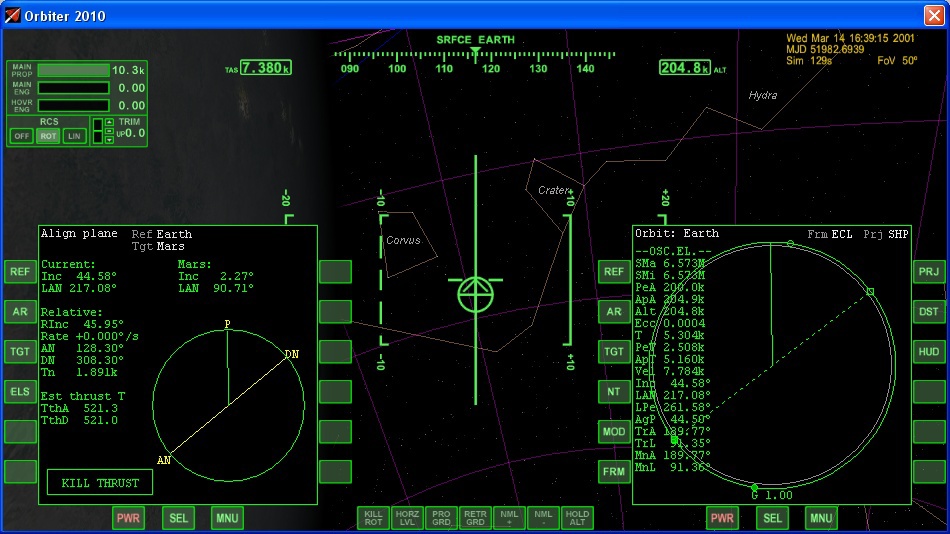
The next node is ascending (Ascend Node, AN), therefore it is necessary to take a position “down” from the orbital plane. For this there is a NML- mode (button ' or click on the NML-button at the bottom of the screen). Let's wait for the point at which the time to the node (Tn on the MFD) will be about half the maneuver time in the node (Est Thrust T), and turn on the main engine in it:

Why half the time to knot? The fact is that during the maneuver the line of nodes shifts, so if you start the correction of the orbit in a time equal to the time of maneuver in the node, the node will “leave”. The same offset of the line of nodes is a criterion for the engine to stop. When the line of nodes is almost perpendicular to the green line, further correction does not make sense.
Thanks to this simple formula, we practically combined the plane of the orbits with a single maneuver. But it is worth repeating the maneuver for maximum alignment of the planes:
We have completed the second stage. Do not forget to save.
Stage 3. Acceleration to Mars
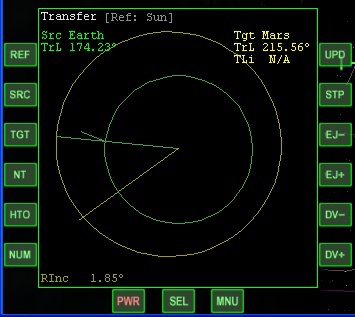
To prepare the maneuver, turn on the MFD “Transition” ( Shift - X ). Our goal is Mars, which revolves around the Sun, therefore, we specify the Sun as the central body ( Shift - R , select Sun in the menu). We are turning around the Earth, therefore we will indicate the Earth as the source body ( Shift - S , select Earth in the menu). Select Mars to target ( Shift - T , select Mars in the menu). MFD will look like this (added explanations for clarity):

Turn on maneuver planning mode ( HTO button on MFD). The dotted radius of the maneuver starting point appears. It can be moved by pressing Shift - < and > . The planned impulse is regulated by the buttons Shift - - and + . Let's take aim at Mars:
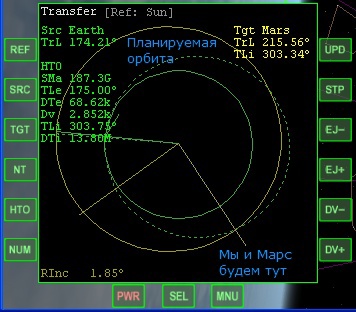
Note that the intercept point of Mars is not on the opposite side of the orbit. This means that our trajectory will not be Gomanovsky , we will spend more fuel, but then we will fly faster.
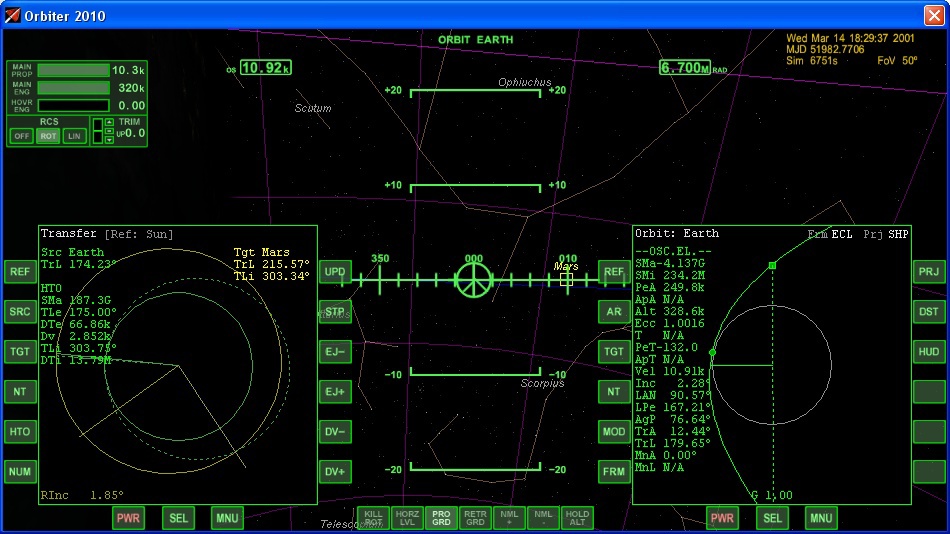
MFD writes that we need to accelerate to 2.8 km / s. Our current orbital speed is 7.6 km / s. It seems that everything is simple: 7.6 + 2.8 = 10.4 km / s. But this is not true! Our ship is in Earth orbit. And the Earth in turn revolves around the sun. It turns out such an interesting picture:

The 2.8 km / s that the MFD offers us should be added to the orbital velocity of the Earth, not us. The situation is further complicated by the following factors:
- In order to leave the Earth's orbit, it is necessary to accelerate to the second cosmic velocity (11.2 km / s).
- The orbital velocity depends nonlinearly on the height of the orbit .
- As we move away from the earth, our speed will fall due to the transition of kinetic energy into potential energy.
- Acceleration is not instantaneous, during the acceleration part of the speed will already be lost on the transition to potential energy.
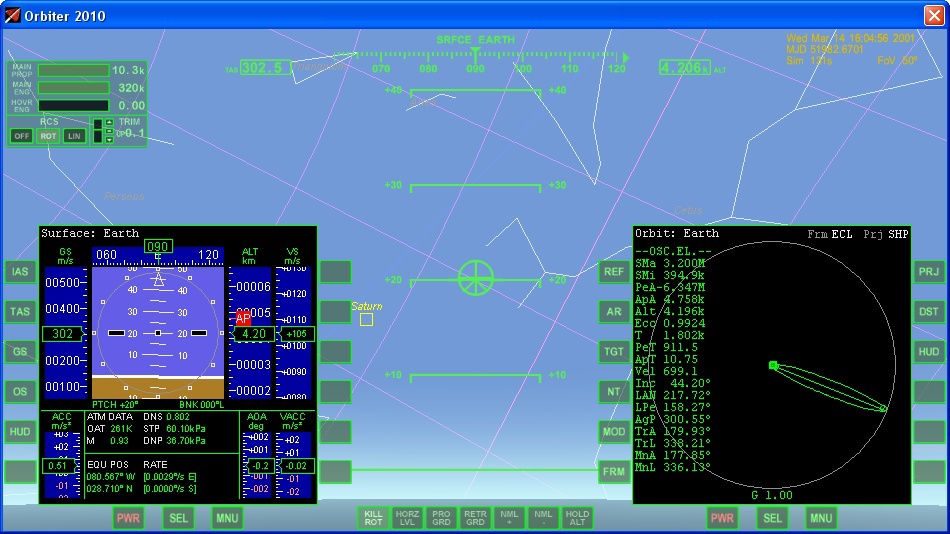
In principle, there are special MFDs for calculating the desired speed, but they have a rather high threshold of entry. Therefore, we will cut this Gordian knot very simply: we will accelerate to the second cosmic velocity, adding 500-1000 m / s to it “by eye”, and, having already moved away from the Earth, we will make a correction of the trajectory. We start acceleration on the night side of the orbit so that our orbital speed adds to the orbital velocity of the Earth:
We track the parameters of the orbit on the right MFD "Orbit":
There is a second space! Pay attention that the speed is not 11.2 km / s. Stop acceleration at a speed of around 11.5 km / s in order not to accelerate too much.
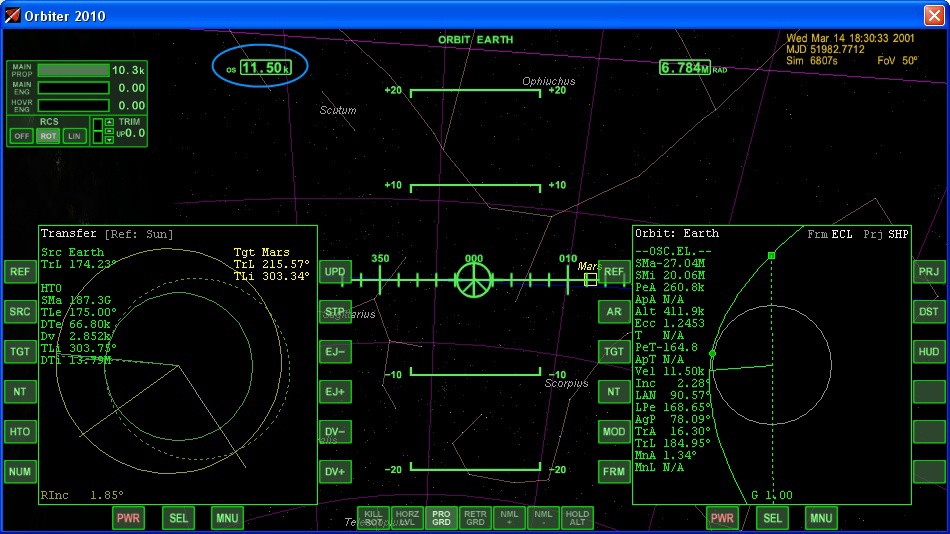
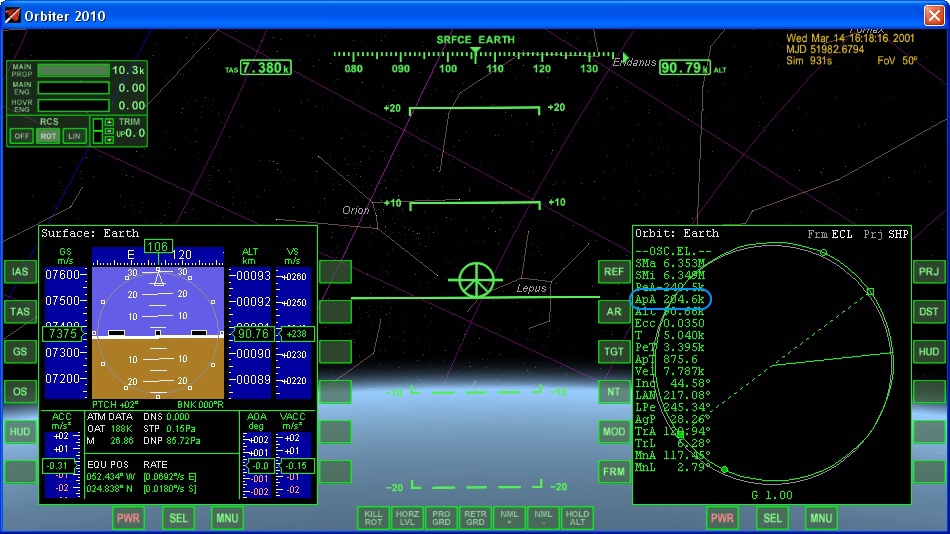
We stabilize the ship in space by turning on the KillRot mode. Accelerating time we squander it until the moment when the gravitational influence of the Earth practically comes to naught. Choose yourself as the source body ( Shift - S , type our name GL-01S in the text field). Not bad overclocked:

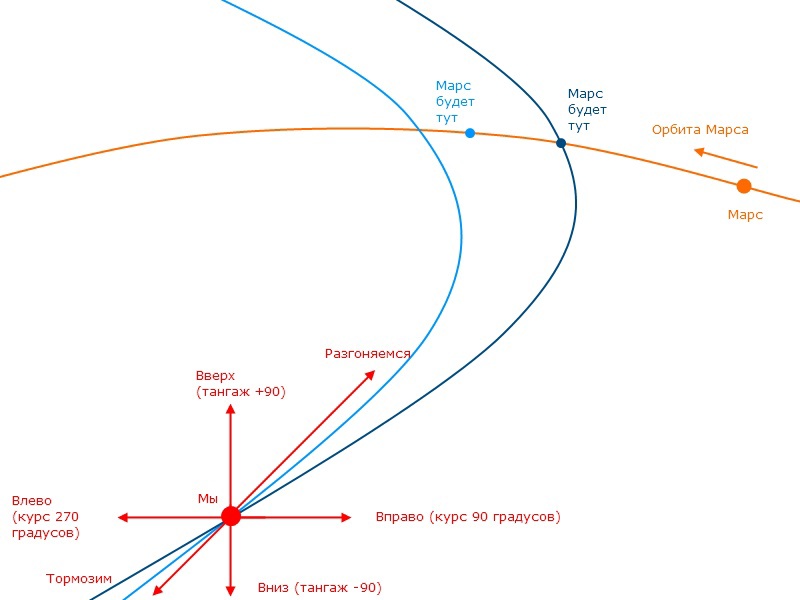
Now our task is to adjust the orbit so that we aim approximately at the meeting point with Mars. Visually, this can be represented as:
MFD orbit synchronization will help us with accurate aiming ( Shift - Y , choose Mars as the target of Shift - T ). Our task is to reduce the value of the parameter DTmin by pulses to the right, left, up, down, forward, backward:
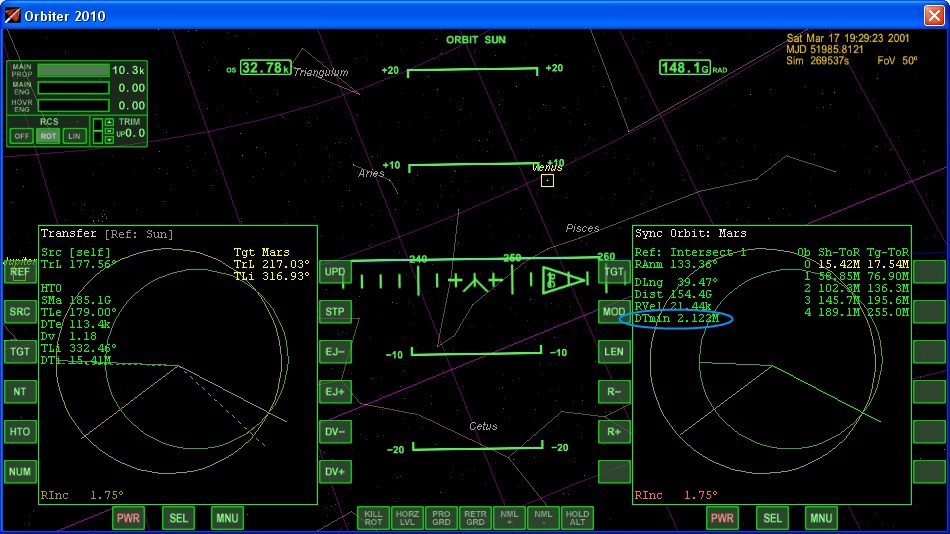
Common sense dictates that with correction it is worth giving impulses to the right. We occupy the position of 90 ° to the right and, holding it manually (there is no automatic mode), we turn on the main engine. Noticeable decrease in DTmin:

The algorithm for further action is simple. When DTmin stops decreasing, not reaching the near-zero value, we change the axis - we check if its up / down or forward / backward reduction will decrease. If we have well combined orbits in stage 2, this is most likely not. The result of the right actions:
Stage 3 is complete. Do not forget to save.
Stage 4. Correction of the trajectory on the way to Mars
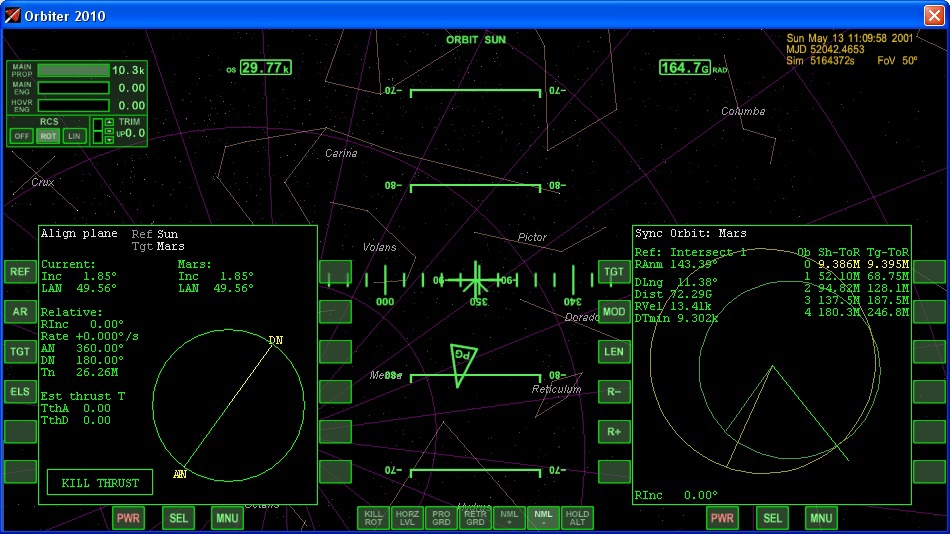
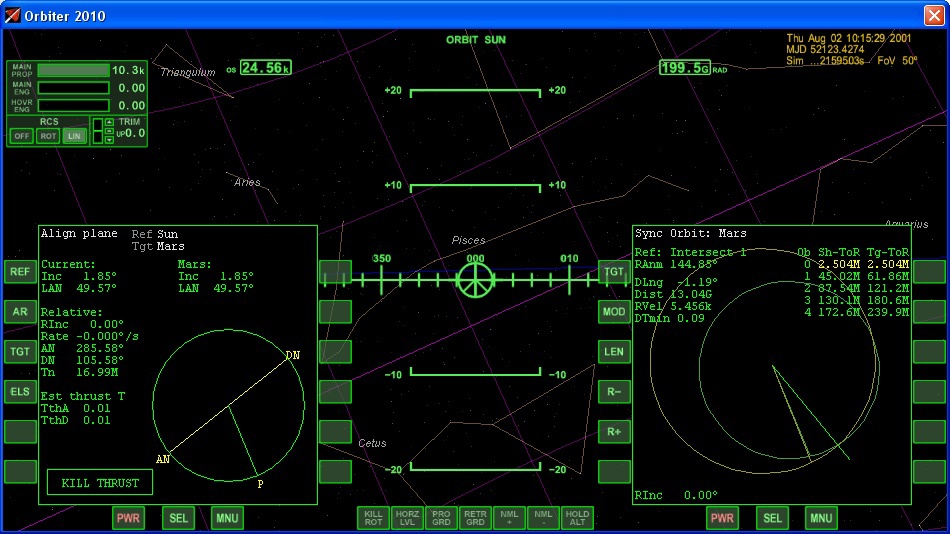
Mars is a relatively light planet. This is not Jupiter, which did not require intermediate corrections during the flight. Therefore, we will adjust our trajectory several times so as not to fly past. The first step will be the complete alignment of the orbit planes and the first correction of the trajectory. If you look at the MFD orbit synchronization, it shows the angle of the orbit planes by almost two degrees. It must be corrected, because the MFD cannot work normally in such conditions. Therefore, we switch the left MFD to the mode of combining the planes of the orbits. He "remembers" the previous body of circulation - the Earth, so you need to switch it to the Sun ( Shift - R , select Sun in the menu). The next node is ascending, it is almost five mega seconds before it (involuntarily I recall Ving's Depth in the Sky, where time was measured by such units):

Combine the plane of the orbits:
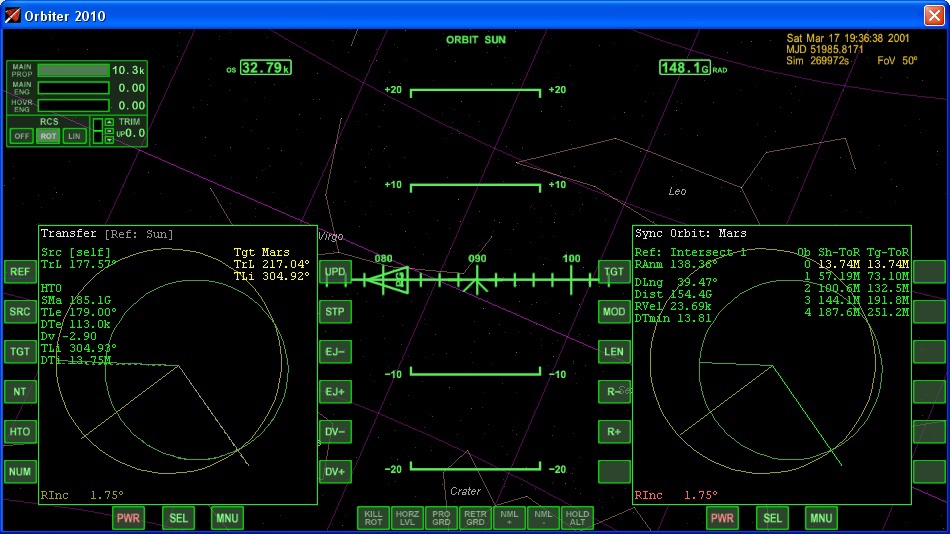
Then we decrease the DTmin. I recommend changing it when accelerating / decelerating, and in no case do not move up / down - we have already combined the planes of orbits. When DTmin is close to zero, it is better to perform small displacements not sustainer, but maneuvering engines:
After accurate aiming, DTmin will be almost zero:

Up to a meeting point of 9.5 mega seconds. I propose to make corrections using the dichotomy method - for five, two and a half, and one megasecond.

Stage 4 is considered over for 1 megasecond from the meeting point. Do not forget to save.
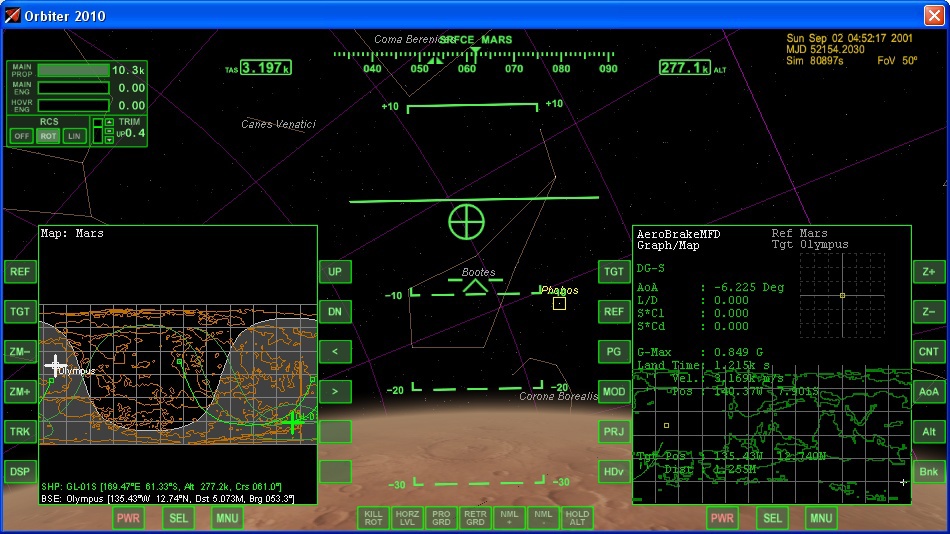
Stage 5. The entrance corridor.
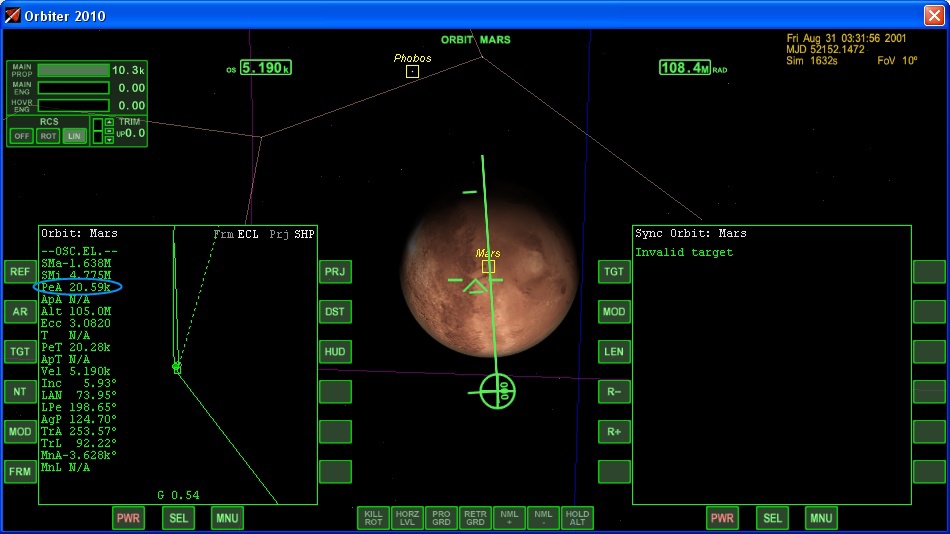
What is an entrance corridor? We need to approach Mars so that, on the one hand, we don’t bump into it, and on the other hand, we don’t fly by. Our goal is a pericenter of 20 km so that we reliably enter the atmosphere and can brake. Let's switch the left MFD to the “Orbit” mode ( Shift - O ) and select Mars as the reference body ( Shift - T , select Mars in the menu). We squander time until the gravity of Mars begins to be felt (20-30 ks to the meeting point):

Apocenter negative, we will have to crash into Mars. It is necessary to raise the apocenter to 20 km. To do this, turn around with the nose to the planet, increase Mars (the Z button reduces the field of view, the X button increases).

I choose braking on the day side. At night, in conditions of lack of time, you can lose orientation in space, which is potentially dangerous.
Pericenter 20 km. Step 5 is complete. Be sure to save!
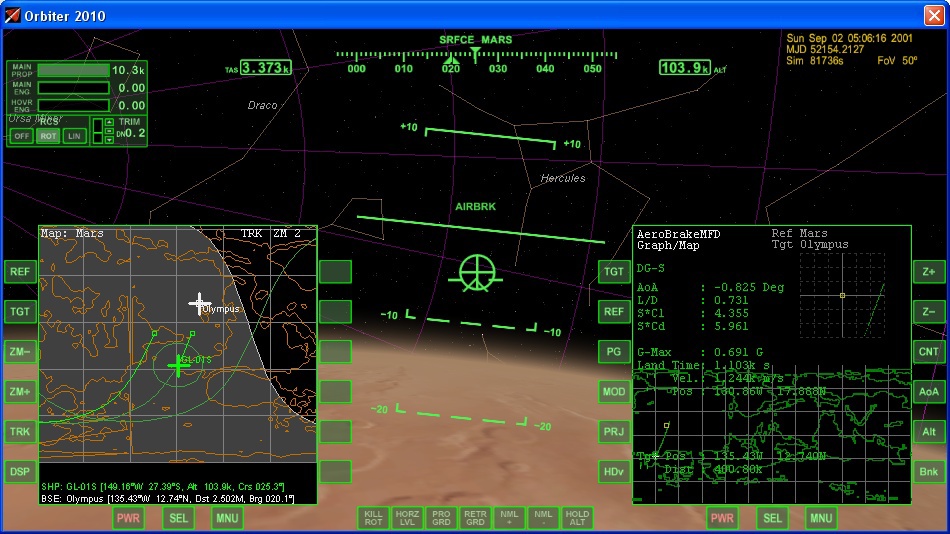
Stage 6. Deceleration in the atmosphere
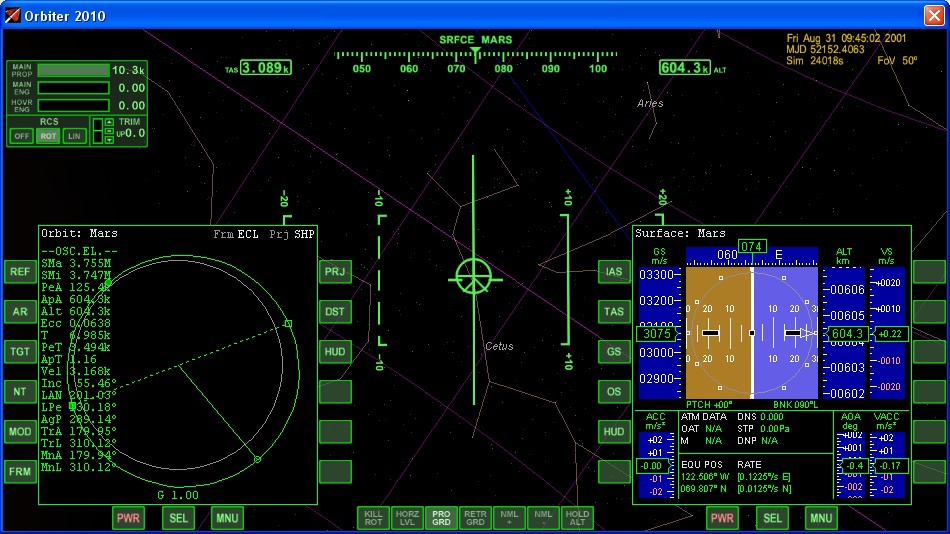
We will install the Surface mode on the right MFD, return the normal field of view, turn the ship in the direction of travel and prepare for the difficult stage morally.

Our main controls are the trimmer, which we already used on take-off from the Earth, and aerodynamic brakes (released and removed by pressing Ctrl-B ). Set the trimmer all the way up and release the brakes. Switch the HUD to the “surface” mode by pressing H and take a position with a roll of 90 °:

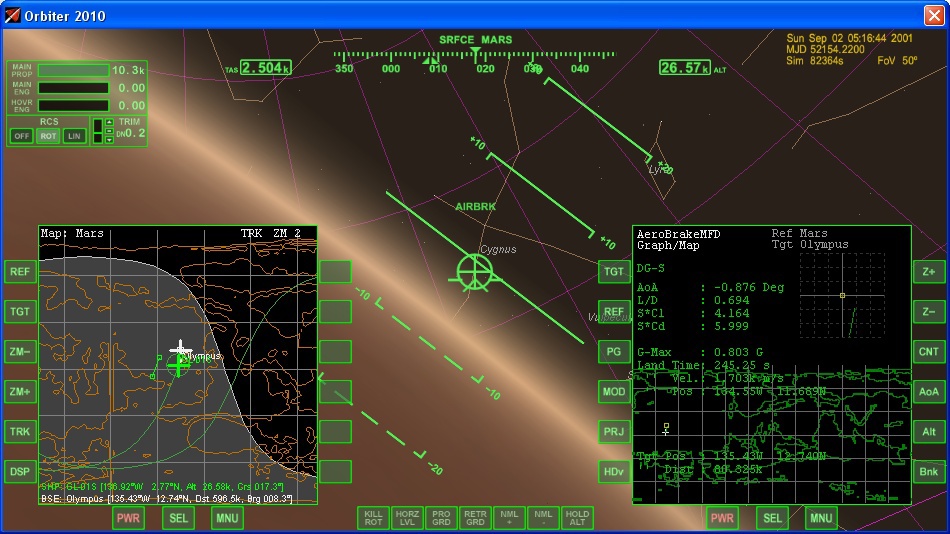
Having reached the pericenter, we manage with a lurch so as to keep the near-zero vertical speed and continue braking:

With the height of the apocenter below 1000 km, we remove the air brakes and begin to get out of the atmosphere:

Upon reaching the apocenter, we raise the pericenter above 100 km:
Everything, we are in a stable orbit around Mars. Be sure to save.
In theory, it is possible to build an approach so as to land at once from this stage. But this is, firstly, difficult, and secondly, it requires very fast work with several MFDs parallel to piloting the ship, which increases the chances of error. I chose to go a longer, but easier and safer way.
Historically, aero braking has been used by Martian vehicles. For example, the MRO on aerodynamic braking saved about half the fuel that would be required for normal braking. Of course, the apparatus did not brake as much in Hussar as we did. MRO reduced the height of the apocenter gradually, repeatedly slowing down in the upper atmosphere.
Stage 7. Preparing for landing
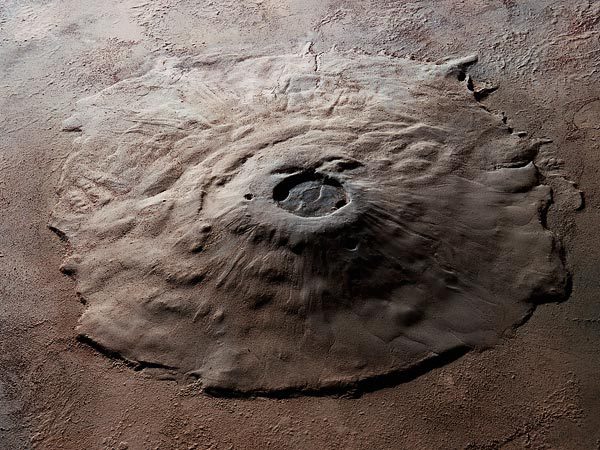
Our goal is the Olympus base, which, as the name suggests, is located not far from Olympus, the highest mountain on Mars and the second highest in the Solar System:
This stage consists of several parts.
Preparation of MFD cards. Let's open the MFD card ( Shift - M ) and select the Olympus Martian base ( Shift - T , choose Spaceports - Olympus) with our target.
Preparing MFD Aerobrake. Open the MFD ( Shift - E ), set the target Olympus base ( Shift - T , enter Olympus from the keyboard), switch the MFD to the map mode by pressing the PG and PRJ buttons.

MFD communications preparation. Open MFD ( Shift - C ). Open the menu with the data of beacons ( Ctlr - I ). The Olympus base has three landing sites (alas, no runways), the first of which has a beacon operating at a frequency of 129.70 MHz. Set this frequency in the MFD by pressing the MFD buttons <, <<,>, >>.

Then you need to plan a landing. Our non-zero orbital inclination means that our trajectory will move along the surface. Also now the base "Olympus" is on the night side. Therefore, being in orbit, we are waiting for the coincidence of two factors - the base on the day side and our trajectory passes next to it. If necessary, you can slightly change the inclination of the orbit. In my case, I had to wait a short time, ten turns:

When 4-5 thousand kilometers remain until the base, we perform a deceleration maneuver so that the base remains a thousand or two kilometers short and direct the ship with its nose ahead:
Stage is completed, be sure to save!
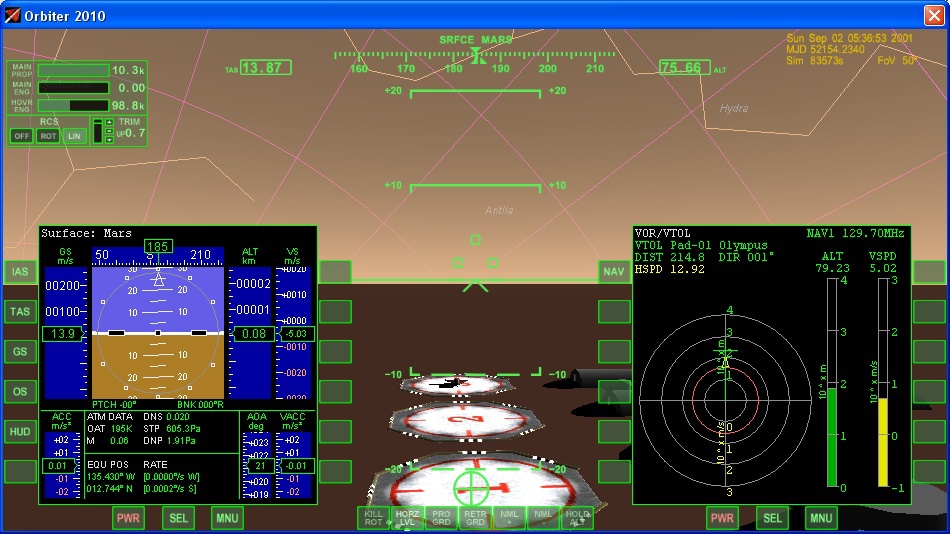
Stage 7. Flight in the atmosphere and landing
MFD cards can be switched to centering mode on the ship ( TRK button on MFD). Our main controls will again be trimmer and aerodynamic brakes. By controlling them, we support the trajectory to the base area on the Aerobrake MFD.
We continue active management.
The problem of the Martian atmosphere is that it is too weak. She is not able to quickly and effectively slow down. Therefore, you will surely fly over the base:

There is nothing wrong with that. Because of the atmosphere, we, in any case, will not be able to turn around and brake with sustainer engines, like on the Moon , so the remnants of speed will have to be dropped in a U-turn. Watch the height - do not stick to Mars. In turn, you can help yourself with lifting engines ( Num 0 to increase the thrust, Num. - to reduce):

Turning towards the base, it is still ~ 50 km away. Keeping the ship in the air with lift engines we continue to draw closer

Turn on the automatic mode of maintaining horizontal orientation ( L ). Switch to landing MFD ( Shift - L ). It is good because it shows the direction and distance quite accurately.
Brake motors are very weak. Try to adhere to the rule: horizontal speed in hundreds of meters per second should not be higher than a distance of tens of kilometers. Otherwise, there is a risk to fly the base a second time:

Our task is to finally stop, turn our noses on the base and begin a slow convergence. Do not forget to follow the vertical speed!

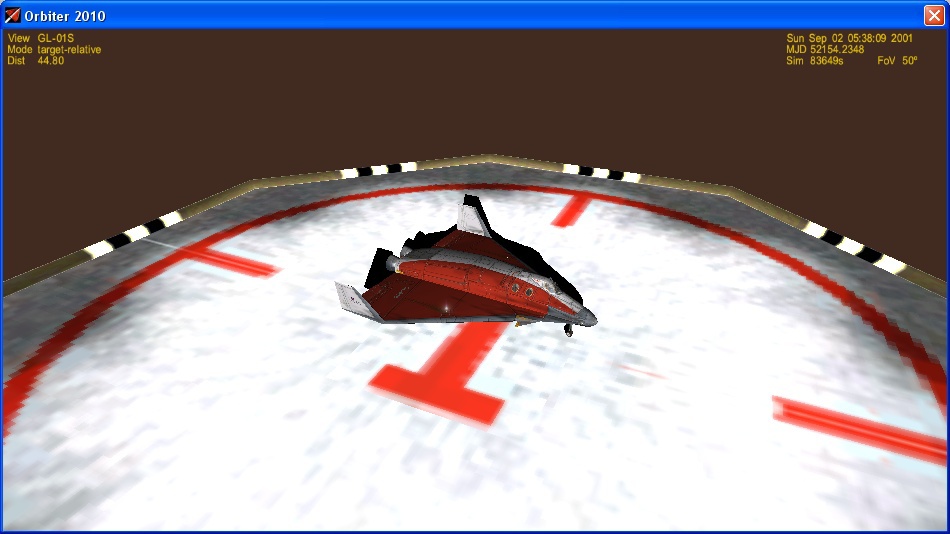
We release the chassis, it remains a bit:

Last meters:
There is a landing!
In general, landing on Mars is more complicated than on a body without an atmosphere like the moon. The atmosphere does not allow to occupy an arbitrary position, you have to fly nose forward. On the other hand, it is not enough for the full work of the wings.
Conclusion
Do not forget to save. Suddenly want to fly to Phobos, or go back to Earth?
For the curious there is a manual translated into Russian . You can also read other posts from the Orbiter series .
Source: https://habr.com/ru/post/236693/
All Articles