Creating a simple program with RMI and parallel access to a GUI in Java
When I had to go deep into the use of RMI, I realized how important the ability to correctly implement parallelism in the program's graphical interface itself. To my surprise on the Internet there was not enough material on this topic and especially qualitative examples, although the topic is of course very important for any programmer. That is why I decided to share my experience.
Briefly about RMI: a program interface for calling remote methods in the Java language ( source ). Using it, you can, for example, manage data on a server program from one or more computers. More can be read on Habré. We will proceed from the fact that you are already familiar with its basics. You must also have an idea of the innovations in Java 8, namely, you will need lambda expressions. There is a good explanation here .
The possibilities of using RMI are very diverse. Using it, you can make, for example, a chat or a Java voting program. In my example, there will be a simple counter with a graphical shell that looks like this:
')
However, before moving on to the GUI, let's create the RMI object itself, the counter and the RMI server on which it will be stored.
Counter - Interface "Counter":
The initialization counter "CounterClass":
Server for RMI counter "Counter_Server":
Since I assume that RMI is already familiar to you, I will not explain these classes in lines. Brief explanation: the reset method equals the counter variable with a value of 0 and returns it back, the increment method increases the value of the counter variable by 1 and returns it back. In the server we create our own register with the CounterClass skeleton. After that, the server can already be started.
Finally, go to the chart. Let's create the class Counter_Client_GUI, which creates the frame with the GUI and simultaneously takes the stub for the remote control of the counter from the previously created register via the main method:
There are already some lines to explain here:
Before the next step, it is necessary to understand why a parallel approach is needed in this case. If we implement JLable updates in the most usual way, for example:
It is very likely that this will lead to a permanent freezing of the frame and at the same time it will not be possible to press any button for a long time, although the clicks are recorded and, when the frame is thawed, one by one they will be executed, which will lead to chaos. This is due to the fact that in this case all actions with the graphical shell will take on only one single Thread - EventDispatchThread . And do not forget that, in this example, the client and the server are on the same computer, the counter is still managed remotely , so there may be a failure in the RMI register or a delay in the delivery of the command to the server (besides this is just an example, but in real the client and server programs are of course not located on localhost).
Now we proceed to the most important part - we describe the incrementClicked and resetClicked methods , while introducing the necessary parallelism :
Explanation: for each button click we create a new Thread and start it.
Inside each thread will be this:
EventQueue.invokeLater (...) is the key point of the program. EventQueue from English "event queue" is a function that (contained in Java) sends the job of the current Thread to the queue to be executed in the main Thread. In our case, the task is to update the counter
It is worth noting that in the body of EventQueue.invokeLater (...) there is also a lambda expression. In this program, they are used for a better and more understandable appearance of the code.
That's all. Now parallel work with the graphical shell of the program is provided in any case, even when working with RMI.
Thanks for attention!
Briefly about RMI: a program interface for calling remote methods in the Java language ( source ). Using it, you can, for example, manage data on a server program from one or more computers. More can be read on Habré. We will proceed from the fact that you are already familiar with its basics. You must also have an idea of the innovations in Java 8, namely, you will need lambda expressions. There is a good explanation here .
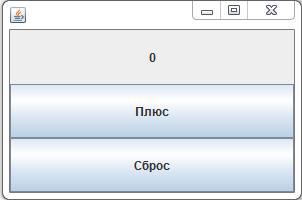
The possibilities of using RMI are very diverse. Using it, you can make, for example, a chat or a Java voting program. In my example, there will be a simple counter with a graphical shell that looks like this:
')
- JLable with current counter value
- JButton "Plus" raises the value of the counter by one
- JButton "Reset" resets the counter value to one
However, before moving on to the GUI, let's create the RMI object itself, the counter and the RMI server on which it will be stored.
Counter - Interface "Counter":
import java.rmi.Remote; import java.rmi.RemoteException; public interface Counter extends Remote { final String NAME = "Counter"; int reset() throws RemoteException; int increment() throws RemoteException; } The initialization counter "CounterClass":
import java.rmi.RemoteException; import java.rmi.server.UnicastRemoteObject; public class CounterClass extends UnicastRemoteObject implements Counter { private static final long serialVersionUID = 1L; private int counter; public CounterClass() throws RemoteException { } @Override public synchronized int reset() { this.counter = 0; return this.counter; } @Override public synchronized int increment() { this.counter++; return this.counter; } } Server for RMI counter "Counter_Server":
import java.io.IOException; import java.rmi.AlreadyBoundException; import java.rmi.registry.LocateRegistry; import java.rmi.registry.Registry; public class Counter_Server { public static void main(final String[] args) throws IOException, AlreadyBoundException { CounterClass counter = new CounterClass(); Registry localReg = LocateRegistry.createRegistry(Registry.REGISTRY_PORT); localReg.bind(Counter.NAME, counter); System.out.println("Counter-Server runs"); } } Since I assume that RMI is already familiar to you, I will not explain these classes in lines. Brief explanation: the reset method equals the counter variable with a value of 0 and returns it back, the increment method increases the value of the counter variable by 1 and returns it back. In the server we create our own register with the CounterClass skeleton. After that, the server can already be started.
Finally, go to the chart. Let's create the class Counter_Client_GUI, which creates the frame with the GUI and simultaneously takes the stub for the remote control of the counter from the previously created register via the main method:
import Counter.Counter; public class Counter_Client_GUI extends JFrame { private static final long serialVersionUID = 1L; protected Counter counter; protected JLabel counterLabel; public Counter_Client_GUI(final Counter counter) { this.setDefaultCloseOperation(WindowConstants.DISPOSE_ON_CLOSE); this.counter = counter; this.counterLabel = new JLabel("0", SwingConstants.CENTER); final JButton incrementButton = new JButton(""); final JButton resetButton = new JButton(""); incrementButton.addActionListener(this::incrementClicked); resetButton.addActionListener(this::resetClicked); this.setLayout(new GridLayout(0, 1)); this.add(this.counterLabel); this.add(incrementButton); this.add(resetButton); this.setSize(300, 200); this.setVisible(true); } public static void main(String[] args) throws RemoteException, NotBoundException { Registry reg = LocateRegistry.getRegistry("localhost"); Counter counter = (Counter) reg.lookup(Counter.NAME); new Counter_Client_GUI(counter); } There are already some lines to explain here:
- incrementButton.addActionListener (this :: incrementClicked) is a lambda expression, the body of the Listener is described in the incrementClicked method in the same class;
- resetButton.addActionListener (this :: resetClicked) is a lambda expression, the body of the Listener is described in the resetClicked method in the same class;
- Registry reg = LocateRegistry.getRegistry ("localhost") - in this example, both the server and the client are on the same computer, therefore, instead of a register link, we specify "localhost".
Before the next step, it is necessary to understand why a parallel approach is needed in this case. If we implement JLable updates in the most usual way, for example:
this.counterLabel.setText(String.valueOf(novoeZnacheniePeremennoiCounter)); It is very likely that this will lead to a permanent freezing of the frame and at the same time it will not be possible to press any button for a long time, although the clicks are recorded and, when the frame is thawed, one by one they will be executed, which will lead to chaos. This is due to the fact that in this case all actions with the graphical shell will take on only one single Thread - EventDispatchThread . And do not forget that, in this example, the client and the server are on the same computer, the counter is still managed remotely , so there may be a failure in the RMI register or a delay in the delivery of the command to the server (besides this is just an example, but in real the client and server programs are of course not located on localhost).
Now we proceed to the most important part - we describe the incrementClicked and resetClicked methods , while introducing the necessary parallelism :
protected void incrementClicked(final ActionEvent ev) { new Thread(this::incrementOnGUI).start(); } protected void resetClicked(final ActionEvent ev) { new Thread(this::resetOnGUI).start(); } Explanation: for each button click we create a new Thread and start it.
Inside each thread will be this:
protected void incrementOnGUI() { try { final int doAndGetIncrement= this.counter.increment(); final String newLabelText = String.valueOf(doAndGetIncrement); EventQueue.invokeLater(() -> this.counterLabel.setText(newLabelText)); } catch (final RemoteException re) { final String message = "Fehler: " + re.getMessage(); EventQueue.invokeLater(() -> JOptionPane.showMessageDialog(this, message)); } } protected void resetOnGUI() { try { final int doAndGetReset= this.counter.reset(); final String newLabelText = String.valueOf(doAndGetReset); EventQueue.invokeLater(() -> this.counterLabel.setText(newLabelText)); } catch (final RemoteException re) { final String message = "Fehler: " + re.getMessage(); EventQueue.invokeLater(() -> JOptionPane.showMessageDialog(this, message)); } } EventQueue.invokeLater (...) is the key point of the program. EventQueue from English "event queue" is a function that (contained in Java) sends the job of the current Thread to the queue to be executed in the main Thread. In our case, the task is to update the counter
this.counterLabel.setText(newLabelText) or to display the error message JOptionPane.showMessageDialog(this, message) . This is necessary in order to avoid confusion among the work of many created Threads. For example, the method will count the number of rows in one Thread in the table, and the other Thread will delete rows. Most likely the resulting number will be wrong. Eventually, EventQueue contains a list of tasks that are executed in turn or by accessibility, without interfering with any other work with the graphical interface.It is worth noting that in the body of EventQueue.invokeLater (...) there is also a lambda expression. In this program, they are used for a better and more understandable appearance of the code.
That's all. Now parallel work with the graphical shell of the program is provided in any case, even when working with RMI.
Thanks for attention!
Source: https://habr.com/ru/post/236569/
All Articles