“There is no time to explain!” Or How to implement the broadcast from the IP camera to the site?
Perhaps, I am lucky to idiotic tasks at the most inopportune moment. Is that a karma ?! Anyway…
In this “holiday” post, we will talk about how to implement a broadcast from an IP camera to the site if you have a 3g modem and a laptop.
I would not have written the post myself, if I hadn’t asked a question on the “Toaster” , where I was told to google.
What we have?
- Not cheap IP camera AXIS Q1755, which I did not even hold in my hands. The camera itself is located in the city "A" and is connected via a brake 3g modem.
- A server on Debian 7 that spins on almost dead Core2Duo. Although it is not so dead, it is not very suitable for these tasks. Oh yes, the server itself lives in city B.
- The site on which you want to hang the player. Located on another, more productive server, in the same city B.
- I, who is in the city of B, with a laptop, 3g-modem and limited traffic at 4gb.
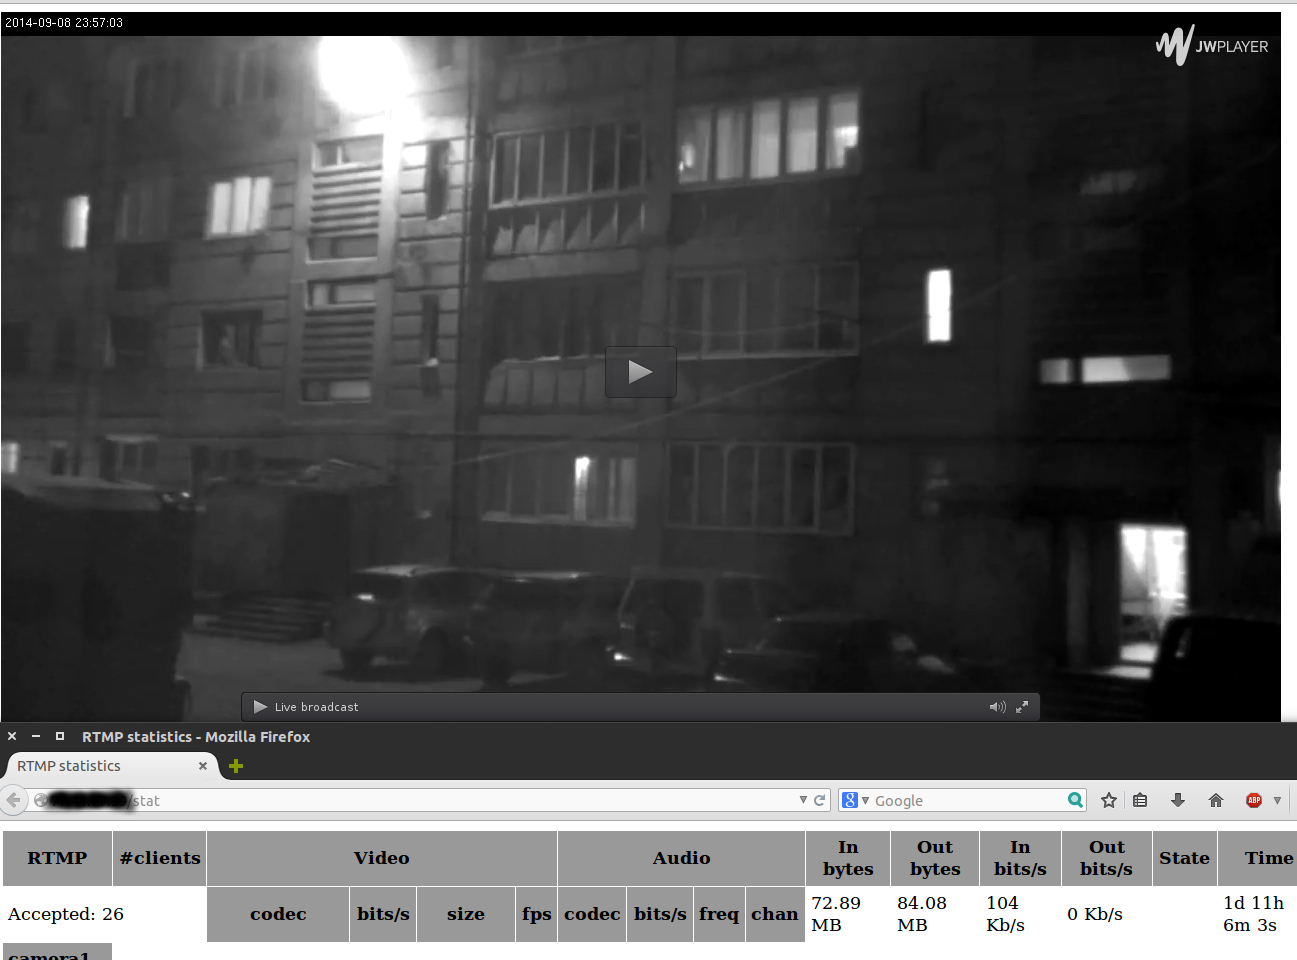
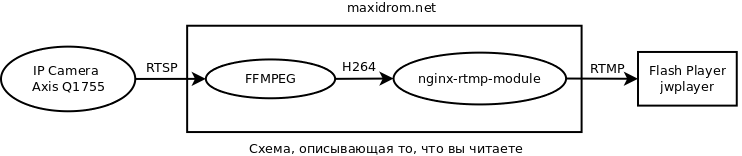
With what help do we realize all this? The camera itself will transmit the stream via RTSP, FFmpeg will receive it and convert it to RTMP, and with the help of JW Player this stream can be “hung on the site”.
')
For those who love visually - get:
Well, now the main thing, what do you need to do in order to have such a thing?
Training
First we need to prepare and install all the necessary packages. For example, to build Nginx you will need a Perl regular expression library and OpenSSL headers:
apt-get install libpcre3 libpcre3-dev libssl-dev We also install the rtmpdump utility, which will allow us to understand whether rtmp is working with us or not:
apt-get install rtmpdump Next, download the Nginx sources themselves, the stable version 1.6.0 and unpack them:
wget http://nginx.org/download/nginx-1.6.0.tar.gz tar -xzvf nginx-1.6.0.tar.gz We will do the same with the module with which we will need to compile Nginx:
wget https://github.com/arut/nginx-rtmp-module/zipball/master -O nginx-rtmp-module-master.zip unzip nginx-rtmp-module-master.zip -d nginx-rtmp-module-master Nginx build with rtmp support
Now proceed to the assembly. First you need to configure Nginx:
cd nginx-1.6.0 ./configure --prefix=/usr --add-module=../nginx-rtmp-module-master/arut-nginx-rtmp-module-0bb2323/ --pid-path=/var/run/nginx.pid --conf-path=/etc/nginx/nginx.conf --error-log-path=/var/log/nginx/error.log --http-log-path=/var/log/nginx/access.log --with-http_ssl_module At the exit, we should get something like this:
... <pre>configuring additional modules <strong>adding module in ../nginx-rtmp-module-master/arut-nginx-rtmp-module-0bb2323/</strong> <strong> + ngx_rtmp_module was configured</strong> checking for PCRE library ... found checking for PCRE JIT support ... found checking for OpenSSL library ... found checking for zlib library ... found creating objs/Makefile</pre> <pre>Configuration summary + using system PCRE library + using system OpenSSL library + md5: using OpenSSL library + sha1: using OpenSSL library + using system zlib library</pre> <pre><strong> nginx path prefix: "/usr"</strong> <strong> nginx binary file: "/usr/sbin/nginx"</strong> <strong> nginx configuration prefix: "/etc/nginx"</strong> <strong> nginx configuration file: "/etc/nginx/nginx.conf"</strong> <strong> nginx pid file: "/var/run/nginx.pid"</strong> <strong> nginx error log file: "/var/log/nginx/error.log"</strong> <strong> nginx http access log file: "/var/log/nginx/access.log"</strong> <strong> nginx http client request body temporary files: "client_body_temp"</strong> <strong> nginx http proxy temporary files: "proxy_temp"</strong> <strong> nginx http fastcgi temporary files: "fastcgi_temp"</strong> <strong> nginx http uwsgi temporary files: "uwsgi_temp"</strong> <strong> nginx http scgi temporary files: "scgi_temp"</strong> It is important that the rtmp module itself is connected and the paths to the logs, configs and the binary are correct. Above, I highlighted what needs to be checked. If all is well, then compile and install:
make make install Now let's copy the stat.xsl file from the source folder to the nginx folder:
cp nginx-rtmp-module-master/arut-nginx-rtmp-module-0bb2323/stat.xsl /etc/nginx/ And check the work of the nginx.
service nginx start Go to http: // ip_servera. See the nginx greeting? Then everything is fine.
Installing FFmpeg and testing it
In order for us to convert the rtsp stream to fvl, we need ffmpeg.
Yes, by the way, if you do all these actions on Ubuntu, then keep in mind that in this Ubuntu FFmpeg is considered obsolete, and in exchange it suggests using avconv. Do not worry, the replacement of "sewing on the soap" will not break anything, everything will work.
All right, we connect FFmpeg repositories and we put it:
apt-add-repository ppa:jon-severinsson/ffmpeg apt-get update apt-get install ffmpeg Now let's check how well ffmpeg connects to cameras. I, for example, forgot to open access on the router to port 554.
ffmpeg -i rtsp://admin:admin@10.10.10.11/axis-media/media.amp At the output we will have to get something like this:
ffmpeg version 1.0.10 Copyright (c) 2000-2014 the FFmpeg developers built on Jul 25 2014 07:50:40 with gcc 4.7 (Debian 4.7.2-5) configuration: --prefix=/usr --extra-cflags='-g -O2 -fstack-protector --param=ssp-buffer-size=4 -Wformat -Werror=format-security ' --extra-ldflags='-Wl,-z,relro' --cc='ccache cc' --enable-shared --enable-libmp3lame --enable-gpl --enable-nonfree --enable-libvorbis --enable-pthreads --enable-libfaac --enable-libxvid --enable-postproc --enable-x11grab --enable-libgsm --enable-libtheora --enable-libopencore-amrnb --enable-libopencore-amrwb --enable-libx264 --enable-libspeex --enable-nonfree --disable-stripping --enable-libvpx --enable-libschroedinger --disable-encoder=libschroedinger --enable-version3 --enable-libopenjpeg --enable-librtmp --enable-avfilter --enable-libfreetype --enable-libvo-aacenc --disable-decoder=amrnb --enable-libvo-amrwbenc --enable-libaacplus --libdir=/usr/lib/x86_64-linux-gnu --disable-vda --enable-libbluray --enable-libcdio --enable-gnutls --enable-frei0r --enable-openssl --enable-libass --enable-libopus --enable-fontconfig --enable-libfdk-aac --enable-libdc1394 --disable-altivec --dis libavutil 51. 73.101 / 51. 73.101 libavcodec 54. 59.100 / 54. 59.100 libavformat 54. 29.104 / 54. 29.104 libavdevice 54. 2.101 / 54. 2.101 libavfilter 3. 17.100 / 3. 17.100 libswscale 2. 1.101 / 2. 1.101 libswresample 0. 15.100 / 0. 15.100 libpostproc 52. 0.100 / 52. 0.100 [rtsp @ 0x19d6cc0] Estimating duration from bitrate, this may be inaccurate Input #0, rtsp, from 'rtsp://admin:admin@10.10.10.11/axis-media/media.amp': Metadata: title : Media Presentation Duration: N/A, start: 0.570122, bitrate: N/A Stream #0:0: Video: h264 (Baseline), yuvj420p, 1280x720 [SAR 1:1 DAR 16:9], 25 tbr, 90k tbn, 180k tbc At least one output file must be specified This proves that the camera is working, the rtsp stream is broadcasting and ffmpeg is working.
Setting up Nginx and testing it
Now open the nginx configuration file with your favorite editor (I have this vim):
vim /etc/nginx.conf And we bring it to the following state:
user nginx; # nproc worker_processes 2; error_log /var/log/nginx/error.log warn; pid /var/run/nginx.pid; events { worker_connections 1024; } http { include /etc/nginx/mime.types; default_type application/octet-stream; log_format main '$remote_addr - $remote_user [$time_local] "$request" ' '$status $body_bytes_sent "$http_referer" ' '"$http_user_agent" "$http_x_forwarded_for"'; access_log /var/log/nginx/access.log main; sendfile on; #tcp_nopush on; keepalive_timeout 65; #gzip on; server { listen 80; # rtmp stat location /stat { rtmp_stat all; rtmp_stat_stylesheet stat.xsl; } location /stat.xsl { # you can move stat.xsl to a different location root /etc/nginx/; } location / { rtmp_control all; } error_page 500 502 503 504 /50x.html; location = /50x.html { root html; } # locations location /image/cam1/ { proxy_pass "http://10.10.10.11/axis-cgi/jpg/image.cgi"; } } include /etc/nginx/conf.d/*.conf; } rtmp { access_log /var/log/nginx/rtmp_access.log; server { listen 1935; ping 30s; notify_method get; application cam1 { live on; exec_pull ffmpeg -i rtsp://admin:admin@10.10.10.11/axis-media/media.amp -threads 2 -f flv -r 25 -s 1280x720 -an rtmp://localhost:1935/cam1/stream 2>>/var/log/nginx/ffmpeg.log; } } } Save, close, check:
nginx -t nginx: the configuration file /etc/nginx/nginx.conf syntax is ok nginx: configuration file /etc/nginx/nginx.conf test is successful service nginx restart You can check the correct operation of the RTMP server based on NGINX by the following command:
rtmpdump -r "rtmp://127.0.0.1:1935/cam1/stream" -v The output video you get directly to the console.
Connecting our stream to JWPlayer
Well, the last thing you need to do is register at www.jwplayer.com , get the player code and bring it to the following form:
<div id='player...'></div> <script type='text/javascript'> jwplayer('player...').setup({ file: 'rtmp://10.10.10.11:1935/cam1/stream', image: 'http://10.10.10.11/image/cam1/', width: '1280', height: '720', aspectratio: '16:9' }); </script> Everything, the task is completed, enjoy!
Sources and other supporting resources
 RTMP streaming from webcams Organization of video broadcasting on the site. VLC + Erlyvideo + HLS + nginx.
 Capturing video from network cameras, part 1 Capturing video from network cameras, part 2 Nginx-based online broadcast server Broadcasting online video with nginx Once again about video surveillance, cameras, RTSP, onvif. And the "bike"! Creating a full-fledged video hosting with their own hands (nginx + php5-fpm + ffmpeg + cumulusclips) How to set your own private RTMP server using nginx help.ubuntu.com/community/FFmpeg github.com/arut/nginx-rtmp-module toster.ru/q/128005 jwplayer.com support.jwplayer.com: Using RTMP Streaming Free player for the site JW Player: cloud connection
Source: https://habr.com/ru/post/236359/
All Articles