About creating platformer on Unity. Part one, characteristic
Hi, Habr!
We all love high-quality walkthroughs for beginners , which is no secret. There are a lot of guides on Unity platform, but not so much quality. Today we will try to add another one to the piggy bank of good lessons. And we will create a character for a 2D platformer, no more, no less.
Join, learn, but remember: there are a lot of gifs under the cut.
')
So, where to start creating a character? Of course, with his sprite. Just drag a picture from any folder on your hard drive to the Assets tab, and from there - right onto the scene. I will make a reservation right away, in this lesson we will not consider the creation of animation. But in the following parts of the cycle - we will.

As you can see, after adding to the scene (let's agree that this is a full-fledged analogue of the scene view), the sprite has two components. The first is transform. He is responsible for the location of any game object on the stage, its scale and current angle of rotation relative to the axes. The sprite renderer component is just engaged in rendering the sprite of our charming nose in the process of editing and playing.

But while the character is just a picture, he cannot interact with the world around him. To do this, come to the aid components hidden in the tab physics2d. In our case, this is a box collider and a circle collider. We will add the first to the upper part of the character for collisions with the walls and everything else, and we will place the second one at the level of the legs. This will allow you to move on inclined surfaces (and surfaces with a small height difference) without any special problems.

Now, in order for the hero to act, say, gravity, we add a rigidbody2D (well, or a solid body, as you like). To do this, all in the same menu add component -> physics2D select the item rigidbody2D and another component will be immediately added to the sprite.

In short:
mass is responsible for what is clear;
linear drag and angular drag - linear and angular resistance, respectively;
gravity scale - gravity scale for this particular object;
fixed angle disables the coup character when confronted with something, say, flying;
isKinematic fixes an object once and for all at one point;
interpolate sets the smoothing mode when drawing a character;
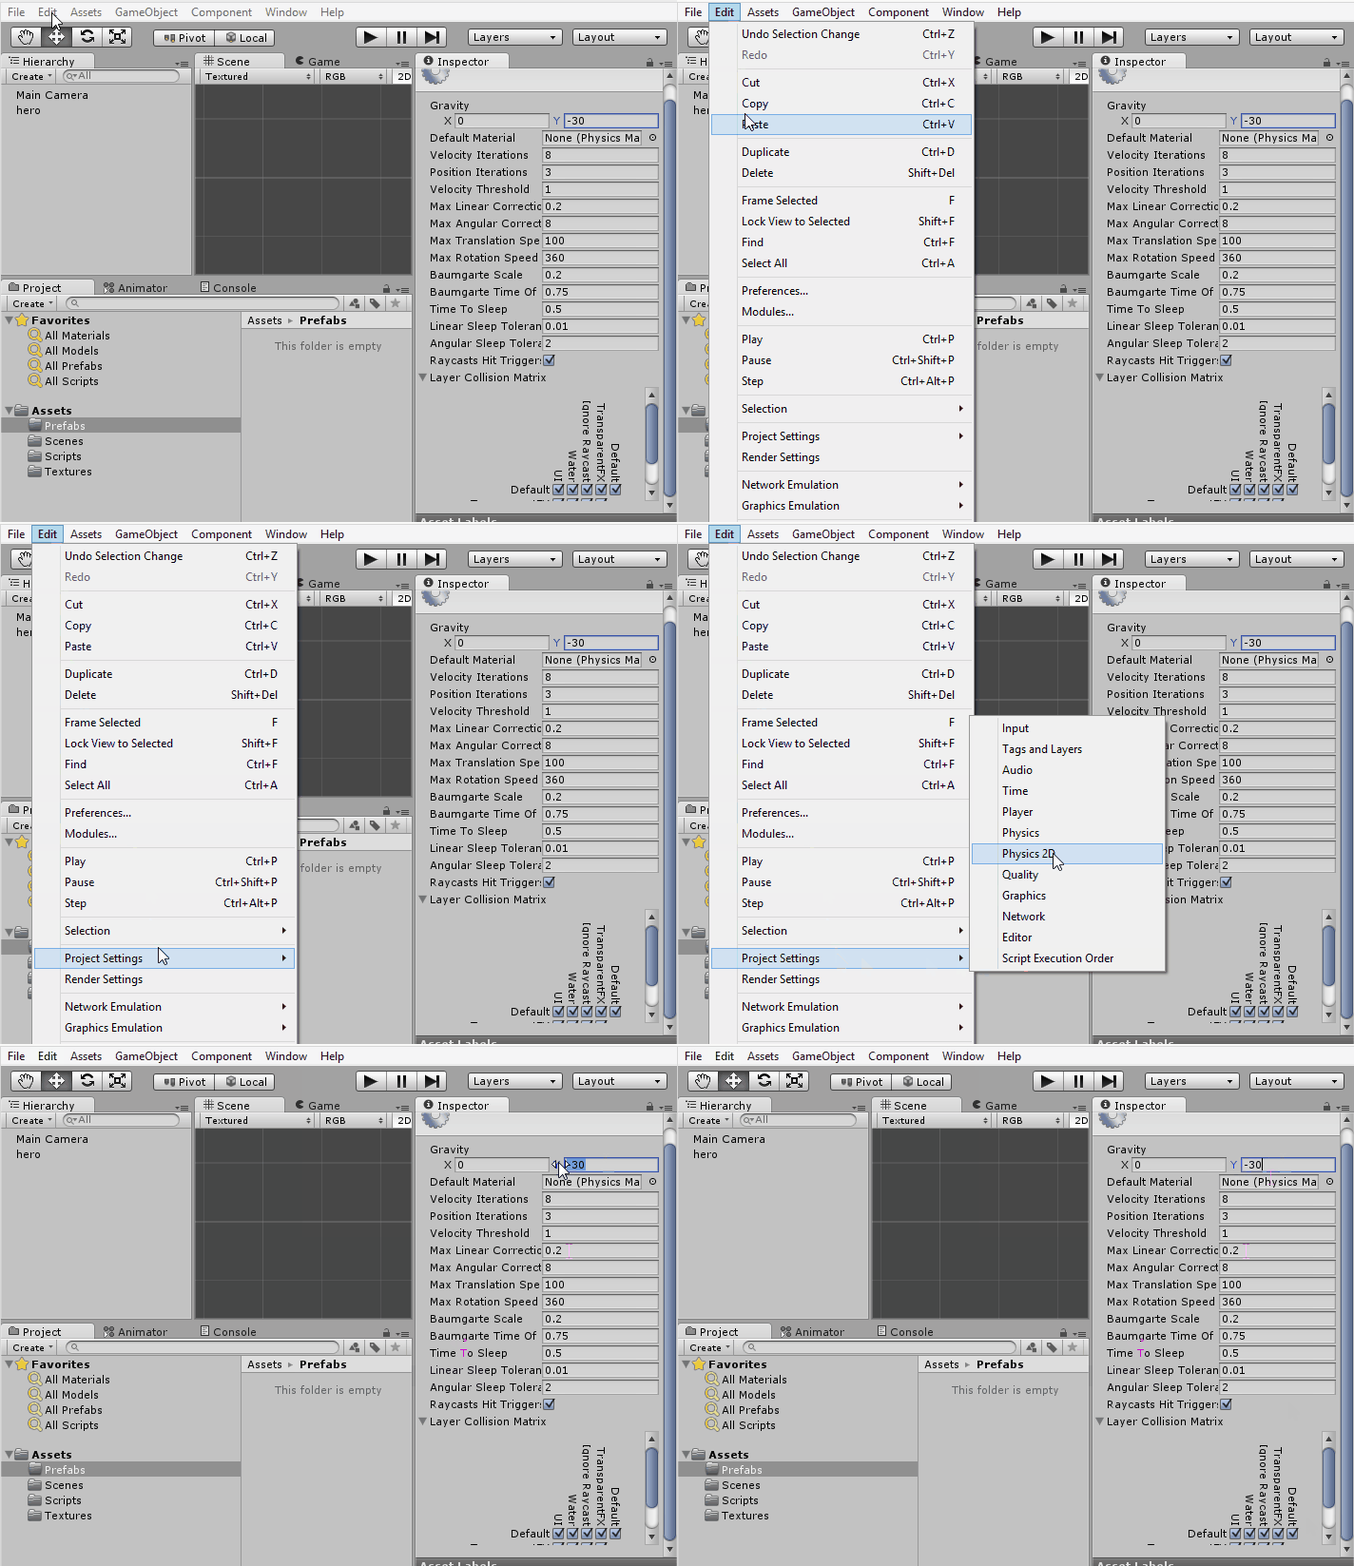
For platformer, the standard value of gravity (-9.81 on the Y axis) is not very suitable, so we will change it to some magic number. For example, -30. To do this, go to Edit - Project Settings - Physics2D and replace the desired value in the inspector.

At this point, let's stop adding character components. But let's make something out of it. In order for us not to have to add the same components a thousand times at each level, say, a level, there is a mechanic called prefabs in Unity. It allows you to create a “dummy” from the game object, which can be used many times and changed as you please, without fear that some instances may remain unchanged. To create a prefab, simply drag the object from the hierarchy to the assets tab. In my case, also in the prefabs folder.

As you can see, both instances of the hero are beautifully created and exist together. Now you need to create a platform on which our big-worth friend will stand. Drag the sprite onto the stage and add a polygon collider to it. The dimensions of this collider, by the way, can be changed by dragging its vertices while holding the shift button.

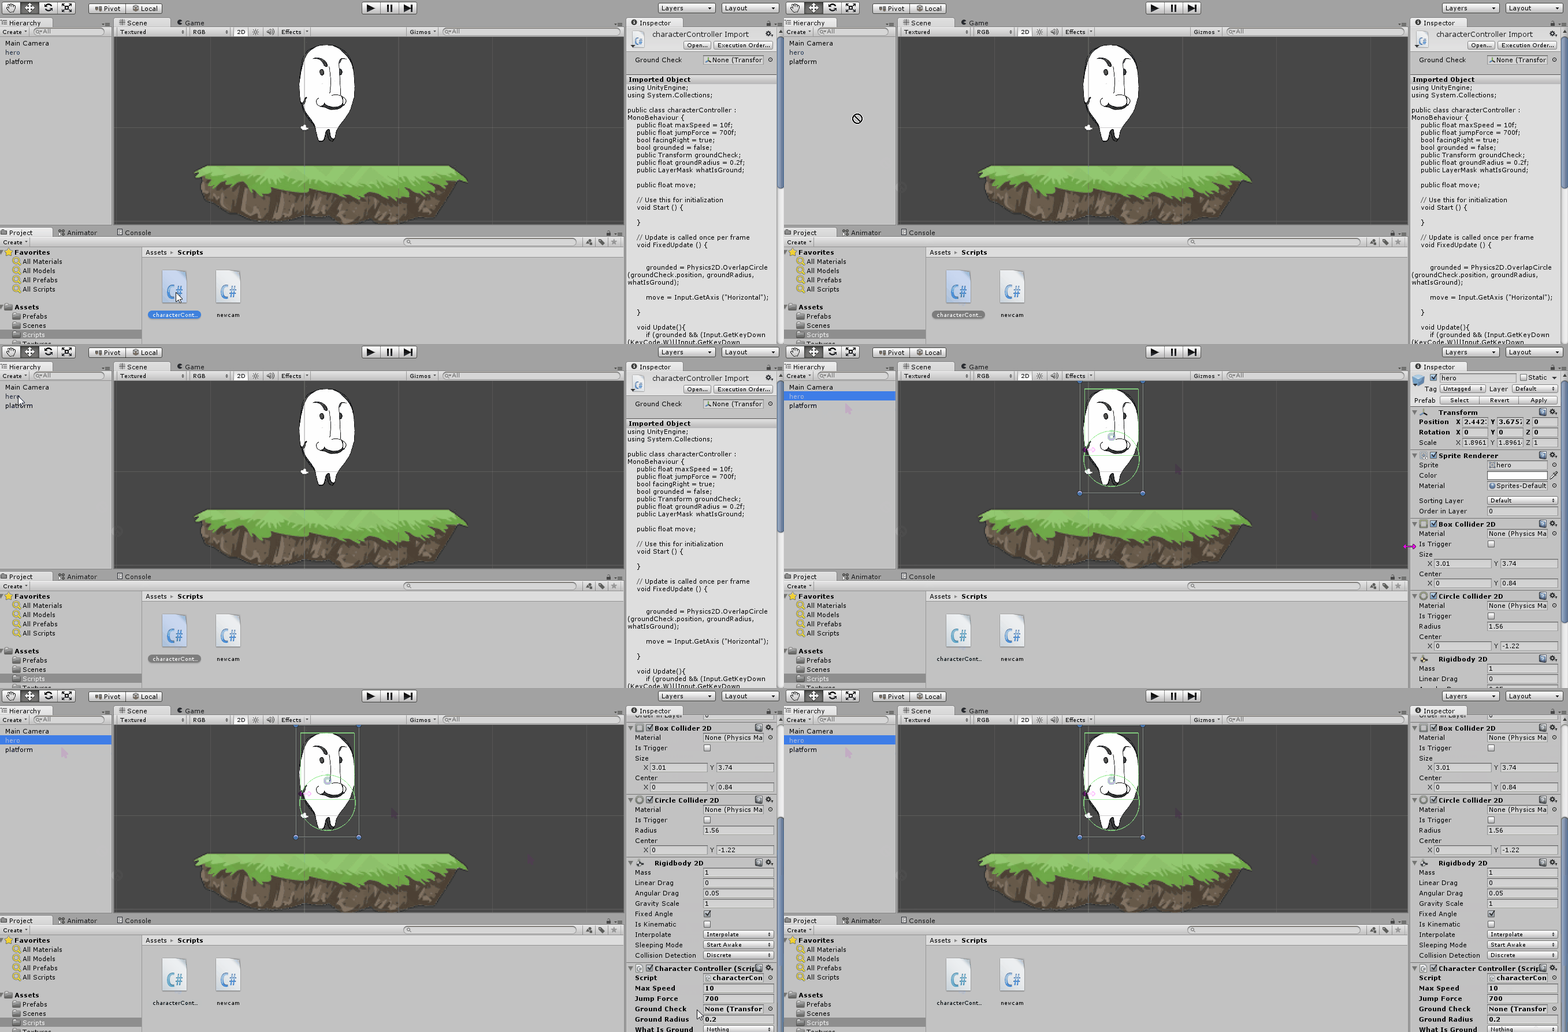
It's time to teach the character to move. Drag and drop a previously prepared script (you need to download it and save it in the assets folder) directly to the character in the hierarchy view.


This piece of code has a number of parameters that are responsible for the behavior of the hero in the game.
maxSpeed and JumpForce - maximum speed (horizontal) and jump power. It was experimentally verified that for a mass equal to one and gravity of -30, the values maxSpeed = 10 and jumpForce = 700 are optimal.
groundCheck is a child object located at the lowest point of the sprite and responsible for determining whether something we control is on the “ground”
whatIsGround - what, in fact, is considered land. In our case, the "land" is everything except the character.
groundRadius is a certain value within which a collision with a surface is checked.
As a result, the line grounded = Physics2D.OverlapCircle (groundCheck.position, groundRadius, whatIsGround); checks whether groundCheck intersects with groundRadius radius and, for example, prohibits jumping in the right cases.

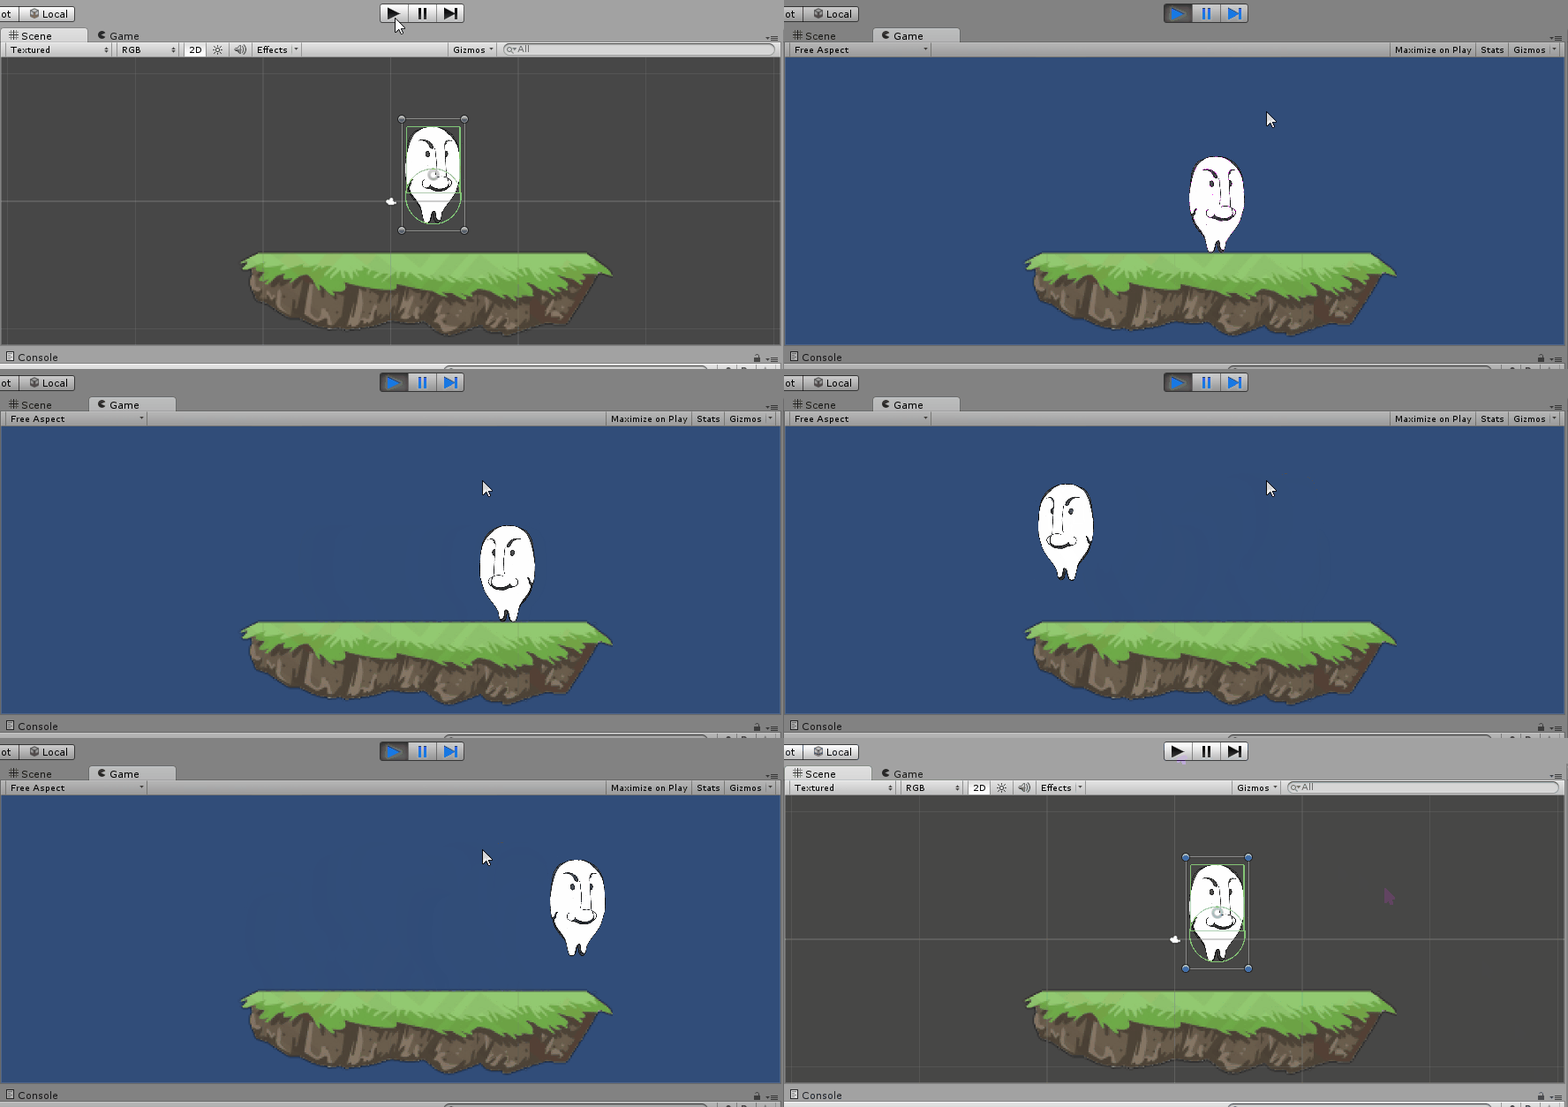
Let's finally launch the game and see what happened with us today. To do this, press the Play button in the top ... Come on, you also saw it yourself :)

The hero moves beautifully (although perhaps not very well), and this creates excellent prerequisites for us to continue creating the platformer.
And in the next part we will figure out how to control the camera, find out who needs to light the stars and create the very first enemy. And yes, along the way, we will fix one critical bug, blithely missed into the article during this lesson. Guess what?
If this article has suddenly awakened in you the desire to write your own game, then do not waste it in vain! A competition is underway right now, to become a participant is too simple: just register , put your game in the store and wait for the results to be announced. And the winners are waiting for the Xbox One and the magnificent Lumia 930!
I'm going to finish my Angry Flappy Swompy 3 Deluxe. Stay tuned, the second part of the article in the coming days!
ps
Platform.png
Character.png (many thanks to Anastasia Garan for drawing the hero)
We all love high-quality walkthroughs for beginners , which is no secret. There are a lot of guides on Unity platform, but not so much quality. Today we will try to add another one to the piggy bank of good lessons. And we will create a character for a 2D platformer, no more, no less.
Join, learn, but remember: there are a lot of gifs under the cut.
')
So, where to start creating a character? Of course, with his sprite. Just drag a picture from any folder on your hard drive to the Assets tab, and from there - right onto the scene. I will make a reservation right away, in this lesson we will not consider the creation of animation. But in the following parts of the cycle - we will.

As you can see, after adding to the scene (let's agree that this is a full-fledged analogue of the scene view), the sprite has two components. The first is transform. He is responsible for the location of any game object on the stage, its scale and current angle of rotation relative to the axes. The sprite renderer component is just engaged in rendering the sprite of our charming nose in the process of editing and playing.

But while the character is just a picture, he cannot interact with the world around him. To do this, come to the aid components hidden in the tab physics2d. In our case, this is a box collider and a circle collider. We will add the first to the upper part of the character for collisions with the walls and everything else, and we will place the second one at the level of the legs. This will allow you to move on inclined surfaces (and surfaces with a small height difference) without any special problems.

Now, in order for the hero to act, say, gravity, we add a rigidbody2D (well, or a solid body, as you like). To do this, all in the same menu add component -> physics2D select the item rigidbody2D and another component will be immediately added to the sprite.

In short:
mass is responsible for what is clear;
linear drag and angular drag - linear and angular resistance, respectively;
gravity scale - gravity scale for this particular object;
fixed angle disables the coup character when confronted with something, say, flying;
isKinematic fixes an object once and for all at one point;
interpolate sets the smoothing mode when drawing a character;
For platformer, the standard value of gravity (-9.81 on the Y axis) is not very suitable, so we will change it to some magic number. For example, -30. To do this, go to Edit - Project Settings - Physics2D and replace the desired value in the inspector.

At this point, let's stop adding character components. But let's make something out of it. In order for us not to have to add the same components a thousand times at each level, say, a level, there is a mechanic called prefabs in Unity. It allows you to create a “dummy” from the game object, which can be used many times and changed as you please, without fear that some instances may remain unchanged. To create a prefab, simply drag the object from the hierarchy to the assets tab. In my case, also in the prefabs folder.

As you can see, both instances of the hero are beautifully created and exist together. Now you need to create a platform on which our big-worth friend will stand. Drag the sprite onto the stage and add a polygon collider to it. The dimensions of this collider, by the way, can be changed by dragging its vertices while holding the shift button.

It's time to teach the character to move. Drag and drop a previously prepared script (you need to download it and save it in the assets folder) directly to the character in the hierarchy view.


This piece of code has a number of parameters that are responsible for the behavior of the hero in the game.
maxSpeed and JumpForce - maximum speed (horizontal) and jump power. It was experimentally verified that for a mass equal to one and gravity of -30, the values maxSpeed = 10 and jumpForce = 700 are optimal.
groundCheck is a child object located at the lowest point of the sprite and responsible for determining whether something we control is on the “ground”
whatIsGround - what, in fact, is considered land. In our case, the "land" is everything except the character.
groundRadius is a certain value within which a collision with a surface is checked.
As a result, the line grounded = Physics2D.OverlapCircle (groundCheck.position, groundRadius, whatIsGround); checks whether groundCheck intersects with groundRadius radius and, for example, prohibits jumping in the right cases.

Let's finally launch the game and see what happened with us today. To do this, press the Play button in the top ... Come on, you also saw it yourself :)

The hero moves beautifully (although perhaps not very well), and this creates excellent prerequisites for us to continue creating the platformer.
And in the next part we will figure out how to control the camera, find out who needs to light the stars and create the very first enemy. And yes, along the way, we will fix one critical bug, blithely missed into the article during this lesson. Guess what?
If this article has suddenly awakened in you the desire to write your own game, then do not waste it in vain! A competition is underway right now, to become a participant is too simple: just register , put your game in the store and wait for the results to be announced. And the winners are waiting for the Xbox One and the magnificent Lumia 930!
I'm going to finish my Angry Flappy Swompy 3 Deluxe. Stay tuned, the second part of the article in the coming days!
ps
Platform.png
Character.png (many thanks to Anastasia Garan for drawing the hero)
Here are our other articles on similar topics :
Source: https://habr.com/ru/post/236125/
All Articles