We develop habraklaviatura under iOS
Often for reading Habr I use Habrahabr mobile application for iPhone and iPad. It is quite convenient for reading articles, but not very convenient for writing comments, especially if you want to write something like that, using the formatting tags. It is inconvenient, because all tags must be typed manually, so it is very easy to make a mistake and, as a result, leave an ugly comment.
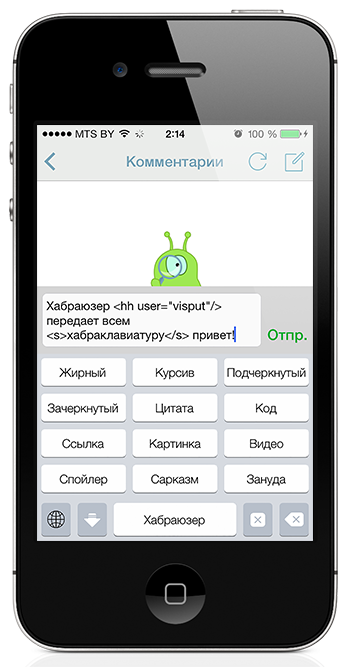
So I had an idea to write my own keyboard, in which, by pressing a key, an opening and closing tag is added to the text field. The cursor should be right between them in order to immediately start writing the text. It is also necessary to be able to move the cursor using swipe gestures, subjectively, it is more convenient than pulling a finger to the field, waiting for the magnifying glass to appear, moving the finger and hoping that the cursor gets where it should be. And finally, it's time to deal with the tags "Sarcasm" and "Bore", which are not supported by the habr parser. The keyboard must have special keys for this purpose, and the design of the tags must be configurable in the keyboard settings so that everyone can specify the look that they like.
With the release of iOS 8, Apple opens a new API that allows you to develop extensions to applications. Keyboard (Custom Keyboard) is one of the representatives of such extensions. About her and will be discussed. In the article, you will learn about what features, limitations and bugs are provided by the new API, how to develop a custom keyboard, and how to make your keyboard appear in the AppStore, and therefore on the devices of your users.
')
Features and limitations
Opening access to the API for creating third-party keyboards, Apple built a narrow bridge between applications. On the one hand, each application is still in its sandbox, but on the other hand, the data entered in one application can now be transferred to another, or sent directly to the server. This functionality is quite serious in terms of the security of user data, so Apple has strictly defined what can and cannot be done. Before turning to the detailed description, I want to clarify that all types of extensions, including the keyboard, can be installed on a mobile device only as part of the main application (container application). For example, an extension in the form of a widget in the Notification Center was added to the latest version of the Habrahabr application.
And so, what opportunities do we have:
- The third-party keyboard can be used in almost any application installed on the device. To do this, the user must personally add the installed keyboard in the device settings. Fortunately, application developers can prohibit the use of third-party keyboards in their applications, but more on that later;
- The keyboard can exchange data with both the container application and the developer server. The permission of such an exchange is configured by the user, and this feature is initially disabled;
- The keyboard can have access to the geolocation and address book service. To gain access, user permission is required both in the keyboard settings and in the corresponding service settings;
- The keyboard can refer to the built-in dictionary to display options for auto-correction and auto-completion of the entered text. Data is taken from the following sources:
- The address book of the device (first and last names are provided indistinctly);
- The abbreviations indicated by the user in the settings of the smartphone;
- General dictionary.
This, in fact, all the basic features. Let's pass to restrictions:
- You can not inherit from the standard keyboard. That is, to take the built-in keyboard as a basis and add gesture processing to control the cursor in it does not work, you have to do everything from scratch. Moreover, the standard keyboard cannot be recreated in principle. The reasons are described in the following clauses;
- A third-party keyboard, like other types of extensions, does not have access to the microphone, which makes it impossible to support voice input;
- A third-party keyboard cannot be used to enter hidden text (
secureTextEntry = YES). That is, if the field is intended for entering a password, then the user will be able to use only the standard keyboard; - Custom keyboard cannot be used for fields with type
UIKeyboardTypePhonePadandUIKeyboardTypeNamePhonePad; - The keyboard does not have access to text selection in the input field. That is, changing the selection without user intervention will not work;
- Unlike the standard keyboard, in a third-party keyboard it’s impossible to get out of the frame. That is, you cannot display anything above the keyboard, such as by long pressing the keys on the top row of a standard keyboard;
- Developers can prohibit the use of third-party keyboards in their applications. To do this, you must override the
application:shouldAllowExtensionPointIdentifier:methodapplication:shouldAllowExtensionPointIdentifier:protocol. For an identifier namedUIApplicationKeyboardExtensionPointIdentifieryou must returnNO. By the way, for iOS 8 it is the only type of extensions that can be prohibited to use.
Full Custom Keyboard Development Documentation: Custom Keyboard
Habraklaviatura
With the theory figured out, go to the practice.
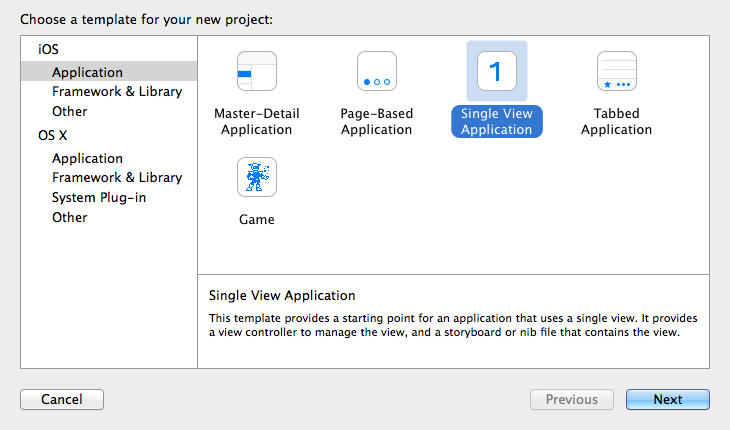
Create a new project, select Application, everything is standard.
Next, you need to add a new Target "Custom Keyboard".

As a result, Xcode generates a descendant class from
UIInputViewController and Info.plist .The
UIInputViewController class is a keyboard controller. All interaction with the input field occurs through it. Consider the class interface in more detail.Basic methods:
- (void)dismissKeyboard- allows you to hide the keyboard. This is an opportunity that is absent in all standard keyboards on the iPhone;- (void)advanceToNextInputMode— performs the display of the next keyboard. The list of available keyboards is defined by the user in the device settings;- (void)requestSupplementaryLexiconWithCompletion:(void (^)(UILexicon *))completionHandler— Provides an array of pairs of strings. Each pair consists of a line that theuserInputuser can enter and a line that is autocompletion or autocorrection ofdocumentText. For example, on my iPhone, this method returns 151 pairs.
To interact with the field, the
textDocumentProxy property is textDocumentProxy . I will describe only the most important for the development of methods:- (void)adjustTextPositionByCharacterOffset:(NSInteger)offset- allows you to control the cursor;- (NSString *)documentContextBeforeInput- returns the string up to the cursor;- (NSString *)documentContextAfterInput- returns the string after the cursor;- (void)insertText:(NSString *)text- inserts a string after the cursor;- (void)deleteBackward- deletes one character before the cursor;- (UIKeyboardAppearance)keyboardAppearance- allows you to determine which theme is used: light or dark;- (UIKeyboardType)keyboardType- allows you to determine which type of keyboard requires an input field.
In addition to the methods described above, the
UIInputViewController class implements the UITextInputDelegate protocol: @protocol UITextInputDelegate <NSObject> - (void)selectionWillChange:(id<UITextInput>)textInput; - (void)selectionDidChange:(id<UITextInput>)textInput; - (void)textWillChange:(id<UITextInput>)textInput; - (void)textDidChange:(id<UITextInput>)textInput; @end Calls to these methods must report the selection and modification of text in the input field, and the
textInput object must provide information about the input field itself and the text it contains.But in fact, we have the following behavior:
- The first two methods are never invoked, regardless of whether the user selects text or not;
- The last two methods are called, but the
textInputobject is alwaysnil.
It looks like a bug. On Stackoverflow, people write that they have encountered the same problem, there is no solution. I want to note that the above described behavior is reproduced on the release version of iOS8.
The second point of contact for the developer is the
Info.plist file. In addition to the already known fields, it contains the NSExtension group: <key>NSExtension</key> <dict> <key>NSExtensionAttributes</key> <dict> <key>IsASCIICapable</key> <false/> <key>PrefersRightToLeft</key> <false/> <key>PrimaryLanguage</key> <string>ru</string> <key>RequestsOpenAccess</key> <false/> </dict> <key>NSExtensionPointIdentifier</key> <string>com.apple.keyboard-service</string> <key>NSExtensionPrincipalClass</key> <string>VPKeyboardViewController</string> </dict> It indicates the type of extension being developed, the name of the controller class, and the attributes. Note the
RequestsOpenAccess attribute. With its help, the system understands whether you need advanced access: data exchange with a container application or server, access to geolocation and address book. If you specify true , then be prepared to explain to Apple what you need it all for.This completes the introduction to the API and proceeds to direct development.
To begin with, we define a layout. I planned to implement support for portrait and landscape orientations for the iPhone and eventually work out for the iPad. The layout for portrait and landscape orientations should have been slightly different. For these purposes, the newly created Sizes Classes technology was perfectly suited. Why am I writing in the past tense? Yes, because all plans failed. The fact is that regardless of the orientation, the system assigns us the same Size Classes: wCompact and hCompact, which corresponds to the landscape orientation for the iPhone. Most likely this is due to the fact that the keyboard frame does not occupy the entire screen, but only the bottom half. In principle, this is a logical behavior, and to get around this problem, you can manually assign an arbitrary Size Class to the controller. To do this, use the
setOverrideTraitCollection:forChildViewController: method. But it was not there, in fact, the call of this method does not affect anything, that is, the UITraitCollection child controller remains unchanged. If any of you have had a positive experience using this method, please share them. I flooded the version of the code with the above described behavior in a separate brunch, if someone is interested you can pick it up. Until the problem is solved, we will be satisfied with one layout for all orientations:
For the convenience of controlling the cursor, let's add the recognition of Swipe gestures. We add two
UISwipeGestureRecognizer objects to UISwipeGestureRecognizer , in the code we implement event handlers: - (IBAction)onLeftSwipeRecognized:(id)sender { if (self.textDocumentProxy.documentContextBeforeInput.length > 0) { [self.textDocumentProxy adjustTextPositionByCharacterOffset:-1]; } } - (IBAction)onRightSwipeRecognized:(id)sender { if (self.textDocumentProxy.documentContextAfterInput.length > 0) { [self.textDocumentProxy adjustTextPositionByCharacterOffset:1]; } } Next, add handlers to close the keyboard and go to the next:
- (IBAction)onNextInputModeButtonPressed:(id)sender { [self advanceToNextInputMode]; } - (IBAction)onDismissKeyboardButtonPressed:(id)sender { [self dismissKeyboard]; } To delete the entered text, we implement two possibilities:
- Delete the last character before the cursor, as in a standard keyboard:
- (IBAction)onDeleteButtonPressed:(id)sender { if (self.textDocumentProxy.documentContextBeforeInput.length > 0) { [self.textDocumentProxy deleteBackward]; } } - Deletes all entered text regardless of cursor position. To avoid accidental deletion of text, we will use
UILongTapGestureRecognizer:- (IBAction)onClearButtonPressed:(id)sender { NSInteger endPositionOffset = self.textDocumentProxy.documentContextAfterInput.length; [self.textDocumentProxy adjustTextPositionByCharacterOffset:endPositionOffset]; dispatch_after(dispatch_time(DISPATCH_TIME_NOW, (int64_t)(0.1 * NSEC_PER_SEC)), dispatch_get_main_queue(), ^{ // We can't know when text position adjustment is finished // Hack: Call this code after delay. In other case these changes won't be applied while (self.textDocumentProxy.documentContextBeforeInput.length > 0) { [self.textDocumentProxy deleteBackward]; } }); }
To achieve the goal, you have to use a hack with the execution of the code with a delay. The fact is that the API allows you to delete text just before the cursor. That is, in order to delete all the text, you must first move the cursor to the end of the line, but the moving process itself is asynchronous, at the same time I did not find an opportunity to find out the time point when this process was completed. Therefore, we set a delay of 0.1 seconds and believe that the cursor has reached its goal.
It remains to figure out for what we actually gathered here: with the introduction of formatting tags.
To store standard tags that are supported by Habrom, we will use the JSON file:
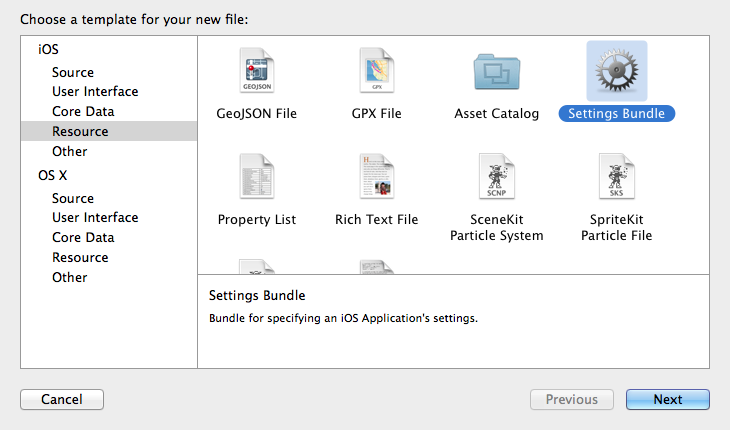
{ "": "<b></b>", "": "<i></i>", "": "<u></u>", "": "<s></s>", "": "<blockquote></blockquote>", "": "<code></code>", "": "<a href=\"http://\"></a>", "": "<img src=\"http://\"/>", "": "<video>http://</video>", "": "<spoiler title=\"\"></spoiler>", "": "<hh user=\"\"/>" } For the tags "Sarcasm" and "Bore" you need to create settings so that each user can set the values for the opening and closing tags. Add Settings Bundle:
Go to Settings.bundle -> Root.plist and fill in all the required fields. Below is the source code of the settings and what the user should see:

But in reality, when installing the keyboard, the values for the tags are not displayed, that is, in fact, the fields are empty. These fields are set by the
Default Value key. At first, I thought I was doing something wrong. But even if you enter the settings and manually fill in these fields, then when you exit the settings, the values are not saved. This is a bug. Other users faced a similar problem, several topics on Stackoverflow confirm this, that is, the problem is not local. It seems that the developers forgot to call the synchronize method on the NSUserDefaults object. Sadly, it only remains to wait for an update to iOS 8.1 or iOS 8.0.1. To take into account this problem, I use the default values in the code, if the settings could not be loaded.With the storage of tags figured out, now we will write a keystroke handler to add tags to the input field:
- (IBAction)onHabraButtonPressed:(id)sender { NSString *tagKey = [sender titleForState:UIControlStateNormal]; NSString *tagValue = self.tagsDictionary[tagKey]; [self.textDocumentProxy insertText:tagValue]; dispatch_after(dispatch_time(DISPATCH_TIME_NOW, (int64_t)(0.1 * NSEC_PER_SEC)), dispatch_get_main_queue(), ^{ // We can't know when text insert is finished // Hack: Call this code after delay. In other case these changes won't be applied [self moveTextPositionToInputPointForTag:tagValue]; }); } - (void)moveTextPositionToInputPointForTag:(NSString *)tag { static NSArray *inputPointLabels = nil; if (inputPointLabels == nil) { inputPointLabels = @[@"]", @"://", @"=\"", @">"]; } for (NSString *label in inputPointLabels) { NSRange labelRange = [tag rangeOfString:label]; if (labelRange.location != NSNotFound) { NSInteger offset = labelRange.location + labelRange.length - tag.length; [self.textDocumentProxy adjustTextPositionByCharacterOffset:offset]; break; } } } It uses the previously described hack with delayed code execution. It is connected with the same cursor. When we call the
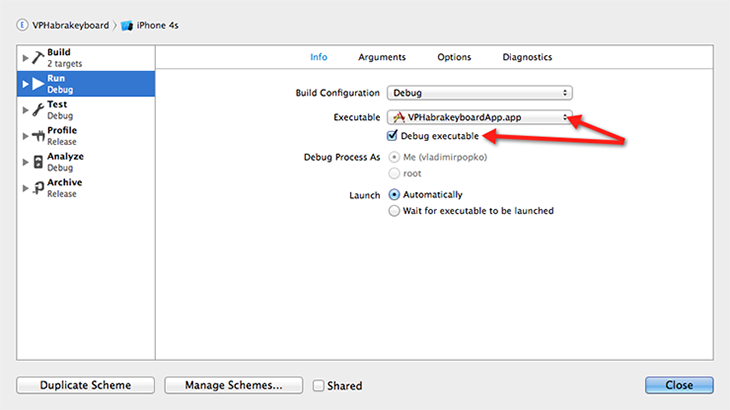
insertText: method insertText: cursor does not move instantaneously, and this must be taken into account. To explain why we need to take into account the offset of the cursor, let me give an example: let's say we want to add a link to a Habrayuser. For this you need to add a tag moveTextPositionToInputPointForTag: method is moveTextPositionToInputPointForTag: , which, using an array of label strings, determines the position to which the cursor should be placed.Implementation completed, select the extension as the active schema and run. For ease of debugging, I recommend to go to the "Edit Scheme" and tick off the "Debug executable". This will allow you to simultaneously debug both the extension and the main application:
To install the keyboard, go to Settings -> General -> Keyboard -> Keyboards -> New Keyboards ...

The screenshot on the right shows the dialog that is displayed when the user tries to allow full keyboard access. To tell the truth, this text tells me to choose “Do not allow”.
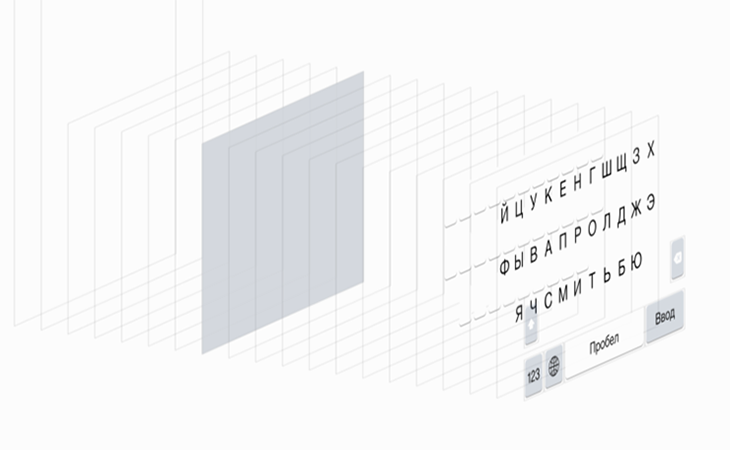
As a bonus, I want to show the hierarchy with a standard keyboard view. I will leave the comments with myself, let everyone draw their own conclusions:
The full version of the source code is available on GitHub: Habrakeyboard
Demonstration
Publication
The process of publishing, like keyboards and other types of extensions, is practically no different from the publication of a regular application, but the extension itself must meet certain technical requirements:
- An extension can only be published as part of a container application. Alone it cannot exist. It is deleted when the application is deleted. By the way, this restriction is only for iOS. For Mac, the extension can be distributed separately;
- Deployment Target for the extension should be> = iOS 8.0. The main application can also be published for earlier versions of the operating system. In older versions, the extension will simply not be available. That is, if, for example, the developers of the Habrahabr application want to implement something like this, then it will not be necessary to increase the Deployment Target;
- Target for expansion should contain a setting for assembly for processors with 64-bit architecture (arm64). If the application implements the data exchange with the extension, then it must meet the same requirements. Anyway, but you need to think about the support of 64-bit processors. For large projects with complex low-level code, this may require considerable labor costs.
Apple also added several new items to a document with recommendations for reviewing. They are specific to “Keyboard” extensions:
- Opening your keyboard, the user should be able to go to the next;
- The keyboard must remain operational in the absence of an Internet connection;
- The keyboard should implement the following types of keyboards: Number and Decimal (that is, if the input field implies entering a number, then the keyboard should provide a convenient method for this);
- The main category for an application that contains a keyboard extension should be Utilities. Also, the application must provide the user with its own privacy policy;
- The keyboard should use user data only to improve its functionality.
Recommendations in the original
- Keyboard extensions must be provided for the next keyboard;
- Keyboard extensions must remain functional;
- Keyboard types;
- You have to be rejected;
- It can be rejected.
If all the requirements described above are satisfied, then it remains to perform several generally known steps:
- Go to the developer portal and create an App ID for the extension. It must be a continuation of the identifier of the main application. For example, if the App ID for the application is:
com.company.application, then the App ID for the extension might be:com.company.application.keyboard. Next, for the new App ID, you must create a provisioning profile. These data must be specified in the settings Target in Xcode; - If the extension implements data exchange with the main application, then the App Group must be created in the developer portal, and the option to use the App Group in the App IDs settings for the extension and the application must be enabled. Actually, this step must be performed at the stage of testing the application, otherwise you will not see data exchange;
- Add screenshots and description for your iTunesConnect extension. Apple has not added special fields for this purpose. These data are filled in along with the information on the main application;
- Collect Target main application and send to review. The extension is already contained in the application package;
- That's all, it remains only to wait.
App Testing Advisory Document: App Store Review Guidelines
Source: https://habr.com/ru/post/235917/
All Articles