Home accounting on the CUBA platform
The purpose of this article is to tell about the capabilities of the CUBA platform by the example of creating a small useful application.
CUBA is designed for rapid development of business applications in Java, we have already written about her several articles on Habré.
Usually, on the platform, either real but too large and closed information systems are built, or applications in the “Hello World” style or artificial examples of the “Library” type on our website. Therefore, some time ago I decided to try to kill two birds with one stone - write a useful application for myself and share it as an example of using our platform, since the subject area is simple and clear to everyone.
')
What happened in the end
In short, the application solves two main tasks:
- At any time shows the current balance for all types of funds: cash, cards, deposits, debts, etc.
- Generates a report by income and expense categories, allowing you to find out what was spent on or where the money came from in a certain period.
A little more detail:
- Different types of cash are invoices .
- Transactions are possible on arrival to the account, expense from the account and transfer of funds between accounts.
- In a receipt or expense transaction, you can set a category to clarify where the money came from or what it was spent on.
- The balance of all accounts on the current date is displayed continuously and is recalculated after each transaction.
- The report on the categories of income and expenses shows a summary of two arbitrary periods simultaneously for a quick visual comparison. Any category can be excluded from the comparison. For each line of the report, you can “fail” in the operation to see what it consists of.
- The system consists of three web applications deployed on one Tomcat:
- Middleware
- Full featured UI on CUBA
- Responsive UI on Backbone.js + Bootstrap for easy input operations on mobile devices.
It looks somewhat redundant for solving such a simple task, but, firstly, the application was created more for training purposes than practical ones, and secondly, it doesn’t need much resources - my own copy runs easily on the Amazon EC2 micro instance.
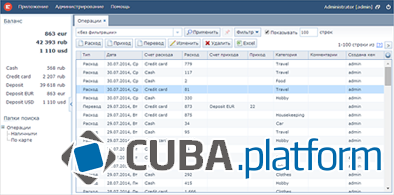
Few screenshots
Primary UI: list of operations
Primary UI: income / expense category report
Responsive UI: list of operations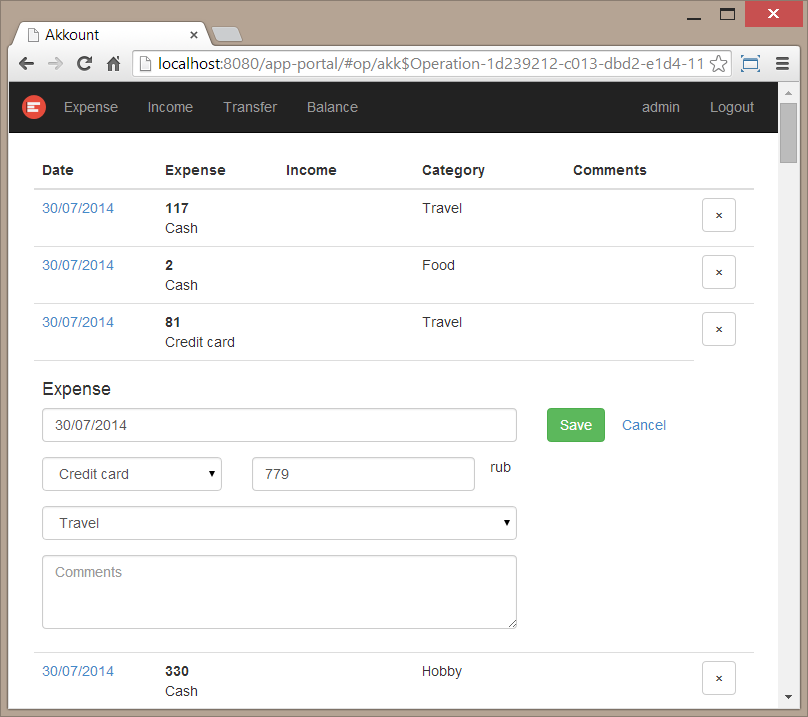
Responsive UI: current balance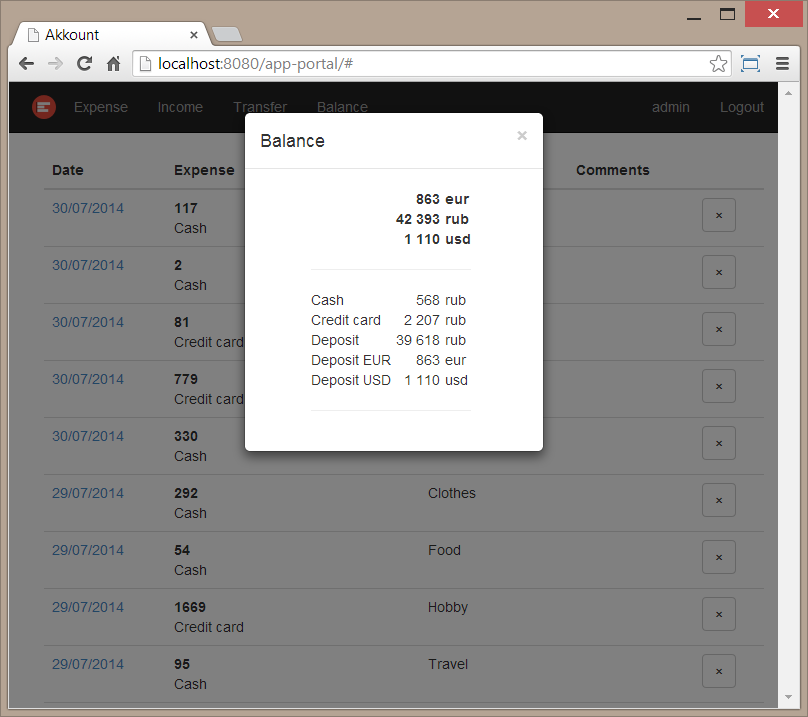
How to start
The source code of the project is here: github.com/knstvk/akkount (QC is my initials, nothing better came to mind).
The platform itself is not free, but five simultaneous connections in a free license are more than enough for home use, so if someone wants to use it, please.
It only requires JDK 7+ and the JAVA_HOME environment variable set. To build, open the command line in the project root and run
gradlew setupTomcat deployGradle will be loaded, which will download the
After that, you need to start the HSQL server and create a database in the data subdirectory of the project:
gradlew startDbgradlew createDbTo run Tomkat, you can use the Gradle command.
gradlew startor by
startup.* scripts in the build/tomcat/bin subdirectory.The main web interface of the application is available on
localhost:8080/app localhost:8080/app , responsive UI - on localhost:8080/app-portal localhost:8080/app-portal . User is admin, password is admin.The database is initially empty; there is a generator for filling it with test data. It is available through the Administration -> JMX Console -> app-core.akkount -> app-core.akkount: type = SampleDataGenerator menu . Here there is a method
generateSampleData() , which takes an integer as input - the number of days ago from the current date for which you need to create operations. For example, type 200, and click Start. Wait for the operation to complete, then log out (the icon in the upper right corner) and log in again. You will see about the same thing as in my screenshots.How to look inside
To study and refine the application, I recommend downloading and installing CUBA Studio, IntelliJ IDEA and CUBA plugin for it.
Further, I will not dwell on how and what is done in the Studio. There and so everything is visually, there is contextual help, there are video materials and documentation on the platform. Let me explain the only nuance with using HSQL database: When opening a project using HSQL DB, Studio launches its own server on port 9001 and stores databases in the
~/.haulmont/studio/hsqldb . This means that if you started the HSQL server separately from Studio with the Gradle commands, you need to stop it. Database files, if necessary, can simply be transferred from data/akk to ~/.haulmont/studio/hsqldb/akk .In general, the application can be run on a more serious database - PostgreSQL, Microsoft SQL Server or Oracle. To do this, in Studio it is enough to select the desired type of database in the Project properties , then execute Entities -> Generate DB Scripts , then in the main menu Run -> Create database .
The main objective of this article is to show those development techniques on the platform that are not visible in the Studio interface and which are difficult to find in the documentation if you do not know in advance what to look for. Therefore, the project description will be fragmentary, with emphasis on non-obvious and non-standard things.
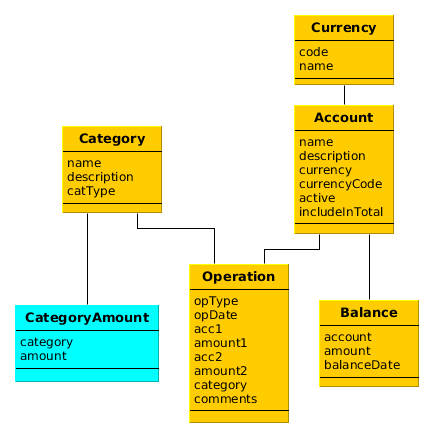
Data model
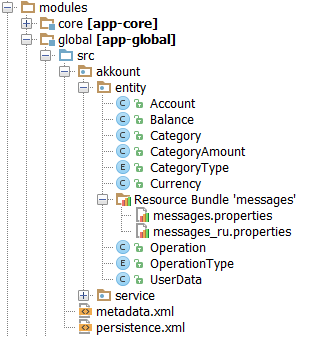
Entity classes are located in the
global module, which is accessible to both the middle layer and web clients.These are mostly regular JPA entities, appropriately annotated and registered in
persistence.xml . Most of them also have a CUBA-specific annotation @NamePattern , which specifies “instance name” - how to display a specific entity instance in the UI, something like toString() . If such an annotation is not specified, just toString() used as the instance name, which returns the class name and object identifier. Another specific annotation - @Listeners , defines classes of listeners for creating / changing objects. The entity listeners below will be discussed in detail.In addition to the JPA entities, there is a non-persistent
CategoryAmount entity in the project. Instances of non-persistent entities are not stored in the database, but are used only for transferring data between application layers and displaying by standard UI components. In this case, this entity is used to generate a report by category: the middle layer retrieves the data, creates and populates CategoryAmount instances, and in the web client these instances are put into data sources (datasources) and displayed in tables. Standard Table components do not know anything about the origin of entities — for them, they are simply objects known in the application's metadata. And in order to include a non-persistent entity in metadata, you need to add the @MetaClass annotation to its class, attributes the @MetaProperty annotation to @MetaProperty , and register the class in the metadata.xml file. Of course, persistent entities are also described in metadata - for this, the metadata loader at the start of the application also parses the persistence.xml file.Next to the entities are enumeration classes, for example
OperationType . Enumerations that are used in the data model in the attributes of entities are not quite ordinary: they implement the EnumClass interface and have the id field. Thus, the value stored in the database is separated from the Java value. This makes it possible to ensure compatibility with data in production DB with arbitrary refactoring of application code.In the files
messages.properties and messages_ru.properties an entity package there are localized names of entities and their attributes. These names are used in the UI, if the visual components do not override them at their level. Message files are regular UTF-8 key-value sets. The search for a message for a locale is similar to the PropertyResourceBundle rules — first, the key is searched for in files with a suffix that matches the locale, if not found — in files without a suffix.Consider the essence of the model.
Currency- currency. It has a unique code and an arbitrary name. The uniqueness of the currency code is maintained by a unique index, which the Studio includes in the database creation scripts if the@Columnannotation contains theunique = trueproperty. The platform contains an exception handler thrown in case of uniqueness violation in the database. This handler issues a standard message to the user. The handler can be changed in your project.Account- an account. It has a unique name and an arbitrary description. It also contains a link to the currency and a separate field of the currency code. This field is an example of denormalization to improve performance. Since in the lists of accounts, as a rule, they are displayed together with the currency code, it makes sense to get rid of the join in database queries by adding the currency code to the account itself. We will force the entity listener to update the currency code in the account when the account currency changes (even though in practice it happens very rarely) - more on this later. The account also contains anactiveattribute — a sign that it is available for use in new transactions, and anincludeInTotalattribute — a sign that the balance on this account should be included in the aggregate balance.Category- the category of income or expenses. It has a unique name and an arbitrary description. ThecatTypeattribute is a category type, defined by theCategoryTypeenum. As already explained above, the class field and the database store the value determined by the enumeration identifier (in this case, the string “E” or “I”), and the getter and setter, and therefore the entire application code, work with theCategoryType.INCOMEvalues andCategoryType.EXPENSE.Operation- operation. Operation attributes: type (transferOperationType), date, expense andacc1accounts (acc1,acc2) and corresponding amounts (amount1,amount2), category and comments.Balance- the balance on the account on a certain date. In general, for home accounting it would be quite possible to do without this entity and to always calculate the balance dynamically “from the beginning of time”: just lay down the entire income and take away all the expense on the account. But I decided for interest to complicate the implementation in case of a large number of operations - the balance on the account at the beginning of each month is stored inBalanceinstances, when recording each operation, balances for the beginning of the next month (and later, if any) are recalculated. But to calculate the balance for the current date, you only need to take the balance at the beginning of the month and calculate the turnover of the operations of the current month. This approach will not cause performance problems over time.UserData- key-value storage of some data associated with the user. For example, the last used account, report parameters by category. That is, it stores what is necessary to “remember” when repeated actions of the user. Possible keys are defined as constants in theUserDataKeysclass.
Entity listeners
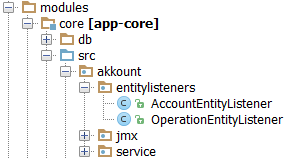
If you worked with JPA, you probably also used entity listeners. This is a convenient mechanism for performing any actions at the moment of saving changes to entities in the database. The most important thing is that all changes made by the listeners are made in the same transaction - similar to the database triggers. Therefore, it is convenient to organize the logic of maintaining the consistency of the data model on the listeners.
The entity listeners in CUBA differ somewhat in implementation from JPA. The listener class must implement one or more special interfaces (
BeforeInsertEntityListener , BeforeUpdateEntityListener , etc.). Listeners on the entity class are registered in the @Listeners annotation @Listeners listing the class names in the array of strings. You cannot use literals class literals directly in an entity class, since an entity is a global object that is accessible to both the middle layer and clients, and the listener is only an object of the middle layer that is inaccessible to clients. The listeners live only on the middle layer because they need access to the EntityManager and other database tools.In this application, entity listeners perform two functions: first, they update denormalized fields, and second, they recalculate balances on accounts at the beginning of months.
The first task is trivial: AccountEntityListener in the
onBeforeInsert() methods, onBeforeUpdate() updates the value of the currency code. To do this, it is enough for him to refer to the associated instance of Currency .The second task is essentially one of the main business logic of the application. Engaged in this
OperationEntityListener in the methods onBeforeInsert() , onBeforeUpdate() , onBeforeDelete() . In addition to recalculating the balance, this listener also remembers the last used accounts in UserData objects.It should be noted that in Before-listers there are no restrictions on using
EntityManager , loading and modifying instances of any entities. For example, in addOperation() using Query Balance instances are loaded and modified. They will be stored in the database simultaneously with the operation in a single transaction.Sometimes in the listener you need to get the “previous” state of the object that is currently in the persistent context, that is, the state that is now in the database. For example, in this case, in
onBeforeUpdate() we must first subtract the previous value of the transaction amount from the balance, and then add the new value. To do this, in the getOldOperation() method, a new transaction is started using persistence.createTransaction() , in its context another EntityManager obtained, and through it the previous operation state with the same identifier is loaded from the database. Then the new transaction is completed without affecting the current one, in which our listener operates.Middle layer components


The main work on loading data to the client level and saving user-made changes to the database is performed by the standard DataService implemented in the platform. Through it work data sources of visual components. This is not enough in our application, so several specific services are created.
First, it is the
UserDataService , which allows you to work with the key-value UserData storage, providing a typed interface for reading and writing entity identifiers. The service interface is in the global module, because it must be accessible to the client layer. The service implementation is located in the core module in the UserDataServiceBean class. It delegates calls to the UserDataWorker , in which the code that does the useful work is concentrated. This is done because this functionality is also required in the OperationEntityListener , that is, “from the inside” of the middle layer. The service forms the “middleware border” and is intended only for calling from client blocks. It should not be called from the inside of the middle layer components, since this leads to the repeated triggering of the interceptor, which checks the authentication and processes the exception in a special way. And just for the sake of restoring order, it is worth separating the services called outside by middleware from the rest of the bins called from within. If only because when you call outside the transaction is always absent, and when you call from the middleware code, the transaction can already be opened.The next service is
BalanceService . It allows you to get the value of the account balance for an arbitrary date. Since this functionality is required both for clients in the UI and on the middle layer (test data generator), it is also moved to a separate bin BalanceWorker .And the last service is
ReportService . It retrieves the data for the report by category, and returns it as a list of instances of the CategoryAmount non-persistent entity.On the middle layer, the
SampleDataGenerator bin is also implemented, which is intended for generating test data. For functionality of this kind, a complex UI is usually not required - it is enough to provide a call with the transfer of simple parameters, sometimes you need to display some state as a set of attributes. In addition, only the administrator works with this, not the users of the system. In this case, it is convenient to give the bean a JMX interface and call its methods from the JMX console built into the web client, or by connecting with any external JMX tool. In our case, the bean has the SampleDataGeneratorMBean interface, and it is registered in the core module spring.xml .Notice that the
generateSampleData() method of a bean is annotated as @Authenticated . This means that when calling this method, a special system login will be executed and a user session will be present in the execution thread. It is required in this case because the method creates and modifies entities through EntityManager , which, when saved, require the installation of their attributes createdBy , updatedBy - who updatedBy given instances. On the other hand, the removeAllData() method, also called via the JMX interface, does not require authentication because it removes data using SQL queries through the QueryRunner and does not access the user session anywhere.In general, the obligatory check of the presence of the user session is performed only at the entrance to the middle layer from the client level - in the service interceptor. Check or not to check the session and user rights at the level of middleware - the application developer decides, but in some cases the session is necessary because of the need to put the user name in the attributes of the audit entities. In addition, user rights are always checked in
DataWorker , a bin to which the DataService delegates the execution of CRUD operations with entities.Main application window
The standard feature of the CUBA web client is a hidden panel on the left side of the application window, which usually displays so-called “application folders” and “search folders”. These folders are used for quick access to information - clicking on the folder opens a specific screen with a list of entities and an overlay filter.
It seemed to me logical to display information on the current balance in the left part of the main window. Therefore, I have embedded the balance panel in the upper part of the folder panel.

This is done as follows:
- The
FoldersPaneclass is inherited from the platformFoldersPane, theinit()andrefreshFolders()methods are overridden, in which thecreateBalancePanel()method iscreateBalancePanel(). It creates a new container, fills it with data from theBalanceService, and fits it at the top of the parent container. - In
LeftPaneluseLeftPanelinstead of the standardFoldersPane, theAppWindowclass is inherited from the platformAkkAppWindowand thecreateFoldersPane()method iscreateFoldersPane(). - So that in turn
AkkAppWindowused instead of the standardAppWindow, thecreateAppWindow()method of theAppclass is overridden. In addition, the method of access to the new panelgetLeftPanel()is defined here - it is called from the screens to update the balance after a commit or delete operations.
Operations Browser
The screen
operation-browse.xml is located in the operation-browse.xml . Everything is standard here, except for the use of formatter classes to represent dates and amounts in the table of operations.To display the date, a platform
DateFormatter is used, which is sent to the format by a key from a package of localized messages. Thus, the format string can be different for different languages - for Russian, the date is divided by dots, and for English - with characters /.In order for the sums to be displayed without the fractional part, and 0 not to be displayed at all, the
DecimalFormatter class was created in the project — it is used in the sums columns.Operation editor
Here it is more interesting: the operation can be one of three types (income, expense, transfer), and the editing screen should look different for them.
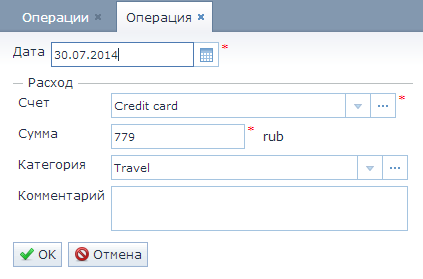

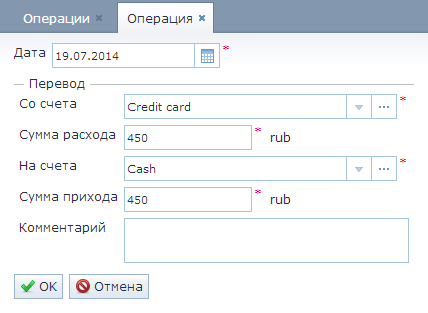
At first glance, the first two screens appear to be the same, but in reality this is not the case: the visual components work with different attributes of the
Operation entity — consumption with acc1 and amount1 , income with acc2 and amount2 . This variability could be implemented completely in the controller code, but I decided to make it more declarative - by separating the different parts of the screen into separate frames.Three frames - by the number of types of operations. All of them are located in the same package as the operation editing screen itself. Most often, frames are connected statically - using the
iframe component in the XML screen descriptor. It does not suit us, because we need to select the desired frame depending on the type of operation. Therefore, in the XML descriptor of the operation-edit.xml , only the frame container is defined — the groupBox component with the frameContainer identifier, and the frame itself is created and inserted into the screen in the OperationEdit controller: @Inject private GroupBoxLayout frameContainer; private OperationFrame operationFrame; @Override public void init(Map<String, Object> params) { ... String frameId = operation.getOpType().name().toLowerCase() + "-frame"; operationFrame = openFrame(frameContainer, frameId, params); OperationFrame — , . — .init() OperationEdit — , : @Override public void init(Map<String, Object> params) { ... getDsContext().addListener(new DsContext.CommitListenerAdapter() { @Override public void afterCommit(CommitContext context, Set<Entity> result) { LeftPanel leftPanel = App.getLeftPanel(); if (leftPanel != null) leftPanel.refreshBalance(); } }); } , .
— , , . , , .
expense-frame.xml . textField amountField . ExpenseFrame AmountCalculator , : @Inject private TextField amountField; @Inject private AmountCalculator amountCalculator; @Override public void postInit(Operation item) { amountCalculator.initAmount(amountField, item.getAmount1()); … } @Override public void postValidate(ValidationErrors errors) { BigDecimal value = amountCalculator.calculateAmount(amountField, errors); … } , Web Client, .
initAmount() , BigDecimal . datatype = decimal , , . calculateAmount() regexp, Groovy Scripting . , .
categories-report.xml . , CategoryAmountDatasource . datasourceClass collectionDatasource . JPQL-, , , . CategoryAmountDatasource loadData() DataService JPQL-, ReportService , : public class CategoryAmountDatasource extends CollectionDatasourceImpl<CategoryAmount, UUID> { private ReportService service = AppBeans.get(ReportService.NAME); @Override protected void loadData(Map<String, Object> params) { ... Date fromDate = (Date) params.get("from"); Date toDate = (Date) params.get("to"); ... List<CategoryAmount> list = service.getTurnoverByCategories(fromDate, toDate, categoryType, currency.getCode(), ids); for (CategoryAmount categoryAmount : list) { data.put(categoryAmount.getId(), categoryAmount); } ... } refresh() — . refreshDs1() , refreshDs2() CategoriesReport . CategoryAmount , data. , , CategoryAmount , ., .
categories-report.xml — . excludeCategory . XML- . How does this work? , init() : . initExcludedCategories() . “” , UserDataService .ExcludeCategoryAction excludeCategory() , ComponentsFactory -, , excludedBox . , , , . , , ., , , .
Thanks
zenmoney.ru , . open-source , , Help -> About -> Credits .
To be continued
responsive UI, Backbone.js + Bootstrap REST API. , UI UI-, .
Source: https://habr.com/ru/post/235617/
All Articles