Together more fun: python + flask + google app engine
Background: I, like many on Habrahabr, damn like to listen to music. Most often I do it on VKontakte. Sometimes an already-formed playlist bothers you - you want something new; but so as not to be much different from what is already there. To do this, all services that provide the ability to listen to music, there are recommendations. I admit honestly, recommendations in VKontakte terrify me. Maybe someone likes it, but my selection there causes a desire to close the browser (IMHO, of course). In general, I decided to correct this situation for myself and implement my own recommendations using the VKontakte and Last.fm API. Since I heard and read a lot about Google App Engine, but never used it, it was decided to join this platform.
I will say right away that I will not describe the subtleties of interaction with the API or the algorithm for selecting recommendations here. About this - in the following articles, maybe. This article describes only the process of creating, configuring and deploying an application on the Google App Engine using python and flask.
About typos and inaccuracies, please report in a personal. Thank.
So, let's begin. Go to appengine.google.com . There, if you are not authorized yet, you will be asked to enter the login / password for your Google account.
After successful authorization, we see the “Create Application” button (or a list of applications, if you have them). As far as I know, without additional investment Google allows you to create up to 25 applications (correct, if I'm wrong). A list of other quotas can be found by clicking on the link .
')
After clicking the button, we will be transferred to a form where you can select an application identifier (not yet taken) and a name, as well as authentication options. We agree with the Terms of Service and click the button to create the first application. Created, what a joy. Now your application is available at http: // [identifier] .appspot.com , where identifier is your unique application identifier. The application is available, but, of course, does not work - there is nothing to work. Correct the situation.
We swing PyCharm if it is necessary. There is a small nuance of choosing the version of the editor: PyCharm, which is Professional Edition, has built-in support for Google App Engine, which is reflected in the deployment tools integrated in the IDE. PyCharm CE has no such support, so it will have to be deployed via the console.
We create the project in PyCharm. If you are using the Professional Edition, you can choose the “Google App Engine project” type when creating a project. In this case, you will have to specify your application identifier (the above identifier), as well as the path to the App Engine SDK, so take care of downloading it in advance. Get the SDK for any supported programming language here . PyCharm will create a project with the app.yaml configuration file already filled in and the main.py working main script.
Actually, the main script:
This example is provided in the Google App Engine for Python manual itself, and even on the JetBrains website. There is nothing remarkable in the script - the standard HelloWorld. I can only say for those who do not know that webapp2 is a lightweight framework that is compatible with Google App Engine and is quite simple to use (well, as far as I used it).
Configuration file:
Let's sort the config:
A detailed description of the configuration of the Google App Engine application is here .
In general, our first application is ready to check its work. We start the project in PyCharm; on the local machine it will be available at: 127.0.0.1 : 8080 (if you have not changed anything in the project configuration). If at the opening, see “Hello world!” - everything works.
What to do if you are not using PyCharm, but you still want to start the project?
Linux way: in the terminal, execute the command in the following format:
Regarding Windows users, it's a little different. The SDK is downloaded and installed on the computer and the Google App Engine Launcher is used to launch the project. I can't say anything about Mac OS - maybe someone will tell in the comments.
Unfortunately, the webapp2 framework is not what we need. Therefore, let's go connect the flask.
Since flask does not appear in the list of default libraries, we, first of all, need to take care of its connection. Google App Engine supports the ability to separately configure the modules used. This is done in a file named appengine_config.py . More about him here . We will use it to connect the framework. To do this, use pip to install flask in the internal directory, let's call it lib . Do it either manually
Flask is installed, you can use - we will rewrite a bit of the config and the main script:
In order for the application to pick up the installed flask, we indicate in the appengine_config.py file its location.
We try to start - we see all the same “Hello world!”.
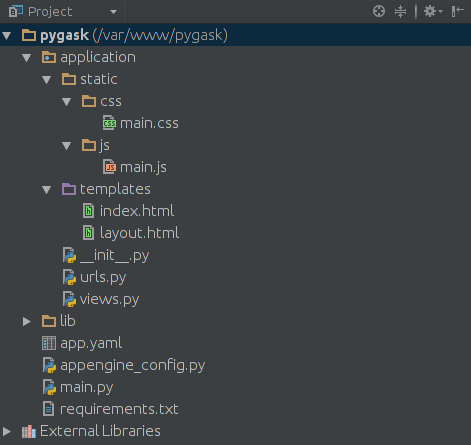
We bring the project to a more or less kosher look: add an application package, folders for static files and templates, render the handlers and views into separate files; act as if you were assembling a regular project in flask. After all the manipulations, the project tree looks like this:
Then you can develop it in any direction.
I’ll draw your attention to how the original files have changed:
The path to the main script has changed in the configuration file - the indication of the application package has been added.
Suppose that the displayed “Hello world!” Is enough for us for the first time. Let's deploy to appspot.com. Actually, there is nothing complicated here either. But, before starting, I want to say about one important thing: in the development process, there are many working files that are not needed on the server. In order for them not to get there when deployed, you can specify in the skip_files directive everything that should not be laid out. More details .
If you are a happy user of PyCharm, then take the trouble to do the “most complicated” operation: Tools -> Google App Engine -> Upload App Engine app ... Next, if this is the first deployment, select the authorization method that suits you (I didn't understand the email / password pair) data did not fit, so I used OAuth2 and did not bother) and, voila, you can go to http: // [identifier] .appspot.com (in this case, pygask.appspot.com ) and look at the result of your work.
If for some reason you are not using the above IDE, the one-line recipe for you (Linux way):
Pay attention to the
That's all, I hope that the material will be useful to someone. If it is interesting, in the future I will tell you how, within the framework of this idea, I had fun with the API Vkontakte and Last.fm and what it all led to. Thanks for attention.
PS The code is on the githaba: pygask .
I will say right away that I will not describe the subtleties of interaction with the API or the algorithm for selecting recommendations here. About this - in the following articles, maybe. This article describes only the process of creating, configuring and deploying an application on the Google App Engine using python and flask.
About typos and inaccuracies, please report in a personal. Thank.
So, let's begin. Go to appengine.google.com . There, if you are not authorized yet, you will be asked to enter the login / password for your Google account.
After successful authorization, we see the “Create Application” button (or a list of applications, if you have them). As far as I know, without additional investment Google allows you to create up to 25 applications (correct, if I'm wrong). A list of other quotas can be found by clicking on the link .
')
After clicking the button, we will be transferred to a form where you can select an application identifier (not yet taken) and a name, as well as authentication options. We agree with the Terms of Service and click the button to create the first application. Created, what a joy. Now your application is available at http: // [identifier] .appspot.com , where identifier is your unique application identifier. The application is available, but, of course, does not work - there is nothing to work. Correct the situation.
We swing PyCharm if it is necessary. There is a small nuance of choosing the version of the editor: PyCharm, which is Professional Edition, has built-in support for Google App Engine, which is reflected in the deployment tools integrated in the IDE. PyCharm CE has no such support, so it will have to be deployed via the console.
We create the project in PyCharm. If you are using the Professional Edition, you can choose the “Google App Engine project” type when creating a project. In this case, you will have to specify your application identifier (the above identifier), as well as the path to the App Engine SDK, so take care of downloading it in advance. Get the SDK for any supported programming language here . PyCharm will create a project with the app.yaml configuration file already filled in and the main.py working main script.
Actually, the main script:
main.py
import webapp2 class MainHandler(webapp2.RequestHandler): def get(self): self.response.write('Hello world!') app = webapp2.WSGIApplication([ ('/', MainHandler) ], debug=True) This example is provided in the Google App Engine for Python manual itself, and even on the JetBrains website. There is nothing remarkable in the script - the standard HelloWorld. I can only say for those who do not know that webapp2 is a lightweight framework that is compatible with Google App Engine and is quite simple to use (well, as far as I used it).
Configuration file:
app.yaml
application: pygask version: 1 runtime: python27 api_version: 1 threadsafe: yes handlers: - url: /favicon\.ico static_files: favicon.ico upload: favicon\.ico - url: .* script: main.app libraries: - name: webapp2 version: "2.5.2" Let's sort the config:
- application is our application identifier (don’t be confused by the word “pygask” is a free abbreviation for python + gae + flask :));
- handlers - a list of URL patterns and descriptions of how to handle them. In the handlers directive you can use two types of handlers - static handlers and script handlers. Statics, in this case, represents the favicon loader, scripts are the main script for launching the main.app application (Attention! You do not need to specify the
.pyextension); - libraries - libraries necessary for the application to work; in this case, webapp2. Python 2.7, run on Google App Engine, supports a certain set of libraries that works out of the box. Full list can be found here .
A detailed description of the configuration of the Google App Engine application is here .
In general, our first application is ready to check its work. We start the project in PyCharm; on the local machine it will be available at: 127.0.0.1 : 8080 (if you have not changed anything in the project configuration). If at the opening, see “Hello world!” - everything works.
What to do if you are not using PyCharm, but you still want to start the project?
Linux way: in the terminal, execute the command in the following format:
<path to python interpeter> <path to SDK>/dev_appserver.py --host 127.0.0.1 <path to project> For clarification, here’s the command I use to run pygask in the console (provided that both the SDK and the project folder are in /var/www/ ): andymitrich@pc:~$ python /var/www/google_appengine/dev_appserver.py --host 127.0.0.1 /var/www/pygask/ We type something similar in the terminal and open 127.0.0.1:8080 and, I hope, see “Hello world!”.Regarding Windows users, it's a little different. The SDK is downloaded and installed on the computer and the Google App Engine Launcher is used to launch the project. I can't say anything about Mac OS - maybe someone will tell in the comments.
Unfortunately, the webapp2 framework is not what we need. Therefore, let's go connect the flask.
Since flask does not appear in the list of default libraries, we, first of all, need to take care of its connection. Google App Engine supports the ability to separately configure the modules used. This is done in a file named appengine_config.py . More about him here . We will use it to connect the framework. To do this, use pip to install flask in the internal directory, let's call it lib . Do it either manually
andymitrich@pc:~$ pip install -t /var/www/pygask/lib/ flask Or using the requirements.txt file andymitrich@pc:~$ pip install -r /var/www/pygask/requirements.txt -t /var/www/pygask/lib/ Note the -t parameter - it contains the path to install the package.Flask is installed, you can use - we will rewrite a bit of the config and the main script:
- You can remove the section with the libraries directive from the app.yaml application config - we do not need it.
- The main script now looks like this:main.py
from flask import Flask app = Flask(__name__) @app.route('/') def home(): return 'Hello world!'
In order for the application to pick up the installed flask, we indicate in the appengine_config.py file its location.
appengine_config.py
import site import os.path site.addsitedir(os.path.join(os.path.dirname(__file__), 'lib')) We try to start - we see all the same “Hello world!”.
We bring the project to a more or less kosher look: add an application package, folders for static files and templates, render the handlers and views into separate files; act as if you were assembling a regular project in flask. After all the manipulations, the project tree looks like this:
Then you can develop it in any direction.
I’ll draw your attention to how the original files have changed:
- main script, which now consists of one linemain.py
import application - project configuration fileapp.yaml
application: pygask version: 1 runtime: python27 api_version: 1 threadsafe: yes handlers: - url: /favicon\.ico static_files: favicon.ico upload: favicon\.ico - url: .* script: main.application.app
The path to the main script has changed in the configuration file - the indication of the application package has been added.
Suppose that the displayed “Hello world!” Is enough for us for the first time. Let's deploy to appspot.com. Actually, there is nothing complicated here either. But, before starting, I want to say about one important thing: in the development process, there are many working files that are not needed on the server. In order for them not to get there when deployed, you can specify in the skip_files directive everything that should not be laid out. More details .
If you are a happy user of PyCharm, then take the trouble to do the “most complicated” operation: Tools -> Google App Engine -> Upload App Engine app ... Next, if this is the first deployment, select the authorization method that suits you (I didn't understand the email / password pair) data did not fit, so I used OAuth2 and did not bother) and, voila, you can go to http: // [identifier] .appspot.com (in this case, pygask.appspot.com ) and look at the result of your work.
If for some reason you are not using the above IDE, the one-line recipe for you (Linux way):
<path to python interpeter> <path to SDK>/appcfg.py <path to project> Accordingly, I use: andymitrich@pc:~$ python /var/www/google_appengine/appcfg.py --oauth2 /var/www/pygask/ Pay attention to the
--oauth2 parameter, it is necessary for authorization through OAuth2. If you do not specify it, they will be asked to enter email / password. In case of successful completion of the execution of the command, your project will be available at the appropriate address.That's all, I hope that the material will be useful to someone. If it is interesting, in the future I will tell you how, within the framework of this idea, I had fun with the API Vkontakte and Last.fm and what it all led to. Thanks for attention.
PS The code is on the githaba: pygask .
Source: https://habr.com/ru/post/235511/
All Articles