Cubietruck. Road mini server. Part 1
The idea of such a server was born on vacation. In the evening, I wanted to watch online TV shows on the tablet, but because of the unstable 3G reception, the viewing turned into flour. As an option, it was possible to download the series, but again, when downloading, the signal constantly floated, the speed jumped and the tablet had to be kept constantly on and on charging (application specifics). By evening, a couple of episodes were downloaded and you could easily watch the serials.
At this time, the idea of creating this device was born. In an Internet, a large number of implementations of information storage on single-board computers of different manufacturers, but no combination of several solutions was found.
What are the plans:
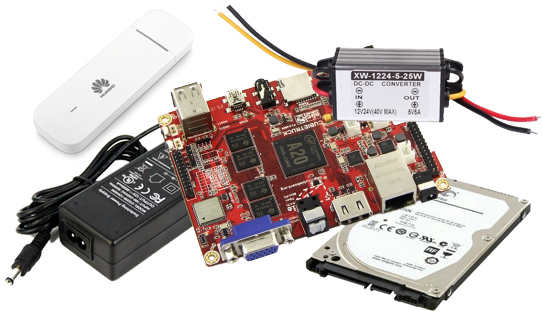
The brain of the whole Cubietruck system
HDD - 500Gb
USB modem HUAWEI E3372
AC-DC 5V power supply
Power supply DC-DC 12V - 5V (for car)
How it will work:
At home, this will be an ordinary NAS connected via a network cable (lan) and attached to the computer as a simple network drive.
CubieTruck will constantly operate the WI-FI access point (in case there is no Wi-FI, but there is only a cable with DHCP).
In the case that a network cable (lan) is connected to Cubietruck, the device connected to the access point Cubietruck must be connected to the Internet via a network cable, not 3G. The modem should start its work when no network cable is connected to Cubietruck.
When setting up relied on the post Cubietruck. Cozy, home server so I will not describe the installation process.
')
Network settings
All the settings did on Windows.
Write the image of the system on the USB flash drive, put it in its place and turn on Cubietruck.
The system itself is installed and rebooted. After that, Cubietruck with Cubian installed is ready to go.
In the absence of a monitor with HDMI and keyboard, we need Putty .
Go to the device with DHCP (router and server), find the ip of our Cubietruck
We make the connection on port 36000 , since this is the default port in SSH Cubian.
Cubie / cubie login / password
In the process of setting did not change.
I personally changed the port.
To do this, rule sshd_config
sudo nano /etc/ssh/sshd_config Find the port with port 36000
Port 36000
Change to
Port 22
We save. In the nano editor to save, press Ctrl + O then Enter and exit Ctrl + X.
Reboot
sudo reboot All can now connect to the standard port 22
Since the cube is planned as something portable, in the future, the eth0 interface, that is, the Enternet port will work via DHCP , but now, for convenience of configuration, I will assign it a static address:
Interface settings are stored in the / etc / network / interfaces file
sudo nano /etc/network/interfaces Default configuration
auto lo iface lo inet loopback # auto eth0 iface eth0 inet dhcp Change interface eth0 . Do not forget that everyone changes the settings for themselves
auto eth0 allow-hotplug eth0 iface eth0 inet static address 192.168.1.247 netmask 255.255.255.0 gateway 192.168.1.10 dns-nameserver 192.168.1.7 Reboot
sudo reboot We ping the host ya.ru check its availability.
cubie@Cubian:~$ ping ya.ru PING ya.ru (213.180.193.3) 56(84) bytes of data. 64 bytes from www.yandex.ru (213.180.193.3): icmp_req=1 ttl=56 time=2.04 ms 64 bytes from www.yandex.ru (213.180.193.3): icmp_req=2 ttl=56 time=1.82 ms 64 bytes from www.yandex.ru (213.180.193.3): icmp_req=3 ttl=58 time=1.95 ms The answer is, the network is configured
Auto mount HDD partition
Create a folder where the HDD will be mounted.
sudo mkdir /media/files We give read / write access for all users.
sudo chmod 777 /media/files View HDD partitions.
sudo fdisk -l I have a 500Gb disk installed
Disk /dev/sda: 500.1 GB, 500107862016 bytes 255 heads, 63 sectors/track, 60801 cylinders, total 976773168 sectors Units = sectors of 1 * 512 = 512 bytes Sector size (logical/physical): 512 bytes / 512 bytes I/O size (minimum/optimal): 512 bytes / 512 bytes Disk identifier: 0x82e3ff7e Let's format the disk in ext4 file system
sudo mkfs.ext4 /dev/sda We recognize the UUID of our HDD
sudo blkid /dev/mmcblk0p1: LABEL="cubieboard" UUID="2a1124a9-6108-4da0-932f-78ccbfd92458" TYPE="ext4" /dev/sda: UUID="ff0caf96-39b9-4aff-a4d0-5892abfdca8f" TYPE="ext4" We need UUID / dev / sda
Copy UUID without quotes
ATTENTION. Each disk has its own UUID
Now add an entry to / etc / fstab
sudo nano /etc/fstab At the very end we add
UUID=ff0caf96-39b9-4aff-a4d0-5892abfdca8f /media/files ext4 defaults,acl,user,user_xattr,errors=remount-ro * exhibit attributes to your liking
Records are separated either by a space or a tab
Reboot:
sudo reboot After reboot check
mount The disk is mounted in the system
/dev/sda on /media/files type ext4 (rw,nosuid,nodev,noexec,relatime,errors=remount-ro,data=ordered) If the disk is formatted in the NTFS system and needs to be mounted into the system
Device Boot Start End Blocks Id System /dev/sda1 2048 234438655 117218304 7 HPFS/NTFS/exFAT To begin, we will update the list of repositories and search for indexes of updated versions of programs, drivers, the kernel, and everything else:
sudo apt-get update In order to install the utility ntfs-3g
sudo apt-get install ntfs-3g We recognize the UUID of our section
sudo blkid /dev/sda1: LABEL="M-PM-^]M-PM->M-PM-2M-QM-^KM-PM-9 M-QM-^BM-PM->M-PM-<" UUID="E8923D15923CE9A8" TYPE="ntfs" We need a UUID = "E8923D15923CE9A8"
Now add an entry to / etc / fstab
sudo nano /etc/fstab At the very end we add
UUID= E8923D15923CE9A8 /media/files ntfs-3g defaults,acl,user,user_xattr,errors=remount-ro * exhibit attributes to your liking
Records are separated either by a space or a tab
Reboot:
sudo reboot After reboot check
mount Disk with NTFS mounted
/dev/sda1 on /media/files type fuseblk (rw,nosuid,nodev,noexec,relatime,user_id=0,group_id=0,allow_other,blksize=4096) Install samba
To begin, we will update the list of repositories and search for indexes of updated versions of programs, drivers, the kernel, and everything else:
sudo apt-get update Install samba
sudo apt-get install samba samba-common-bin There are a lot of settings in samba, but now we need to configure only the main ones in order to access our disk.
Open the smb.conf file
sudo nano /etc/samba/smb.conf You can delete all the many settings, or you can add the necessary settings to the appropriate sections.
[global] workgroup = WORKGROUP guest ok = yes netbios name = CubieNAS security = share browseable = yes [files] path = /media/files writeable = yes browseable = yes Restart Samba
sudo /etc/init.d/samba restart We try to enter
\\ CubieNAS or \\ ip
If everything is set up correctly we will see the files folder
I have a speed gigabit network:
EXT4 disc
File 1 Gb is transmitted at a speed of 24-29 Mb / s
Folder with 300 files of various formats 16-34 Mb / s
Copy from the cube
File 1 Gb is transmitted at a speed of 26-34 Mb / s
Folder with 300 files of various formats 22-33Mb / s
NTFS disk
Copy to dice
File 1 Gb is transmitted at a speed of 8-9 Mb / s
Folder with 300 files of various formats 3-8 Mb / s
Copy from the cube
File 1 Gb is transmitted at a speed of 24-28Mb / s
Folder with 300 files of different formats 12-27Mb / s
Not fast, but it works.
Cubietruck. Road mini server. Part 2
Cubietruck. Road mini server. Part 3
Source: https://habr.com/ru/post/235355/
All Articles