How to make a dance platform for the Dance Dance Revolution
Hello, dear habrovchane. Long thought about the name of the post, but ultimately decided, albeit long, but to write the essence of it. Under the cut will be discussed how to create from scratch a good game controller for a rhythm game, without spending too much. And let lately periodically skip over comments, they say, “Habr is no longer a“ cake ”, I hope my taste will be to your taste.
')
But first, a small introduction, so that everyone understands what will be discussed below. A great Wikipedia article will clarify.
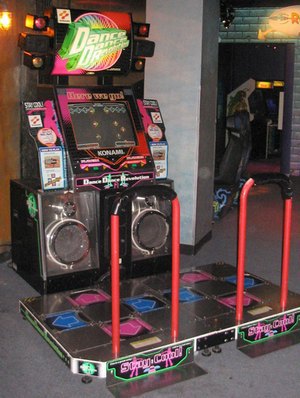
Historically, the game in Russia, Ukraine and Belarus gained popularity among anime fans, gradually singling out into a separate sports area. Gradually, instead of “nyakayuschih” girls, guys appeared around the slot machines, strongly sticking in “To Do List”, discussing the advantages of this or that “dance” technique and desperately arguing about choosing the right shoe “for step”. Soon the first championships loomed on the horizon.
And here there was a problem. Success in the game is directly dependent on the number of workouts. You could train well only on the slot machine. But since most of the players were of school and college age, only a few could afford full-fledged training. After all, everything costs money, and tokens are no exception.
The way out was obvious: to find the "home" version of DDR . Alas, the hopes did not come true. No, home versions existed, but were either substandard or not affordable . In addition, delivery sometimes increased the cost of the dance platform itself by 2 or more times. And it is in Russia. About Belarus, even the speech did not go.
It was with this state of affairs that I and jsirex , who lived in the glorious city of Minsk, turned out to be. Not finding an adequate option for reasonable money, we decided to build our own dance platformwith munchkin and geisha . Goals set ambitious. Dance platform \ mat \ pad was supposed to be:
The structure, which will be discussed now, is the fruit of two years of joint work. Retaining the original form factor, inside the rug has changed dramatically several times. I would like to share the assembly instructions for the final version with the community.
For clarity, the assembly process was filmed on video. Therefore, anyone who wants to first see the final result, and only then read a sheet of text with photos, I ask here:
In the meantime, proceed to the assembly.
The time spent on the assembly of the rug can be divided into two periods: theoretical and practical. The first is the time you spend on purchasing the necessary supplies and tools. Under the second - directly build time. If you do not be lazy, then alone the mat is going for 4 days.

Let's go back to shopping. You will need:
All of the above was in my possession. Therefore, prices do not quote. The rest had to buy. Prices are relevant for Belarus in August 2014. Translated in USD at the rate of 1 USD = 10 000 BYR.
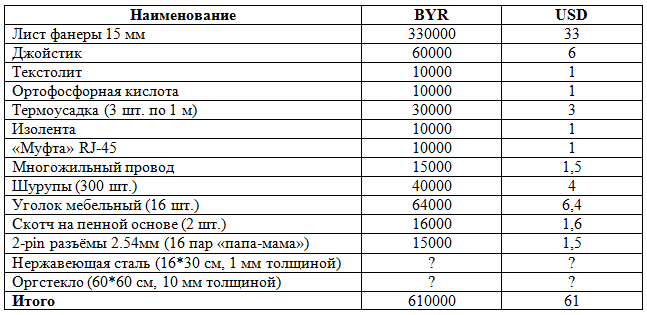
As you can see, prices for stainless steel and plexiglass are not indicated. In my case, I did not have to buy them - it helped jsirex . However, instead of a stainless steel, you can take any conductive material (not necessarily metal) with shape memory. For example, textolite.
With plexiglass more difficult. Sellers usually do not want to sell small pieces. But you can go to the trick. From plexiglas, we will need to make 4 buttons with dimensions of 28 * 28 cm. Therefore, we can take both a "square" of 60 * 60 cm and a "rectangle" of 30 * 120 cm. Take the glass right next to it or with a margin? It depends on how you cut it:
At this preparatory stage is over.
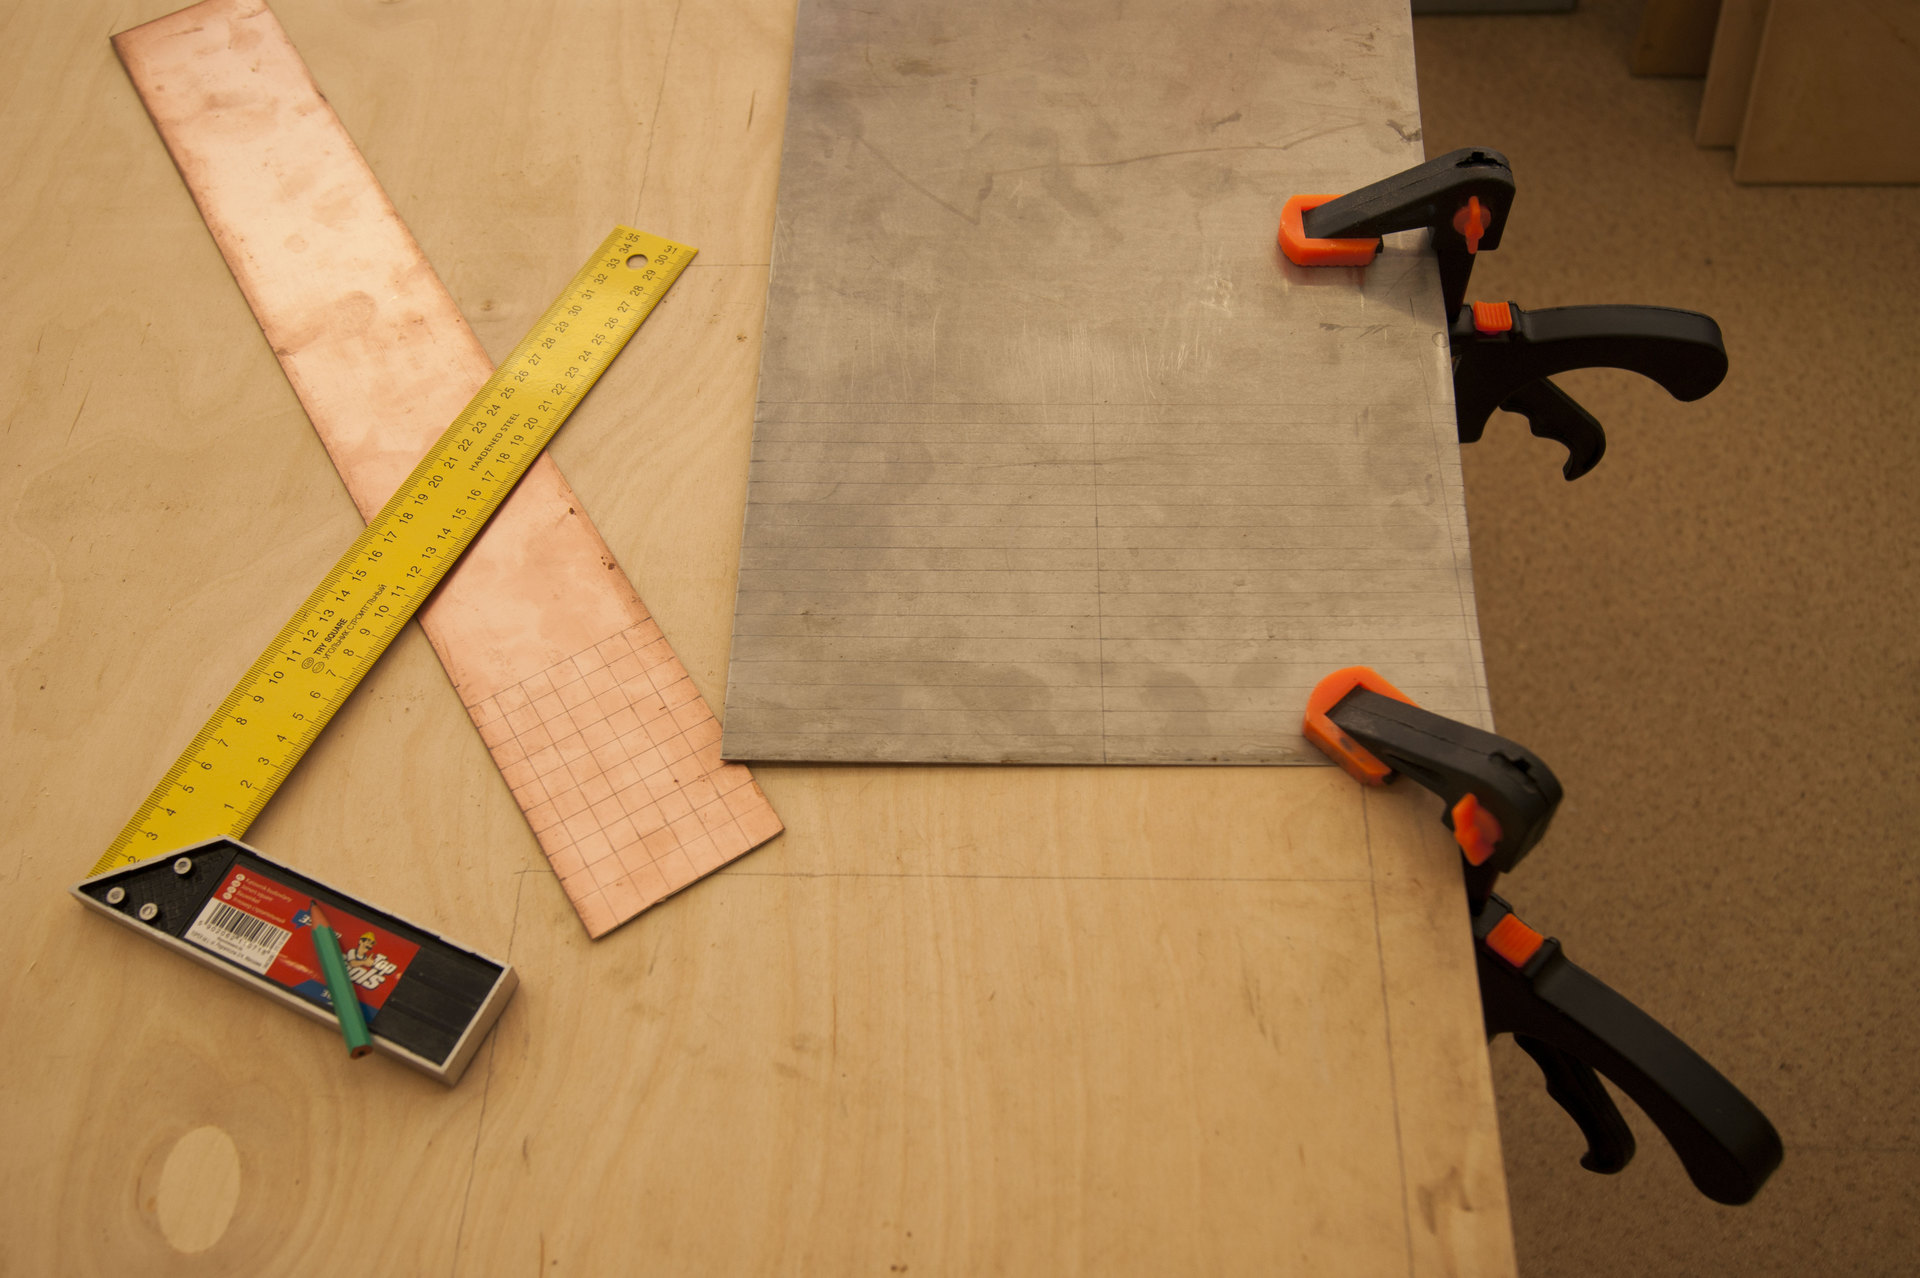
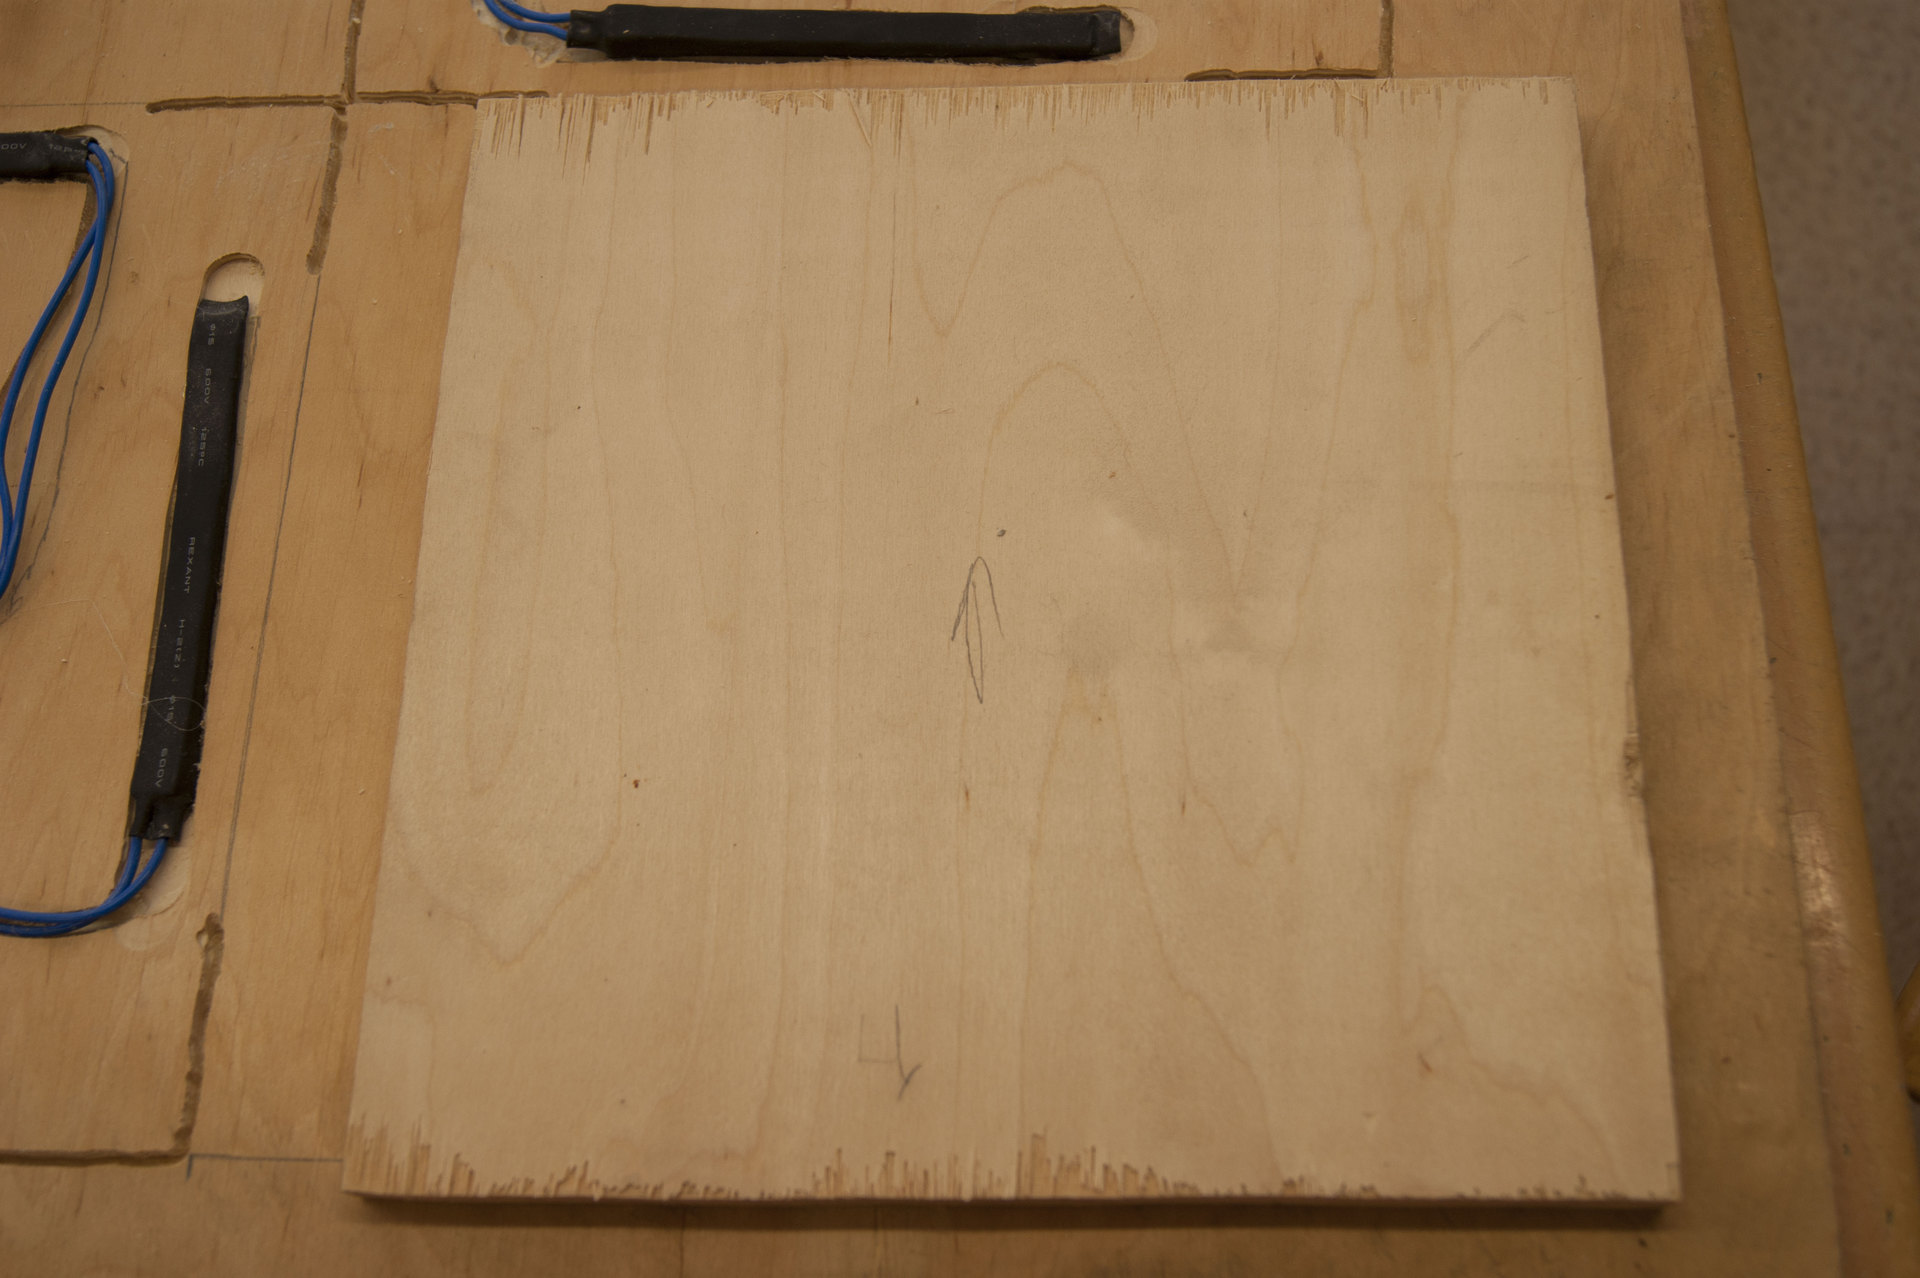
You can start cutting plywood. The thickness of 15 mm is chosen by chance. One of the goals, as you remember, is weight. Too light a mat with an intense load will slip on the floor. Too heavy will be inconvenient to transport. For the first reason you should not consider plywood of 10 mm and less. In the second - 18 mm and thicker. In addition, the dependence of the cost of plywood on its thickness, it turns out, is nonlinear. Thus, there are two "finalists": 12 mm and 15 mm. I do not know how in other cities, but in Minsk 12 mm turned out to be rare. Looking ahead, I say, the mat assembled from 15 mm plywood weighs 18 kg.
Having decided on the thickness of the plywood, you need to cut this sheet into “parts”. From one standard sheet should be:
You can cut plywood with a hacksaw or a circular saw. In the first case, it will not work out very smoothly, while in the second case, it is important to take into account the fact that the circular will “eat” 2-3 millimeters. Therefore, all your sizes should "grow" by the appropriate amount.
Also, when sawing, burrs will inevitably remain.
You can get rid of them with sandpaper or with the help of a suitable tool.
Remember, when working with wood there will be a lot of chips. Lots of. Therefore, make sure that your family does not drive you out of the house. If everything is completed safely, feel free to proceed to the next stage.
Over the years of DDR hobbies, jsirex and I have been digging in arcade machines more than once.
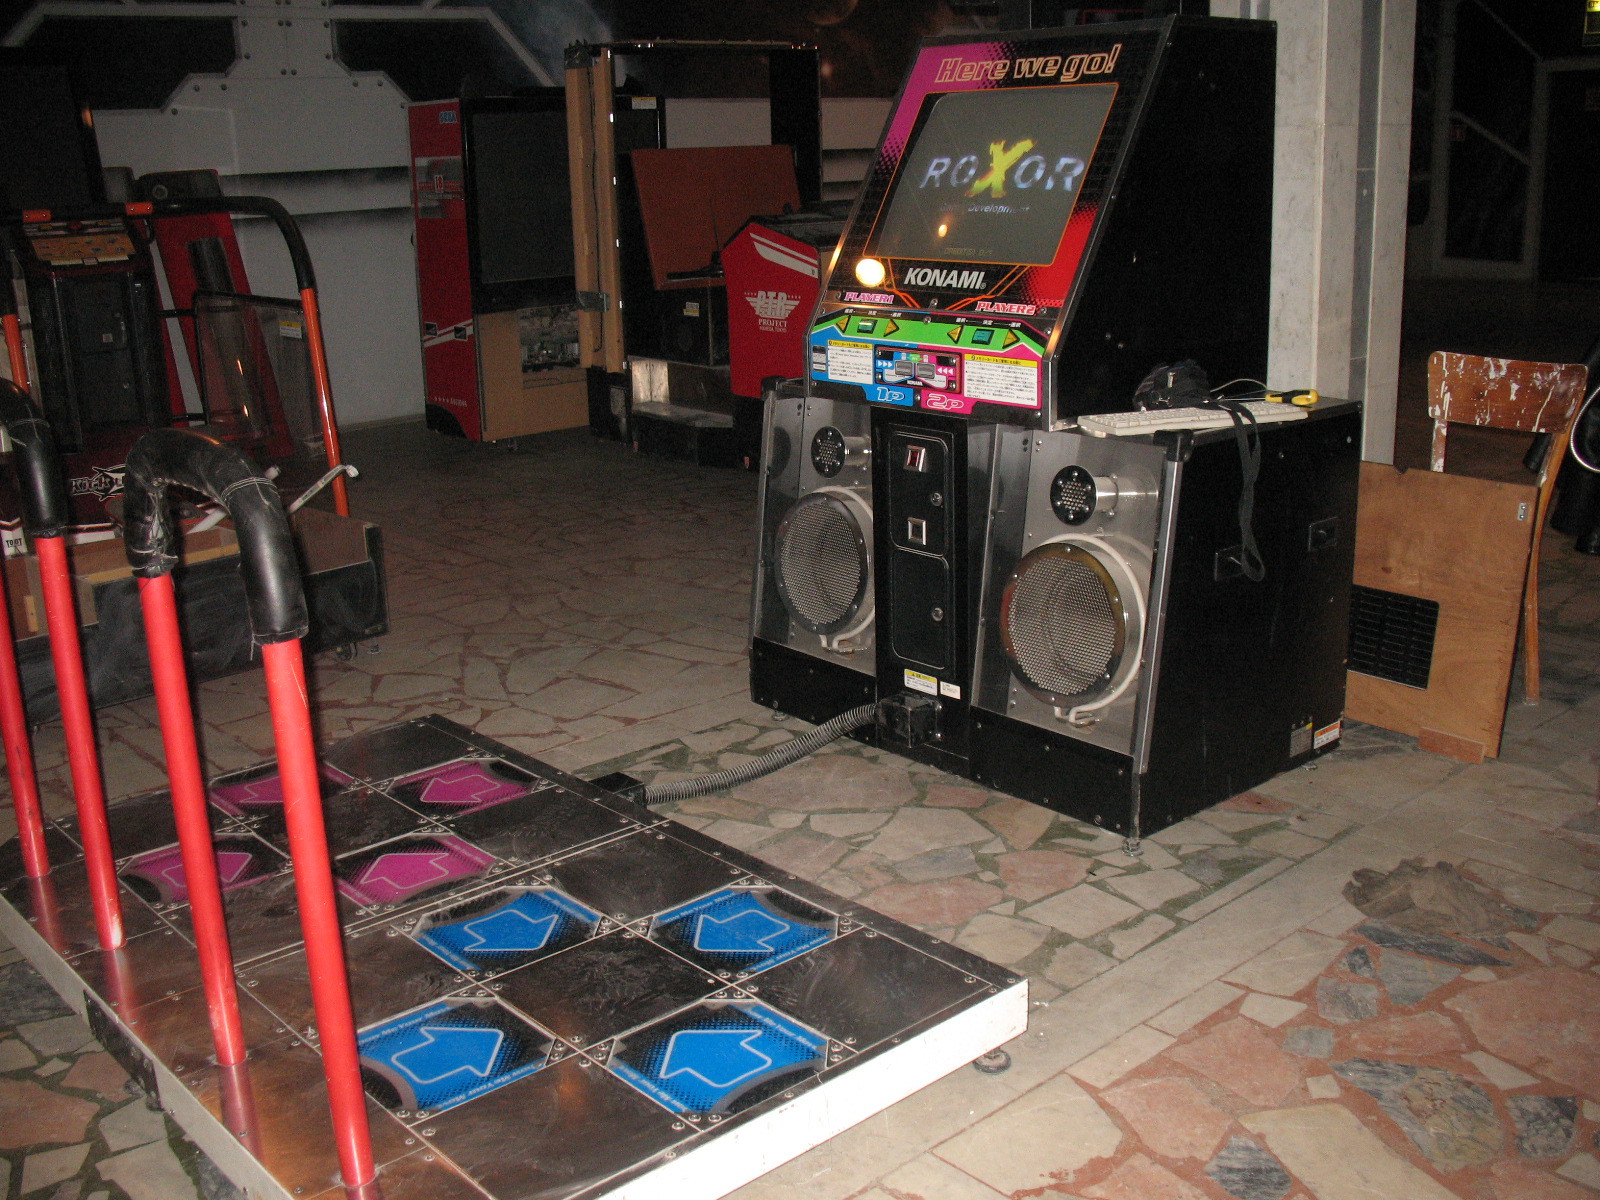
On the one hand, there was a need (the machine is always put in order before the championship), on the other - it was interesting that what the Japanese were thinking about. All ingenious, as you know, is simple.
The sensor is the simplest design: two conductive plates separated by a dielectric at the edges and locked in the center of the player's weight. Each button has 4 sensors, one for each side. Thus, regardless of which part of the button the player advances on, pressing always works.
But enough words. We proceed to the assembly.
We draw textolite in squares of 1 * 1 cm. Stainless steel - strips of 1 * 15 cm. The most difficult thing is to cut the stainless steel. There are no problems if there is a Bulgarian at hand. The only caveat - you need to adjust the size. Instead of 1 * 15 cm there will be 1.1 * 15.1 cm. The Bulgarian will eat the excess.
But if such a wonderful tool in your arsenal is not available, begin "dancing with a tambourine." At first I decided to use the Dremel. In his arsenal there was just a cutting disc.

However, the stainless steel 1 mm thick did not want to spit on trendy wheels and grind it after 8 cm cut. Therefore, reluctantly I had to go for the “analog” tool - metal scissors.

He was a stainless steel in the teeth. But not a single barrel of honey in my memory was complete without a spoon of tar. And this case is no exception.
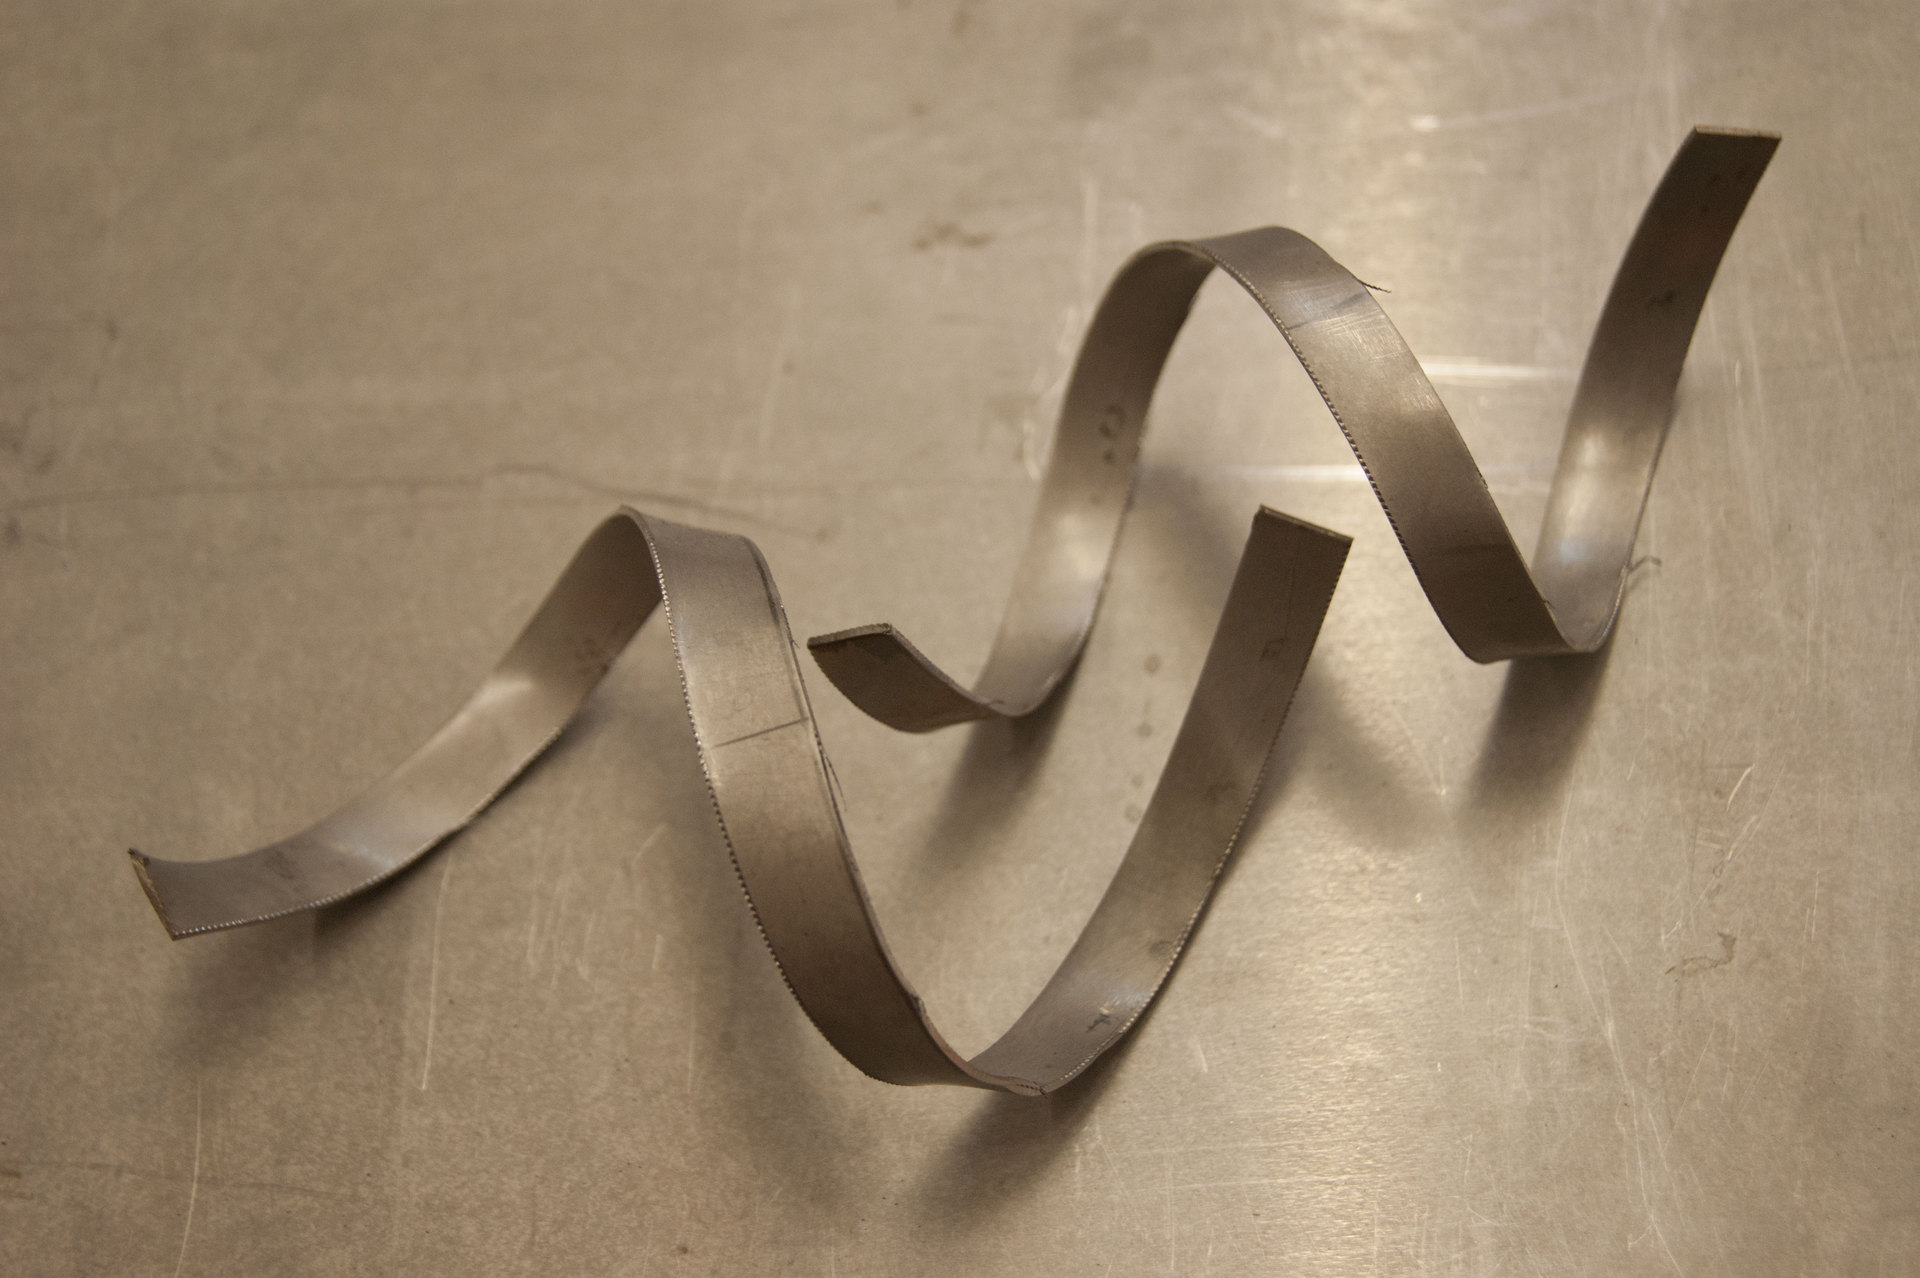
Scissors cut metal cheerful curls with burrs. Therefore, we first had to dub them with a hammer (blanks, not scissors) to a sane state.

And then “shave” the burrs with Dremel. He coped with this task perfectly and without loss of consumables.

Meanwhile, a soldering iron is heated. No, nobody owed me any money. Just came the next step in the manufacture of the sensor.
In terms of soldering, there are no subtleties. Ludim wires, drip orthophosphoric acid on the bare edge of a strip of stainless steel and solder.
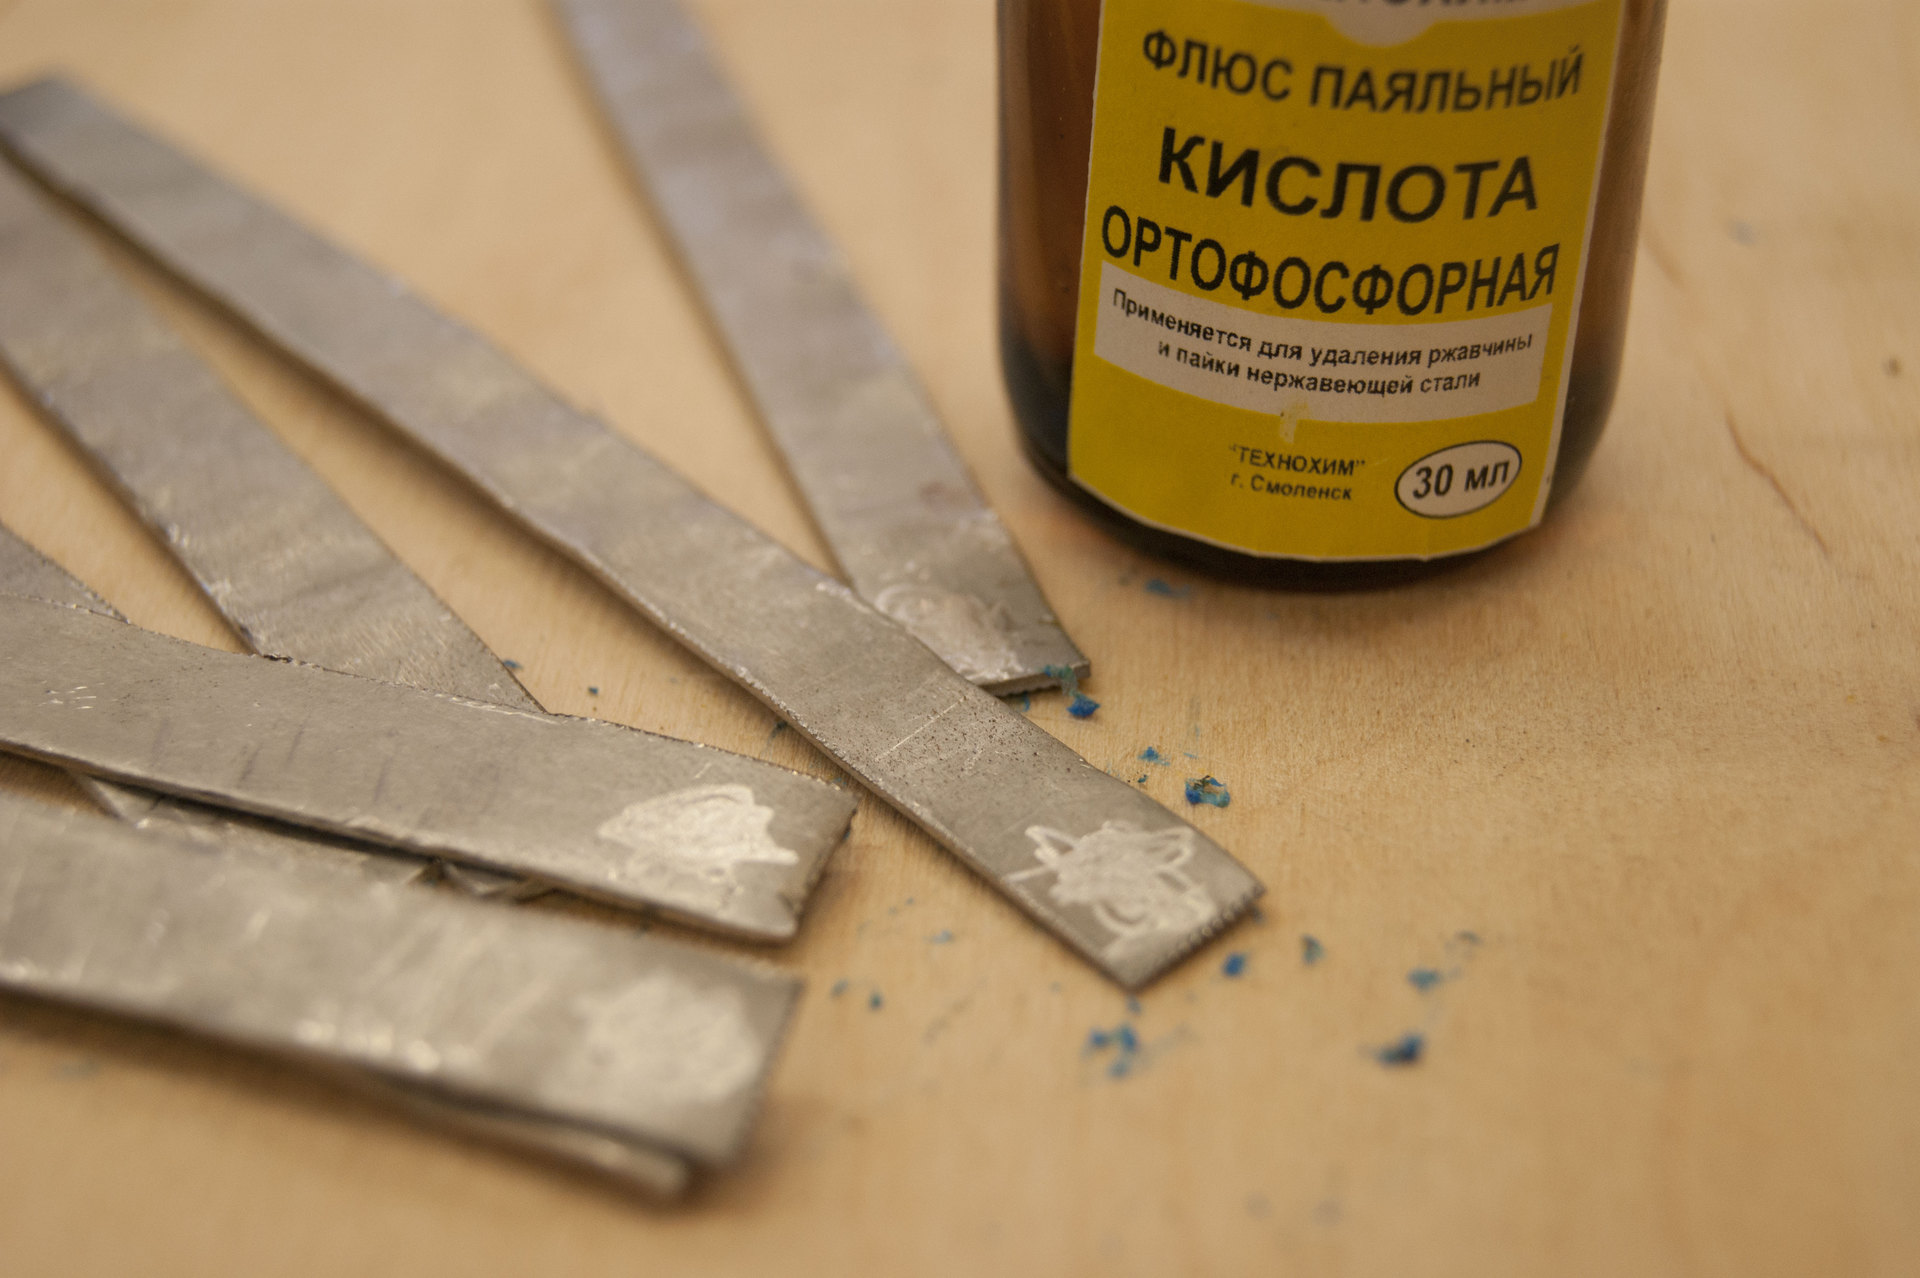
It may not look very aesthetically pleasing, but you can tear off the figs.
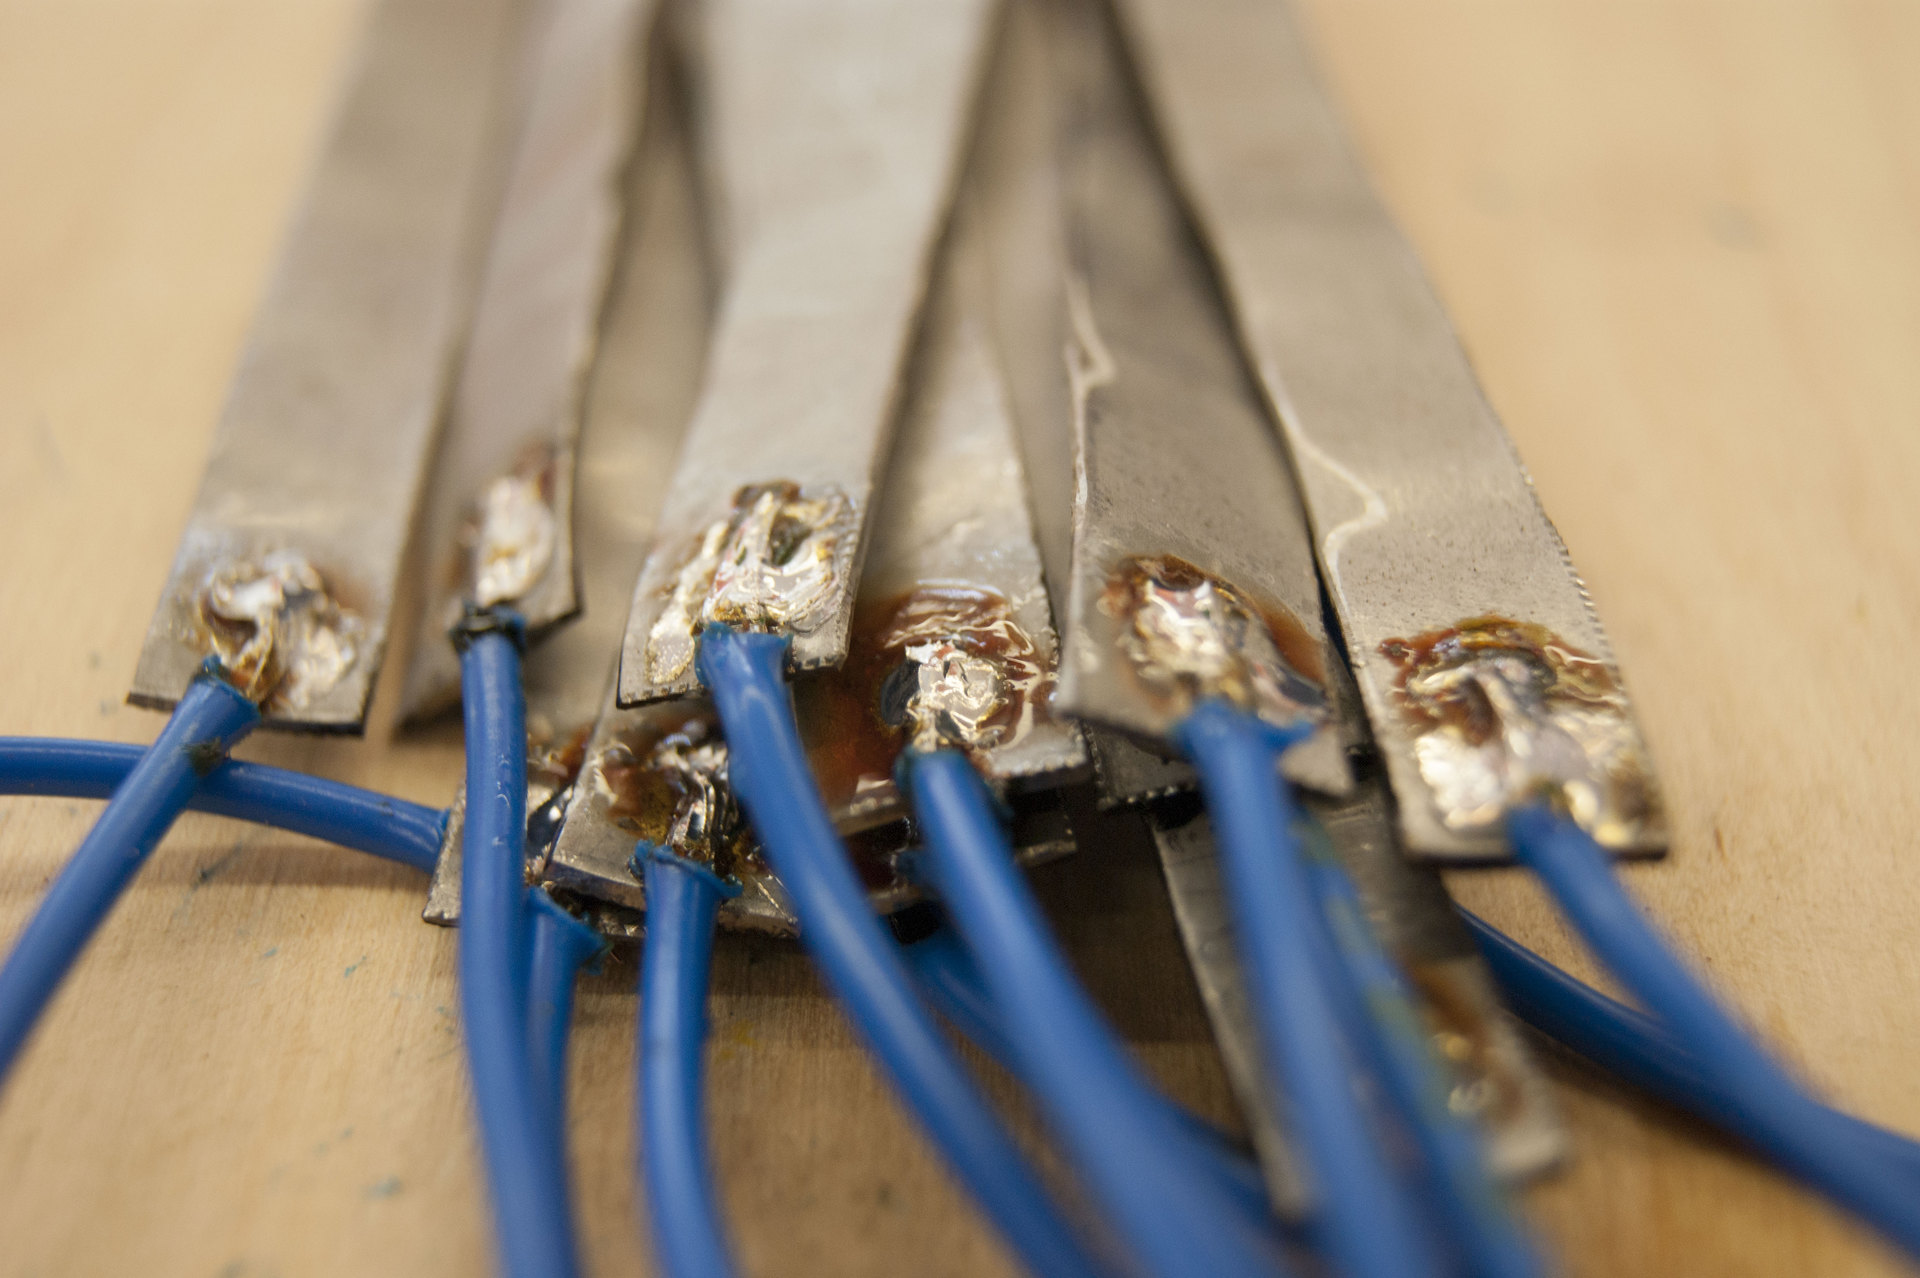
PCB squares are attached to the resulting blanks using tape. He acts as a dielectric. On one blank, it is attached on the soldering side, on the other - from the "tail" side.
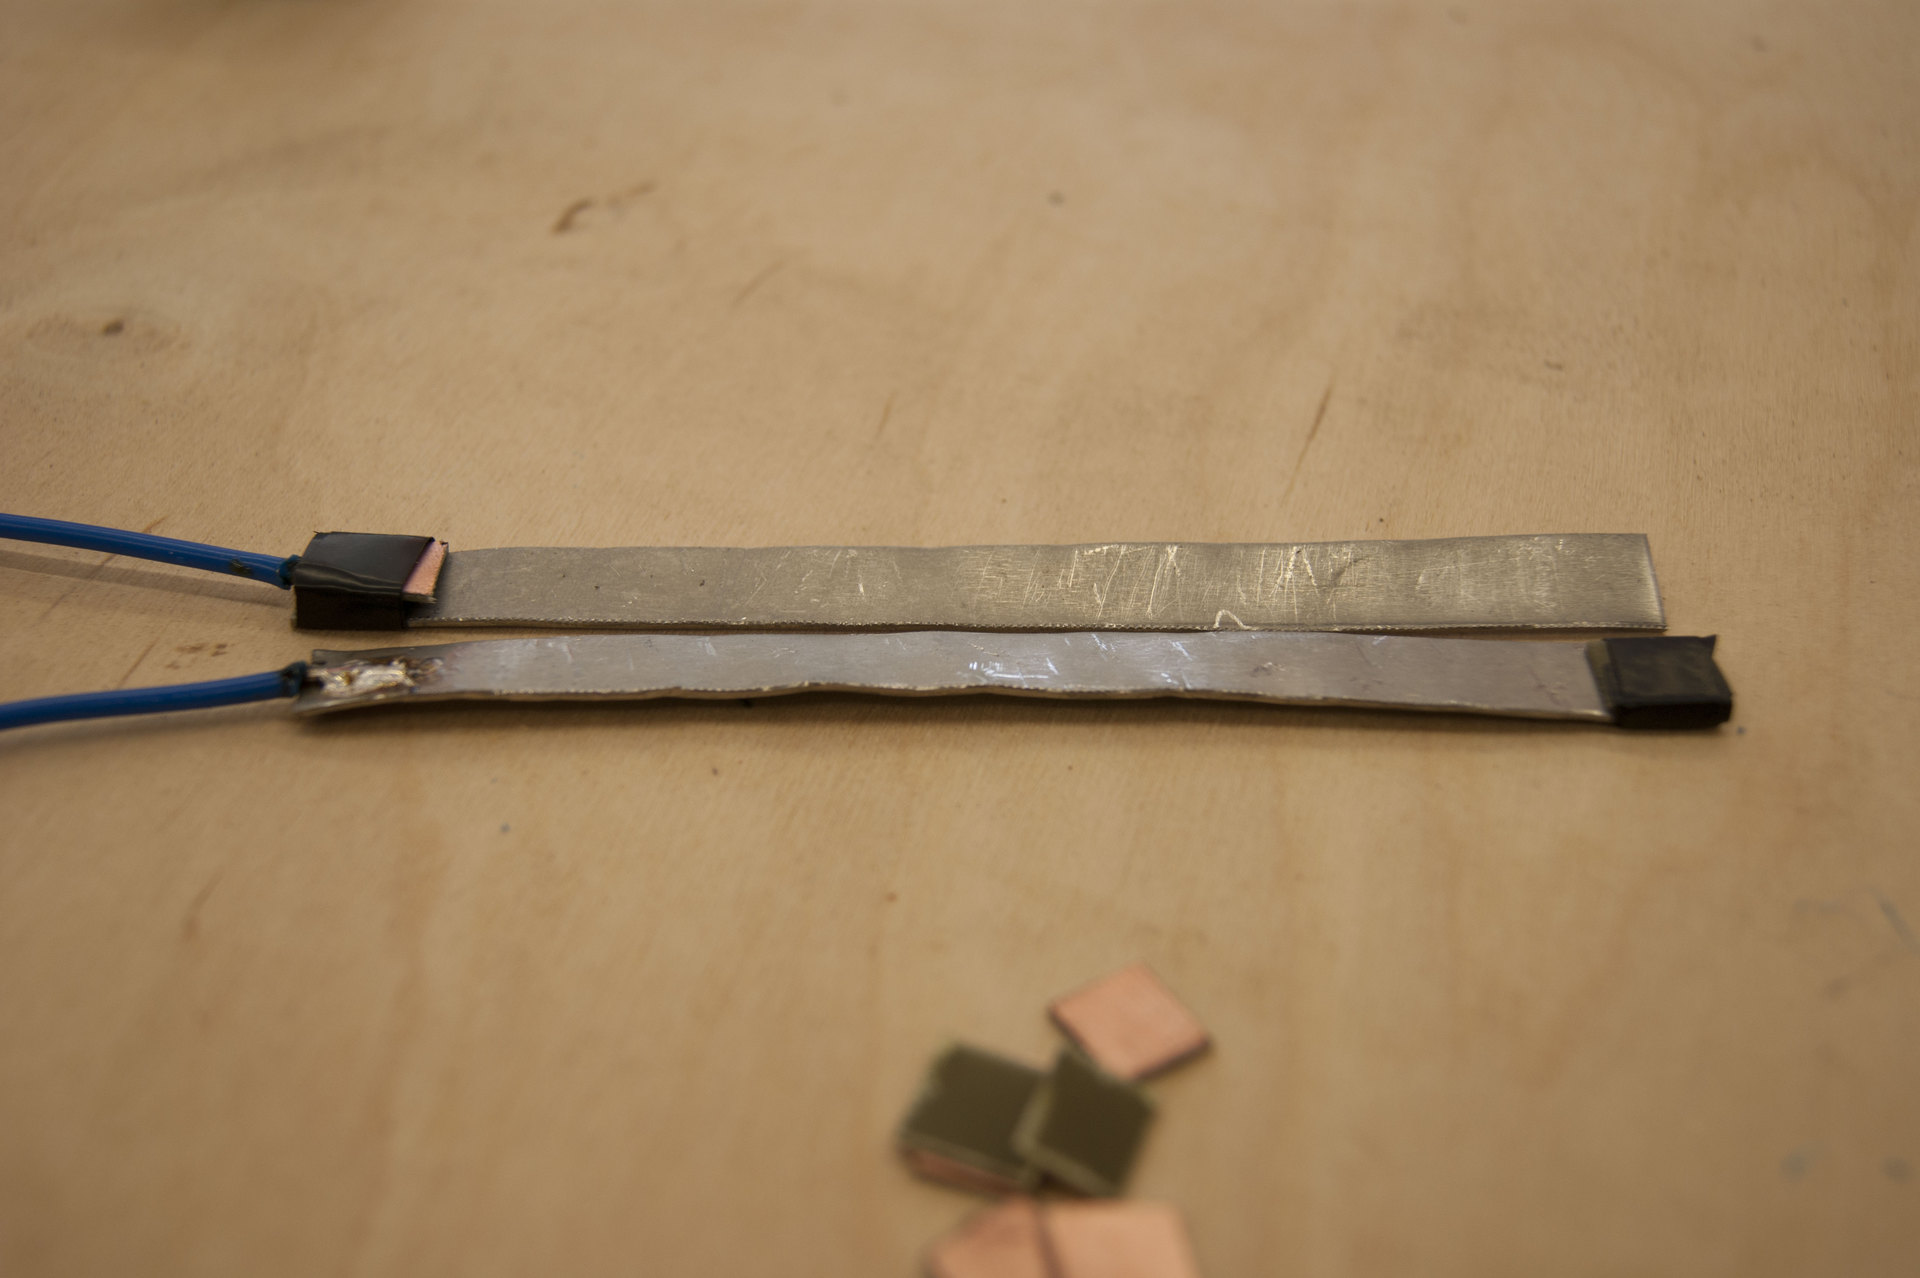
I repent, I used black tape instead of blue, so I can’t vouch for the durability of the sensors.
Then two blanks are fastened at the edges with tape. The final version below.

It's time to do beautiful. For this you need shrinking. With a sensor size of 1 * 15 cm heat shrinkage with a diameter of 15 mm is perfect.
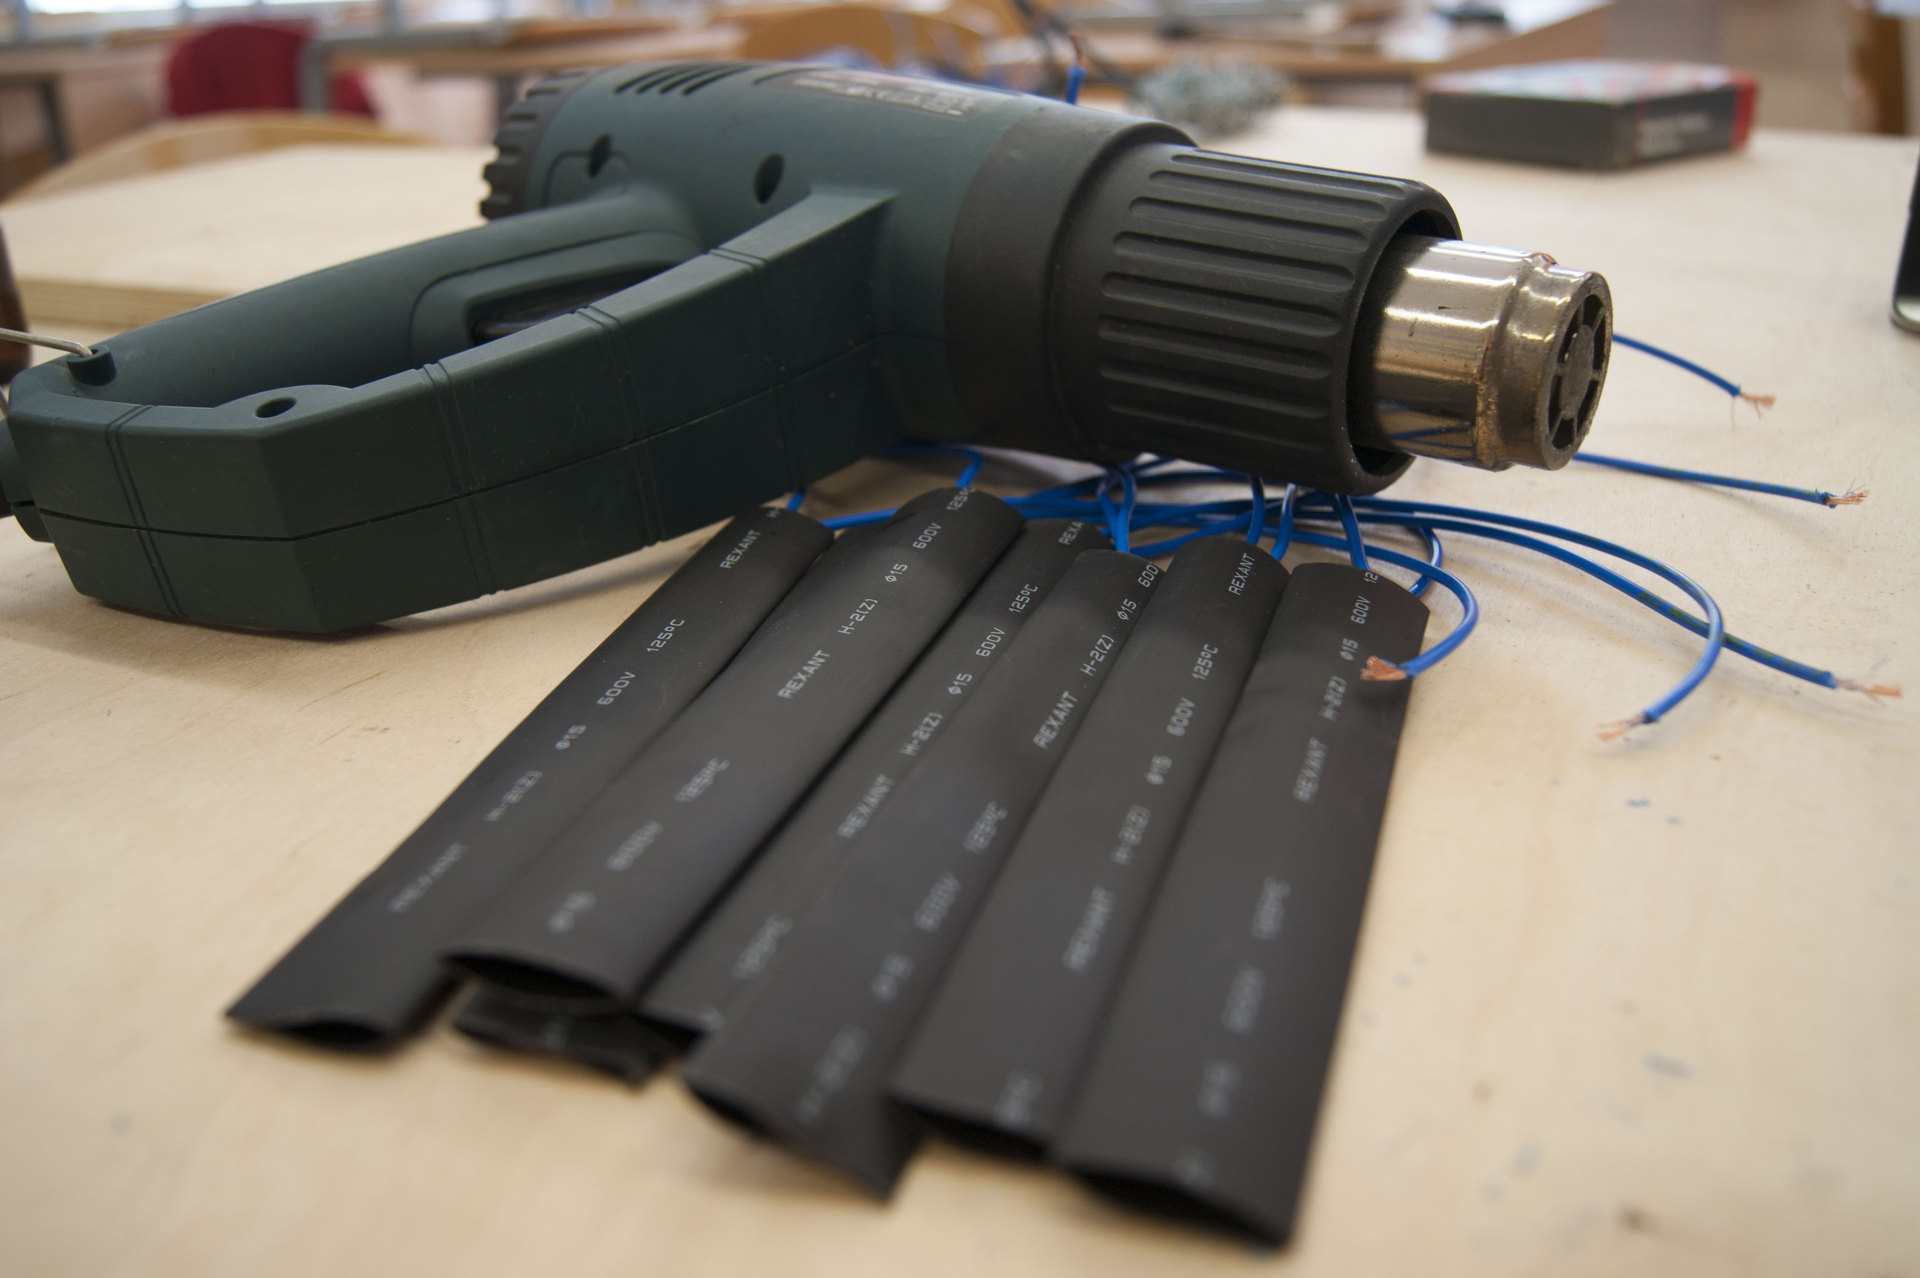
Shrinks shrink industrial hair dryer. If there is no hair dryer, a gas stove will do. The desired effect will be achieved. Bonus can get the smell of burnt hair. By the way, if you slightly heat up the “tail” of the sensor, and then quickly clamp it with pliers or a screwdriver, you get an almost sealed case. This moment is in the video.

Just in case, the fruits of works are checked by a tester. In the free state of contact, of course, should not be.

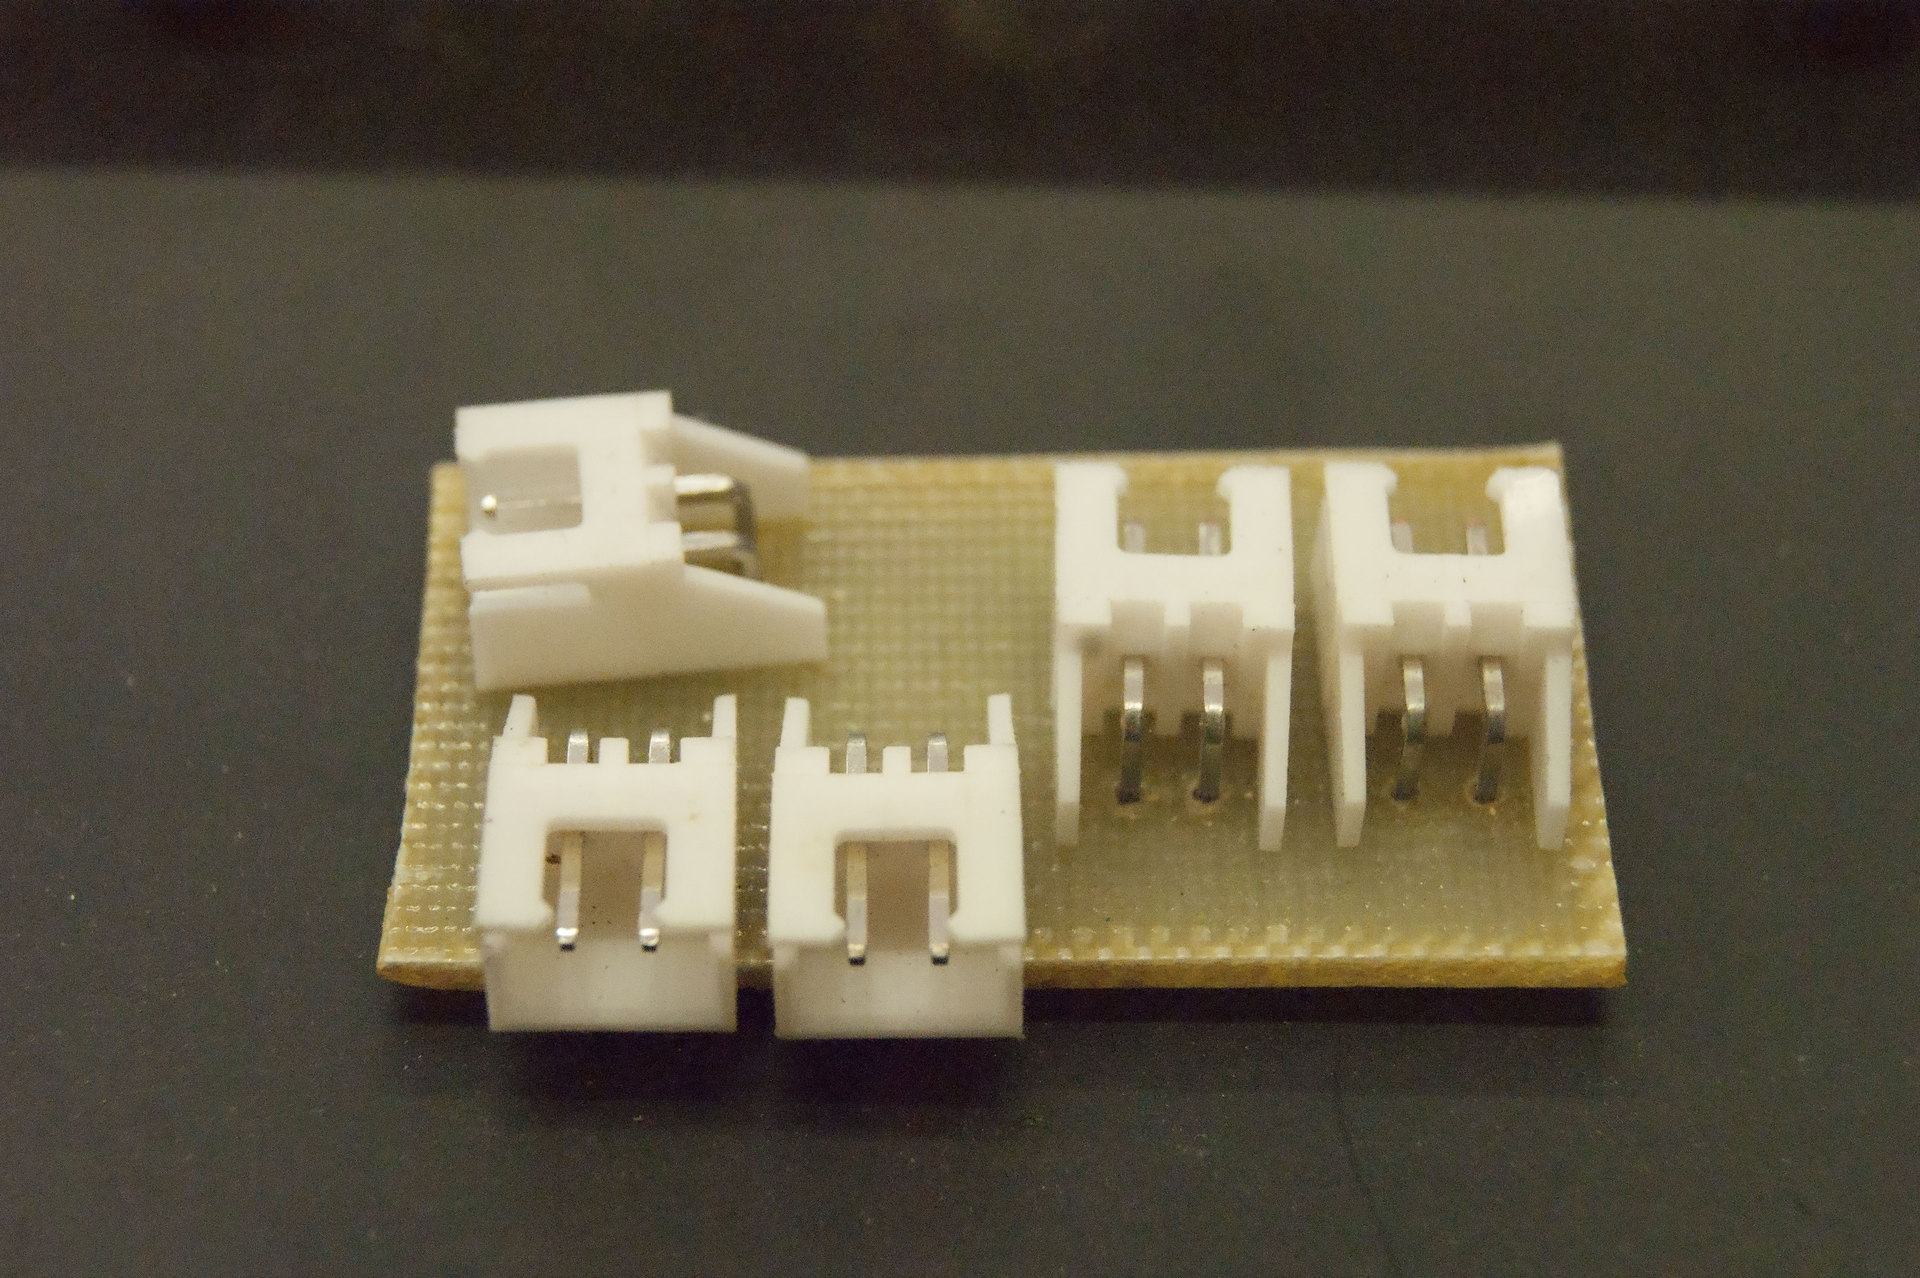
Now it is the turn of the papa-mama connectors.

We solder something (to be honest, I do not know how it is properly called) on the free ends of the wires. Here is an important note. If you have a thick stranded wire, it makes sense to bite off some of the cores. In other words, do not do as shown in the photo below, do not leave all the wires.

The message is simple: you can solder, but then you can not insert the “father” into the “mother”, because there will be no free space.
A properly made sensor is moderately beautiful and beautiful.

Besides, it does not experience any problems when connecting to the board.
A few words about the board. To be honest, from personal experience I can say that it is not necessary to make a garden with connectors and boards. You can take all the sensors in the button on the "twist", pour solder, and then hot melt. And this design will work fine. At least the first samples of rugs still work, but it's been 6 years already.
But back to the boards. They are poisoned by the well-known method ofcarrot and carrot printer and iron. After etching have the following appearance:
After cutting, at least strategic holes are drilled in strategic places with a millimeter drill.

As a result, after soldering, it turns out even beautiful. Back view.
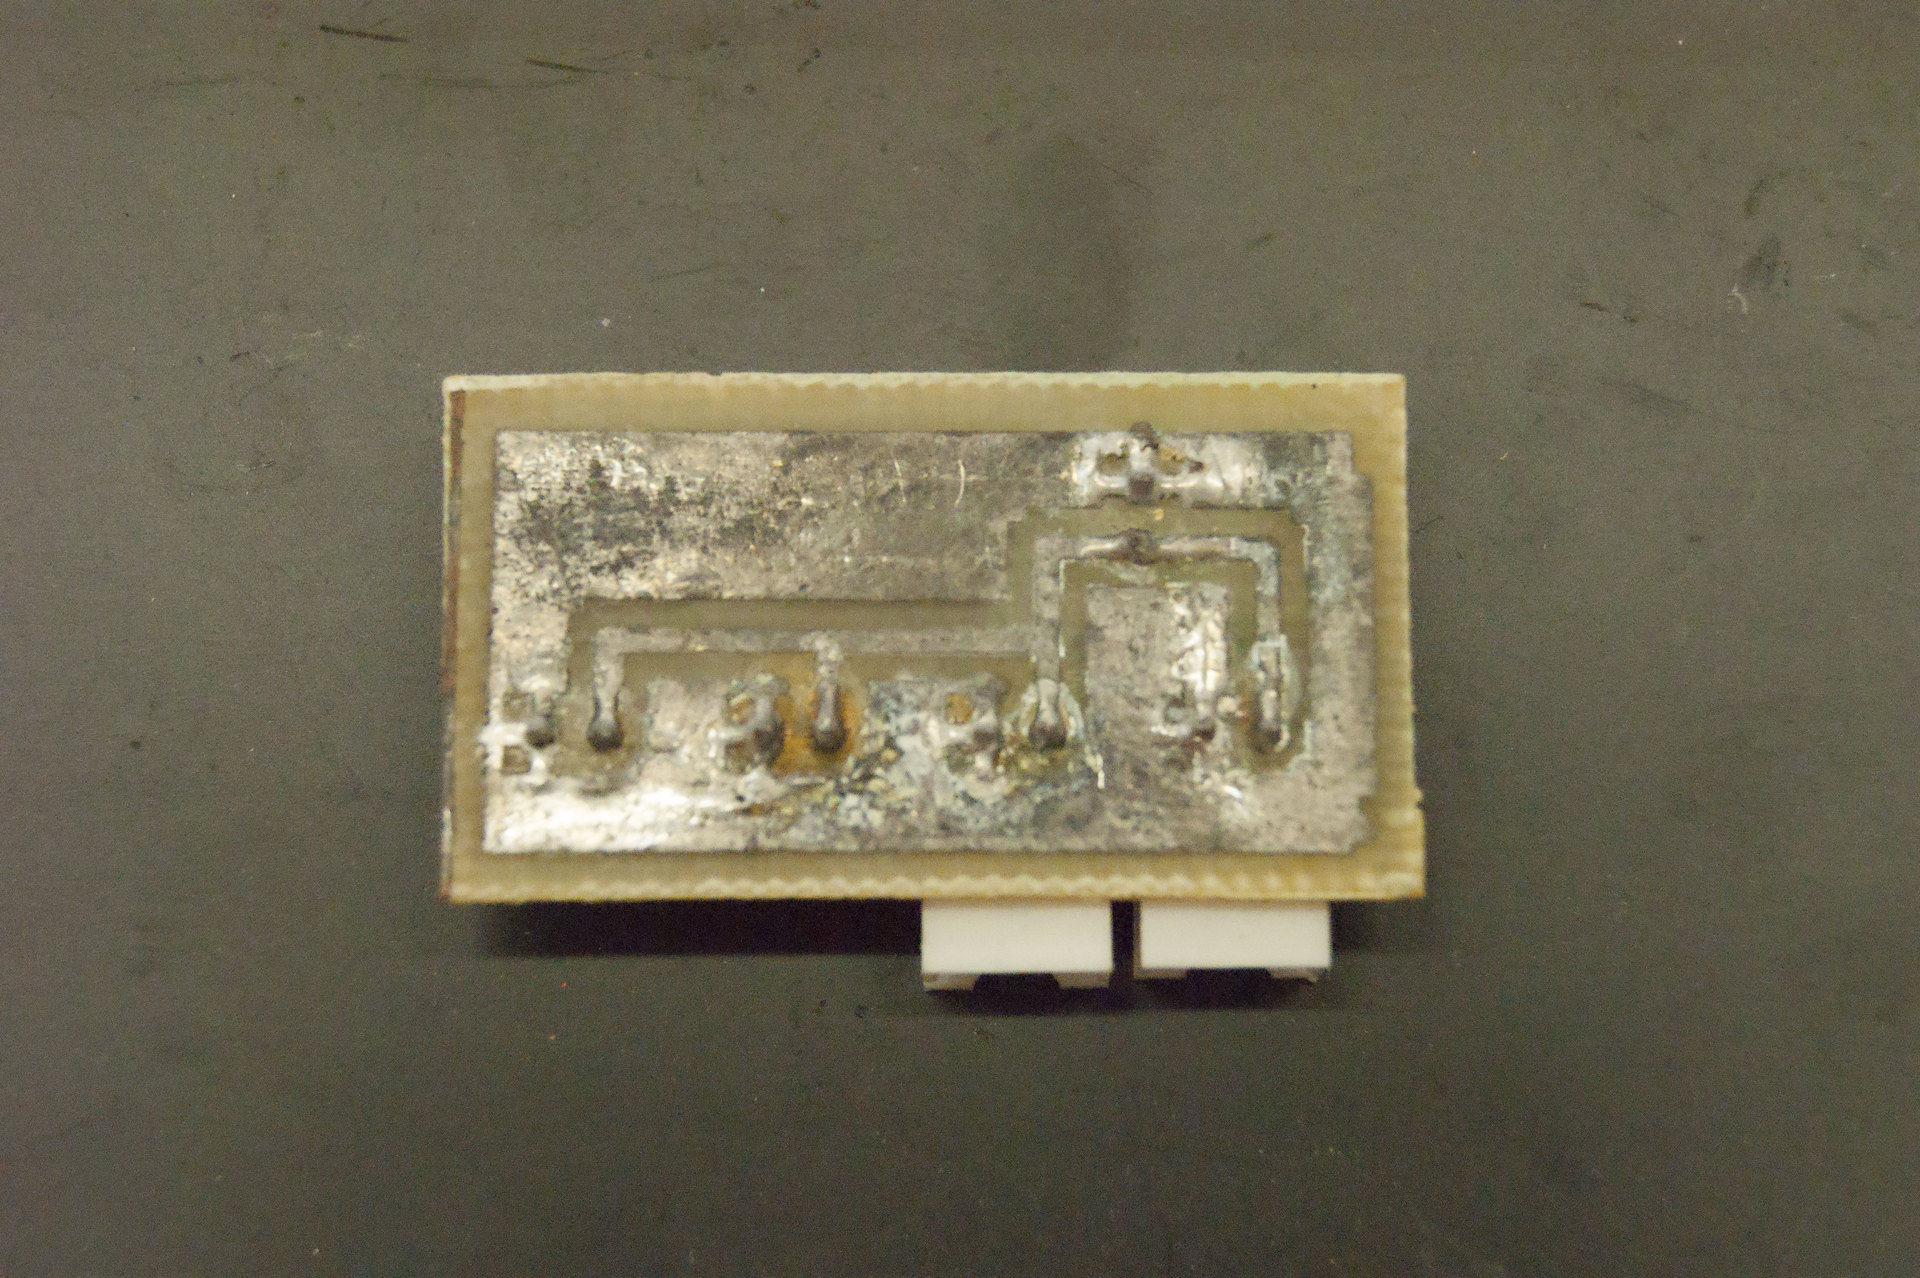
Front view:
And here we come close to the wiring.
Meticulous readers will consider a complex version presented in the photo above. I will tell you about the simplified version, implemented through a twisted pair.
It all starts with a “clutch” with an RJ-45 connector. It has 8 outputs, so it goes to 8 wires. Choose 4 "plus" and 4 "minus". Since the "minus" is common - we twist 4 wires into one. Believe it or not, twisted pair also contains 8 wires. On the "pros" and "cons" they are divided in exactly the same way. I, for example, assign all the color "minuses", and all white and color - "pluses". Ultimately, each button in the rug should come 1 "+" and 1 "-".
To preserve the wiring, it should not be laid on top of the base, but on the previously made grooves in it. There are 2 ways:
I went in a modified second way. I did not have a milling machine, but I didn’t really want to buy one at a time. But there was a dremel with a set of all sorts of things. Among other things, there were found universal drills. Their feature in sharpening. The drill can perform the function of the cutter. The video captures the process, so it makes no sense to describe in words. Better to see once.
When all the grooves are sawn through, it is time for the glue to melt. Stuck extremely useful for small quick repairs. Using thermogun we lay the wiring, gluing the sensors. Do not forget to periodically "ring out" the structure, so that you do not have to disassemble the finished mat to the ground.
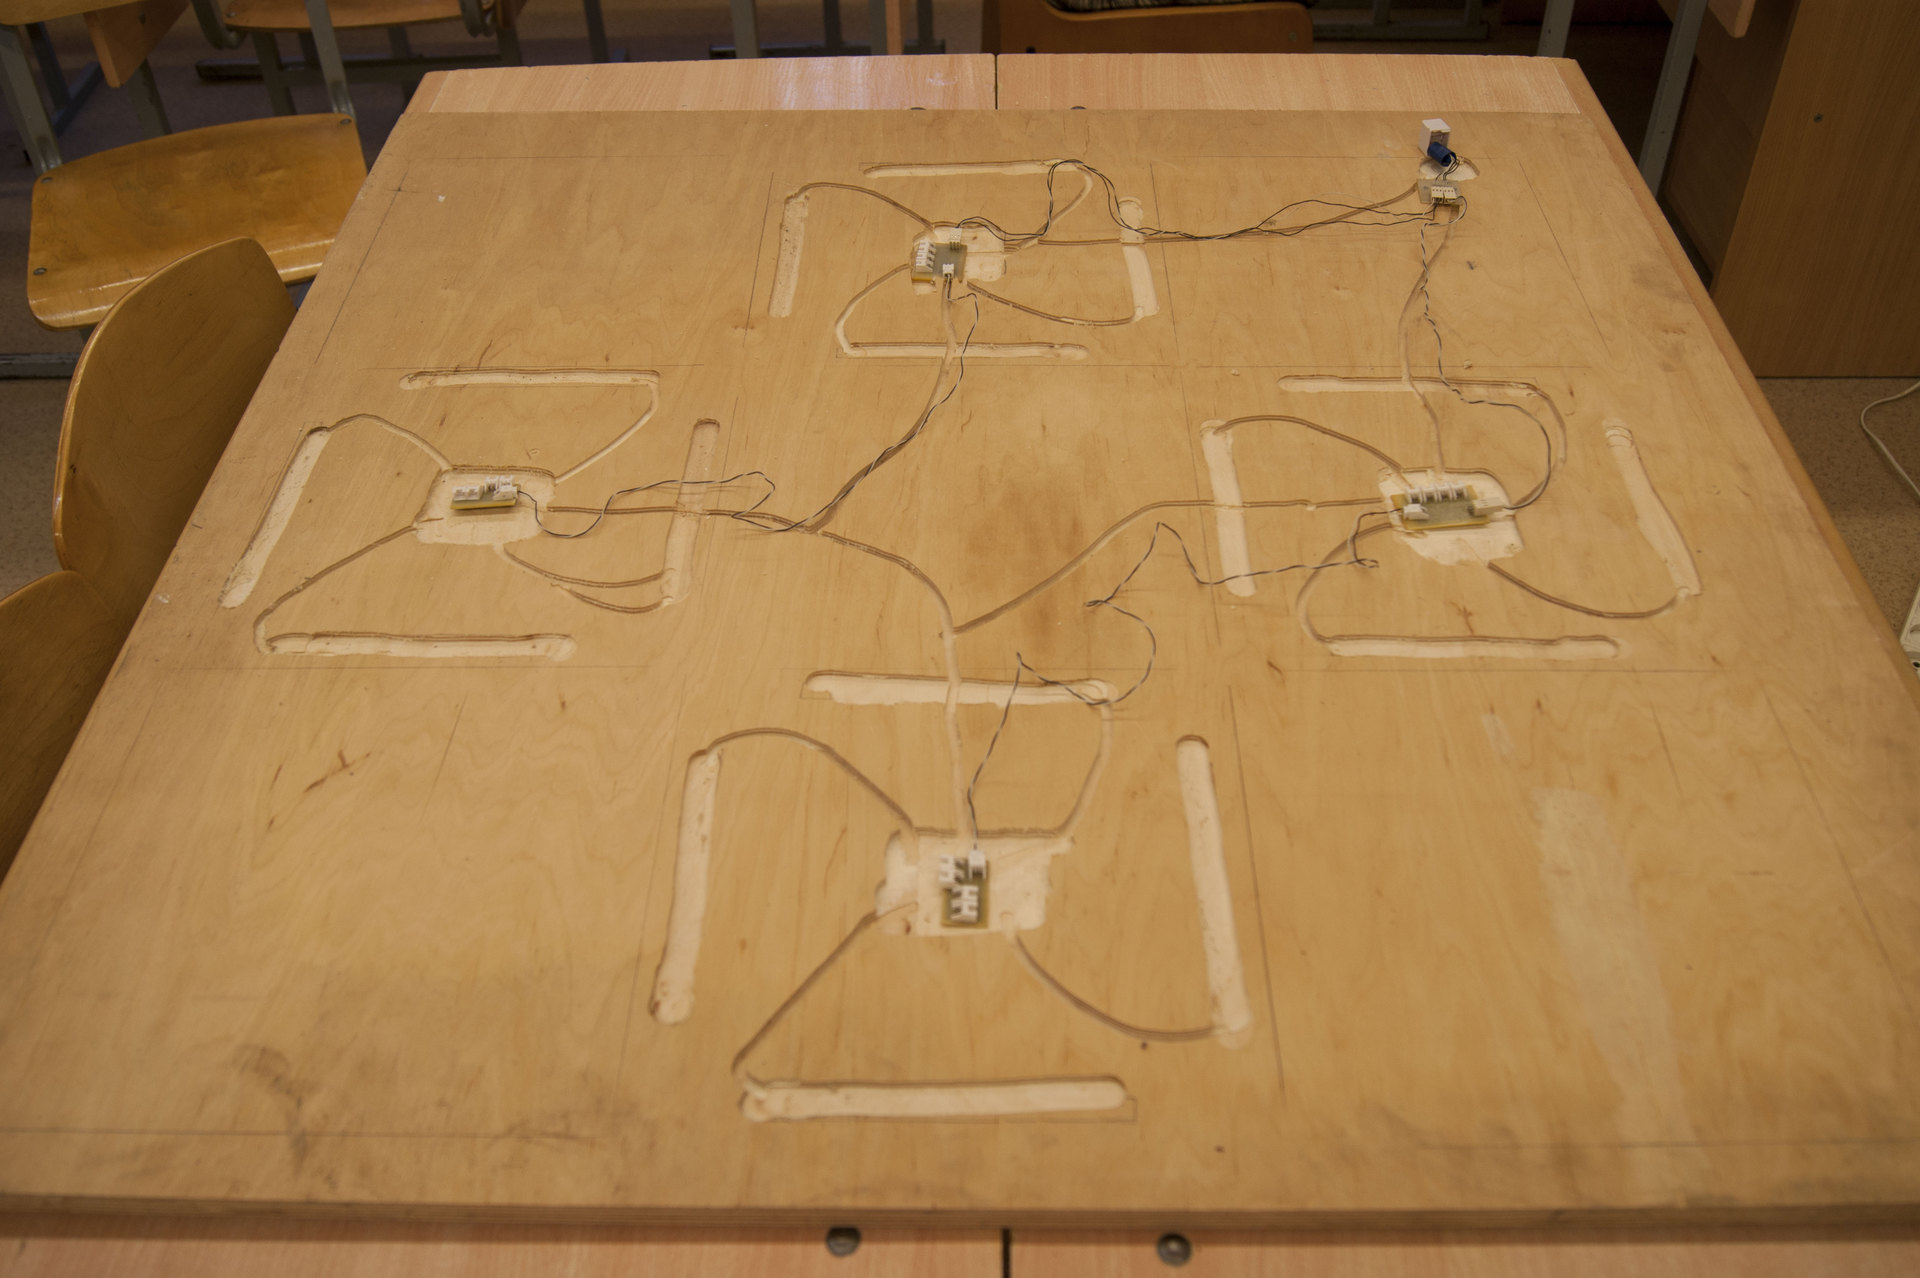
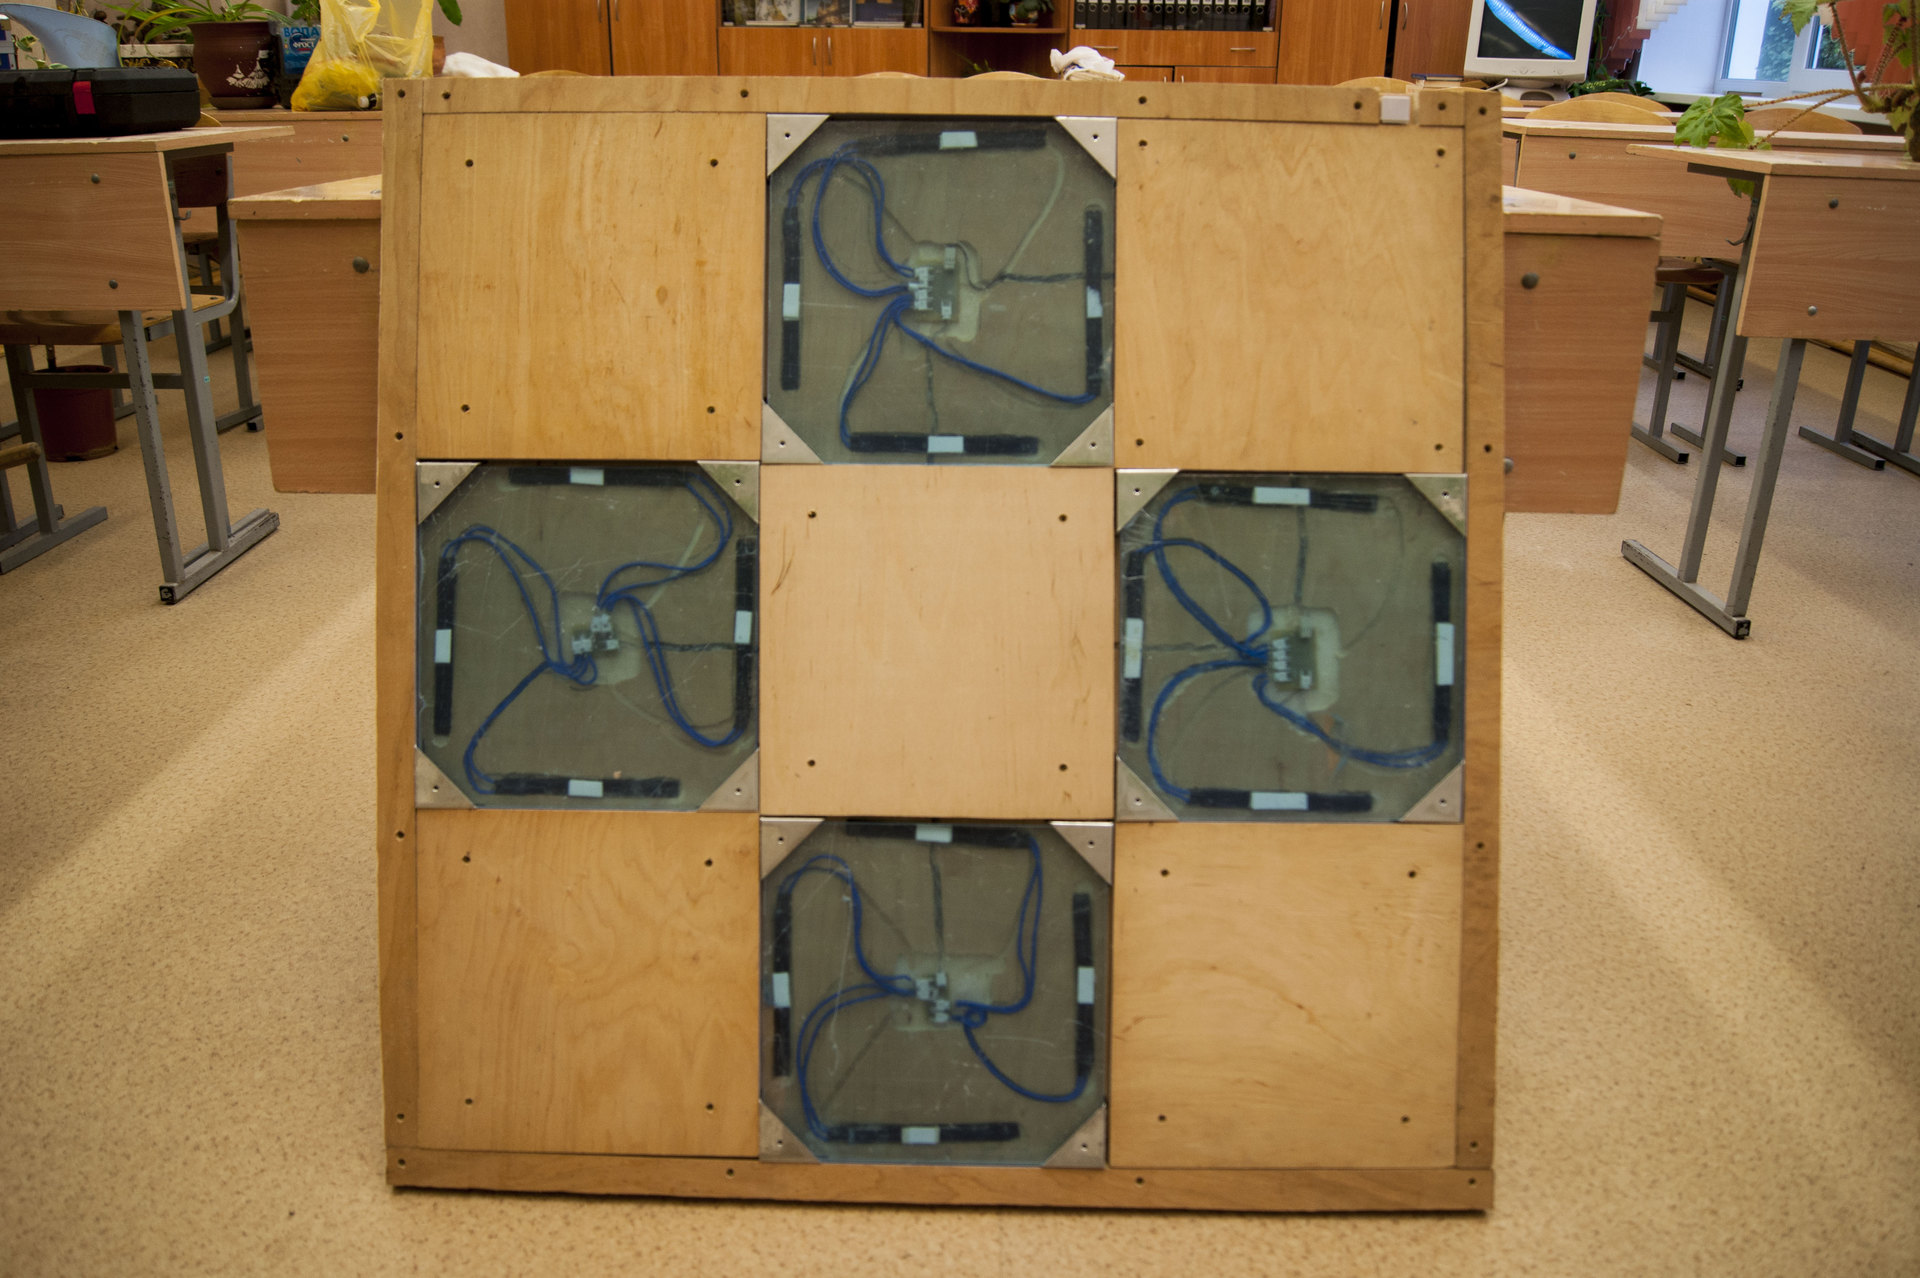
Well, already seen the light at the end of the tunnel. Finish line - assembly. Remember 5 wooden buttons, 4 plexiglas and 4 slats? It is their time.
It is curious that no matter how hard you try to cut everything smoothly, no matter how straight and square the blanks seem to you, at the assembly stage you will be haunted by a sense of universal curvature and clumsyness. Do not worry, this is the paradox of the curvature of space-hand-time. Without an additional 7 measurements, it is still impossible to fix it, so accept it.
No, there are still some tricks. If we assume that all the buttons and slats are crooked a little crooked, then there is a chance to put them together in such a combination, when everything rises exactly. In general, take and start to try. When the final placement is found, sign its place and direction on the back of the button. For example, LN - lower left, C - central.
Starting to build this "ikebana" is better from any angle. As soon as it happened - bait on the screws. Plexiglas baiting on screws is not necessary.
That plexiglas did not drop out, we fix it with furniture corners. Nuance: the corners of the height more than necessary. Option two:
I chose the second option, drilled with a Dremel.

In the course of the assembly do not forget to ring the structure.
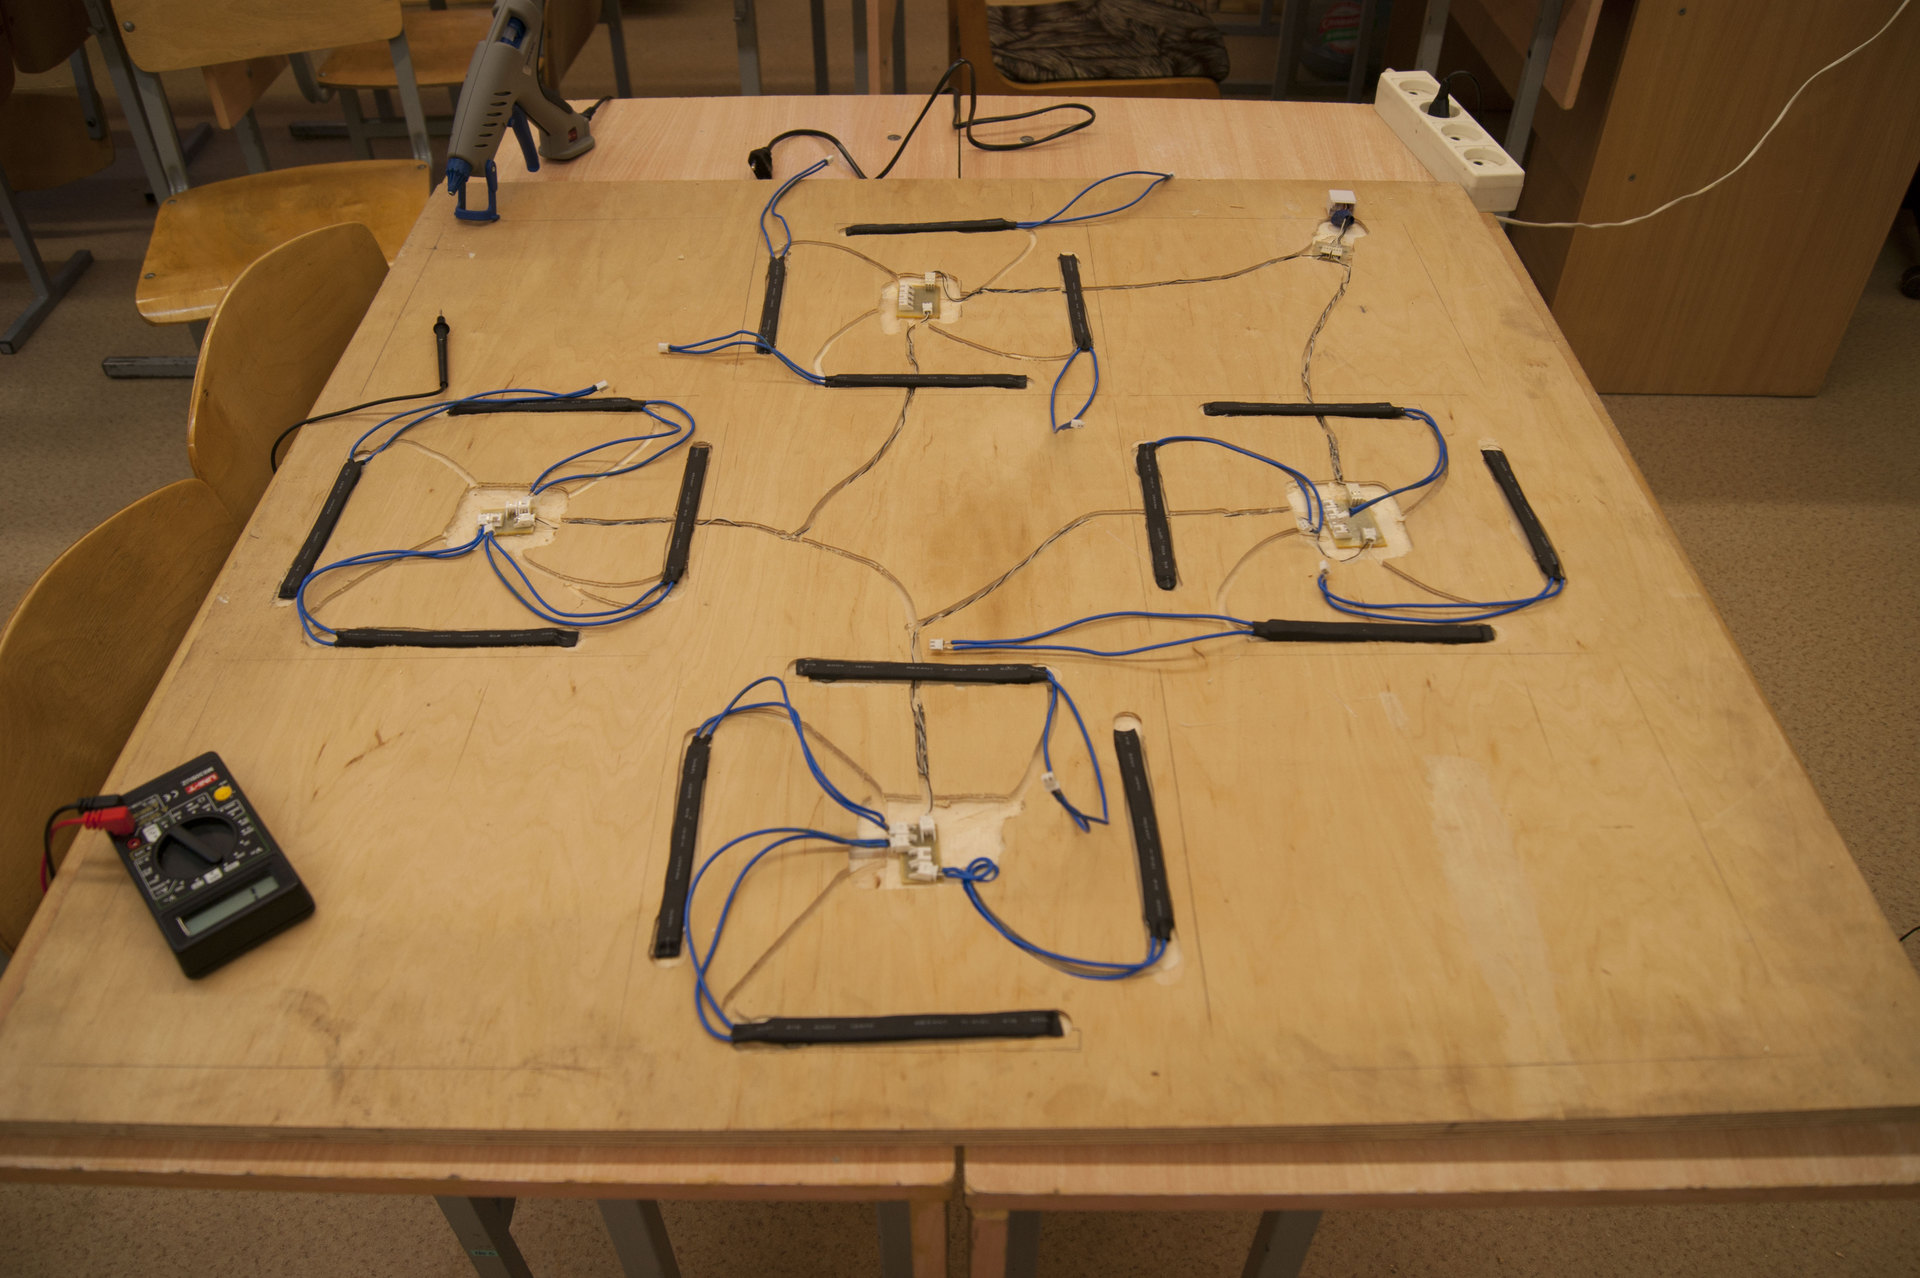
Finally, the most important component without which nothing will work is tape on a foam base. You can laugh, but it is. Even in the original Japanese arcade machines, we found it.

It is glued with small strips of 3-4 centimeters in length along the center of each sensor. Since we made the sensors ourselves and did not buy them at the factory, several layers may be needed. Usually 2-3. Ultimately, the button should be pressed with some hand force. Not from touch, but from the effort! It is important!
In parallel with the assembly of the mat, its link with the computer is also assembled. Since Windows does not understand the EPRST \ EKLMN protocol, you will have to “make friends” with the computer in the traditional way, that is, via USB.
For these purposes, buy the cheapest gamepad. On his board and to be soldered end of a twisted pair. Just in case I will remind the order.
All this has already been done. Further.
So, get drunk on the board as follows.

As you can see, the "pluses" are soldered to the action buttons. The "minuses" are twisted-soldered together and soldered to the "ground".
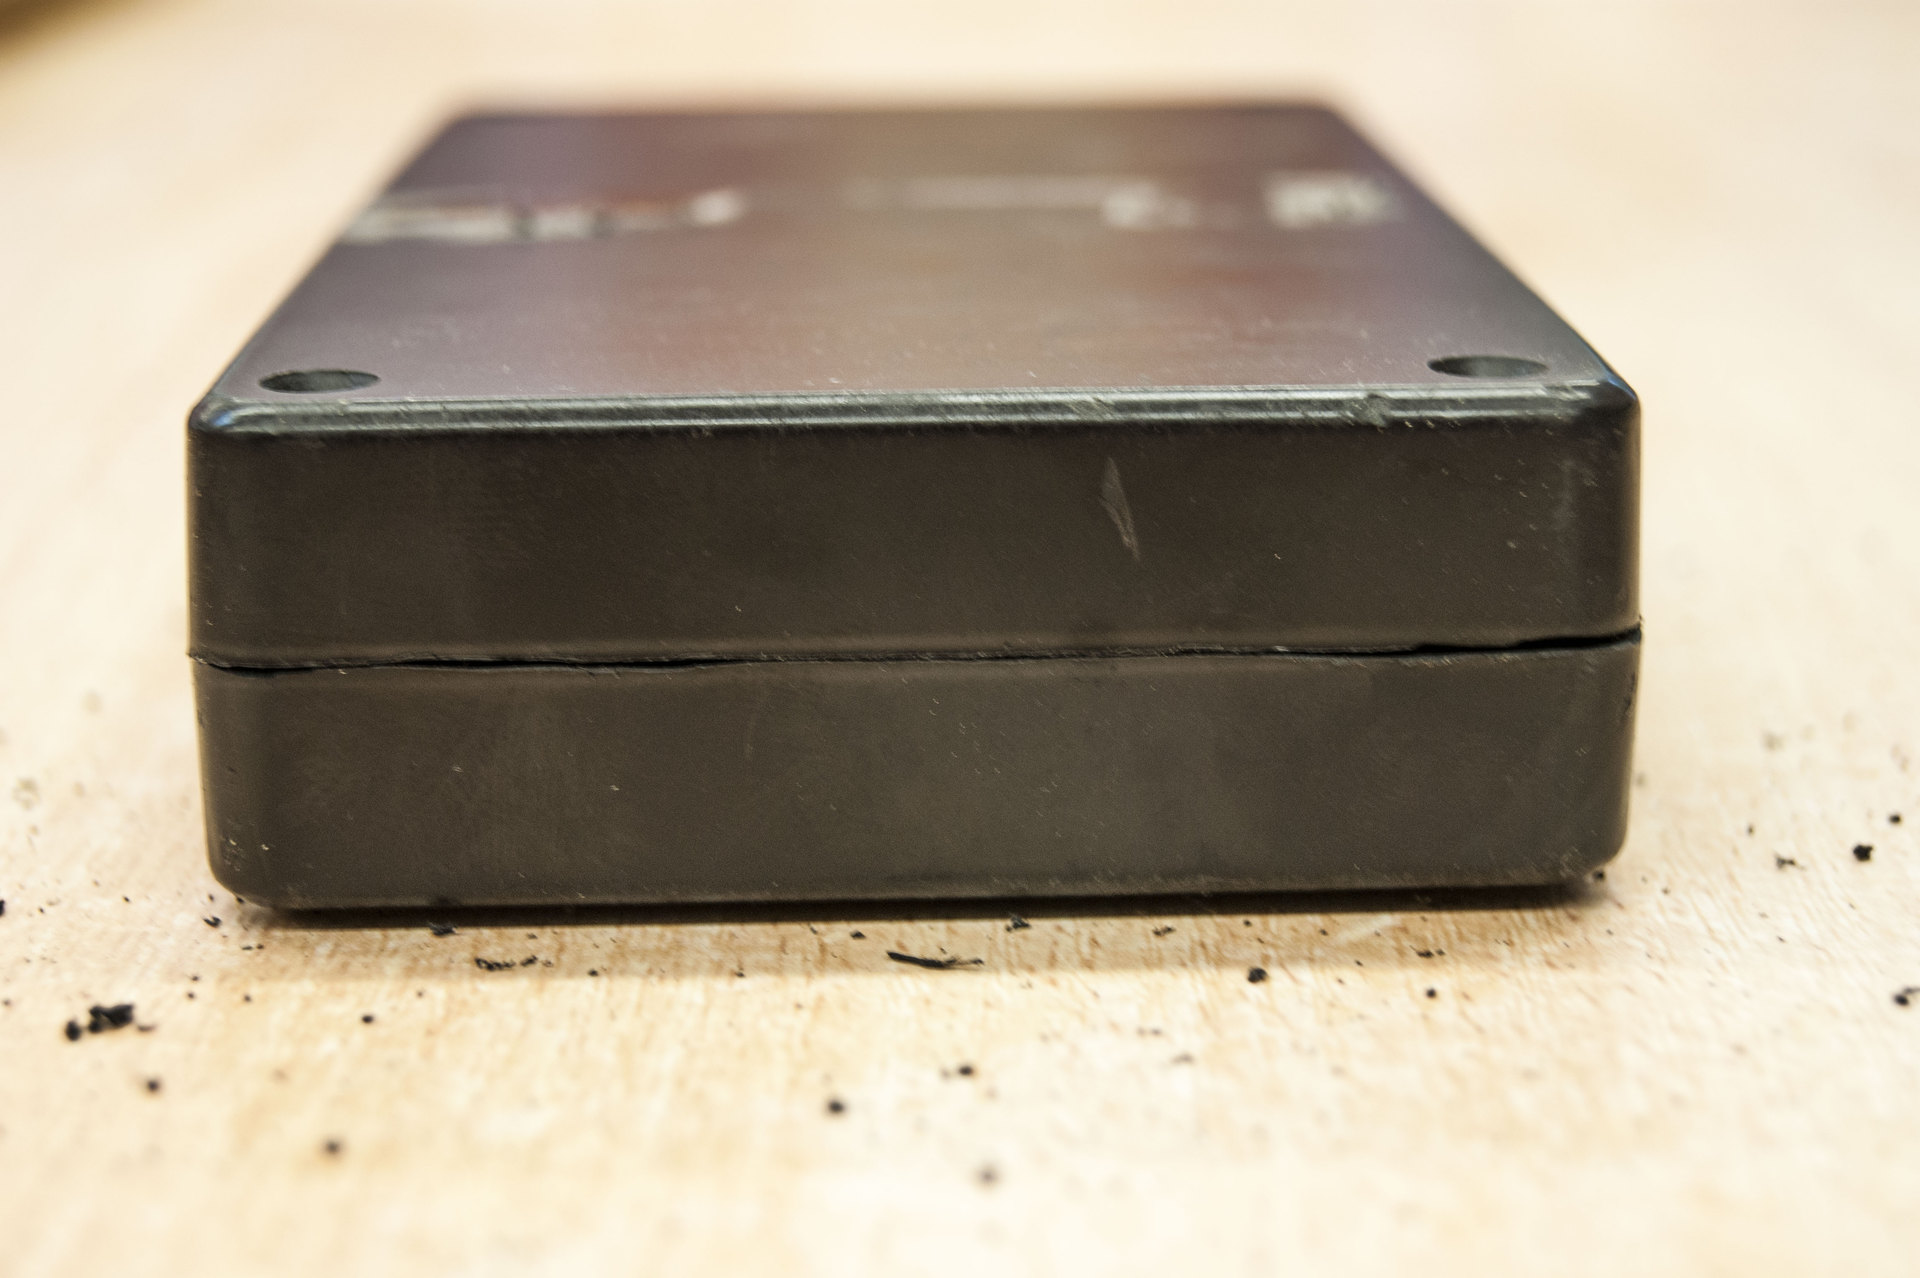
In principle, everything is ready. But you can bring beauty. For example, push the board into the case. I bought it on the collapse of the radio market. True, then it turned out that these are just two covers that are not intended to be connected at least in the semblance of something whole. I had to polish a little.
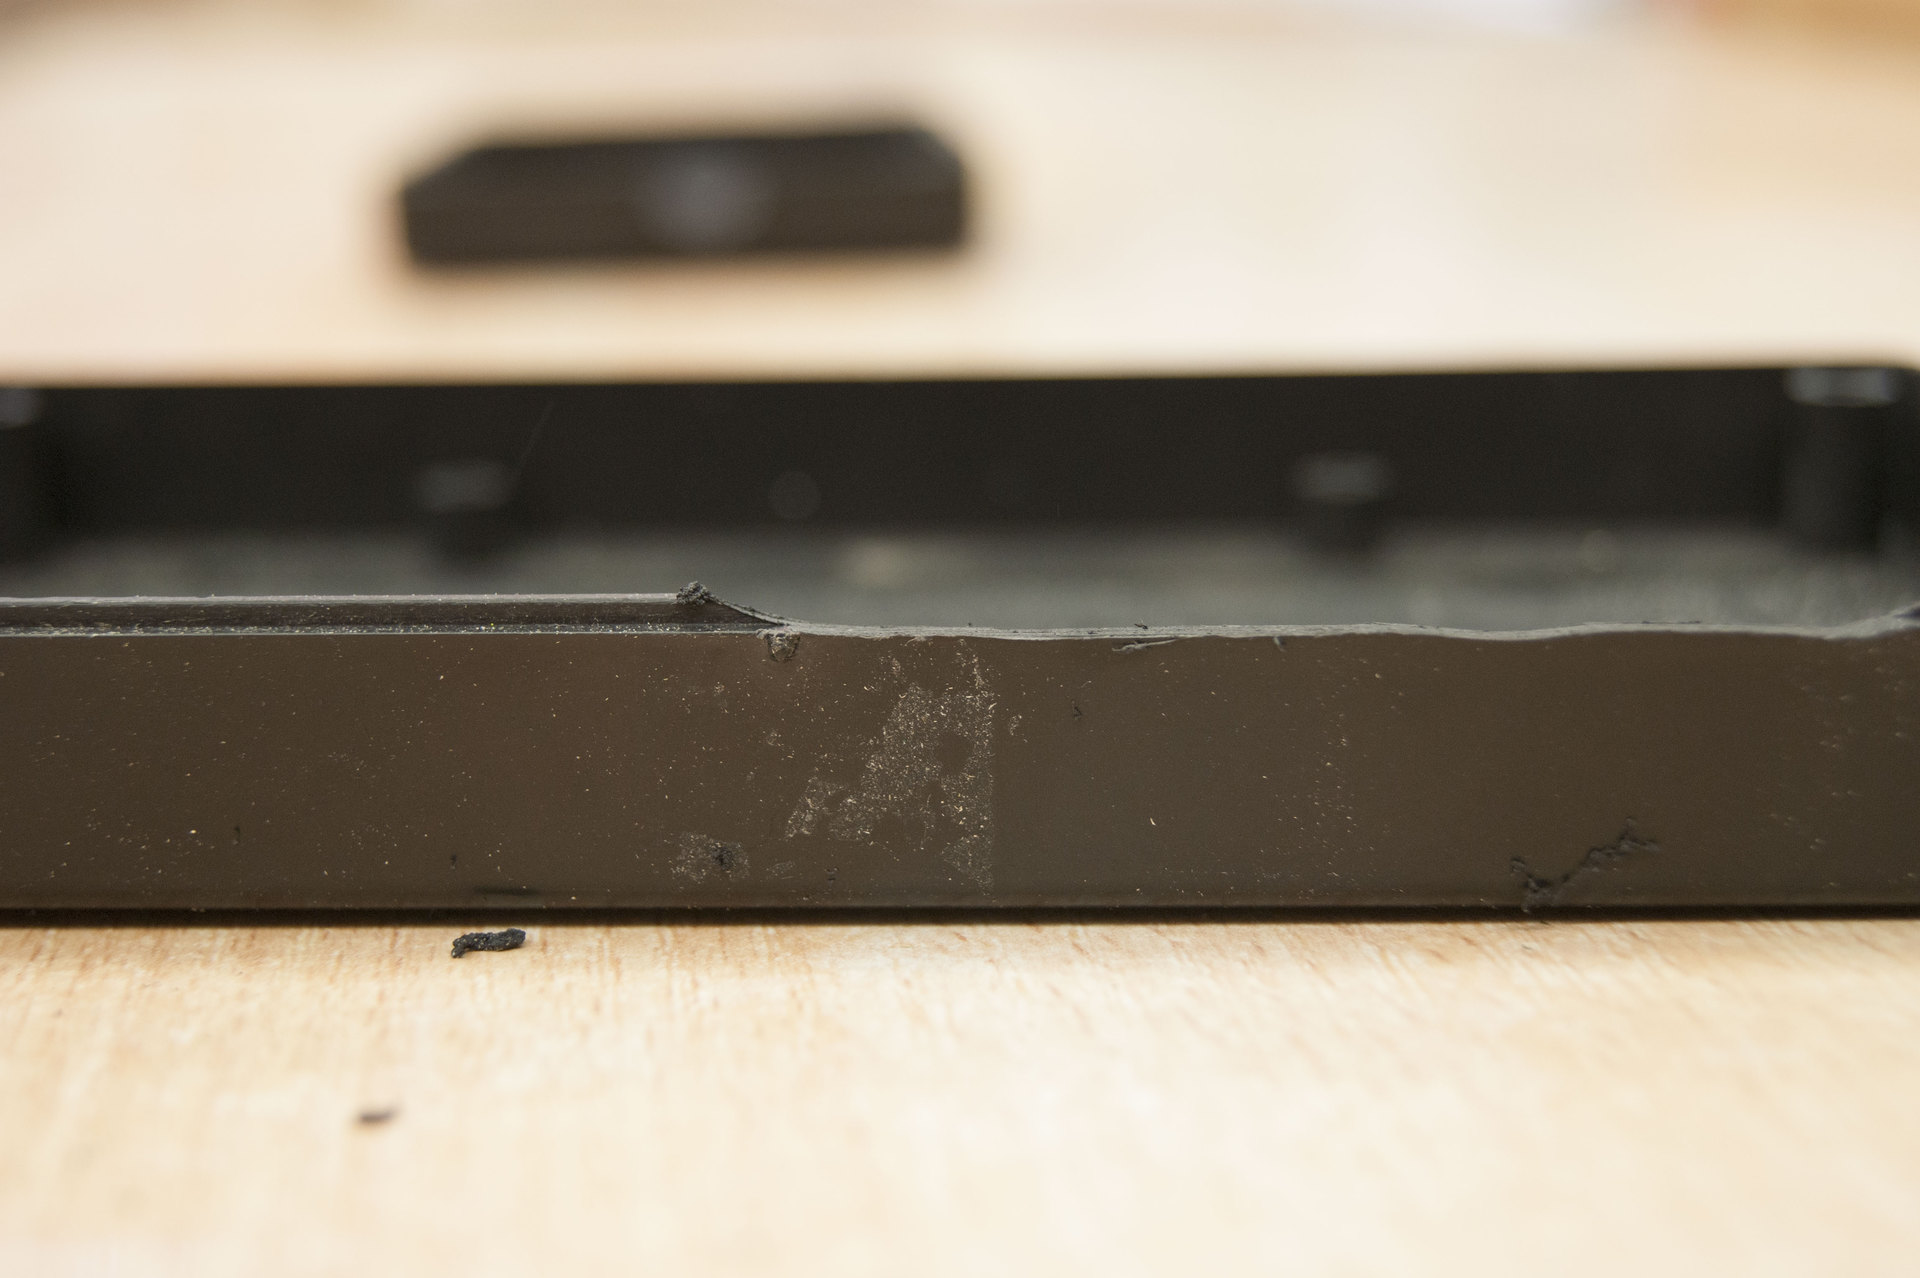
In general, it turned out sanely. With the help of sandpaper for Dremel he removed the excess, and with the help of the cutter he made a notch for the wire.
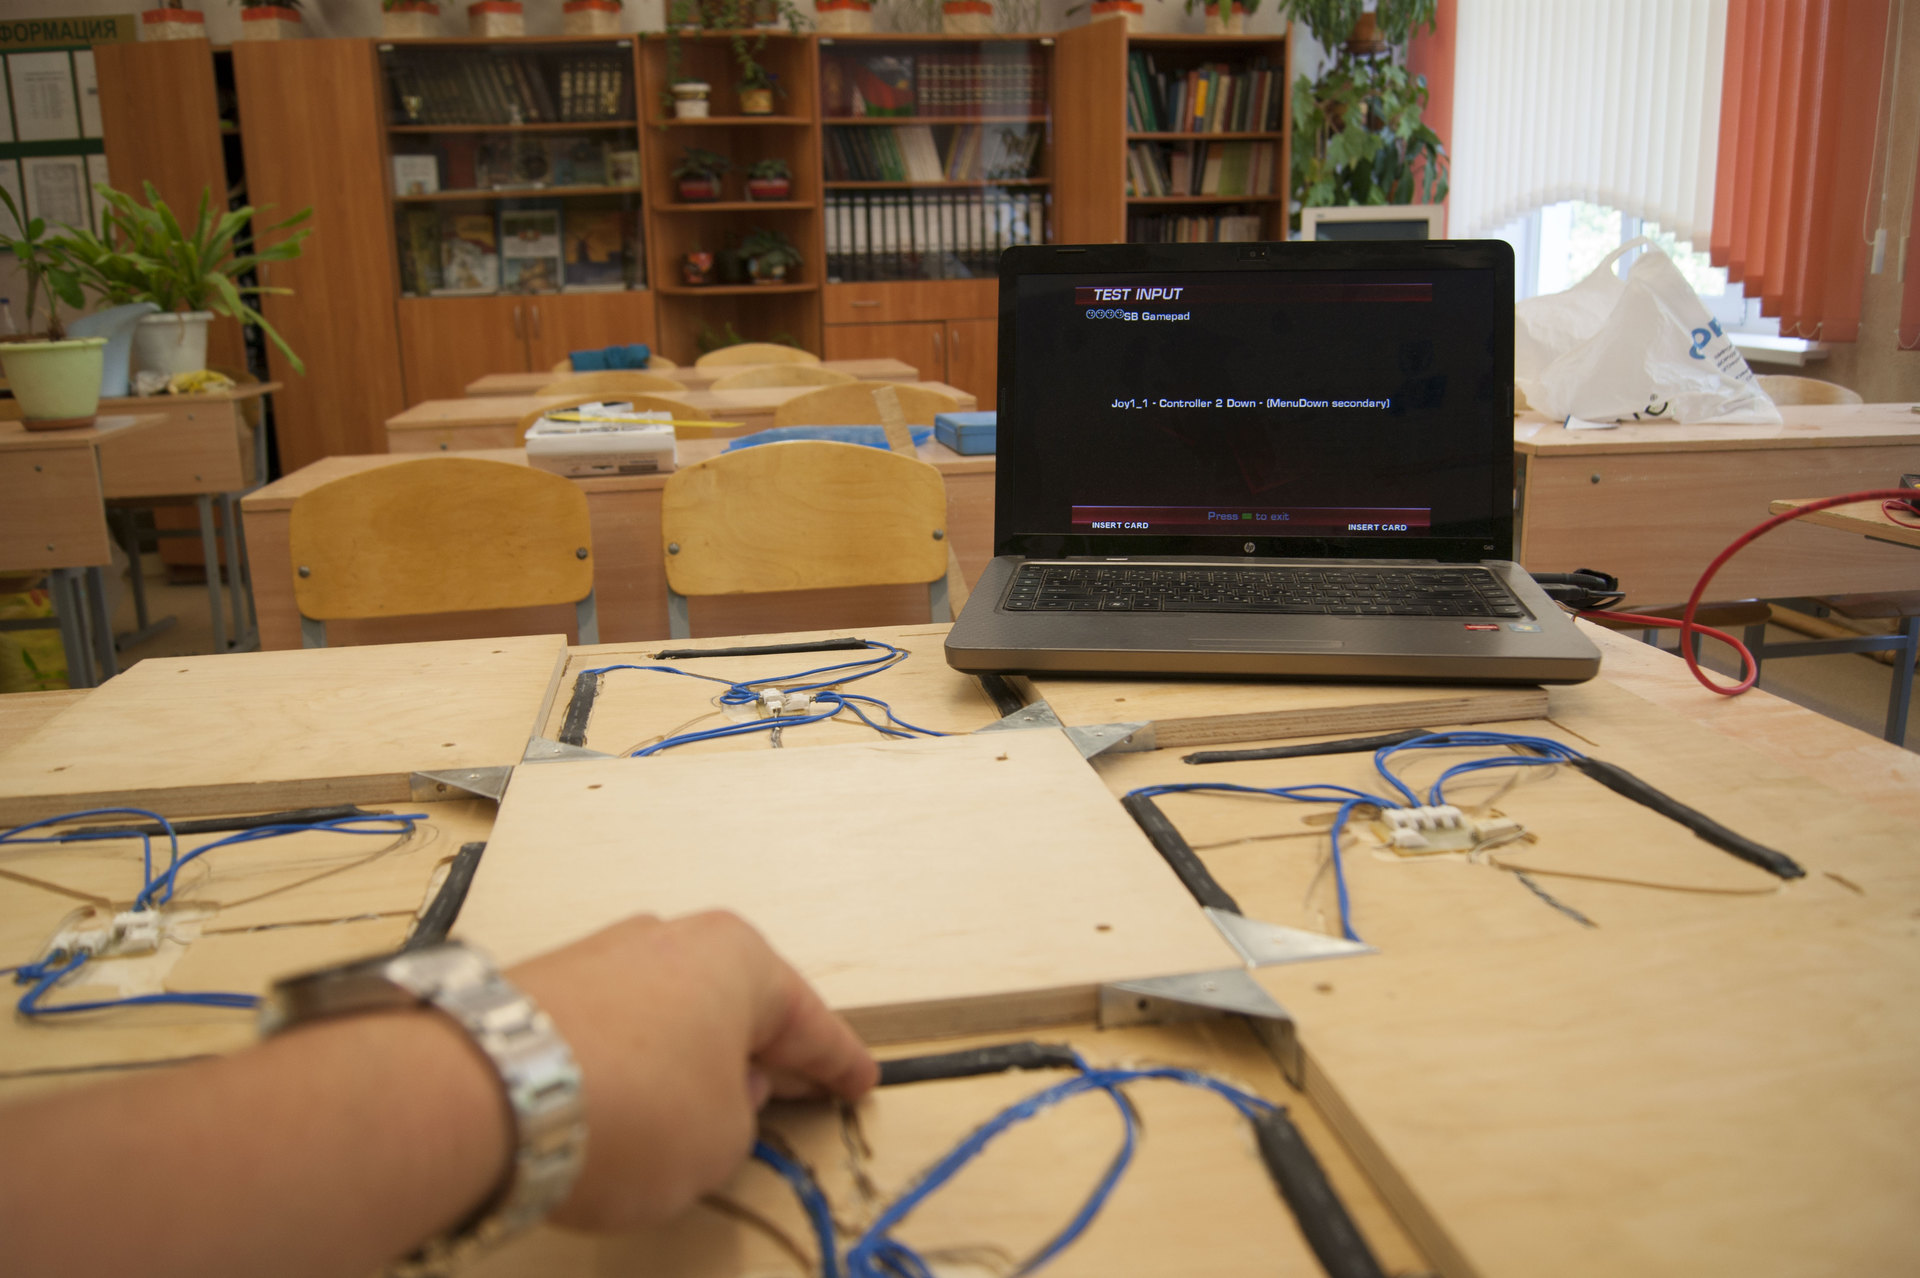
Finally, all the pieces of the mosaic are ready and you can connect the mat to the computer for testing in the game.
A few words about her. To play on the computer, good people wrote a simulator of an arcade- controlled DDR machine called Stepmania . Then no less kind people based on Stepmania created a modified version - In The Groove (ITG). It is with her, or rather with the OpenITG project, that I work. Download distributions here . You can independently assemble from source . In general, setting up the game, downloading tracks and even creating your own is a topic for a separate post. If the community is for, let me know about it in the comments. In the meantime, back to the mat.
The final look of the patient.
You can get out on such a rug a lot. Unfortunately, I have long been out of shape and on the video I give out only sluggish fluttering. But once it was like this:
It is impossible not to notice that the appearance of the rug is not aesthetic. It does not matter. First, it can be painted.
Wooden parts are unscrewed and painted. Plexiglas is painted from the inside.
Secondly, if you do not want to work with paint, you can print stickers.

You come up with a drawing of 9 squares 29 * 29 cm. I was not mistaken, the buttons are 28 * 28 cm, and the stickers are bigger. But you remember that the buttons are not quite square?
That's all. Questions, comments and suggestions are welcome.
Content
- What's the post about
- Preparatory stage
- Chronicle of the bark beetle (markup and milling)
- Solder me, solder me completely (we make sensors)
- Holy couple (do the wiring)
- Tyap-loop and in production (build)
- USBsexual (we are friends of a dance platform with a computer)
- What's next? Instead of totals.
')
What's the post about
But first, a small introduction, so that everyone understands what will be discussed below. A great Wikipedia article will clarify.
Dance Dance Revolution (DDR) is a series of music video games from Konami Digital Entertainment, Inc., also known as the Dancing Stage. The game takes place on a dance platform with four panels: "up", "down", "left" and "right". During gameplay, a sequence of arrows moves across the screen, which corresponds to the musical rhythm of the song being played. The player must press with his feet in time to the music corresponding panels at the moment when the arrows coincide with a translucent stencil, usually located at the top of the screen. Each time you press the player correctly, the level of the “scale of life” is gradually replenished. For each miss, a certain amount of energy is taken from the scale. A round is considered to be lost if a player at least once during the passage of a song allowed the level of the “scale of life” to drop to zero.Well, if you explain clearly, it is better to use the services of Jean Reno and the film "Wasabi."
Historically, the game in Russia, Ukraine and Belarus gained popularity among anime fans, gradually singling out into a separate sports area. Gradually, instead of “nyakayuschih” girls, guys appeared around the slot machines, strongly sticking in “To Do List”, discussing the advantages of this or that “dance” technique and desperately arguing about choosing the right shoe “for step”. Soon the first championships loomed on the horizon.
And here there was a problem. Success in the game is directly dependent on the number of workouts. You could train well only on the slot machine. But since most of the players were of school and college age, only a few could afford full-fledged training. After all, everything costs money, and tokens are no exception.
The way out was obvious: to find the "home" version of DDR . Alas, the hopes did not come true. No, home versions existed, but were either substandard or not affordable . In addition, delivery sometimes increased the cost of the dance platform itself by 2 or more times. And it is in Russia. About Belarus, even the speech did not go.
It was with this state of affairs that I and jsirex , who lived in the glorious city of Minsk, turned out to be. Not finding an adequate option for reasonable money, we decided to build our own dance platform
- cheap;
- durable;
- not too heavy (easy) and not too bulky.
- The accuracy of clicks and sensations from the game should not differ from the arcade machine.
The structure, which will be discussed now, is the fruit of two years of joint work. Retaining the original form factor, inside the rug has changed dramatically several times. I would like to share the assembly instructions for the final version with the community.
For clarity, the assembly process was filmed on video. Therefore, anyone who wants to first see the final result, and only then read a sheet of text with photos, I ask here:
In the meantime, proceed to the assembly.
Preparatory stage
The time spent on the assembly of the rug can be divided into two periods: theoretical and practical. The first is the time you spend on purchasing the necessary supplies and tools. Under the second - directly build time. If you do not be lazy, then alone the mat is going for 4 days.
Let's go back to shopping. You will need:
- Clamps (2 pieces);
- Screwdriver;
- Wood drill;
- Saw;
- Dremel;
- Scissors for metal;
- Tester;
- Square;
- Pencil;
- Screwdriver;
- Soldering iron;
- Solder;
- Rosin;
- Twisted pair;
- Hammer
- Industrial dryer;
- Glue gun.
All of the above was in my possession. Therefore, prices do not quote. The rest had to buy. Prices are relevant for Belarus in August 2014. Translated in USD at the rate of 1 USD = 10 000 BYR.
As you can see, prices for stainless steel and plexiglass are not indicated. In my case, I did not have to buy them - it helped jsirex . However, instead of a stainless steel, you can take any conductive material (not necessarily metal) with shape memory. For example, textolite.
With plexiglass more difficult. Sellers usually do not want to sell small pieces. But you can go to the trick. From plexiglas, we will need to make 4 buttons with dimensions of 28 * 28 cm. Therefore, we can take both a "square" of 60 * 60 cm and a "rectangle" of 30 * 120 cm. Take the glass right next to it or with a margin? It depends on how you cut it:
- Manually using a special plexiglass cutting knife (similar to a stationery knife). The glass is taken exactly in size. The cutting process is like working with a glass cutter. This method is very budget, but due to inexperience it is possible to break off the blank badly and negate all the savings.
- Laser cutting. Cuts perfectly to size, but is expensive. The peculiarity of the laser operation requires a "minimum offset" from the edge of the workpiece. That is, in order to cut a button 28 * 28 cm, a blank of at least 28.5 * 28.5 cm is needed.
At this preparatory stage is over.
Chronicle of the bark beetle (markup and milling)
You can start cutting plywood. The thickness of 15 mm is chosen by chance. One of the goals, as you remember, is weight. Too light a mat with an intense load will slip on the floor. Too heavy will be inconvenient to transport. For the first reason you should not consider plywood of 10 mm and less. In the second - 18 mm and thicker. In addition, the dependence of the cost of plywood on its thickness, it turns out, is nonlinear. Thus, there are two "finalists": 12 mm and 15 mm. I do not know how in other cities, but in Minsk 12 mm turned out to be rare. Looking ahead, I say, the mat assembled from 15 mm plywood weighs 18 kg.
Having decided on the thickness of the plywood, you need to cut this sheet into “parts”. From one standard sheet should be:
- base dimensions 90 * 90 cm;
- 5 buttons with the size of 28 * 28 cm;
- 2 slats with dimensions of 3 * 90 cm;
- 2 slats with dimensions of 3 * 84 cm.
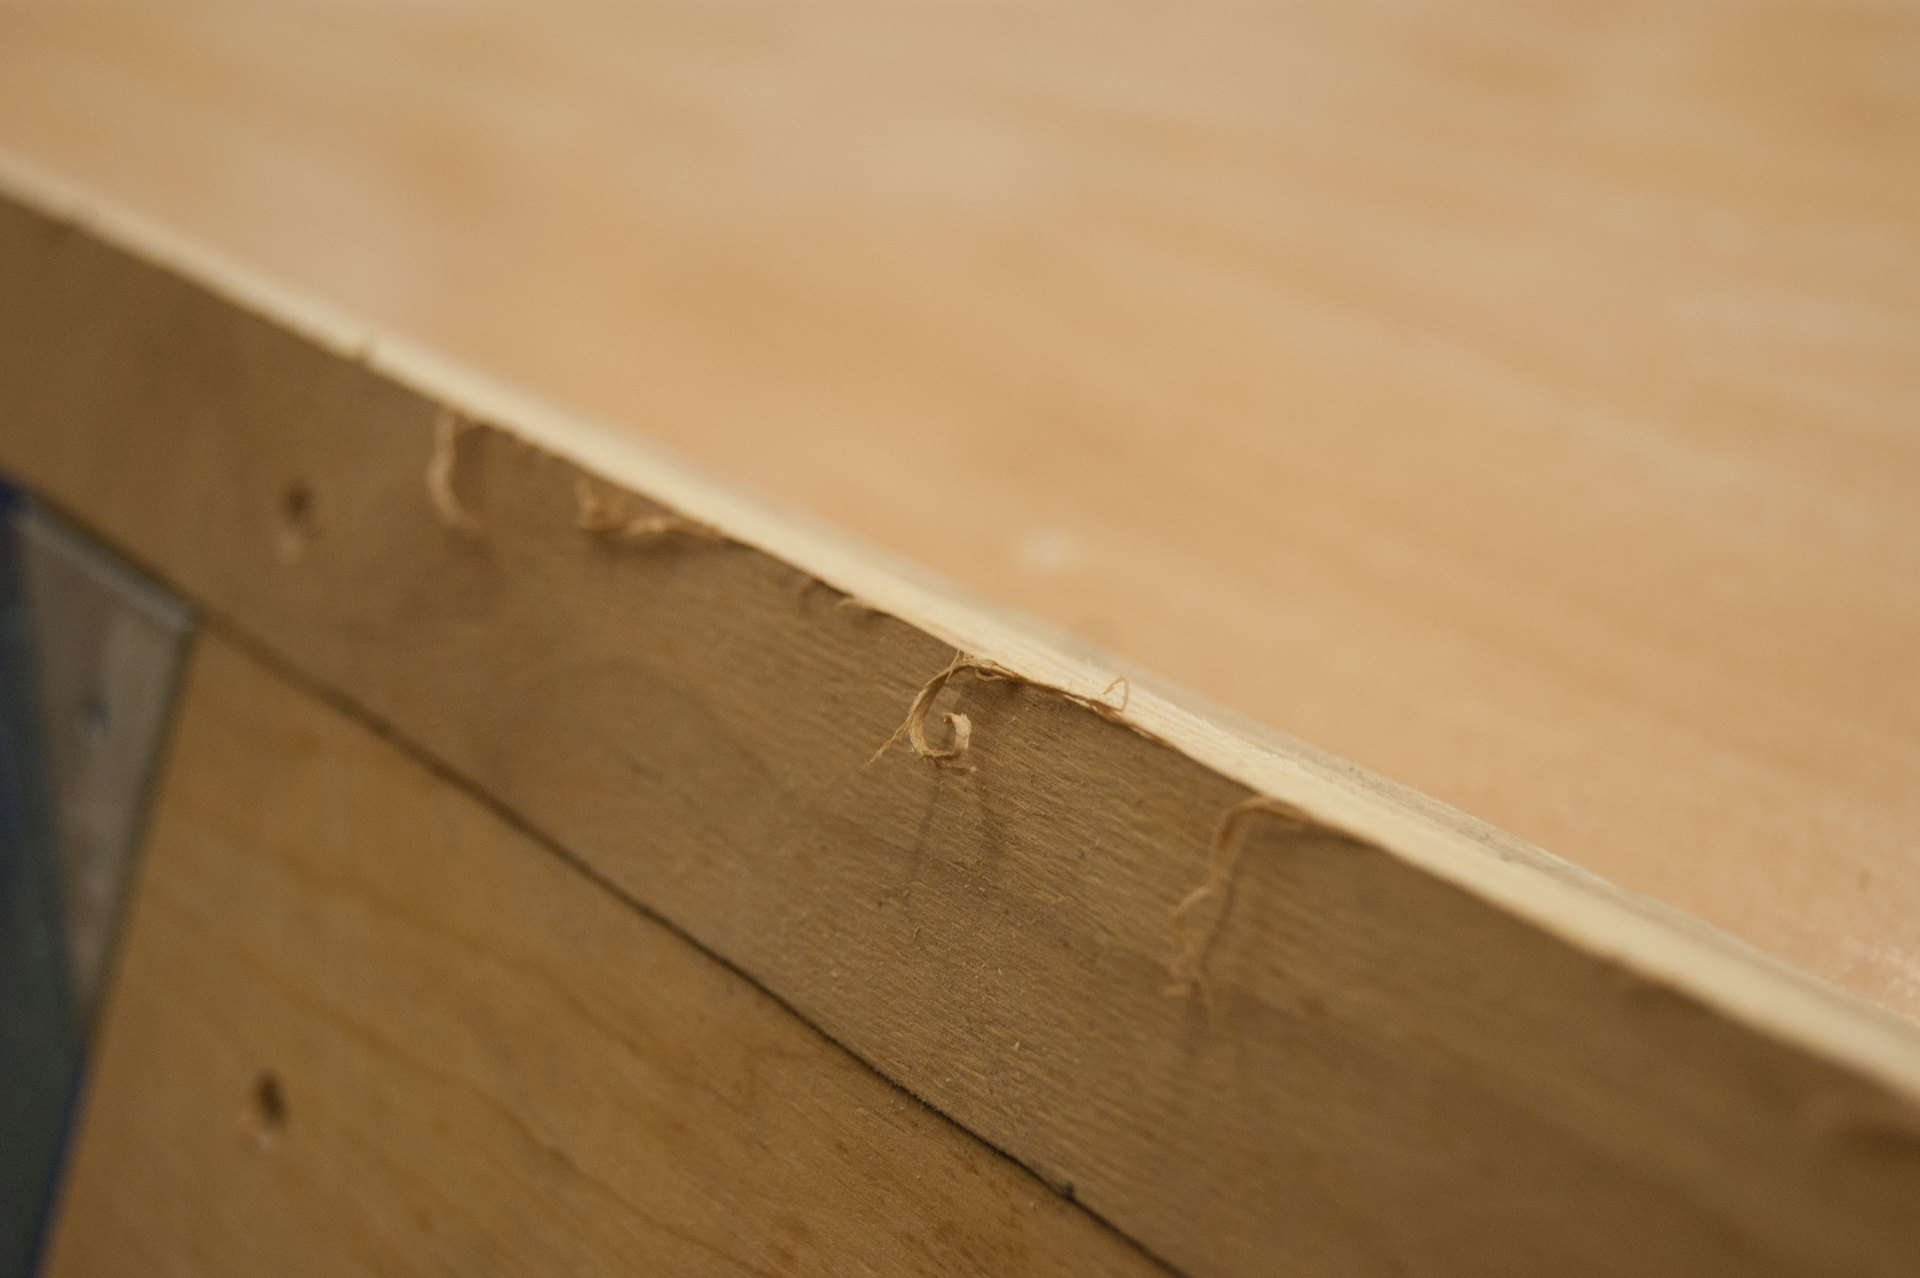
You can cut plywood with a hacksaw or a circular saw. In the first case, it will not work out very smoothly, while in the second case, it is important to take into account the fact that the circular will “eat” 2-3 millimeters. Therefore, all your sizes should "grow" by the appropriate amount.
Also, when sawing, burrs will inevitably remain.
You can get rid of them with sandpaper or with the help of a suitable tool.
Remember, when working with wood there will be a lot of chips. Lots of. Therefore, make sure that your family does not drive you out of the house. If everything is completed safely, feel free to proceed to the next stage.
Solder me, solder me completely (we make sensors)
Over the years of DDR hobbies, jsirex and I have been digging in arcade machines more than once.
On the one hand, there was a need (the machine is always put in order before the championship), on the other - it was interesting that what the Japanese were thinking about. All ingenious, as you know, is simple.
The sensor is the simplest design: two conductive plates separated by a dielectric at the edges and locked in the center of the player's weight. Each button has 4 sensors, one for each side. Thus, regardless of which part of the button the player advances on, pressing always works.
But enough words. We proceed to the assembly.
We draw textolite in squares of 1 * 1 cm. Stainless steel - strips of 1 * 15 cm. The most difficult thing is to cut the stainless steel. There are no problems if there is a Bulgarian at hand. The only caveat - you need to adjust the size. Instead of 1 * 15 cm there will be 1.1 * 15.1 cm. The Bulgarian will eat the excess.
But if such a wonderful tool in your arsenal is not available, begin "dancing with a tambourine." At first I decided to use the Dremel. In his arsenal there was just a cutting disc.
However, the stainless steel 1 mm thick did not want to spit on trendy wheels and grind it after 8 cm cut. Therefore, reluctantly I had to go for the “analog” tool - metal scissors.
He was a stainless steel in the teeth. But not a single barrel of honey in my memory was complete without a spoon of tar. And this case is no exception.
Scissors cut metal cheerful curls with burrs. Therefore, we first had to dub them with a hammer (blanks, not scissors) to a sane state.
And then “shave” the burrs with Dremel. He coped with this task perfectly and without loss of consumables.
Meanwhile, a soldering iron is heated. No, nobody owed me any money. Just came the next step in the manufacture of the sensor.
In terms of soldering, there are no subtleties. Ludim wires, drip orthophosphoric acid on the bare edge of a strip of stainless steel and solder.
It may not look very aesthetically pleasing, but you can tear off the figs.
PCB squares are attached to the resulting blanks using tape. He acts as a dielectric. On one blank, it is attached on the soldering side, on the other - from the "tail" side.
I repent, I used black tape instead of blue, so I can’t vouch for the durability of the sensors.
Then two blanks are fastened at the edges with tape. The final version below.
It's time to do beautiful. For this you need shrinking. With a sensor size of 1 * 15 cm heat shrinkage with a diameter of 15 mm is perfect.
Shrinks shrink industrial hair dryer. If there is no hair dryer, a gas stove will do. The desired effect will be achieved. Bonus can get the smell of burnt hair. By the way, if you slightly heat up the “tail” of the sensor, and then quickly clamp it with pliers or a screwdriver, you get an almost sealed case. This moment is in the video.
Just in case, the fruits of works are checked by a tester. In the free state of contact, of course, should not be.
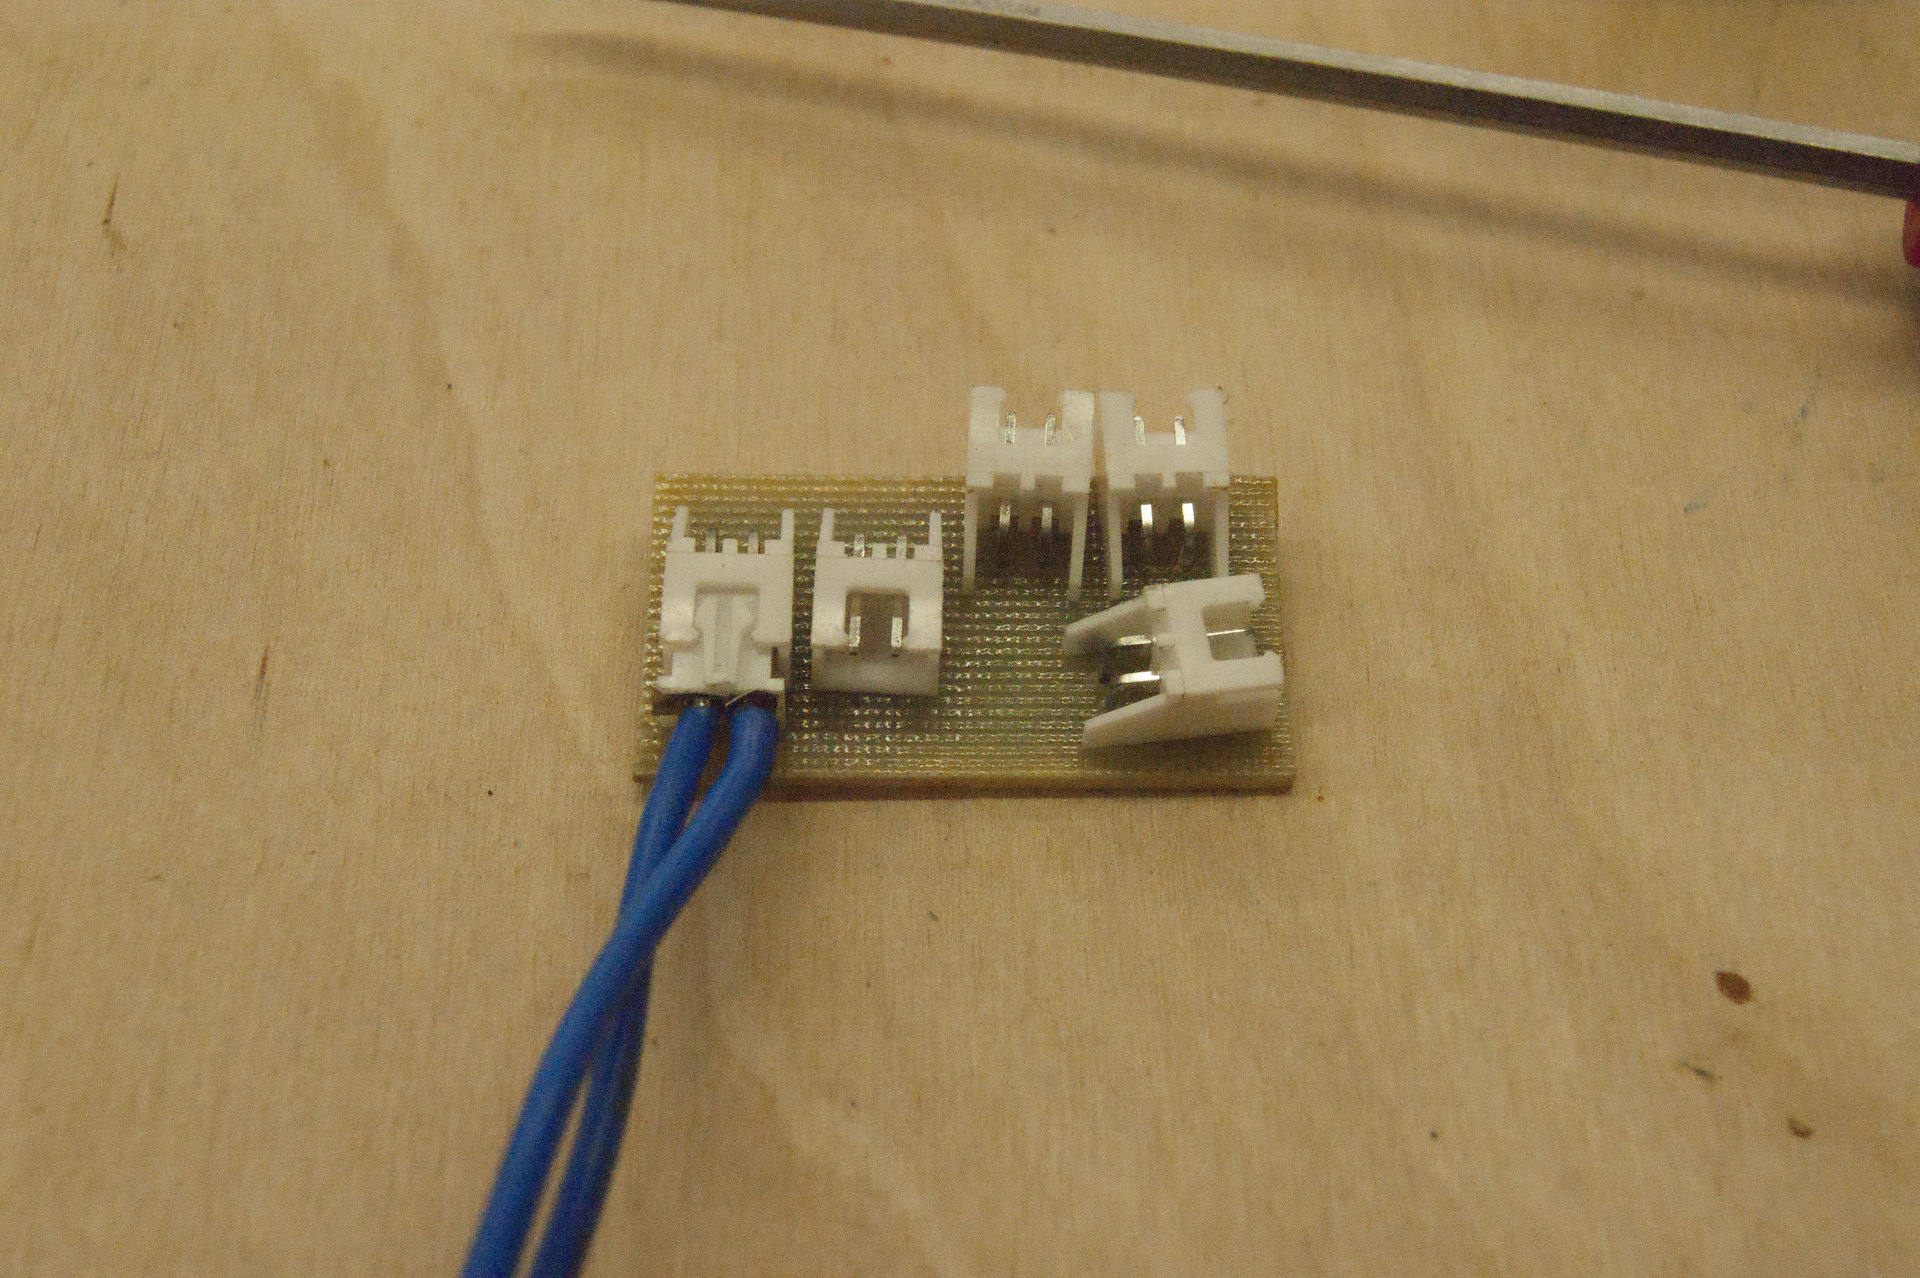
Now it is the turn of the papa-mama connectors.
We solder something (to be honest, I do not know how it is properly called) on the free ends of the wires. Here is an important note. If you have a thick stranded wire, it makes sense to bite off some of the cores. In other words, do not do as shown in the photo below, do not leave all the wires.
The message is simple: you can solder, but then you can not insert the “father” into the “mother”, because there will be no free space.
A properly made sensor is moderately beautiful and beautiful.
Besides, it does not experience any problems when connecting to the board.
A few words about the board. To be honest, from personal experience I can say that it is not necessary to make a garden with connectors and boards. You can take all the sensors in the button on the "twist", pour solder, and then hot melt. And this design will work fine. At least the first samples of rugs still work, but it's been 6 years already.
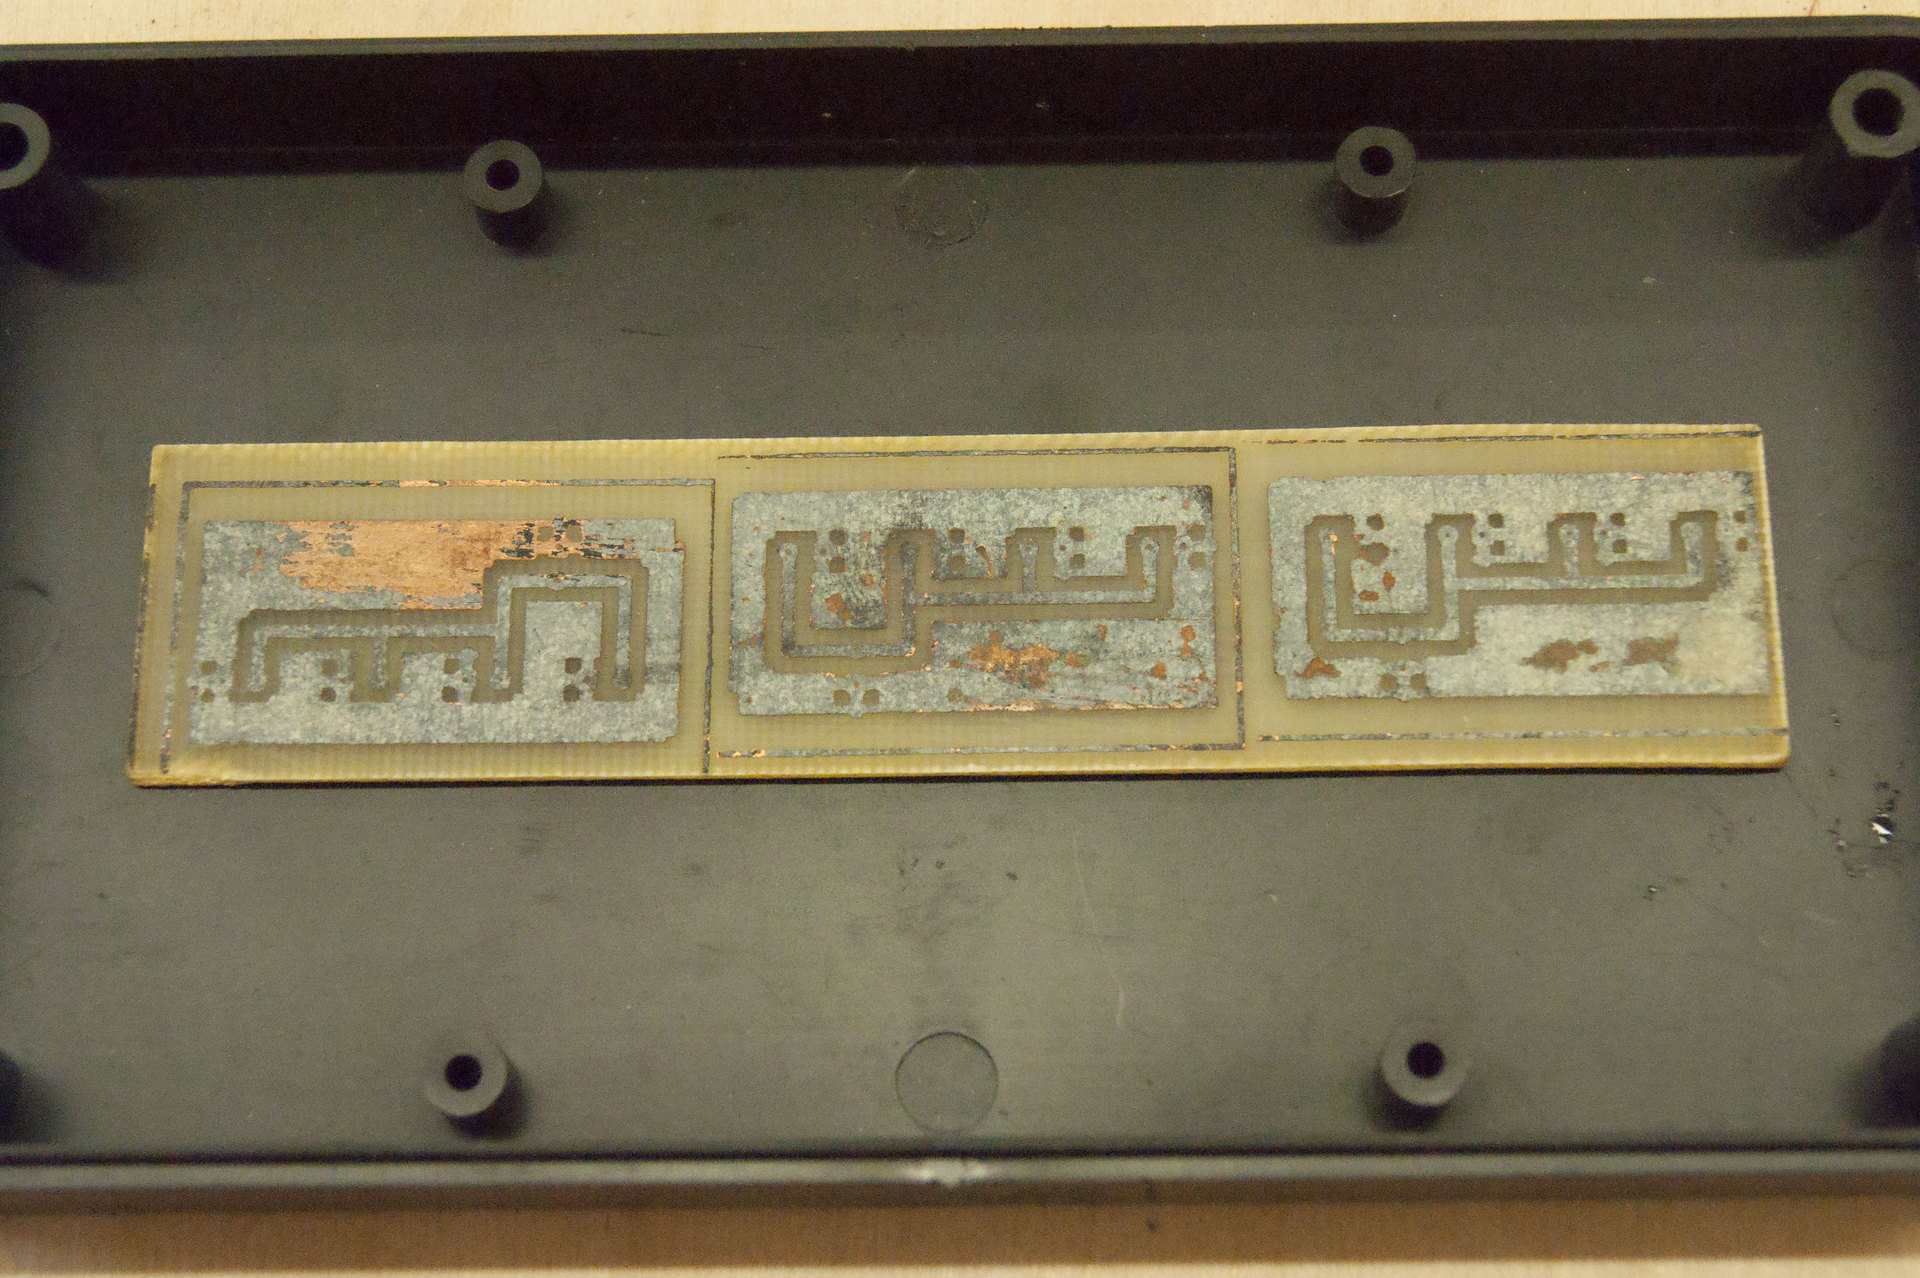
But back to the boards. They are poisoned by the well-known method of
After cutting, at least strategic holes are drilled in strategic places with a millimeter drill.
As a result, after soldering, it turns out even beautiful. Back view.
Front view:
Holy couple (do the wiring)
And here we come close to the wiring.
Meticulous readers will consider a complex version presented in the photo above. I will tell you about the simplified version, implemented through a twisted pair.
It all starts with a “clutch” with an RJ-45 connector. It has 8 outputs, so it goes to 8 wires. Choose 4 "plus" and 4 "minus". Since the "minus" is common - we twist 4 wires into one. Believe it or not, twisted pair also contains 8 wires. On the "pros" and "cons" they are divided in exactly the same way. I, for example, assign all the color "minuses", and all white and color - "pluses". Ultimately, each button in the rug should come 1 "+" and 1 "-".
To preserve the wiring, it should not be laid on top of the base, but on the previously made grooves in it. There are 2 ways:
- Cheap. Take a chisel and a hammer. We hollow grooves. It turns out effectively, but not very beautiful.
- We take the milling machine and cut out everything that is needed in 10 minutes.
I went in a modified second way. I did not have a milling machine, but I didn’t really want to buy one at a time. But there was a dremel with a set of all sorts of things. Among other things, there were found universal drills. Their feature in sharpening. The drill can perform the function of the cutter. The video captures the process, so it makes no sense to describe in words. Better to see once.
When all the grooves are sawn through, it is time for the glue to melt. Stuck extremely useful for small quick repairs. Using thermogun we lay the wiring, gluing the sensors. Do not forget to periodically "ring out" the structure, so that you do not have to disassemble the finished mat to the ground.
Tyap-loop and in production (build)
Well, already seen the light at the end of the tunnel. Finish line - assembly. Remember 5 wooden buttons, 4 plexiglas and 4 slats? It is their time.
It is curious that no matter how hard you try to cut everything smoothly, no matter how straight and square the blanks seem to you, at the assembly stage you will be haunted by a sense of universal curvature and clumsyness. Do not worry, this is the paradox of the curvature of space-hand-time. Without an additional 7 measurements, it is still impossible to fix it, so accept it.
No, there are still some tricks. If we assume that all the buttons and slats are crooked a little crooked, then there is a chance to put them together in such a combination, when everything rises exactly. In general, take and start to try. When the final placement is found, sign its place and direction on the back of the button. For example, LN - lower left, C - central.
Starting to build this "ikebana" is better from any angle. As soon as it happened - bait on the screws. Plexiglas baiting on screws is not necessary.
That plexiglas did not drop out, we fix it with furniture corners. Nuance: the corners of the height more than necessary. Option two:
- Grind down every corner.
- Make indentations in the base.
I chose the second option, drilled with a Dremel.
In the course of the assembly do not forget to ring the structure.
Finally, the most important component without which nothing will work is tape on a foam base. You can laugh, but it is. Even in the original Japanese arcade machines, we found it.
It is glued with small strips of 3-4 centimeters in length along the center of each sensor. Since we made the sensors ourselves and did not buy them at the factory, several layers may be needed. Usually 2-3. Ultimately, the button should be pressed with some hand force. Not from touch, but from the effort! It is important!
USBsexual (we are friends of a dance platform with a computer)
In parallel with the assembly of the mat, its link with the computer is also assembled. Since Windows does not understand the EPRST \ EKLMN protocol, you will have to “make friends” with the computer in the traditional way, that is, via USB.
For these purposes, buy the cheapest gamepad. On his board and to be soldered end of a twisted pair. Just in case I will remind the order.
- The signal starts with a short circuit on the sensor;
- It is transferred to the board fixed in the center of the button;
- Then transferred to the "clutch";
- And goes to the RJ-45 connector.
All this has already been done. Further.
- We insert compressed "dad" in the "mother" of RJ-45;
- The twisted pair signal is transmitted to the gamepad;
- From the gamepad, the USB signal goes to the computer.
So, get drunk on the board as follows.
As you can see, the "pluses" are soldered to the action buttons. The "minuses" are twisted-soldered together and soldered to the "ground".
In principle, everything is ready. But you can bring beauty. For example, push the board into the case. I bought it on the collapse of the radio market. True, then it turned out that these are just two covers that are not intended to be connected at least in the semblance of something whole. I had to polish a little.
In general, it turned out sanely. With the help of sandpaper for Dremel he removed the excess, and with the help of the cutter he made a notch for the wire.
Finally, all the pieces of the mosaic are ready and you can connect the mat to the computer for testing in the game.
A few words about her. To play on the computer, good people wrote a simulator of an arcade- controlled DDR machine called Stepmania . Then no less kind people based on Stepmania created a modified version - In The Groove (ITG). It is with her, or rather with the OpenITG project, that I work. Download distributions here . You can independently assemble from source . In general, setting up the game, downloading tracks and even creating your own is a topic for a separate post. If the community is for, let me know about it in the comments. In the meantime, back to the mat.
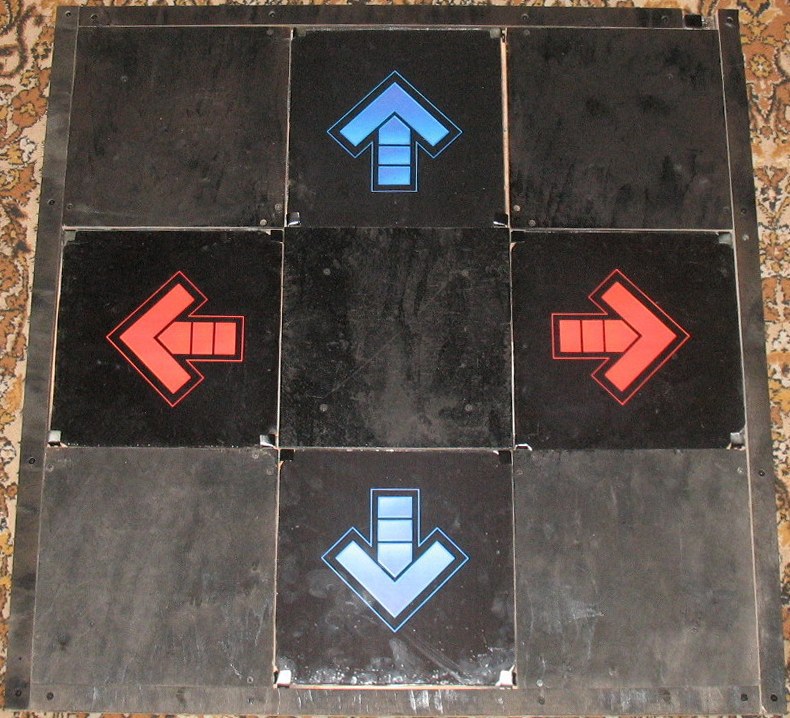
The final look of the patient.
You can get out on such a rug a lot. Unfortunately, I have long been out of shape and on the video I give out only sluggish fluttering. But once it was like this:
What's next? Instead of totals
It is impossible not to notice that the appearance of the rug is not aesthetic. It does not matter. First, it can be painted.
Wooden parts are unscrewed and painted. Plexiglas is painted from the inside.
Secondly, if you do not want to work with paint, you can print stickers.
You come up with a drawing of 9 squares 29 * 29 cm. I was not mistaken, the buttons are 28 * 28 cm, and the stickers are bigger. But you remember that the buttons are not quite square?
That's all. Questions, comments and suggestions are welcome.
Source: https://habr.com/ru/post/235323/
All Articles