We do authorization on Codeigniter 2.0 using ajax and HMVC
Good afternoon, dear Habrachititeli.
Not so long ago, I was faced with the task of implementing the authorization widget on the site. The idea is not new, I would even say banal, but either I didn’t google well, or the solution was so obvious that there was no point in writing about it. In any case, even for newbies, this can cause problems, which is why I decided to write this article.
So, to begin with, to understand how this is all implemented, you need to get acquainted (for those who are not familiar) with the HMVC extension for Codeigniter. You can do it here .
I will try to do everything very clearly, so I'll start with the project file structure:
')
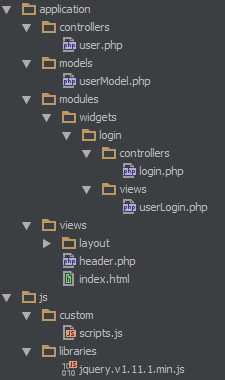
As you can see, I did not specify the entire file system, but the structure that we need.
We submit the output of our authorization form to Modules / widgets, thereby using HMVC, but I implemented all the logic in application / controllers and application / models. Why did I do that? Honestly, I do not know. You could of course do all this in Modules / widgets, but I decided to do just that. Nobody bothers you in your own way.
So let's break down the file system
application / controllers / user - the controller in which ajax processing of the authorization and exit events takes place.
application / model / userModel - the model that checks for the existence of the user, and gives the desired array with user data.
application / modules / widgets / login / controllers / login - the widget controller where session data will be transmitted.
application / modules / widgets / login / controllers / userLogin - type of authorization widget.
application / views / layout / head, application / views / layout / footer - the header containing the beginning of the document and the footer
application / views / header - Hader of our site, in which the authorization widget is displayed. We don’t have the controllers that output all of this, but I think this is so obvious.
js / custom / scripts is our script file, where we will call ajax methods.
and of course the jquery library.
Well, it's time to start. We start by creating our widget in application / modules / widgets / login / controllers / login
<?php if ( ! defined('BASEPATH')) exit('No direct script access allowed'); class CustomWidgets extends MX_Controller { public function userLogin() { $this->load->view('userLogin'); } } Create a view of our widget:
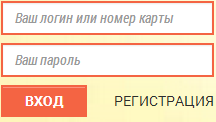
<form role="form" id="login-form" class="login-form"> <input type="text" name="login" placeholder=" "> <input type="password"name="pass" placeholder=" "> <button type="button" id="signIn"></button> </form> Now pass it to our header view:
<div id="header" class="row"> <div class="col-xs-3" id="account"> <?=Modules::run('widgets/login/login/userLogin')?> </div> <div class="col-xs-9"> <!-- --> </div> </div> On the example of my project, after styling, of course, you should have something like this:
So, it's time to write our authorization. Provided, of course, that before that you yourself implemented it.
Let's first go to the user controller and create a blank there with two methods:
class User extends MX_Controller { public function __construct() { parent::__construct(); $this->load->model('userModel'); } public function ajax_login() { } public function ajax_logout() { } } We will do the preparation in advance in our userModel model:
<?php if ( ! defined('BASEPATH')) exit('No direct script access allowed'); class TemplateModel extends CI_Model { // public function __construct() { parent::__construct(); $this->load->database(); } // public function check_user($log) { } public function user_login($login) { } } Now we are ready to send form data ajax. So do it!
$(document).ready(function(){ // Ajax login $('#account').on('click', '#signIn', function(){ var params = $('#login-form').serialize(); console.log(params); // , , . . $.post('user/ajax_login', params, function(data){ if(data == 'denied') { // , , alert(' '); } else { $('#login-form').remove(); $('#account').append(data); } }); }); }); We passed the data, let's process it in the ajax_login method:
public function ajax_login() { $log['login'] = trim(strip_tags($_POST['login'])); $log['pass'] = sha1(md5($_POST['pass'])); $check = $this->TemplateModel->check_user($log); if($check) { $data['user_info'] = $this->TemplateModel->user_login($log['login']); $ses_data = array( 'login' => $data['user_info']['login'], ); $this->session->set_userdata($ses_data); } else { echo 'denied'; } } At the moment, there are dark spots, but we will disperse them now. Go to our model, and create a method check_user, where we pass our array $ log
public function check_user($log) { $this->db->where('login', $log['login']); $this->db->where('password', $log['pass']); $query = $this->db->get('user'); if($query->num_rows > 0) { return TRUE; } else { return FALSE; } } In this method, we check whether such fields exist, and if their number is greater than 0, then we return TRUE.
Next, in the $ data ['user_info'] array, we return the work of the user_login method, to which we transfer the data of the $ log ['login'] array
public function user_login($login) { $this->db->where('login', $login); $query = $this->db->get('energy_user'); return $query->row_array(); } And finally, we write the values we need in the session. And after the line:
$this->session->set_userdata($ses_data); insert the magic line, which gives the result we need:
redirect(base_url().'widgets/login/login/userLogin'); Here, in fact, almost everything, it remains only to transfer the session values to our widget controller:
<?php if ( ! defined('BASEPATH')) exit('No direct script access allowed'); class CustomWidgets extends MX_Controller { public function userLogin() { $data['user_info'] = $this->session->userdata('login'); $this->load->view('userLogin',$data); } } Now everything works with us! Almost profit. It remains to make a similar LogOut. Further I will give 2 code sections. I think you can figure out where to insert them.
But before that, you need to slightly modify the appearance of our widget:
<?if(!empty($user_info)):?> <div id="userWidget"> <span>, <?=$user_info?></span><br> <a href=""> </a> <button type="button" href="<?=base_url()?>user/logout" id="logout"></button> </div> <?else:?> <form role="form" id="login-form" class="login-form"> <input type="text" name="login" placeholder=" "> <input type="password"name="pass" placeholder=" "> <button type="button" id="signIn"></button> </form> <?endif;?> Here are the 2 promised code points:
public function ajax_logout() { $logout = $_POST['logout']; if($logout) { $this->session->unset_userdata('login'); redirect(base_url().'widgets/login/login/userLogin'); } } $('#account').on('click', '#logout', function(){ $.post('user/logout', {logout : true}, function(data){ $('#userWidget').remove(); $('#account').append(data); }); }); In general, this is all I wanted to talk about. Of course, you can finish a lot, for example, if you are in your personal account, accidentally or even specifically pressed the exit button in the widget, and so on.
I will be glad to hear the criticism of professionals.
Source: https://habr.com/ru/post/235175/
All Articles