What else can be done in Photoshop?
It will be about our own .NET + WPF software (called “inForm”), which I use to get the so-called “interactive presentations” (they are also “non-linear presentations”), as well as interactive information interfaces.
And I will immediately reply to the title of the article - in Photoshop, you can draw an interface and launch it in a simple way on the Windows platform. As a result, in order to obtain a working interactive information interface, you will need only 2 means - the inForm application and Photoshop.
To perform a task in Photoshop, you need to know how to create layers, group them into groups and save them into separate files. In general, nothing special.
The article has an introductory nature, and will most likely be interesting for Photoshop amateur enthusiasts and interfaces. The inForm application can be used for free with some functional limitations.
So, an example of an interactive application "Hello world."
')
The interface will fit into the overall ideology of my software product: there is a “home screen” with the main menu and slides, then for each menu item a screen with information is displayed, or a sub-menu from which full-screen slides open. All this is similar to the usual mobile applications or sites, only works in full screen mode under Windows and involves the use of touch-screen.
Open Photoshop, create a new file 1920x1080x96dpi and immediately in the layer control block make the structure folders for the “home screen”:

The folders with system names are marked in red — you will need to save files under these names in order to get interface elements.
Now we take in hands a little photoshop creative and draw the actual interface of the future interactive application.

This is what came out of me on the basis of a random image of background wallpapers from Google search: three buttons on the left, a center slider and a logo on the right, which will also be a button to return to the "home screen".
To view the resulting interface in action:
- who has not yet, then download and install the latest .NET Framework 4.5: www.microsoft.com/en-us/download/details.aspx?id=30653
- my inForm application is here: issimple.co/app/forhabr/inForm215withDemoUI.zip (6Mb)
- PSD file with interface: issimple.co/app/forhabr/fancy-round-ui.zip ( 10Mb )
Then:
- we save each layer of interface elements layers on a transparent background with its own file name and the extension .png (only the bg background file must be .jpg)
- for automation, you can use the script to save layers: issimple.co/app/forhabr/LayerSaver.jsx
- copy the received files to the “data” folder of the inForm application, slides - to the “data / slides” folder
- run INFORM.EXE
If everything looks the same as in Photoshop, then go on to drawing “screens” that will appear by pressing the menu buttons. We add new groups to the layers at the same level as the “main screen” - screen 1, screen 2, screen 3. Groups can be any name - this is just for convenience.
In the inForm application for the design of sub-screens there are several means: it can be a stack of jpg icons of the same size, or icons + preview, or navigation like a map, or png buttons / content of arbitrary shape. Let's stop on the last method.

For example, for the second menu item “Triangle” we create three groups with buttons in each:
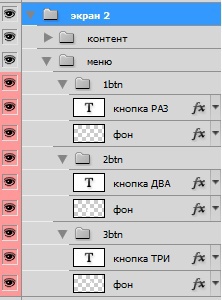
Next, save each group on a transparent background as a file of the type “1btn.png” and transfer it to the data / 2sub / folder. The structure of the application's content files and groups in Photoshop is fairly easy to understand just by looking at them.
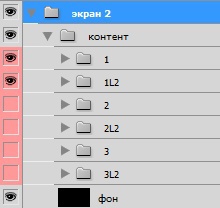
The last type of “screens” is full-screen content like slides. Each slide can consist of 3 layers with additional animation of each on the screen.
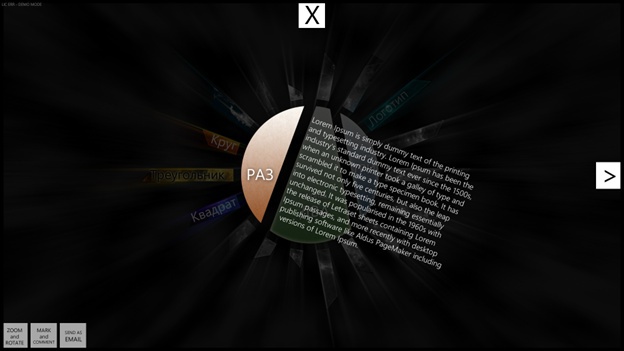
On the application, it looks like this:
Files are saved in “1.png”, “1L2.png”, “1L3.png” formats, where the first digit is the slide number, and after “L” is an additional layer. Copy files to “data / 2sub /”.
Arrows, crosses and other elements of full-screen navigation can be replaced by any other, because these are also files in the data / interface / folder.
After all the saving, we get the final interface structure in the data / folder:

It is clear that everything can be scaled in terms of the number of categories, buttons, slides. Also there are all kinds of settings, additions. But the simplest option is considered.
Here is the result:
And actually what it is all about - in this simple way you can create interactive books, interface prototypes, applications for museum kiosks, presentations of products, companies, applications for Windows tablets (though only Desktop applications so far), information systems for state institutions, educational institutions etc.
And I will immediately reply to the title of the article - in Photoshop, you can draw an interface and launch it in a simple way on the Windows platform. As a result, in order to obtain a working interactive information interface, you will need only 2 means - the inForm application and Photoshop.
To perform a task in Photoshop, you need to know how to create layers, group them into groups and save them into separate files. In general, nothing special.
The article has an introductory nature, and will most likely be interesting for Photoshop amateur enthusiasts and interfaces. The inForm application can be used for free with some functional limitations.
So, an example of an interactive application "Hello world."
')
The interface will fit into the overall ideology of my software product: there is a “home screen” with the main menu and slides, then for each menu item a screen with information is displayed, or a sub-menu from which full-screen slides open. All this is similar to the usual mobile applications or sites, only works in full screen mode under Windows and involves the use of touch-screen.
Open Photoshop, create a new file 1920x1080x96dpi and immediately in the layer control block make the structure folders for the “home screen”:
The folders with system names are marked in red — you will need to save files under these names in order to get interface elements.
Now we take in hands a little photoshop creative and draw the actual interface of the future interactive application.
This is what came out of me on the basis of a random image of background wallpapers from Google search: three buttons on the left, a center slider and a logo on the right, which will also be a button to return to the "home screen".
To view the resulting interface in action:
- who has not yet, then download and install the latest .NET Framework 4.5: www.microsoft.com/en-us/download/details.aspx?id=30653
- my inForm application is here: issimple.co/app/forhabr/inForm215withDemoUI.zip (6Mb)
- PSD file with interface: issimple.co/app/forhabr/fancy-round-ui.zip ( 10Mb )
Then:
- we save each layer of interface elements layers on a transparent background with its own file name and the extension .png (only the bg background file must be .jpg)
- for automation, you can use the script to save layers: issimple.co/app/forhabr/LayerSaver.jsx
- copy the received files to the “data” folder of the inForm application, slides - to the “data / slides” folder
- run INFORM.EXE
If everything looks the same as in Photoshop, then go on to drawing “screens” that will appear by pressing the menu buttons. We add new groups to the layers at the same level as the “main screen” - screen 1, screen 2, screen 3. Groups can be any name - this is just for convenience.
In the inForm application for the design of sub-screens there are several means: it can be a stack of jpg icons of the same size, or icons + preview, or navigation like a map, or png buttons / content of arbitrary shape. Let's stop on the last method.
For example, for the second menu item “Triangle” we create three groups with buttons in each:
Next, save each group on a transparent background as a file of the type “1btn.png” and transfer it to the data / 2sub / folder. The structure of the application's content files and groups in Photoshop is fairly easy to understand just by looking at them.
The last type of “screens” is full-screen content like slides. Each slide can consist of 3 layers with additional animation of each on the screen.
On the application, it looks like this:
Files are saved in “1.png”, “1L2.png”, “1L3.png” formats, where the first digit is the slide number, and after “L” is an additional layer. Copy files to “data / 2sub /”.
Arrows, crosses and other elements of full-screen navigation can be replaced by any other, because these are also files in the data / interface / folder.
After all the saving, we get the final interface structure in the data / folder:
It is clear that everything can be scaled in terms of the number of categories, buttons, slides. Also there are all kinds of settings, additions. But the simplest option is considered.
Here is the result:
And actually what it is all about - in this simple way you can create interactive books, interface prototypes, applications for museum kiosks, presentations of products, companies, applications for Windows tablets (though only Desktop applications so far), information systems for state institutions, educational institutions etc.
Source: https://habr.com/ru/post/235145/
All Articles