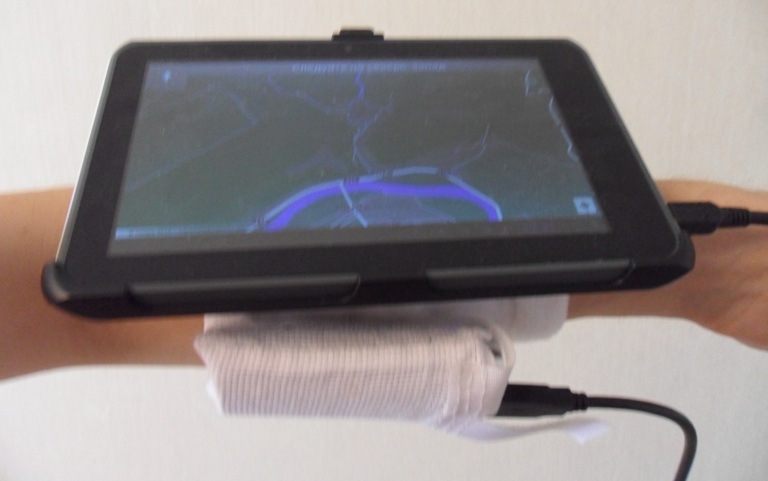
Fastening for tablet MoveO! TPC-7SG on hand
I'll start from afar.
Therefore, I purchased a 7 'tablet with GPS for navigation in unfamiliar terrain (last year a phone was used for this purpose, but I wanted a “bigger screen without mobile Internet”).
Unfortunately, the field trials in Moscow showed that it’s not very convenient to walk with a 7 'device in your pocket, and constantly getting / removing it presents a certain inconvenience.
So the idea was born of mounting the tablet on your hand, the story of which is created under the cut ...
Caution photo!
')
Of course, the first attempt to google a ready-made solution was a failure, so pretty quickly I decided to recall that “I’m an engineer-physicist” (and there are 1.5 years of experience as a designer, albeit in a distant past). If suddenly I am blind and my story is a senseless invention of a clumsy bicycle - just stick it with your nose in a personal message, and not a minus. :-)
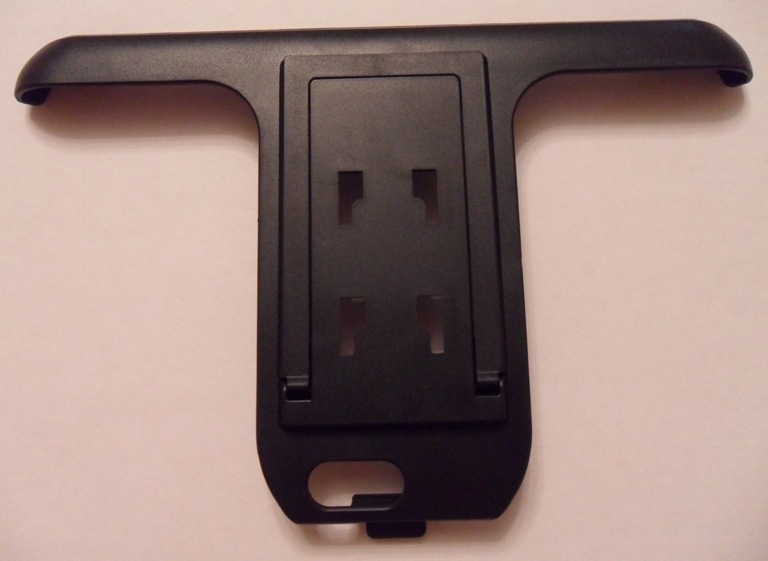
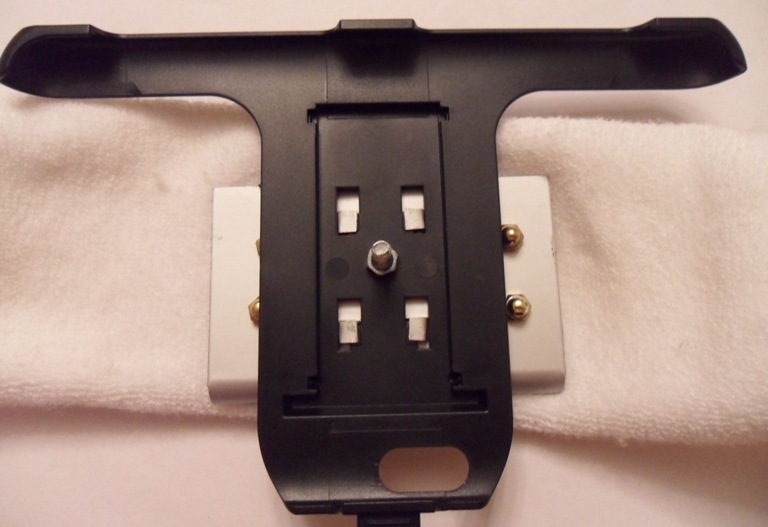
Since the “auto holder” was already bundled with the purchased tablet, in fact, the task was reduced to making the bracket compatible with the standard stand and the method of fastening this bracket to the arm.
A photo

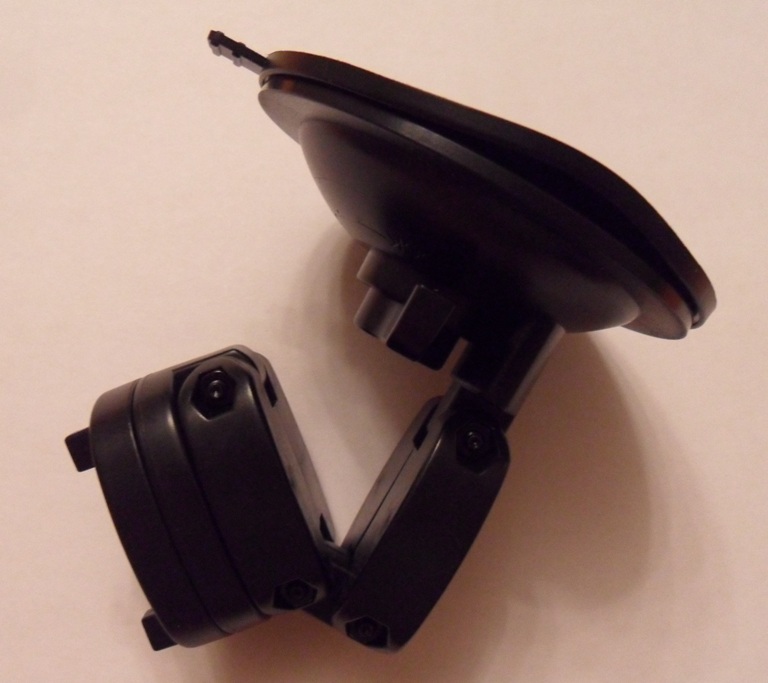

The full fabric cover was not considered. This method of attachment is common for sportsmen’s smartphones / players, but my device is “slightly larger”, so the method seemed ineffective.
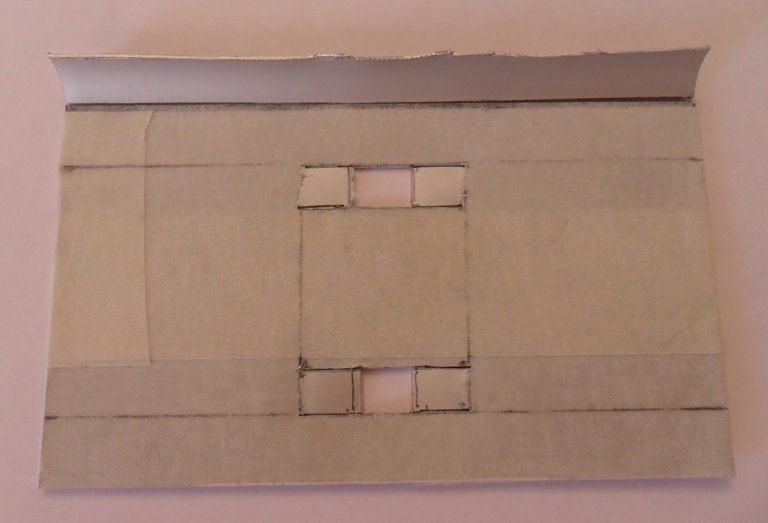
Bracket
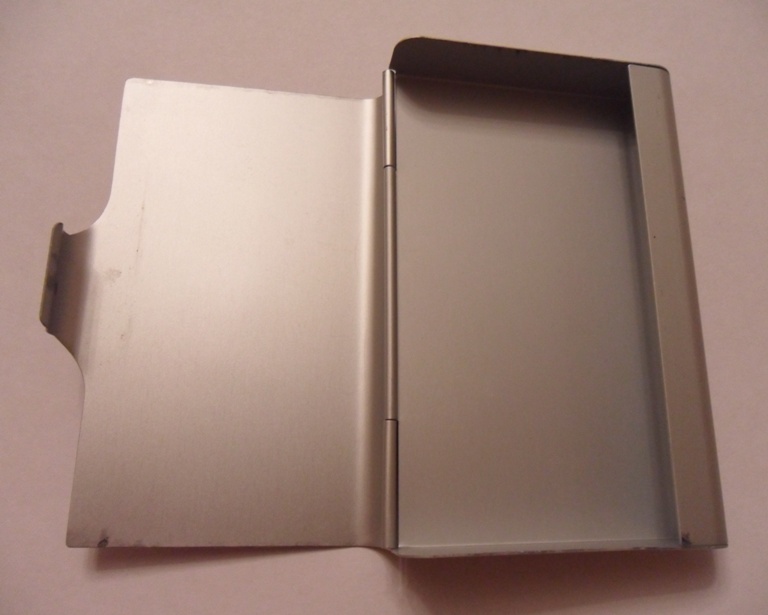
I had an AUMA aluminum business card holder, which I did not use at all, from which I decided to make a bracket.
A photo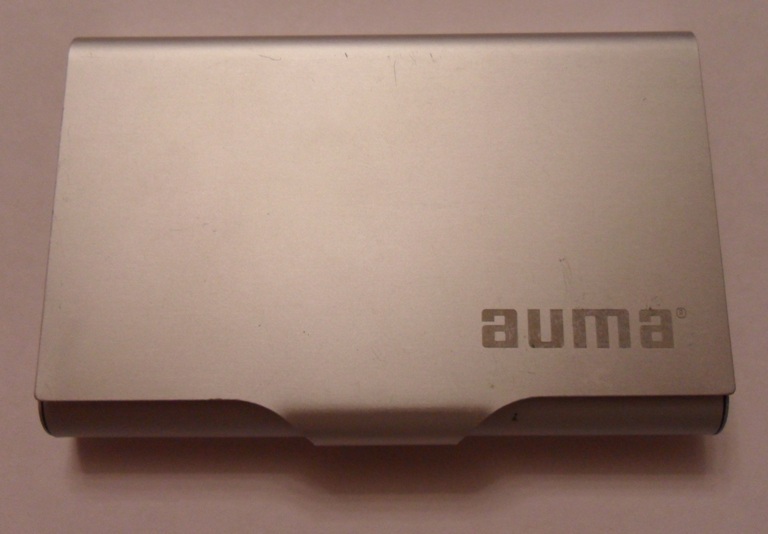
I admit right away that the first attempt was not very successful. Since the development was carried out with virtually no design documentation, errors were inevitable (below is a diagram drawn after the completion of the work. The process used a similar pencil sketch on paper).
However, in the process of manufacturing the first instance, technological solutions were tested that showed different degrees of suitability. This is very important, since the original development plan was different from the real one and constantly received adjustments along the way!
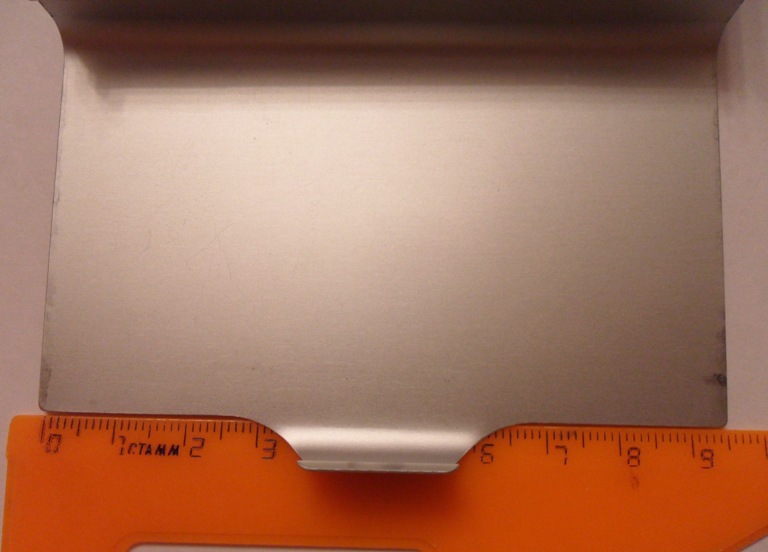
To begin with, we will separate the unnecessary parts of aluminum from a flat surface, which we will use as a blank (I left a small rounding, which does not yet have a functional purpose).
To do this, mark the surface of the ruler with an ordinary pencil. And then (again on the line) along this line we will draw the line with a stationery knife. It makes sense to hold the line twice or three times, gradually increasing the pressure and deepening the groove, but not trying to cut through aluminum.
Further, at the site of the incision, it will be easy to break off the unnecessary part by applying a small mechanical force.
Now we will cover the surface of the blank with ordinary masking tape. Enough 1 layer.
This is done in order not to scratch the surface as a result of machining. And also in order to simplify the layout of the part (the pencil is not erased from the masking tape, as opposed to metal, and you can always remove the scotch and glue the new net).
In the manufacture of option 1, I neglected this precaution, believing that I would not treat the surface in any way, and therefore I could not damage it. As will be seen later, this is a mistake.
Also, initially I did not separate the edges. It was interesting to show the process of turning business card holders into a bracket. Alas, such a window dressing significantly interferes with work.
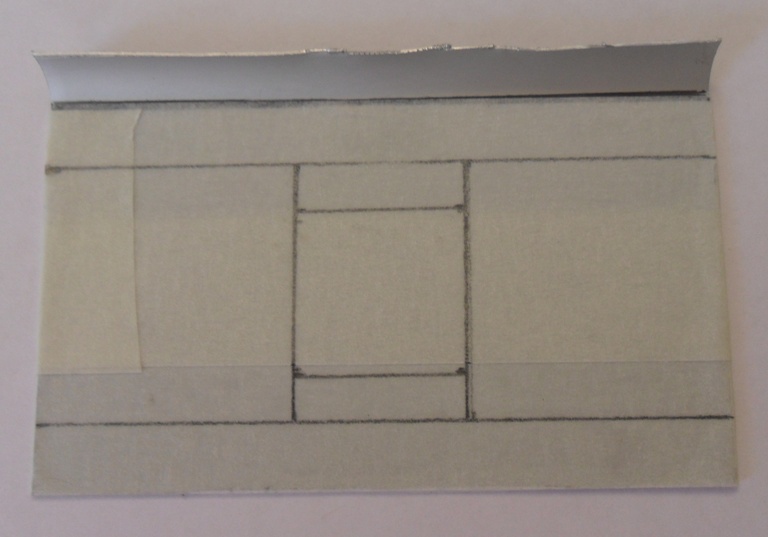
Let's make measurement of the turned out preparation and fixture of the tablet. Prepare an approximate scheme of the details and proceed to marking directly over the tape.
The diagram below shows an APPROXIMATE marking scheme (dimensions correspond to the product that I did):
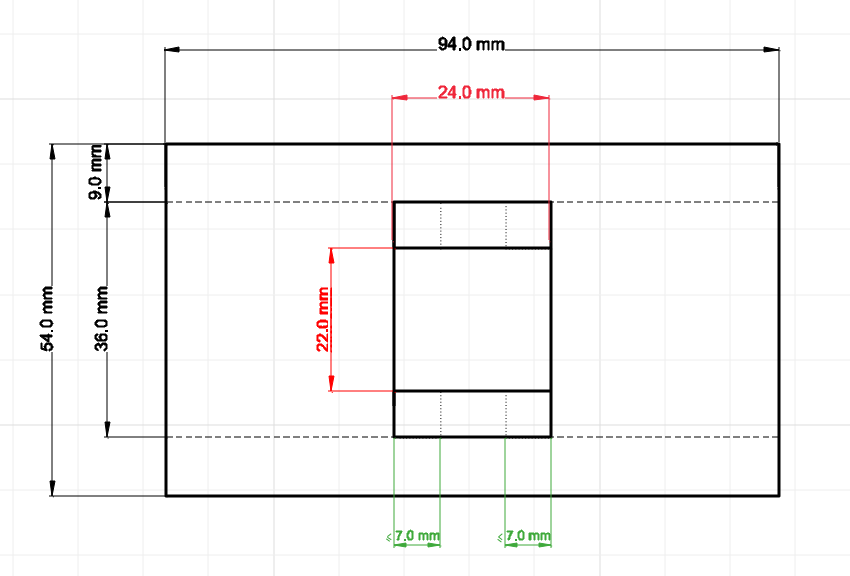
Color identification of sizes:
- Red - these dimensions should correspond exactly to the position of the holes in the mounting plate.
- Green - it is better to take these dimensions “with a stock” and then cut it with a file or cut with a nipper
- Black - overall dimensions, as well as dimensions that determine the position of the mounting feet relative to the part - special accuracy is not important here.
Small cheat
If you stick a strip of adhesive tape on the tablet mount, then you can paint over the position of the holes for the bracket. Further, this strip can be used as a “stencil”, imposing on the marked part as needed, to check whether you have deviated somewhere during the marking process due to the inaccuracy of the tools used or the trembling hand.
You should always give priority to such a stencil!
Due to the fact that during the development of the 1st part I blindly trusted the calculations and layout, the total deviation in the location of the mount was about 2 millimeters, which is very significant in the light of their small size! The size had to be adjusted in the process with the help of a file (more on this later)


The marked horizontal lines at the central site are the places of the first “cuts”. It is from these 2 strips that we will make the legs-holders with which the stand will be attached to the bracket.
This is done in 3 steps:
- Mark up the line with a pencil (done)
- Mark up the line with a stationery knife in 2-3 passes (the first time is very weak, along the ruler, then pressing harder to deepen the groove)
- Punches the plate with a chisel (in my case it was a chisel). It is advisable to use 2 tools:
- Wide for long lines (in my case it's an 18 mm chisel, which is just a little less than what is needed)
- Narrow for the completion of long lines and the application of transverse "cuts"
Aluminum is a fairly soft metal, so with proper effort you can even cut it with a clerical knife. I actually started with this. However, this is long and tedious, and the cut lines are very uneven (and therefore the legs of the mountings will be curved), which makes it necessary in the future to seriously process the edges of the parts with a needle file.
When working with a chisel, the part slightly warps up, which can be seen in all further photos.
Since the width of the hole for the passage of the bracket mounts in the stand is 5 mm, and the leg height is about 2 mm, each strip should be about 7 mm long. It is better to take a little more - we will always be able to shorten it with a needle and / or wire cutter.
It makes sense to pierce all the lines, and then bend the legs out (during the manufacture of the 1st test sample, I did it in turn to make sure the method worked, however, this is not very convenient).

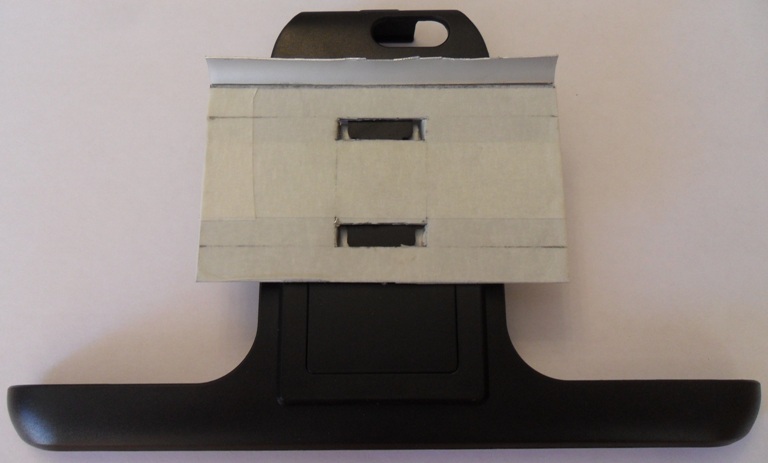
Now we will insert the workpiece of our bracket into the stand (at the same time we will check all the dimensions and if there is a need to “finish the part with a
If everything is OK - slightly bend the legs with small pliers (in order to understand where and how much to bend them), remove the part from the stand and bend it to the end.

The following photo shows the traces of the file on the masking tape - this is exactly the precaution I wrote about above. Although I tried to be very careful, anyway when machining the edges, it is inevitable that the tool hits the adjacent surfaces:

It is impossible not to hold on and not try on the resulting part in the assembly with the tablet! And suddenly everything is in vain!
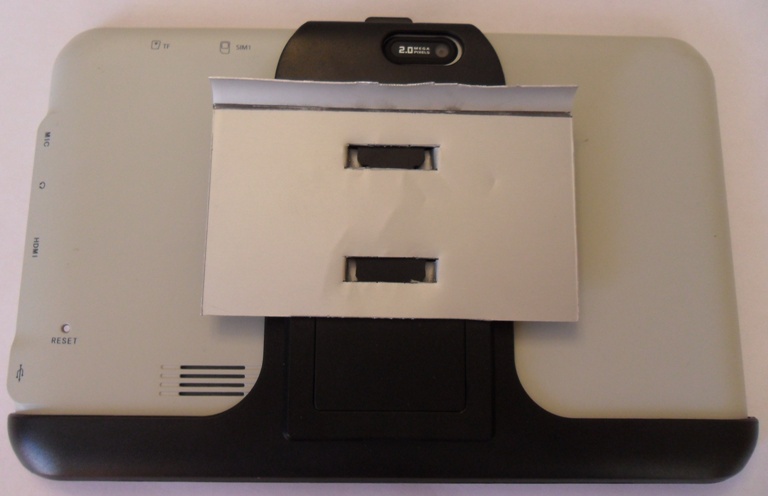
My concerns about "all for nothing" are not unfounded. As I mentioned above, the development of the 1st instance went without documentation, and therefore quite a common mistake was made, which the designers always revealed at the design stage of the ASSEMBLY DRAWING - the wrong location of the nodes.
In my case, it turned out that the bracket of the 1st instance was not made along the stand, but across. This made it impossible to attach to the wristband, which I assumed next.
However, if I didn’t have a softer and brittle aluminum, but a more ductile metal (for example, stainless steel), then I could try to remedy the situation by bending the ends of the bracket and making a “bracelet” for the wrist.
This actually can be considered completed part of the creation of "bracket". Further refinement in its design is more likely to refer to the sleeves / wristband.
Armlet
The initial idea was quite simple - the bracket had to be attached to a special plate sewn into a wristband / armband.
To do this, in the nearest sport goods store were purchased:
- a set of elbow pads (had durable fabric stripes on the outer surface, which made it possible not to stretch it completely on the arm and use it as a kind of "band")
- 2 wristbands (in the package they looked quite single-layer, so it was supposed to sew them 1 in 2, and fasten a bracket plate between them).
Obviously, it would hardly have been possible to sew / attach the aluminum plate directly into the fabric. Yes, and I didn’t want to risk protruding parts of the structure when washing (and what kind of equipment is it that cannot be washed).
Unfortunately, just walking 500m down the street in the elbow pads I realized that I was too hot in it (maybe it's the sunny July day), so I dropped out of the experiment and no longer appear in this article.
Wristbands have proven much better.
An unexpected (but pleasant) discovery was waiting for me inside the wristbands. It turns out that they were nevertheless double-layered, just the seam was hidden on the inner surface, and in order to get to it the wristband had to be turned inside out.

The seam gap I got a sleeve twice as long as a wristband.
How should the bracket be attached to the wristband? Screws!
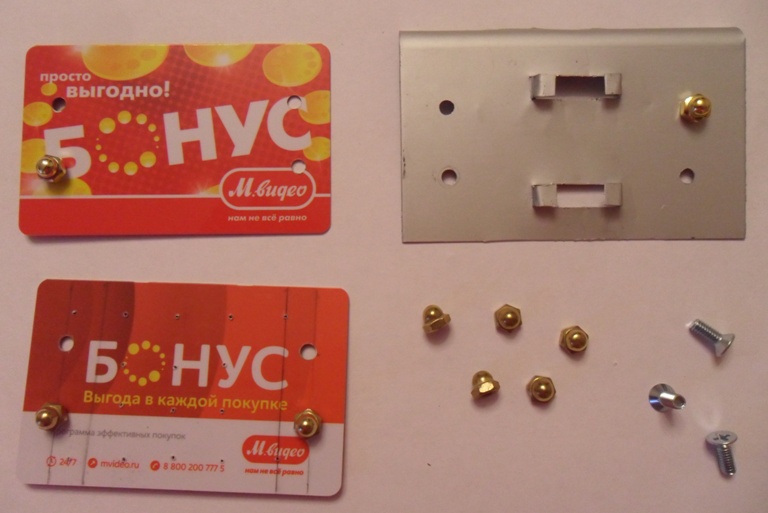
To do this, take 4 tiny M4 screws and four cap-nuts suitable for them.
Why not ordinary? And because we will have a screw cap inside a wristband, we will mount a bracket on the screw, and fasten it with a nut. If the nut is ordinary, then it is at least not aesthetically pleasing. And at most, we can hook onto the edge of the screw thread with clothes.
Lyrical digression
At this moment, I had a brilliant (as it seemed) idea to sew inside a wristband a kind of flat plate, to which the bracket would be directly attached. With a plate area comparable to the bracket area, this should have made the mount ultra-secure, distribute the load on the fabric and prevent possible ruptures.
The mounting plate should have been connected to the bracket with screws.
Also, to reinforce the construction of an identical plate, I decided to put it under the bracket (the plasticity and the brittleness of aluminum at this point somewhat alerted me).
Given the size of the source material - business card holders would be ideal for my purposes ordinary plastic cards. And since this good is now in every store you are given a mountain (with completely unintelligible impracticable conditions of "stimulation"), then I did not have a shortage of material:
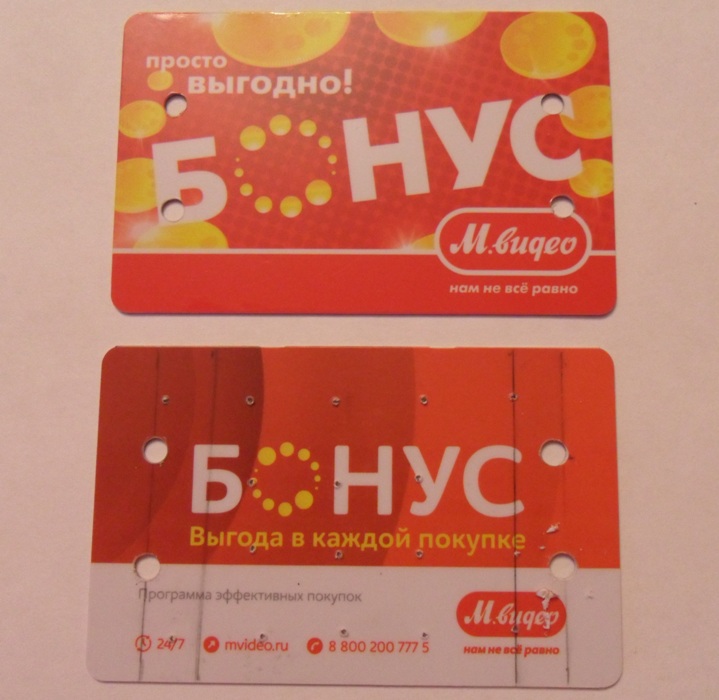
Greetings to the representatives of the retail network!
As you can see, holes with a diameter of 4 mm have already been drilled in the corners.
Also looking closer you can see tiny holes (1 mm diameter) on one of the plates, which I also drilled. In theory, this would allow stitching a card to the fabric. In practice, one can get into these holes only from one side - the one where the plate is. Trying to flash in the opposite direction, you must aim blindly. It does not help even if you push the second needle and aim at it.Easier to flash the card itself. At some point, it seemed easier to flash a card.
Do not try this again. There is a serious risk of breaking a sewing needle!
The effect of such "sewing" is not worth the effort.
Having suffered the evening, I abandoned this idea (the card was otporot and thrown away, there were small traces on the wristband.
The mounting plate should have been connected to the bracket with screws.
Also, to reinforce the construction of an identical plate, I decided to put it under the bracket (the plasticity and the brittleness of aluminum at this point somewhat alerted me).
Given the size of the source material - business card holders would be ideal for my purposes ordinary plastic cards. And since this good is now in every store you are given a mountain (with completely unintelligible impracticable conditions of "stimulation"), then I did not have a shortage of material:
Greetings to the representatives of the retail network!
As you can see, holes with a diameter of 4 mm have already been drilled in the corners.
Also looking closer you can see tiny holes (1 mm diameter) on one of the plates, which I also drilled. In theory, this would allow stitching a card to the fabric. In practice, one can get into these holes only from one side - the one where the plate is. Trying to flash in the opposite direction, you must aim blindly. It does not help even if you push the second needle and aim at it.
Do not try this again. There is a serious risk of breaking a sewing needle!
The effect of such "sewing" is not worth the effort.
Having suffered the evening, I abandoned this idea (the card was otporot and thrown away, there were small traces on the wristband.
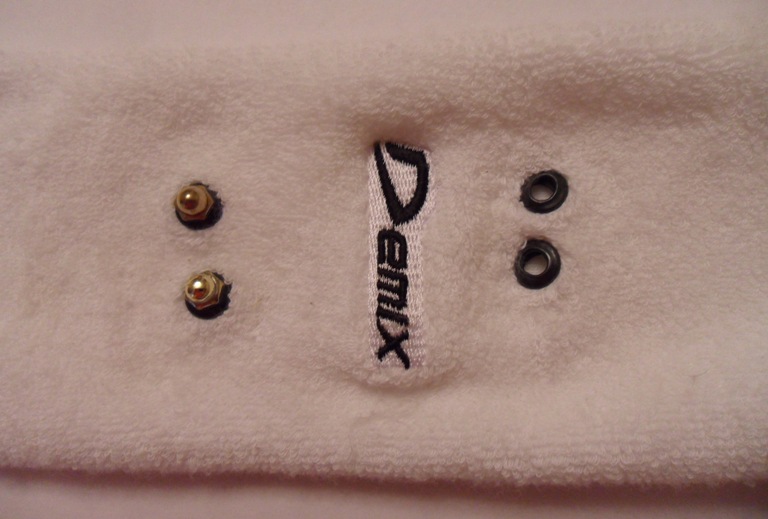
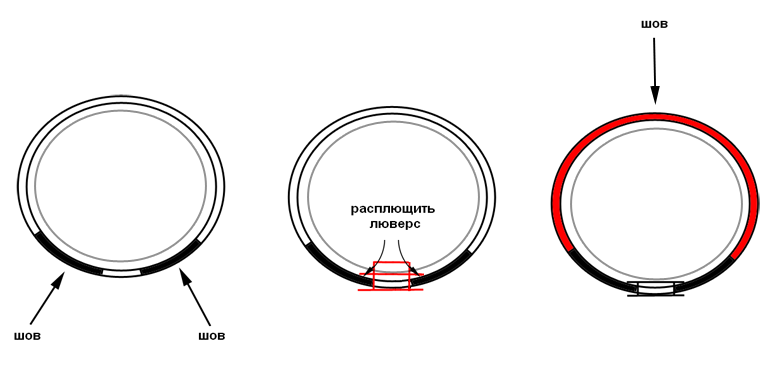
The correct way to mount the bracket to the wristband is eyelets !
Yes, such small metal rings, through which we pass the laces on our shoes!
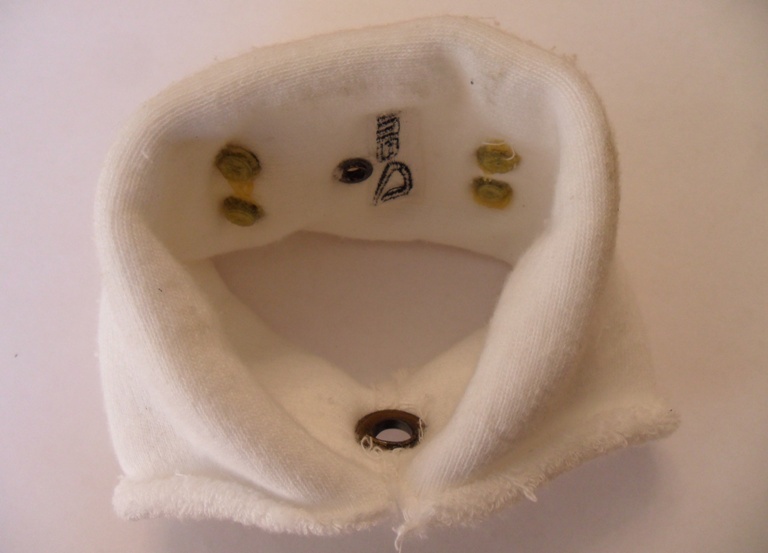
Since I did not have a tool to install the grommets at home, I did not do it very carefully. Fortunately, I bought them with a slightly larger diameter than the screws (The diameter of the eyelets for the screws is 5 mm, the diameter of the screws is 4 mm).
For comparison, tightened screws without eyelets
After that, something worked in my head again
“But when I sew a wristband, it will not be convenient to install screws into the holes in the grommets! Yes, I will insert them in advance, and what if they fall out? Catch them inside? ”
The solution was super glue.
=)

Perhaps not very carefully, but nobody will see ...
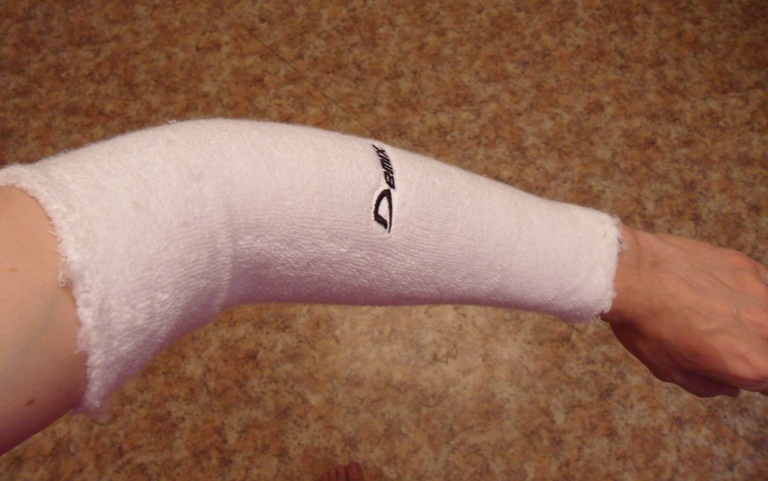
When the glue dried, I was able to assemble my product for the first time (even with an oversleeve for the whole hand instead of a wristband) and check what happened. We must pay tribute - it turned out!
The tablet sat on the arm quite stably and comfortably. Turning the arm upside down, I made sure that even though the screws slightly pull the fabric away. It was a pity to do a tear test.
Attach a second plastic card (I told the fate of the first in a lyrical digression) we will be under the bracket. I used for this cold welding (I will not advertise the manufacturer, I think the usual glue will do).
Do not forget to paste over the front surface of the bracket with masking tape !!!
Otherwise, you will rub cold welding from him, as I ...
Did I already talk about bouts of brain activity at the most inappropriate moments? Yes…
So, sometimes I still have attacks of paranoia! ..
In general, the aluminum legs were recognized by me as not very reliable (but how could anyone hook a tablet on the street and pull it along?).
To solve this engineering problem, it was decided to use a small recess inside the tablet mount (under the tablet itself, where there are holes for the bracket legs).
There after all the nut of M4 will perfectly enter! A M4 bolt, we can install directly through the wristband and fasteners. ( I originally wanted to put the M5, but unfortunately, the reserves did not have the right length bolt, and I could not buy it. And even with a hacksaw, I carefully cut off the space without damaging the thread - for my “straight” hands a space task ).
To do this, we need to punch another 1 hole under the thread (and protect the fabric with a grommet).
And since this bolt should be installed last, after assembly (when the tablet fastener is mounted on the bracket legs), it cannot be made part of a wristband.
There is nothing terrible - we will install a 2nd eyelet on the inner surface of the wristband, the inner diameter of which will be larger than the diameter of the bolt head. However, this will be the final of our operation, since the center of the inner surface of the sleeves will have to be neatly on the seam! Those. First, we sew a part of the seam (not all, to make it easier to get to the grommet), install the grommet, sew the seam to the end.
Schematic process:
Accordingly, the result:
Around the center of the mounting plate and bracket we need a hole.
It is obvious that it is necessary to drill it in the COLLECTED state (i.e. when the plate is dressed on the bracket).
It is important that this central screw will be longer than the screws for fastening the bracket. Approximately 2-3mm!
Result:

( if you look closely, you can see that the bolt and nut in the photo are not M4, but M5. This is evident from the fact that the nut is larger than the nuts securing the bracket to the wristband. I forgot to redo the photo at the time of writing this article )
In principle, the mount at this point is completely ready. And I was even preparing to make the final photos, but ...
There is another idea how to improve this device.
The fact is that I decided to increase the battery life of the navigator.
Extra battery
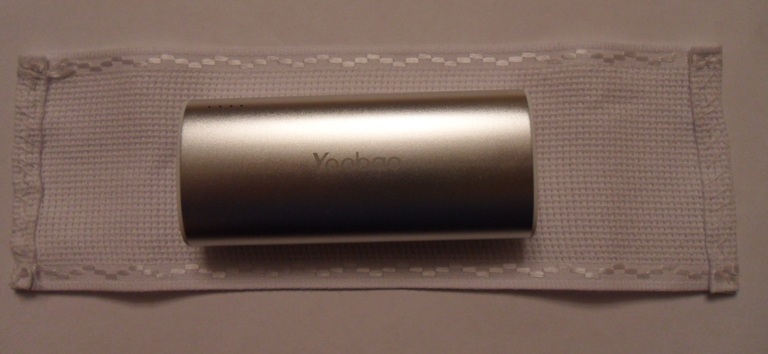
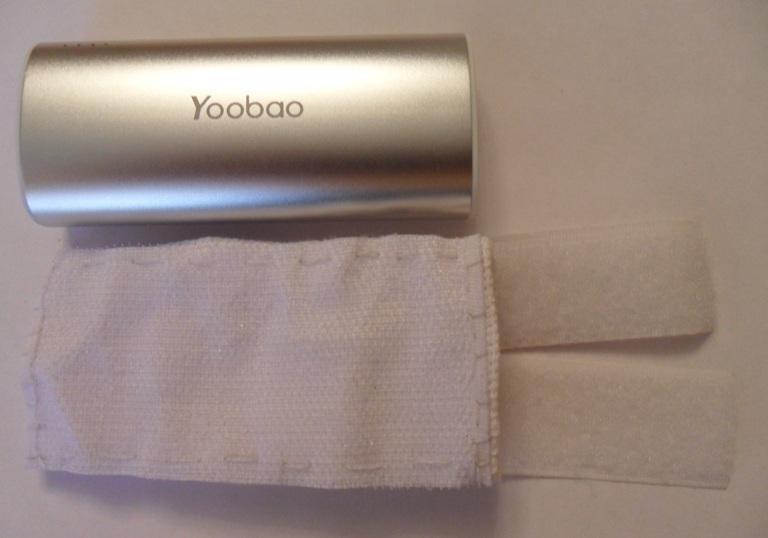
A practically unused (donated) Yoobao battery at 5200mAh was found on the farm. If you add it to the native 3100 mAh tablet, then it is almost + 150% of the resource!

But do not carry the same battery in your hand, if there is a mount for the tablet!
The simplest solution is a Czech with a sticky tape .
For this, a regular canvas was bought (70mm wide).
canvas tape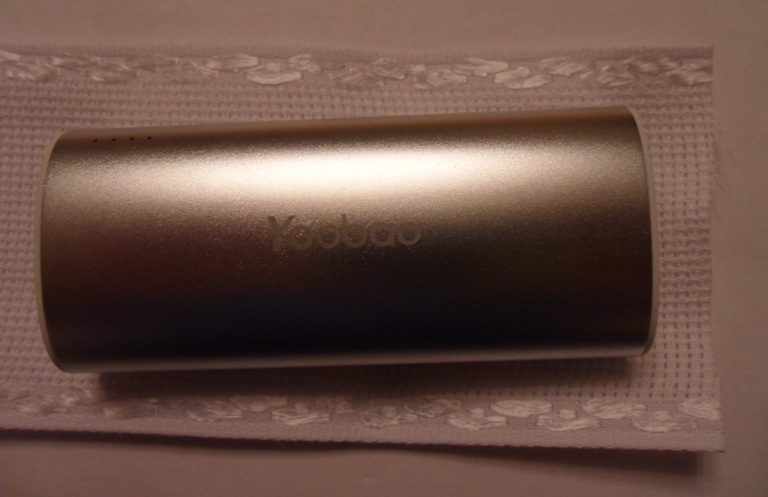
The battery is on top to represent the scale.
The battery is on top to represent the scale.
Cut off a small piece of tape, a long bit longer than the battery (about 3-4 centimeters).
Bend and hem the edges so that the threads do not open.
The resulting billet should be slightly longer than the battery (obviously, about its thickness).
The side on which there are folded and hemmed edges of the tape will be inside.
Approximately half of the outside we need to sew a wide tape-adhesive tape.
At the edge of the second half we will sew 2 narrow tapes of velcro.
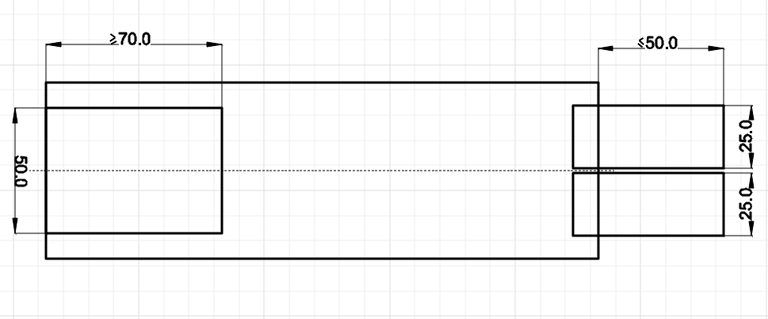
- the size of a wide tape-velcro (hooks) - 50 * 70 (NOT more, otherwise it will be inconvenient to turn out)
- the size of narrow years of velcro (soft) - 60 * 25 (approximately 10 mm to sew and 50 free ends, you can more)
After that, fold the canvas-canvas in half (inside out, and with velcops inside) and sew the edges.
After the tape is sewn, the resulting “bag” must be turned inside out (so that all our seams are inside it). This is the most time consuming operation. The fabric will cling to the tape-Velcro (the one with hooks), so the smaller it is, the easier it will be to turn.
2 tips:
1) Despite the complexity of turning it out, it is better to sew the velcro first, and then sew the tape into a “bag”. I also tried the process in the reverse order - it is an order of magnitude more difficult to wield a needle inside the "bag" because it is necessary to act blindly.
2) Periodically insert into your product cover what should be stored there. I sewed it in “a little thing in a thread”, so if I had made a mistake of only 1 millimeter, the battery would not have gotten trite.
=)
2 tapes of Velcro "tail" close the cover and securely fix the battery inside. I made them specifically 2 so that you can not close one, if the power cord is inserted into the battery.
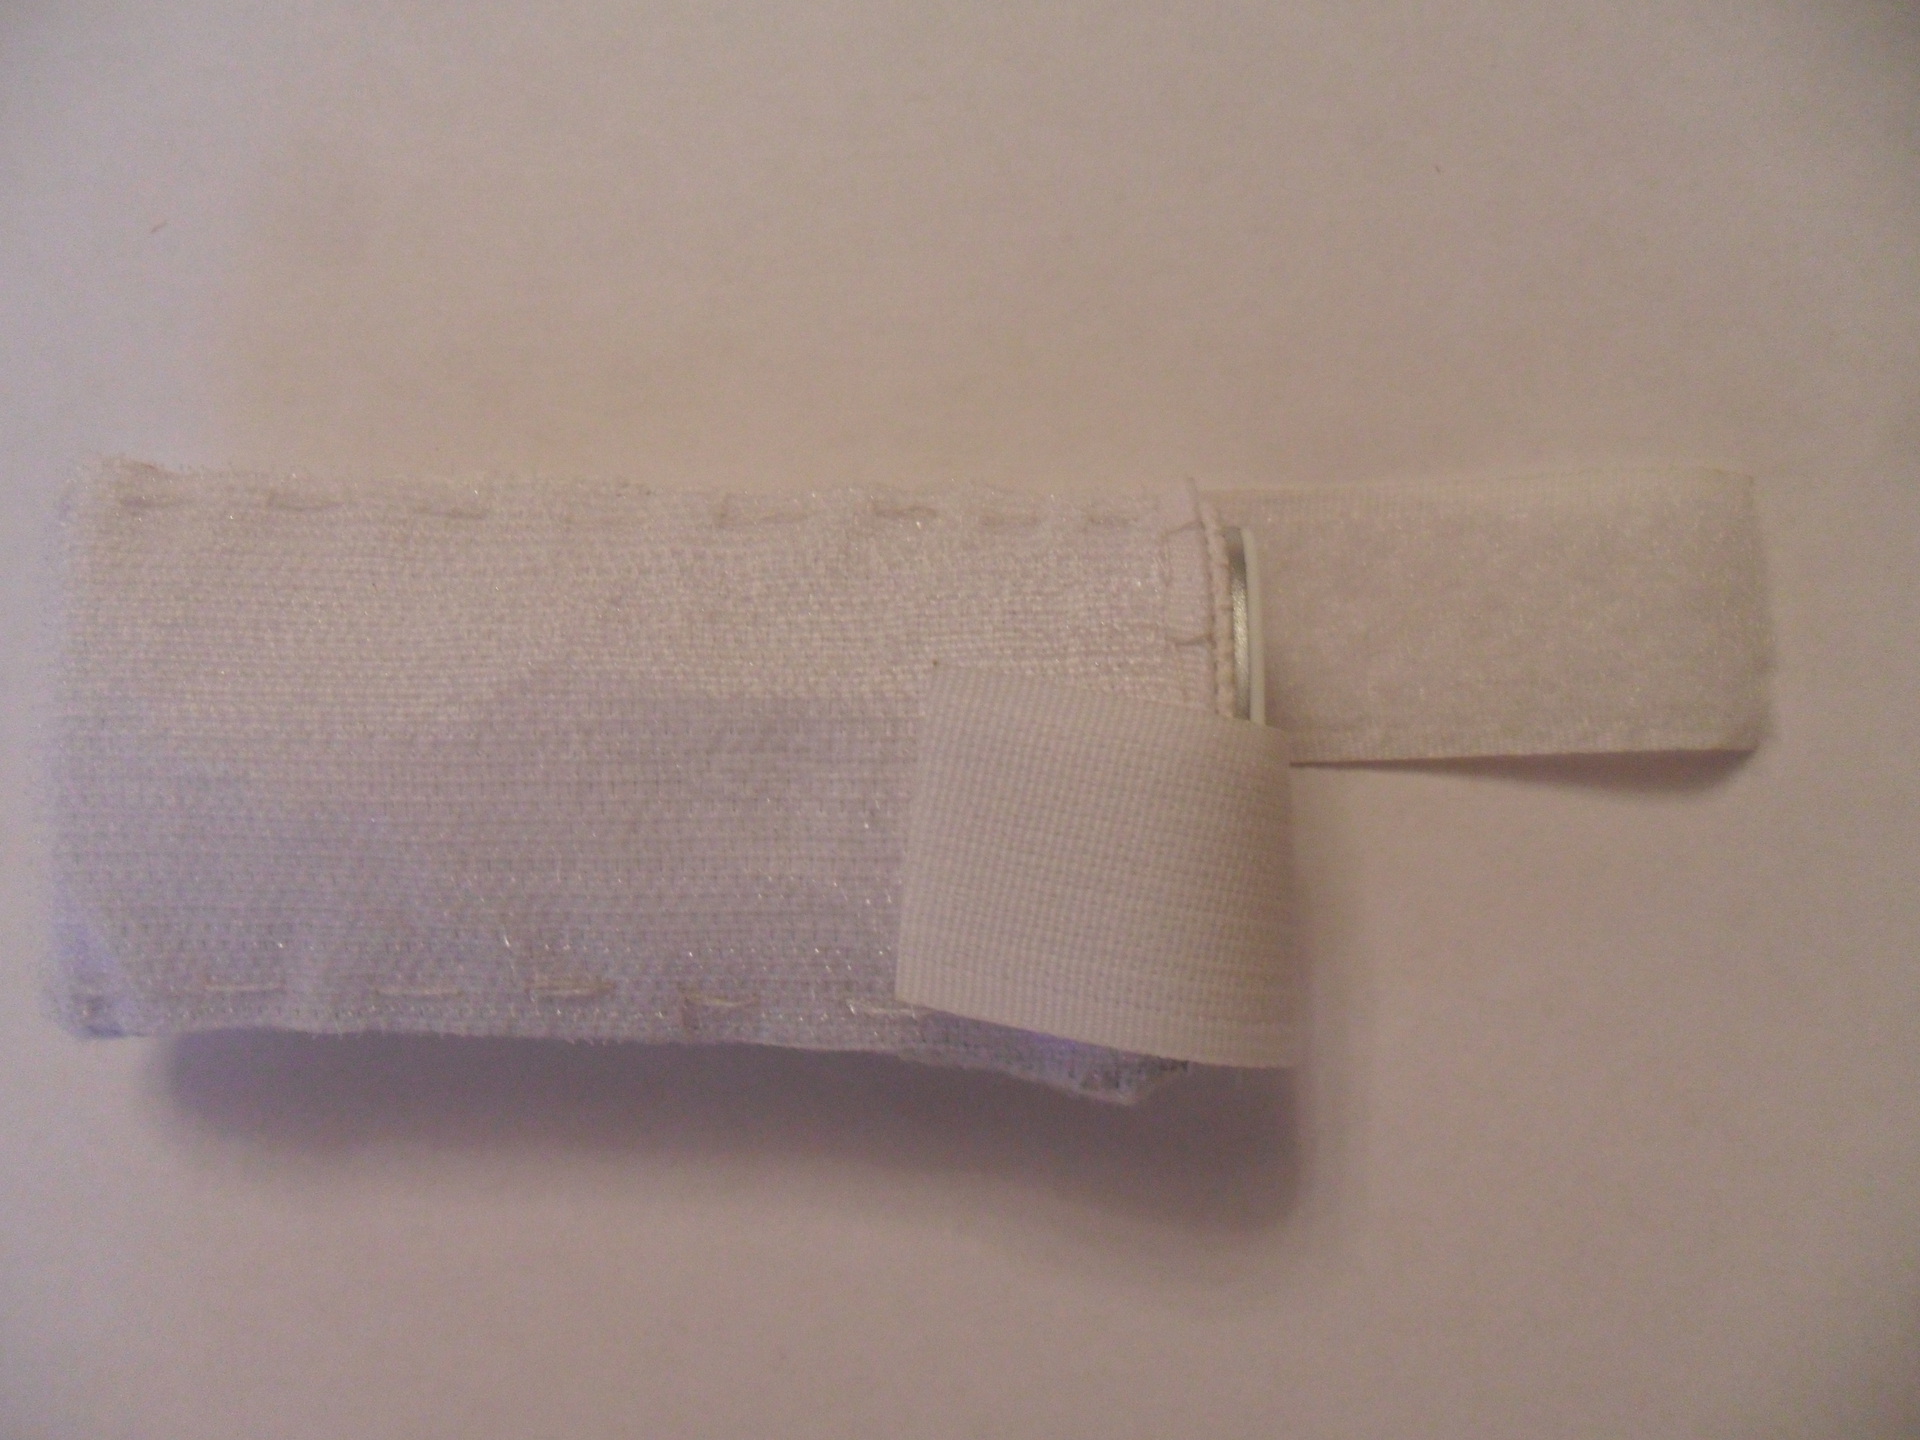
Now it remains to sew on the armband the soft part of the adhesive tape to which our case will be attached.
I made it a little wider than the part with the “hooks” on the case itself in order to have a certain reserve (everyone knows that the villi from the soft part of the velcro are gradually pulled out and clogged with dirt, reducing the effectiveness of the velcro, so it’s better to increase the work surface).

Now our product is 100% complete!
Real-life examples
Unfortunately, during the holidays, almost on the second day, the camera was lost, which was used to make high-quality photos of operation of the resulting “system”, so the photos taken on the phone are below ...
= (
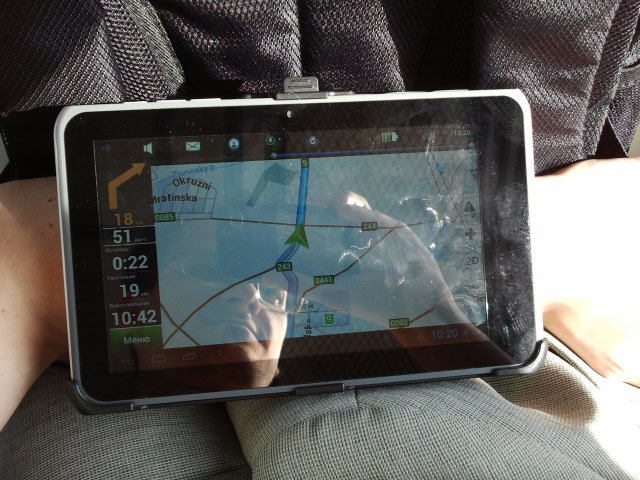
Check the bus route on the way from Prague to the castle Melnik. Alas, the bus makes a number of stops along the way, I was not familiar with the route, the destination point was also unfamiliar, and the bus had to move on, so in order not to miss my stop I just made a route.
Similarly, it is convenient to follow the route and stops in trains and trains (but there is still usually a scoreboard indicating stops)

From the terrace in the cafe in Melnik castle there is a beautiful view of the Elbe and the Vltava rivers, which is not a pity to take even on the poor camera of the tablet. The sleeve over the camera lens did not hit.
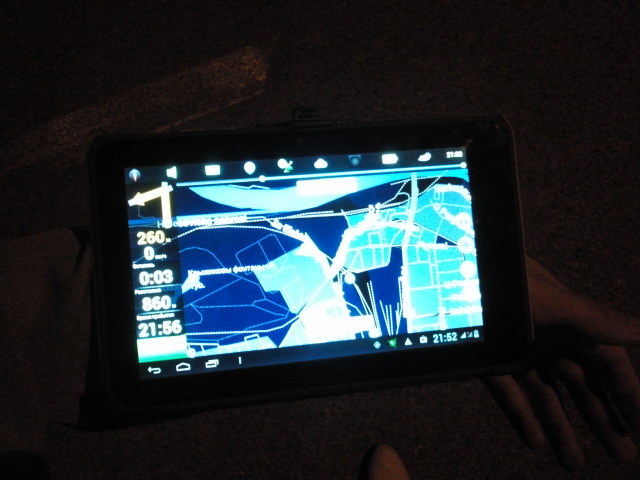
At night, the terrain changes visually, and even where you are well versed you may need help. — .

.
= (
Check the bus route on the way from Prague to the castle Melnik. Alas, the bus makes a number of stops along the way, I was not familiar with the route, the destination point was also unfamiliar, and the bus had to move on, so in order not to miss my stop I just made a route.
Similarly, it is convenient to follow the route and stops in trains and trains (but there is still usually a scoreboard indicating stops)
From the terrace in the cafe in Melnik castle there is a beautiful view of the Elbe and the Vltava rivers, which is not a pity to take even on the poor camera of the tablet. The sleeve over the camera lens did not hit.
At night, the terrain changes visually, and even where you are well versed you may need help. — .
.
In addition, I post a list of used materials and tools (and the cost of their purchase).
Tools and materials
Required
- Aluminum business card AUMA
- Tablet + Car Mount
- Ordinary pencil
- Ruler
- Stationery knife
- Chisel - 6mm
- Chisel - 18mm
- Hammer
- Pliers
- Screwdriver
- Drill - 4mm
- Drill - 5mm
- Screws - M4 * 10 - 4pcs (about 15p for 10pcs)
- Cap nuts - M4-4pcs (about 15p for 10pcs)
- Screw - M4 * 12 - 1pc (about 15p for 10pc)
- Nut - M4 - 1pc (about 15p for 10pc)
- Scissors / knife
- Needle (even 2, considering 1 broken)
- White thread
- Plastic card (given the failed experiment, even 2)
- Stand for wooden teapot
- Tape-canvas, 70mm (74p per 1 meter)
- Velcro tape, 25mm (38p per 1 / 4m)
- Velcro tape, 100mm (20p per 1 / 4m)
- File
- Wristband (99r)
- Cringles - 5mm - 5pcs (30p for 10pcs)
- Cringles - 10mm - 1pc (30p for 10pc)
- - / / / ----
( , , )
- ( 1- . 2- «»)
- ( 1- . )
- — 1 ( , , . .)
- 2
- Elbow pads (larger in size with a good patch on the outer surface, but either too small or too synthetic - even a short walk in it was extremely uncomfortable and it was not used)
TOTAL: 351r
Of course, in fact, my expenses were significantly higher, because I had to buy some tools, some consumables were bought, but not used (for example, M5 bolts / nuts), and some materials were bought "with a margin" that guaranteed several attempts at manufacturing corresponding nodes.
As I thought from the very beginning, if there was any reasonable offer on the market to buy it, it would hardly be much more expensive.
Source: https://habr.com/ru/post/235135/
All Articles