Star Wars Musical Doorbell on Arduino
Hello everyone, not so long ago I told, and showed on the video, how to flash Attiny13 with the help of Arduino , and now I will show a practical application of this.
I have to say right away, fuses, firmware in the form of a hex-file, C code, a sketch for the Arduino IDE, files for Proteus 7 can be downloaded at the end of the article.
Well, that really pull, show you how it works:
')
I have long wanted such a musical doorbell, so that when you press the button, you play the Empire march (Imperial March or Darth Vader's Theme) from Star Wars , I really like this tune.
As the name of the video above shows, the main component of the device is the Attiny13 microcontroller, its application made it possible to make the dimensions of the board several times smaller than the matchboxes:
The power range is from about 2 V to 6 V, that is, from two to four AA batteries, although ideally a voltage of 3-4 V would be provided, that is, a lithium-ion battery from a mobile phone or a 18650 battery is ideal for this purpose. although it is desirable that it be protected, since I have not yet implemented any protection against a deep discharge.
Well, I will say a few words on circuitry:
The scheme looks like this (Proteus files are attached at the end of the article, you can not even collect anything on the breadboard):
Since the microcontroller cannot independently draw out enough loudness so that the bell can be heard throughout the house, I added the NPN transistor 2N3904 , a pretty common transistor, in principle any transistor can pull the speaker, in my case the transistor is 100 mA.
When using 3 AA batteries, the transistor warmed a little, when using two, the volume remained at a decent level, but the transistor was already slightly warm.
Resistor R2 - standard piping for a microcontroller, serves as protection against accidental reloads of the microcontroller, in principle it should work without it, resistor R1 serves to limit the current at the base of the transistor.
The photo also shows a protective diode, it protects from carelessness, namely from polarity reversal, in my case, polarity reversal will very quickly disable the microcontroller, and both pyrotechnic and sound effects are quite possible. By the way, on the diagram below, I forgot to specify it, any diode that is designed for voltages from 10 V and current from 200 mA is suitable, put in series on the board's input, or by minus or plus, I have minus.
The speaker from the old Dial up modem Zyxel, by the way, there is one well-known joke about Dial up modems from this company:
The code, I’ll say right away, google it , or rather I found it on the YouTube space, here’s the actual video itself:
Under the video there is a link to the code , here it is:
As you can see, there are two arrays in frequencies — in English from frequency and durations — duration, all data like word, PROGMEM — the data is stored in the microcontroller’s flash memory (without using the pgmspace.h library, it will not work) buzz () which takes three parameters - the pin on which the frequency will be generated, the second - the frequency in hertz, the third - the duration in milliseconds.
This code should be Arduino compatible and even work on Arduino Uno, Arduino Nano or Arduino Pro Mini and other duins as well.
As you could hear on the video, the sound of my video is slightly different from the second video, the fact is that I changed the length of the notes a little and three times by the popular “scientific spear” method, picked up the frequency, since such a small speaker doesn’t play well with me Those frequencies that were originally, and added a button, what kind of doorbell without a button?
As you can see, the additions of triggering when the button was pressed exceeded 1024 bytes and had to insert pieces of C code to fit in attiny13.
Frequency raised by strings buzz (PIN_BUZZER, pgm_read_word (& (frequences [i])) * 3, 2 * pgm_read_word (& (durations [i]))); however, by multiplying the generated frequencies, as you understand by three, this is purely my whim, you can not multiply anything at all.
If you are an experienced arduinschik, then I think you will notice in the code that I made a software pull-up of the PULLUP resistor to the PB4 port.
For those who do not know, this is done like this:
We expose the port to the input and feed it a logical unit. Now the port will have a voltage, approximately equal to the supply voltage, if this port is shorted to ground, it will change its state from a logical unit to a logical zero, and the microcontroller will not suffer, as an internal resistor with a nominal value of 10-100 kΩ is used.
I did it purely to save the board size, you could just solder a 10 kΩ resistor to the power supply and the desired port, when you press the button, we “pull the port to the ground” and it will be a logical zero.
I add code on pure AVR-C for work AVR'schikov:
It seems like it should compile without problems, but when using this code in the Arduino IDE for some reason, the size of the hex file at least doubles the “Sketch size in binary code: 1,986 bytes (out of 1,024 bytes maximum)”.
How I managed to find out all this because of the use of _delay_us (*); although the Arduin function delayMicroseconds (*); essentially doing the same thing, I think this is a shortage of kernel files for tini13, here’s a thread on the arduino bourgeois forum, from where I got the kernel files, though I didn’t modify it a bit, I’ve referred to the Attiny13 firmware article with the help of the Arduino .
If someone helps to deal with this bug, I will be only too happy, because theoretically, Arduino IDE should easily swallow the C-shn code.
Well, a few words on the firmware - on the first video I ran a tinkle at a frequency of 1.2 MHz, as for me, so 1.2 million operations are enough to play your favorite melody and not much to eat at the same time, by the way, the hex file is compiled just for this frequency.
Here are the fusions from the fusion calculator :
Now, anyone who has an AVR programmer will be able to repeat this device.
As promised at the beginning of the article here are all the necessary files .
All my publications .
And finally - "May the force be with you."
UPD 01/05/2015
Habrouser SparF did what I was lazy to do all this time, namely, to bring energy consumption to mind and make playback when you press the PB1 button.
Now, after playing the melody, the MK does not “thresh” further, waiting for the button to press, but it falls asleep and every time the button is pressed, it wakes up, loses the Imperial march we love and then goes to sleep, consuming almost nothing, enough batteries for a dozen years in this mode of consumption.
Code is compiled without problems in the Arduino IDE.
Files
Checked, it works:
I have to say right away, fuses, firmware in the form of a hex-file, C code, a sketch for the Arduino IDE, files for Proteus 7 can be downloaded at the end of the article.
Well, that really pull, show you how it works:
')
I have long wanted such a musical doorbell, so that when you press the button, you play the Empire march (Imperial March or Darth Vader's Theme) from Star Wars , I really like this tune.
As the name of the video above shows, the main component of the device is the Attiny13 microcontroller, its application made it possible to make the dimensions of the board several times smaller than the matchboxes:
Board dimensions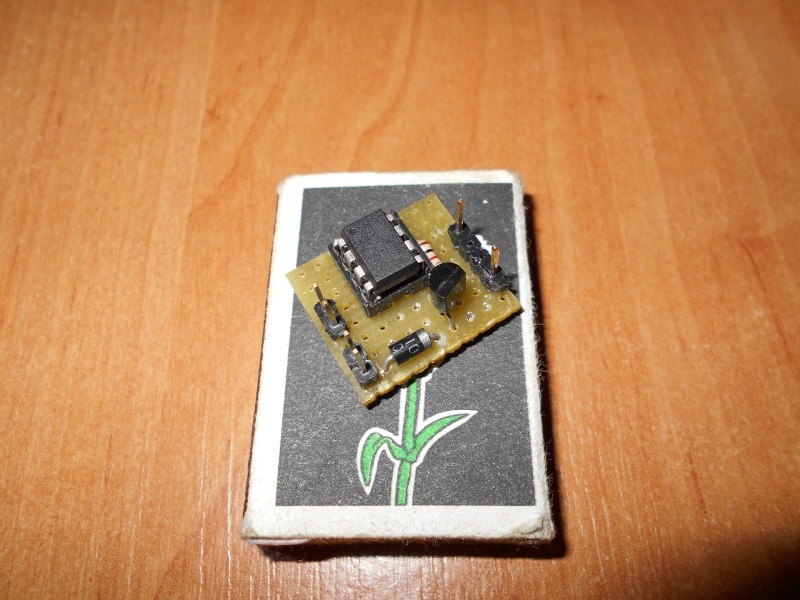
And now everything is connected:
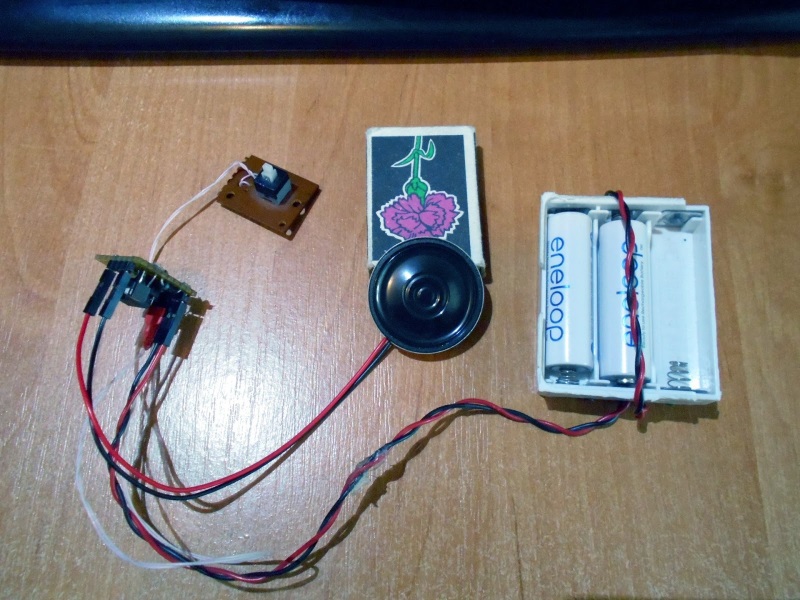
And now everything is connected:
The power range is from about 2 V to 6 V, that is, from two to four AA batteries, although ideally a voltage of 3-4 V would be provided, that is, a lithium-ion battery from a mobile phone or a 18650 battery is ideal for this purpose. although it is desirable that it be protected, since I have not yet implemented any protection against a deep discharge.
Well, I will say a few words on circuitry:
The scheme looks like this (Proteus files are attached at the end of the article, you can not even collect anything on the breadboard):
Drawn in Proteus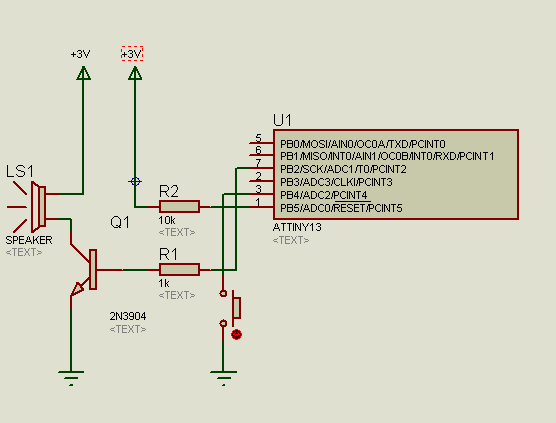
Since the microcontroller cannot independently draw out enough loudness so that the bell can be heard throughout the house, I added the NPN transistor 2N3904 , a pretty common transistor, in principle any transistor can pull the speaker, in my case the transistor is 100 mA.
When using 3 AA batteries, the transistor warmed a little, when using two, the volume remained at a decent level, but the transistor was already slightly warm.
Resistor R2 - standard piping for a microcontroller, serves as protection against accidental reloads of the microcontroller, in principle it should work without it, resistor R1 serves to limit the current at the base of the transistor.
The photo also shows a protective diode, it protects from carelessness, namely from polarity reversal, in my case, polarity reversal will very quickly disable the microcontroller, and both pyrotechnic and sound effects are quite possible. By the way, on the diagram below, I forgot to specify it, any diode that is designed for voltages from 10 V and current from 200 mA is suitable, put in series on the board's input, or by minus or plus, I have minus.
The speaker from the old Dial up modem Zyxel, by the way, there is one well-known joke about Dial up modems from this company:
Joke
Two hackers sit, and a cat enters the room. One hacker asks:
- Your cat?
- Yes, my. Zuhel name is!
- Why Zuhel?
- Here look. He takes a broom, pokes them at the cat and says: “Zuhel, connect !!!” Cat:
- Pshshshshshshshshshshshshshshshsh!
- Your cat?
- Yes, my. Zuhel name is!
- Why Zuhel?
- Here look. He takes a broom, pokes them at the cat and says: “Zuhel, connect !!!” Cat:
- Pshshshshshshshshshshshshshshshsh!
The code, I’ll say right away, google it , or rather I found it on the YouTube space, here’s the actual video itself:
Under the video there is a link to the code , here it is:
Code from video description
Sketch in binary code: 946 bytes (out of 1,024 bytes maximum)
#include <avr/pgmspace.h> // by @tartakynov // programmed for ATtiny13 in Arduino IDE using core13 http://sourceforge.net/projects/ard-core13/ #define PIN_LED 1 #define PIN_BUZZER 0 #define COUNT_NOTES 39 word frequences[COUNT_NOTES] PROGMEM = { 392, 392, 392, 311, 466, 392, 311, 466, 392, 587, 587, 587, 622, 466, 369, 311, 466, 392, 784, 392, 392, 784, 739, 698, 659, 622, 659, 415, 554, 523, 493, 466, 440, 466, 311, 369, 311, 466, 392 }; word durations[COUNT_NOTES] PROGMEM = { 350, 350, 350, 250, 100, 350, 250, 100, 700, 350, 350, 350, 250, 100, 350, 250, 100, 700, 350, 250, 100, 350, 250, 100, 100, 100, 200, 100, 350, 250, 100, 100, 100, 200, 100, 350, 250, 100, 750 }; void setup() { pinMode(PIN_LED, OUTPUT); pinMode(PIN_BUZZER, OUTPUT); } void loop() { for (byte i = 0; i < COUNT_NOTES; i++) { buzz(PIN_BUZZER, pgm_read_word(&(frequences[i])), 2 * pgm_read_word(&(durations[i]))); delay(100); } delay(3000); } void buzz(unsigned char pin, word frequencyInHertz, word timeInMilliseconds) { long delayAmount = (long)(long(1000000) / (long)frequencyInHertz); long loopTime = (long)(((long)timeInMilliseconds * 500) / delayAmount); for (long i = 0; i < loopTime; i++) { digitalWrite(pin, HIGH); delayMicroseconds(delayAmount); digitalWrite(pin, LOW); delayMicroseconds(delayAmount); } } Sketch in binary code: 946 bytes (out of 1,024 bytes maximum)
As you can see, there are two arrays in frequencies — in English from frequency and durations — duration, all data like word, PROGMEM — the data is stored in the microcontroller’s flash memory (without using the pgmspace.h library, it will not work) buzz () which takes three parameters - the pin on which the frequency will be generated, the second - the frequency in hertz, the third - the duration in milliseconds.
This code should be Arduino compatible and even work on Arduino Uno, Arduino Nano or Arduino Pro Mini and other duins as well.
As you could hear on the video, the sound of my video is slightly different from the second video, the fact is that I changed the length of the notes a little and three times by the popular “scientific spear” method, picked up the frequency, since such a small speaker doesn’t play well with me Those frequencies that were originally, and added a button, what kind of doorbell without a button?
Slightly corrected and commented
Sketch in binary code: 976 bytes (out of 1,024 bytes maximum)
// by @tartakynov: // http://youtu.be/5R7NeQkVS_8 // and me - vk.com/razniepodelki #define F_CPU 1200000L // #include <avr/pgmspace.h> // PROGMEM #define PIN_BUZZER 2 // PB2 #define BUTTON 4 // PB4 #define COUNT_NOTES 39 // word frequences[COUNT_NOTES] PROGMEM = { // 392, 392, 392, 311, 466, 392, 311, 466, 392, 587, 587, 587, 622, 466, 369, 311, 466, 392, 784, 392, 392, 784, 739, 698, 659, 622, 659, 415, 554, 523, 493, 466, 440, 466, 311, 369, 311, 466, 392 }; word durations[COUNT_NOTES] PROGMEM = { // 350, 350, 350, 250, 100, 350, 250, 100, 700, 350, 350, 350, 250, 100, 350, 250, 100, 700, 350, 250, 100, 350, 250, 100, 100, 100, 450, 150, 350, 250, 100, 100, 100, 450, 150, 350, 250, 100, 750 }; //void setup() //{ int main( void ) // void setup(), { pinMode(PIN_BUZZER, OUTPUT); // pinMode(BUTTON, INPUT); // digitalWrite(BUTTON, HIGH); // //LOW //} //void loop() //{ while(1){ // void loop()( ) if (digitalRead(BUTTON) == LOW) { // for (byte i = 0; i < COUNT_NOTES; i++) // { buzz(PIN_BUZZER, pgm_read_word(&(frequences[i])) * 3, 2 * pgm_read_word(&(durations[i]))); // : // buzz(PIN_BUZZER, pgm_read_word(&(frequences[i])), 2 * pgm_read_word(&(durations[i]))); // 3 //(pgm_read_word(&(frequences[i])) * 3) // //delay(100); // } } //delay(3000); // } // return 0; // int main( void ) } // while(1) void buzz(unsigned char pin, word frequencyInHertz, word timeInMilliseconds) // { // long delayAmount = (long)(long(1000000) / (long)frequencyInHertz); // 3 long loopTime = (long)(((long)timeInMilliseconds * 500) / delayAmount); // 1 - for (long i = 0; i < loopTime; i++) // 2 - { // 3 - digitalWrite(pin, HIGH); // delayMicroseconds(delayAmount); digitalWrite(pin, LOW); delayMicroseconds(delayAmount); } } Sketch in binary code: 976 bytes (out of 1,024 bytes maximum)
As you can see, the additions of triggering when the button was pressed exceeded 1024 bytes and had to insert pieces of C code to fit in attiny13.
Frequency raised by strings buzz (PIN_BUZZER, pgm_read_word (& (frequences [i])) * 3, 2 * pgm_read_word (& (durations [i]))); however, by multiplying the generated frequencies, as you understand by three, this is purely my whim, you can not multiply anything at all.
If you are an experienced arduinschik, then I think you will notice in the code that I made a software pull-up of the PULLUP resistor to the PB4 port.
For those who do not know, this is done like this:
We expose the port to the input and feed it a logical unit. Now the port will have a voltage, approximately equal to the supply voltage, if this port is shorted to ground, it will change its state from a logical unit to a logical zero, and the microcontroller will not suffer, as an internal resistor with a nominal value of 10-100 kΩ is used.
I did it purely to save the board size, you could just solder a 10 kΩ resistor to the power supply and the desired port, when you press the button, we “pull the port to the ground” and it will be a logical zero.
I add code on pure AVR-C for work AVR'schikov:
Code on AVR-C
// by @tartakynov: // http://youtu.be/5R7NeQkVS_8 // and me - vk.com/razniepodelki #define F_CPU 1200000UL // #include <avr/io.h> // #include <util/delay.h> // #include <avr/pgmspace.h> // PROGMEM #define PIN_BUZZER 2 // PB2 #define BUTTON 4 // PB4 #define COUNT_NOTES 39 // word frequences[COUNT_NOTES] PROGMEM = { // 392, 392, 392, 311, 466, 392, 311, 466, 392, 587, 587, 587, 622, 466, 369, 311, 466, 392, 784, 392, 392, 784, 739, 698, 659, 622, 659, 415, 554, 523, 493, 466, 440, 466, 311, 369, 311, 466, 392 }; word durations[COUNT_NOTES] PROGMEM = { // 350, 350, 350, 250, 100, 350, 250, 100, 700, 350, 350, 350, 250, 100, 350, 250, 100, 700, 350, 250, 100, 350, 250, 100, 100, 100, 450, 150, 350, 250, 100, 100, 100, 450, 150, 350, 250, 100, 750 }; //void setup() //{ int main( void ) // void setup(), { DDRB |= (1<<PIN_BUZZER); // DDRB &= ~(1<<BUTTON); // PORTB |= (1<<BUTTON); // //0 () //} //void loop() //{ while(1){ // void loop()( ) if (!(PINB & (1<<BUTTON))) { // for (byte i = 0; i < COUNT_NOTES; i++) // { buzz(pgm_read_word(&(frequences[i])) * 3, 2 * pgm_read_word(&(durations[i]))); // : // buzz(PIN_BUZZER, pgm_read_word(&(frequences[i])), 2 * pgm_read_word(&(durations[i]))); // 3 //(pgm_read_word(&(frequences[i])) * 3) // } //_delay_ms(100); // } //_delay_ms(3000); // } // return 0; // int main( void ) } // while(1) //void buzz(unsigned char pin, word frequencyInHertz, word timeInMilliseconds) void buzz(word frequencyInHertz, word timeInMilliseconds) // { // long delayAmount = (long)(long(1000000) / (long)frequencyInHertz); // 3 long loopTime = (long)(((long)timeInMilliseconds * 500) / delayAmount); // 1 - for (long i = 0; i < loopTime; i++) // 2 - { // 3 - //digitalWrite(pin, HIGH); // PORTB |= (1<<PIN_BUZZER); // //delayMicroseconds(delayAmount); // _delay_us(delayAmount); // //digitalWrite(pin, LOW); PORTB &= ~(1<<PIN_BUZZER); //delayMicroseconds(delayAmount); // _delay_us(delayAmount); // } } It seems like it should compile without problems, but when using this code in the Arduino IDE for some reason, the size of the hex file at least doubles the “Sketch size in binary code: 1,986 bytes (out of 1,024 bytes maximum)”.
How I managed to find out all this because of the use of _delay_us (*); although the Arduin function delayMicroseconds (*); essentially doing the same thing, I think this is a shortage of kernel files for tini13, here’s a thread on the arduino bourgeois forum, from where I got the kernel files, though I didn’t modify it a bit, I’ve referred to the Attiny13 firmware article with the help of the Arduino .
If someone helps to deal with this bug, I will be only too happy, because theoretically, Arduino IDE should easily swallow the C-shn code.
Well, a few words on the firmware - on the first video I ran a tinkle at a frequency of 1.2 MHz, as for me, so 1.2 million operations are enough to play your favorite melody and not much to eat at the same time, by the way, the hex file is compiled just for this frequency.
Here are the fusions from the fusion calculator :
Hidden text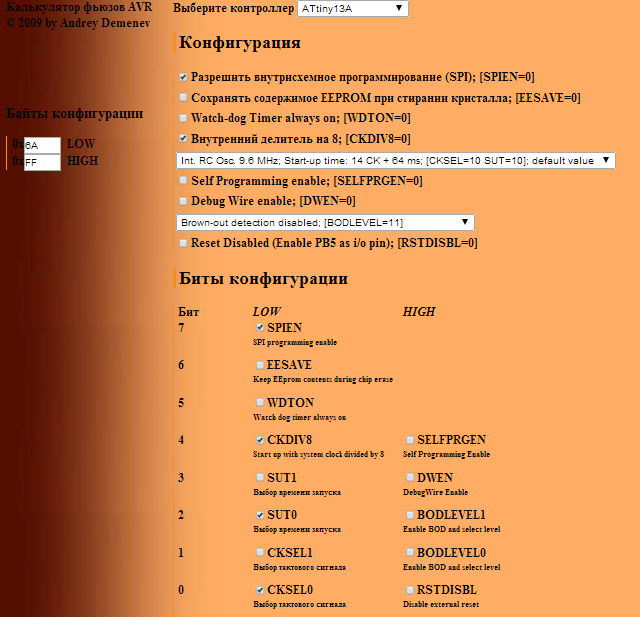
Now, anyone who has an AVR programmer will be able to repeat this device.
As promised at the beginning of the article here are all the necessary files .
All my publications .
And finally - "May the force be with you."
UPD 01/05/2015
Habrouser SparF did what I was lazy to do all this time, namely, to bring energy consumption to mind and make playback when you press the PB1 button.
Now, after playing the melody, the MK does not “thresh” further, waiting for the button to press, but it falls asleep and every time the button is pressed, it wakes up, loses the Imperial march we love and then goes to sleep, consuming almost nothing, enough batteries for a dozen years in this mode of consumption.
The scheme looks like this: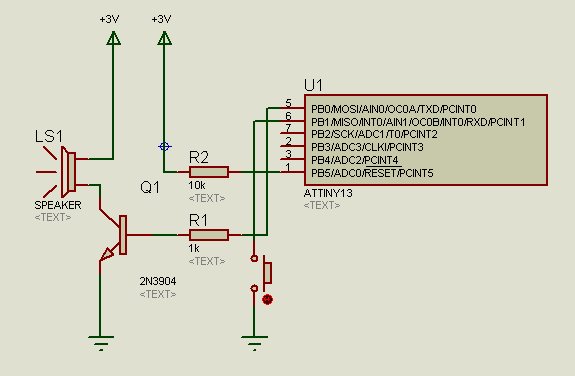
Here is the code:
/* Attiny13 Star Wars melody */ #define F_CPU 1200000UL #include <avr/io.h> #include <avr/pgmspace.h> #include <util/delay.h> #include <avr/interrupt.h> #include <avr/sleep.h> #define COUNT_NOTES 39 // const uint16_t frequences[COUNT_NOTES] PROGMEM = { 392, 392, 392, 311, 466, 392, 311, 466, 392, 587, 587, 587, 622, 466, 369, 311, 466, 392, 784, 392, 392, 784, 739, 698, 659, 622, 659, 415, 554, 523, 493, 466, 440, 466, 311, 369, 311, 466, 392 }; // const uint16_t durations[COUNT_NOTES] PROGMEM = { 350, 350, 350, 250, 100, 350, 250, 100, 700, 350, 350, 350, 250, 100, 350, 250, 100, 700, 350, 250, 100, 350, 250, 100, 100, 100, 450, 150, 350, 250, 100, 100, 100, 450, 150, 350, 250, 100, 750 }; int main( void ) { /* () = PB1 , .. INT0 - , Power-down () = PB0, .. PB0 PB1, */ DDRB = (1 << DDB0); // PB0 /* -, INT0 , RESET: , ... */ PORTB = (1 << PORTB1); // PB1 GIMSK = (1 << INT0); // INT0 (PB1) set_sleep_mode(SLEEP_MODE_PWR_DOWN); // Power-down sei(); // while(1) sleep_mode(); // } // static inline void doSound(void) { // TCCR0A = (1 << COM0A0) | (1 << WGM01); //Toggle OC0A (PB0) on Compare Match ; mode = CTC TCCR0B = (1 << CS01) | (1 << CS00); //Clock Select = F_CPU/64 // for (uint8_t i = 0; i < COUNT_NOTES; i++) { // int16_t freq = pgm_read_word(&(frequences[i])); int16_t dur = pgm_read_word(&(durations[i])); // 1.5 dur *= 3; dur /= 2; // PB0 OCR0A = (F_CPU / (2UL * 64UL * freq)) - 1; //, while (dur > 0) { _delay_ms(10); dur -= 10; } } // TCCR0A = 0; TCCR0B = 0; } // INT0 ISR(INT0_vect) { doSound(); } Code is compiled without problems in the Arduino IDE.
Files
Checked, it works:
Source: https://habr.com/ru/post/234763/
All Articles