We work with notifications in Windows Phone 8.1
Hello to all!
Today we will talk about new features related to notifications in Windows / Windows Phone 8.1. Let's discuss what types of notifications exist, how to organize them in your application, and also note one of the main innovations for Windows Phone devices - the Notification Center (Action Center) .
Notifications
Notifications in Windows Phone is an important way for an application to interact with the user. They help the user to learn about updating information in the application, notify him about the actions of other users or remind about the necessary activities.
')
Notifications can come from any service or locally from an application.
In Windows / Windows Phone 8.1, there are several ways to display notifications:

The user can receive a notification in the form of information on the application tile or with the help of a small black icon.
More information about the possibilities of living tiles can be found in the following course .
In addition to this, the following ways of displaying notifications are available:
- Toast - notifications - when you receive this type of notification, a text notification appears at the top of the device screen. At the same time, the application may currently be inactive. By clicking on this message, you can quickly switch to the appropriate application.
- Raw notifications - with this type of notification, the content is transferred directly to the application. The application processes the contents of the notification according to its own algorithm. These notifications do not have their own UI. Like other push notifications, the WNS service delivers them to an application from a cloud or any external service.
Toast - notifications
To work with Toast notifications, you need to connect this way of displaying notifications in the application manifest . We will not be able to send Toast notifications until we indicate that the application can send them.
Fortunately, it is very simple - switch the appropriate setting in Package.appxmanifest to “Yes”:

We send a Toast notification using the following XML code:
<toast> <visual> <binding template="ToastText04"> <text id="1">headline text</text> <text id="2">body text</text> </binding> </visual> </toast> Note that this XML schema is standard for any kind of notification.
When you click on Toast - the user will be able to launch the application.
For the Windows platform, there are as many as 8 display templates for Toast notifications, but on Windows Phone 8.1, they have only one fixed appearance, regardless of the template specified by the developer:

However, the logic of the operation of Toast - notifications on both platforms will be the same .
Ways to implement notifications
For all Windows devices, there are several ways to implement the notification mechanism:
- Scheduled Notifications. Such notifications will queue up system tasks and run at a given fixed time;

How it works:
Inside the application, a notification scheduler API is used that accesses the system queue schedule. The system checks the queue and at the time specified for the notification sends an update to the tile or Toast.var scheduleToast = new ScheduledToastNotification( xmlDoc, DateTimeOffset.UtcNow + TimeSpan.FromDays(1.0) ); var toastNotify = ToastNotificationManager.CreateToastNotifier(); toastNotify.AddToSchedule(scheduleToast);
Using the ScheduledToastNotification class, we create an object that is responsible for a scheduled notification, in which, using previously demonstrated XML code, we specify the content and set the time at which the notification should be displayed. And using the ToastNotificationManager class, we create a toastNotify object for which the function of adding a notification to the AddToSchedule () system queue is implemented. - Periodic updates (Periodic) - extract data for notifications from the specified URL and display them with the specified periodicity - once per hour / at 6 hours / at 12 hours;

How it works:
In the application, we turn to Windows System Services, indicating that we need notifications at intervals of 0.5 / 6/12 hours. These services, in turn, communicate with the tile and icon update API a certain number of times, using an HTTP request to receive XML notification data that can be sent to a tile or icon.var periodic = TileUpdateManager.CreateTileUpdaterForApplication(); Uri myTileFeed = new Uri("http://mysite.com/tileRSS.xml"); periodic.StartPeriodicUpdate(myTileFeed, PeriodicUpdateRecurrence.Hour);
Using the TileUpdateManager class, we create a periodic object that provides periodic tile updates. Next, create the URI channel myTileFeed, to which the data for the notification in xml format will be translated. An object of type PeriodicUpdateRecurrence allows you to set the required frequency of notifications coming from the myTileFeed channel.
There is an easier way to implement periodic notifications using the Package.appxmanifest file settings:
You only need to select the frequency and specify the URI channel. - Local application notifications (Local);

How it works:
The application uses updates of tiles and icons for notifications; in the background mode it already refers to the Toast API of notifications.BadgeNotification newBadge = new BadgeNotification(badgeDoc); BadgeUpdater update = BadgeUpdateManager.CreateBadgeUpdaterForApplication(); update.Update(newBadge);
Create an icon using an object of the BadgeNotification type and the Update () function implemented for an object of the BadgeUpdater type, instantly updating the icon.
Below is a table of the possibility of using methods for implementing notifications depending on their type:

Let's not disregard the last way to implement notifications - push notifications . Consider it in more detail.
Push notifications
Prior to the current release, for this type of notification in Windows 8.0 and Windows Phone 8.0, two different services were used: Microsoft Push Notification Services (MPNS) for phones and Windows Notification Services (WNS) for other Windows devices.
However, now Push notifications for any Windows / Windows Phone 8.1 devices are implemented via WNS.
What are the benefits for developers using WNS:
- The same approach for any device on Windows;
- Unified application registration process for push notifications;
- Unified push notification template for Windows / Windows Phone 8.1 platforms.
How it works:
- The Windows Phone 8.1 application communicates with the Windows Notification Client platform to obtain an application channel URI that is unique to each device and application;
- Further, the URI channel must be registered in the cloud service;
- The cloud service authenticates the WNS service by providing its data (SID packet and private key), and provides access that allows the service to send notifications. Now you can send push notifications using this service;
- The cloud service, at the appropriate time, sends a push notification to the WNS service;
- WNS communicates with the Windows Notification Client platform, which updates any of the specified notification types.

Read more about how the WNS service works here .
Below we implement the push-notification mechanism in the application step by step, performing a number of necessary actions:
To begin, we will make all the necessary preparations in the Development Center using our developer account:

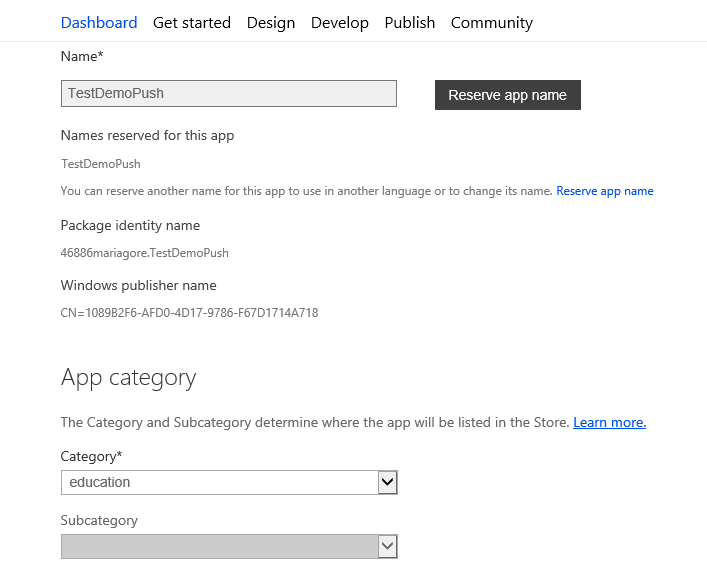
Click Submit App and reserve the name of the intended application:

Complete the App Info:
Go down below and in More Options, find the settings required for WNS:

Follow the link here :
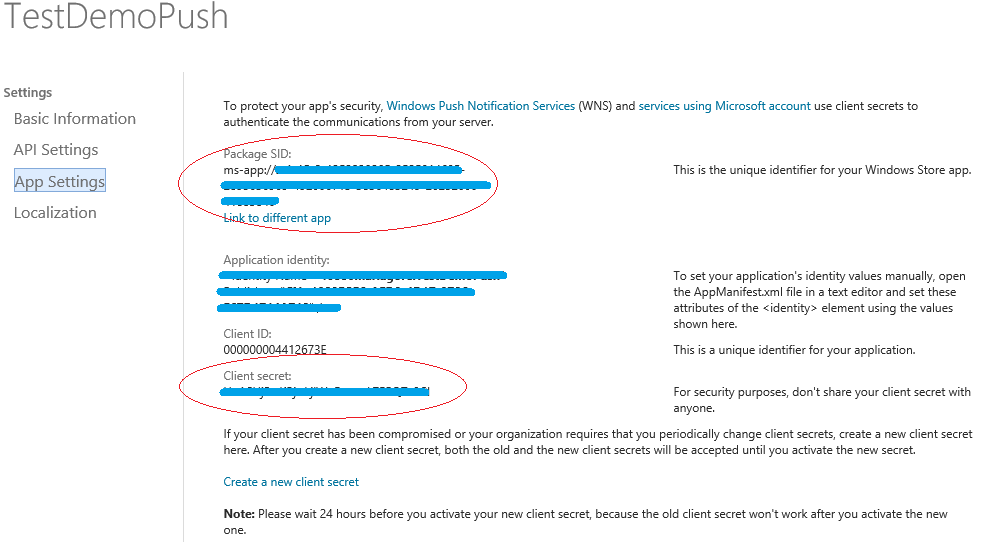
And we get all the necessary data for further work.
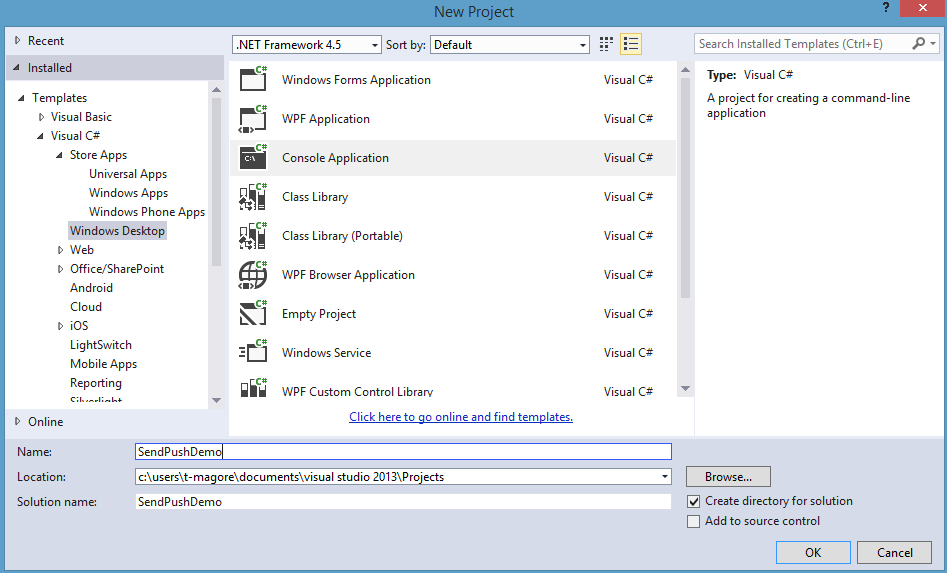
In Visual Studio, we will create a test universal application:

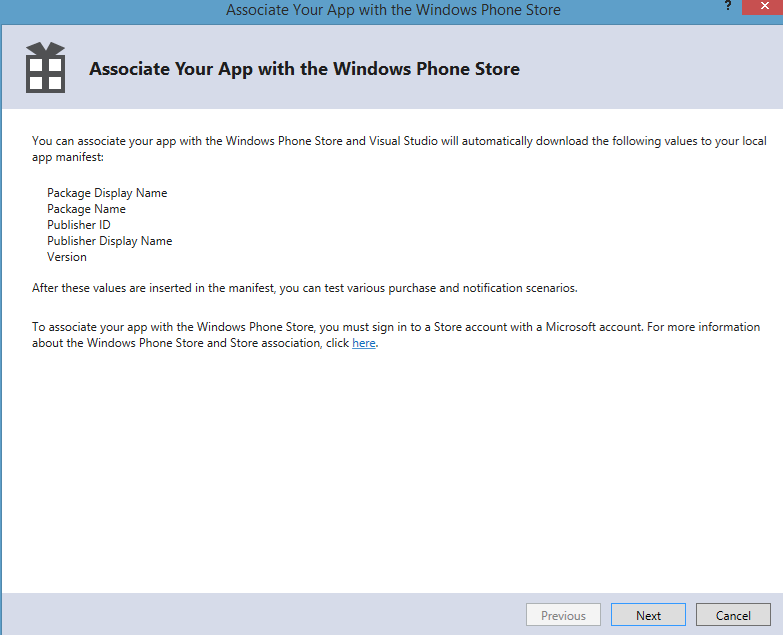
In the solution browser, right-click on the project for Windows Phone and select Associate App with the Store :

The binding wizard will start:
Log in using a developer account and select the application that we registered before:
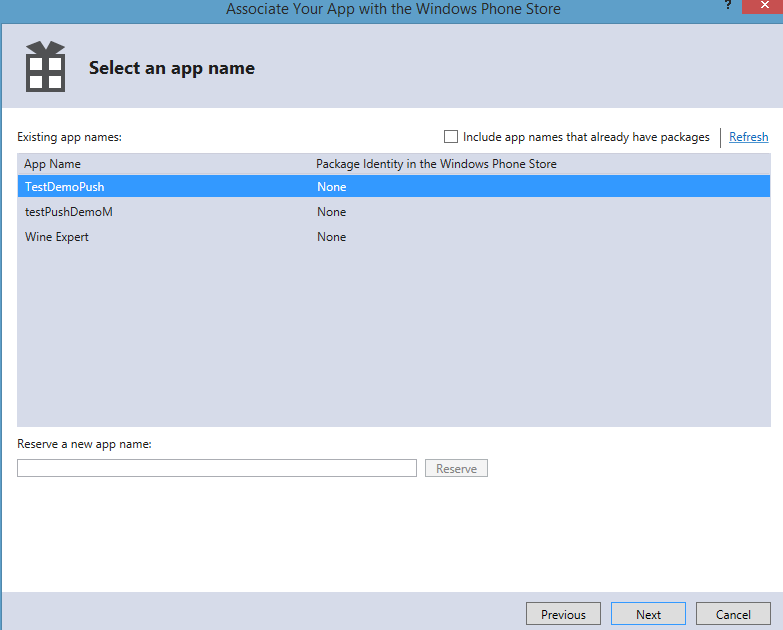
All data is filled automatically:
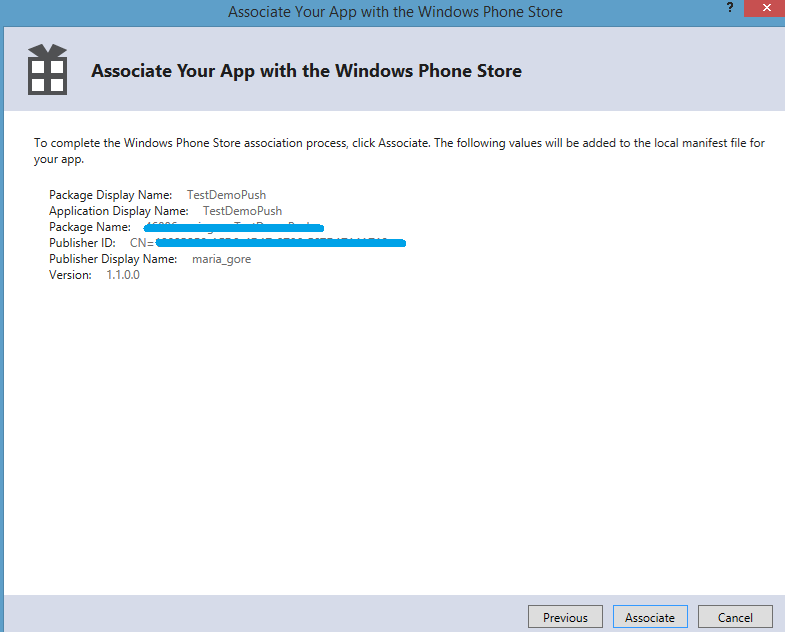
After clicking on Associate , a Package.StoreAssociation.xml file will be created in the Windows Phone project.
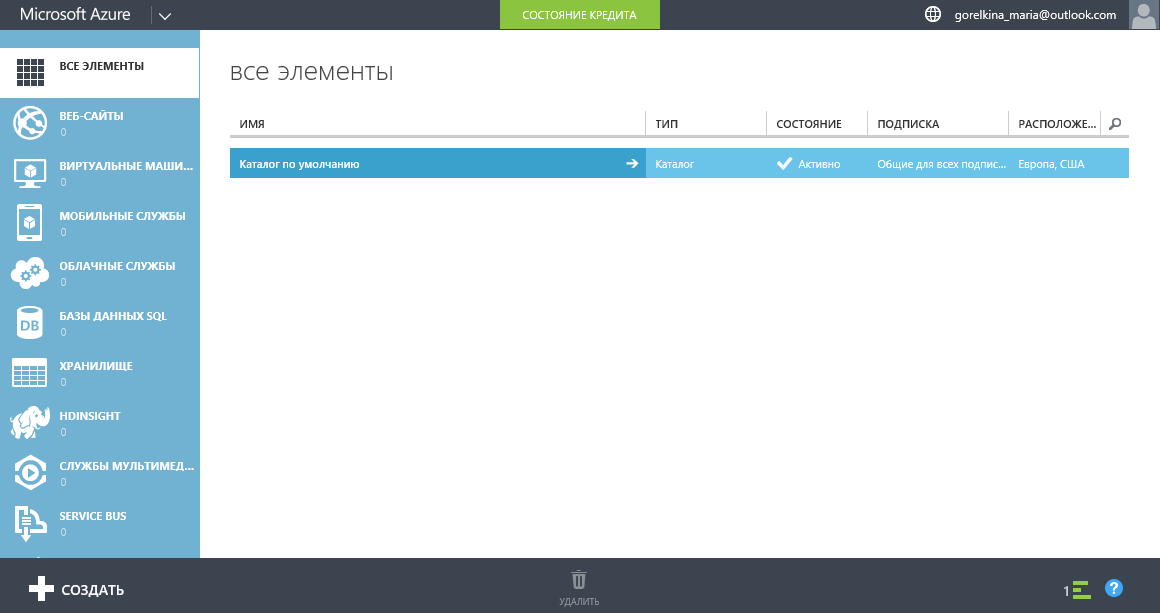
Log in to the Azure Control Panel and click the Create button:
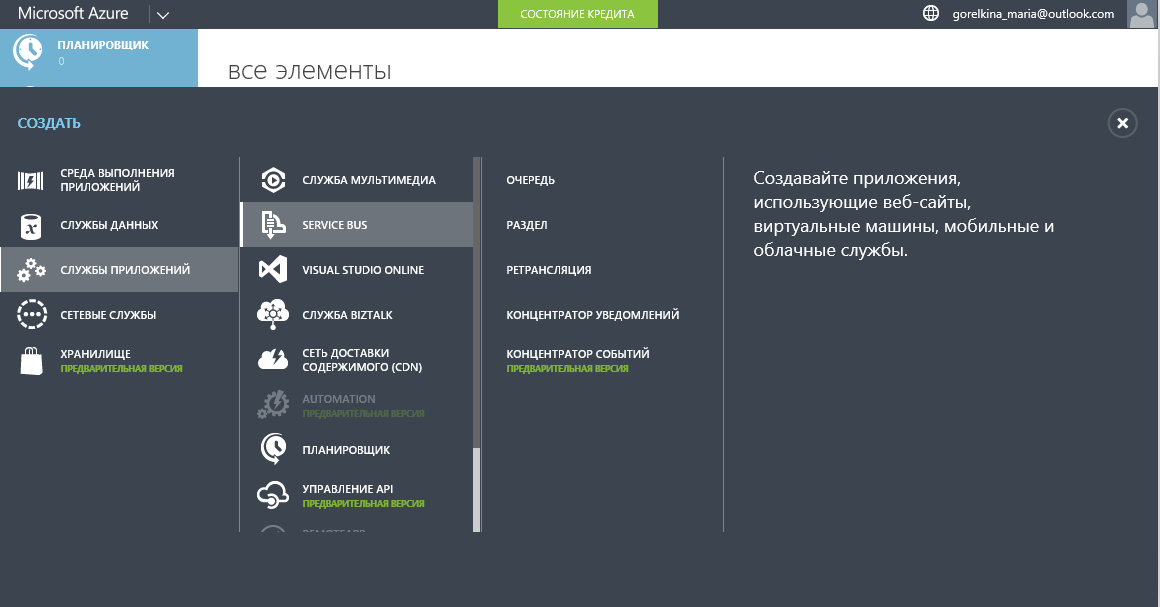
Click on Application Services -> Service Bus -> Notification Hub
Click on Quickly create and fill in the necessary data:
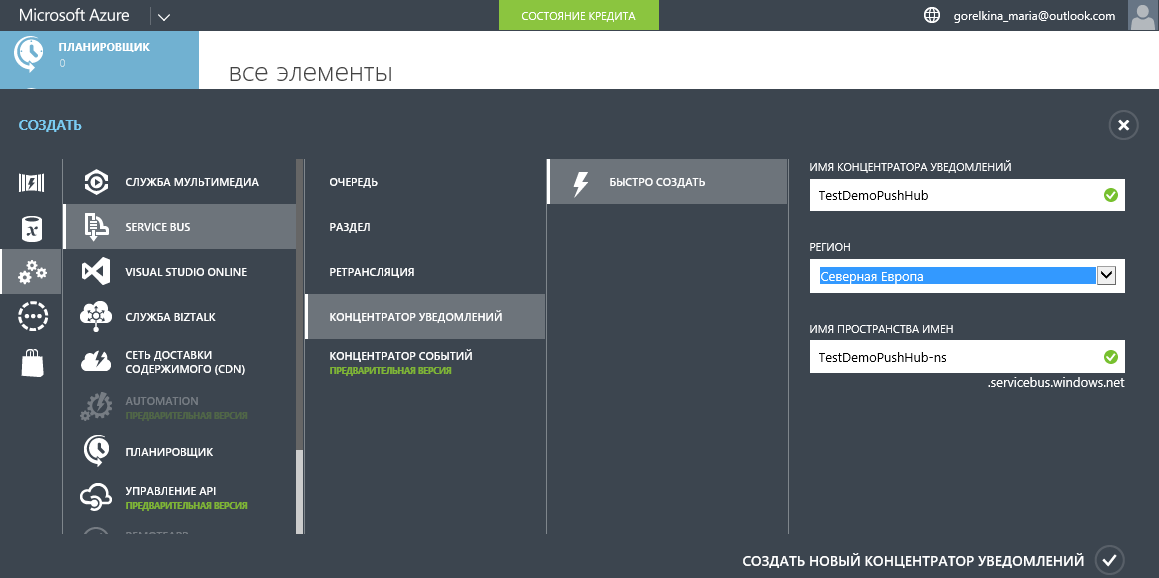
Create a new Notification Hub:
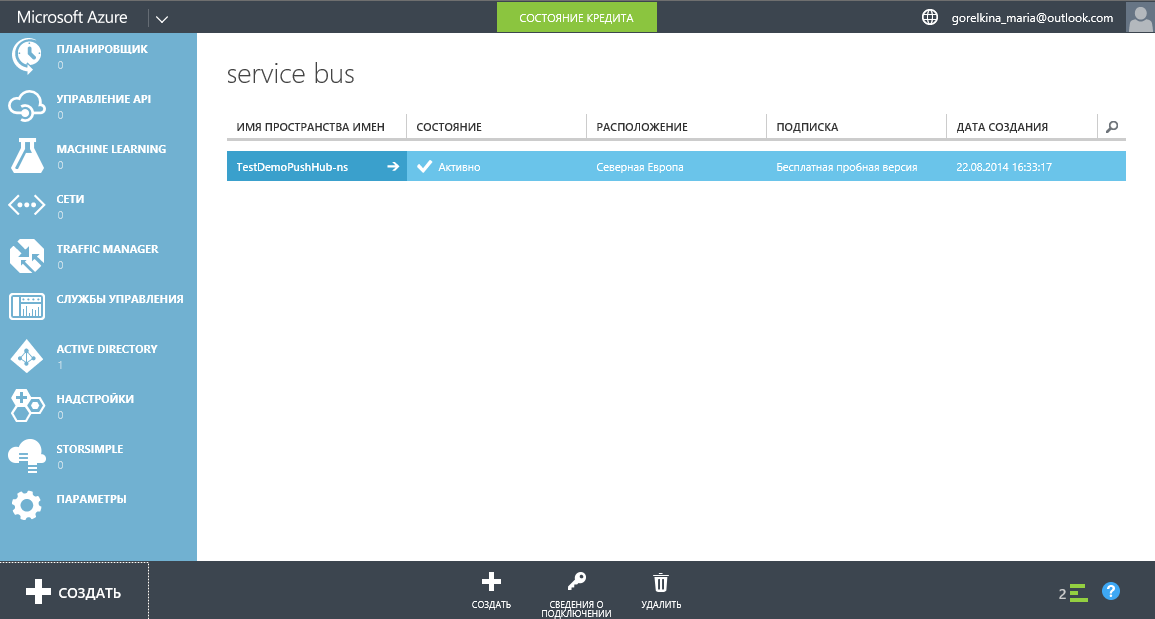
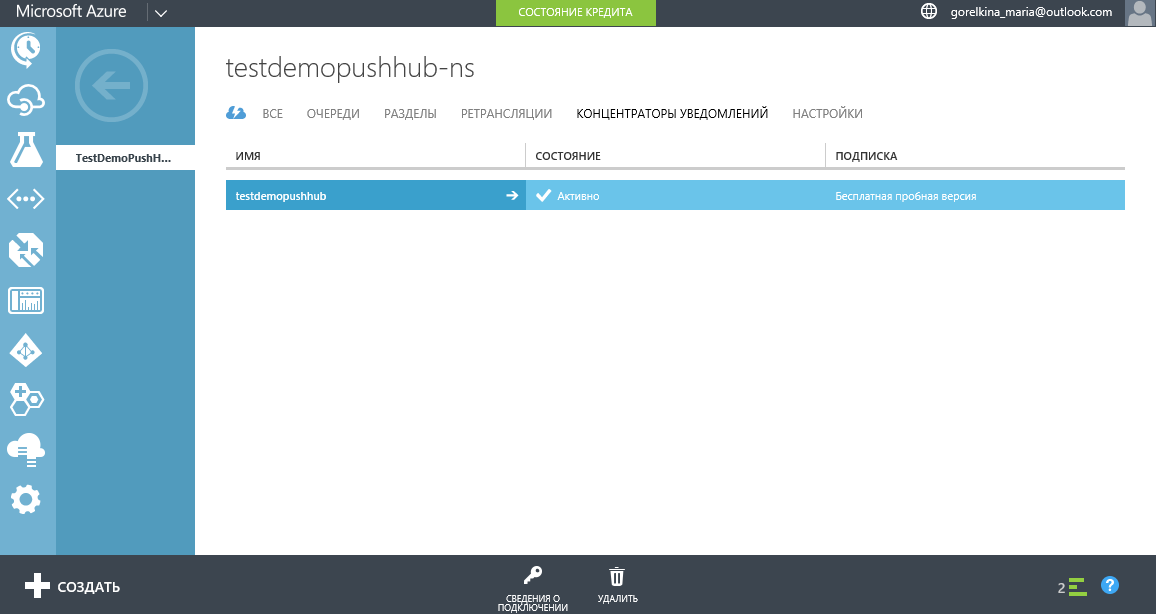
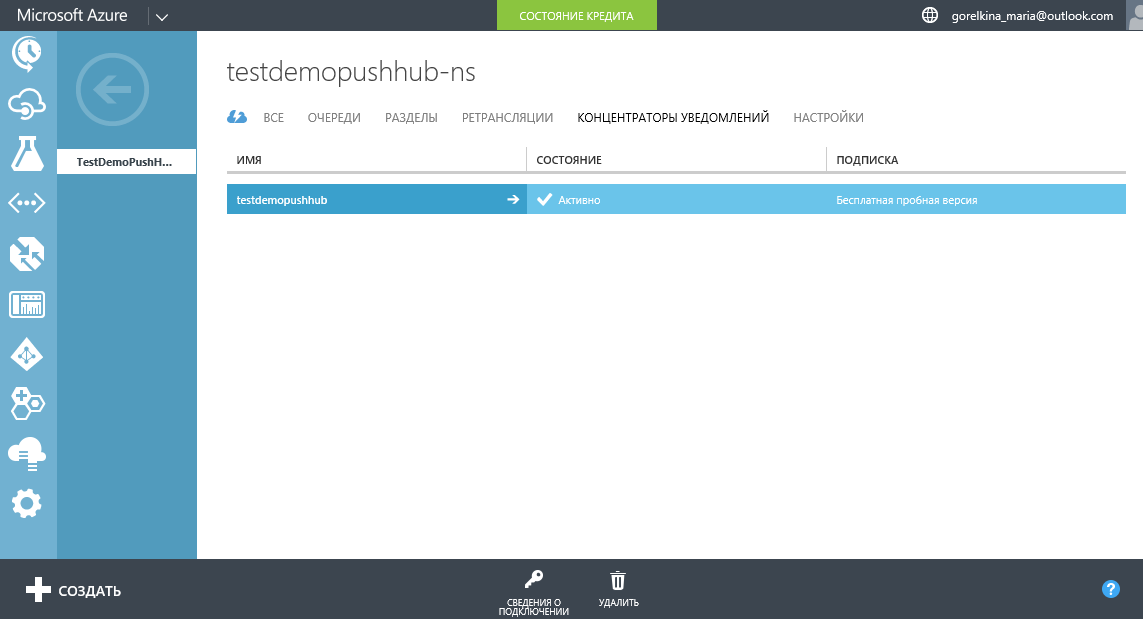
Click on the newly created TestDemoPushHub-ns namespace and find the newly created notification hub:
Let us go to the settings of the notification hub, where we fill in the required fields with the previously noted data:
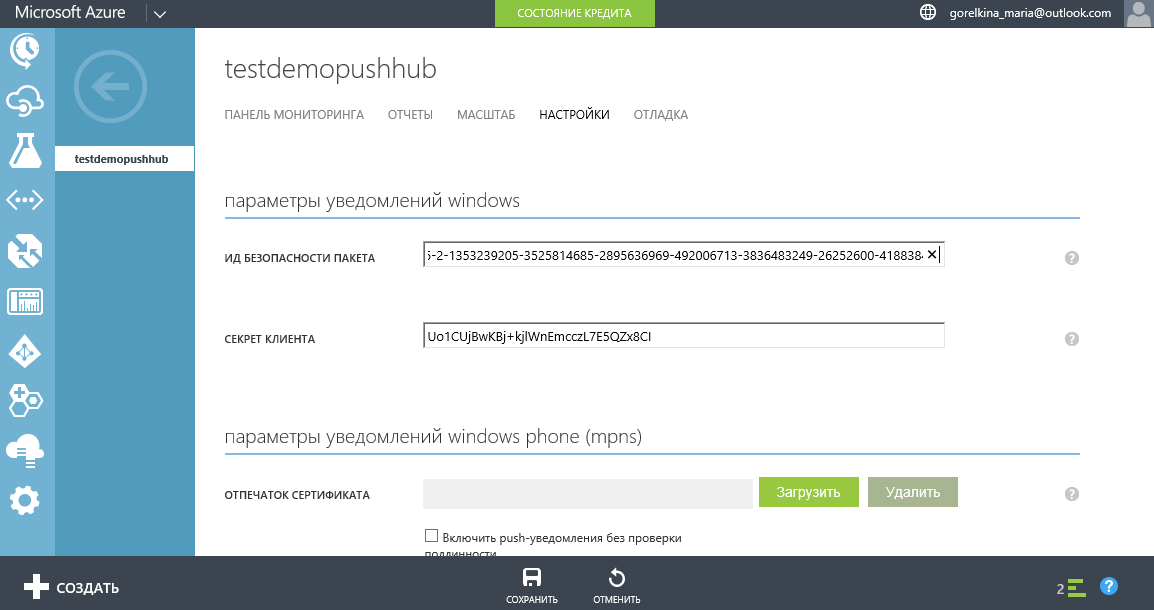
The notification hub is now configured as a WNS service. The following information will be needed to connect the application to the notification hub:
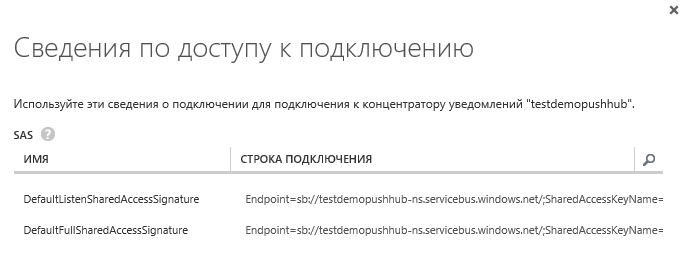
This information can be obtained by clicking on the "Connection Information" button:
We connect our application to the notification hub.
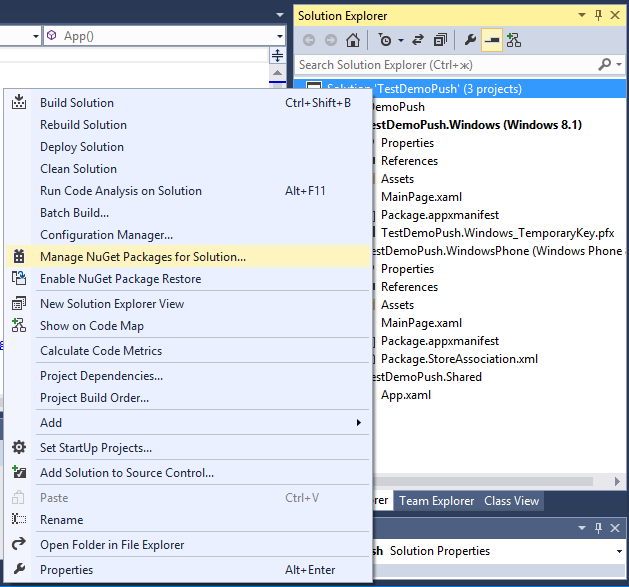
Right-click on the solution in Visual Studio:
In the Manage NuGet Packages dialog box, look for WindowsAzure.Messaging.Managed and click Install :
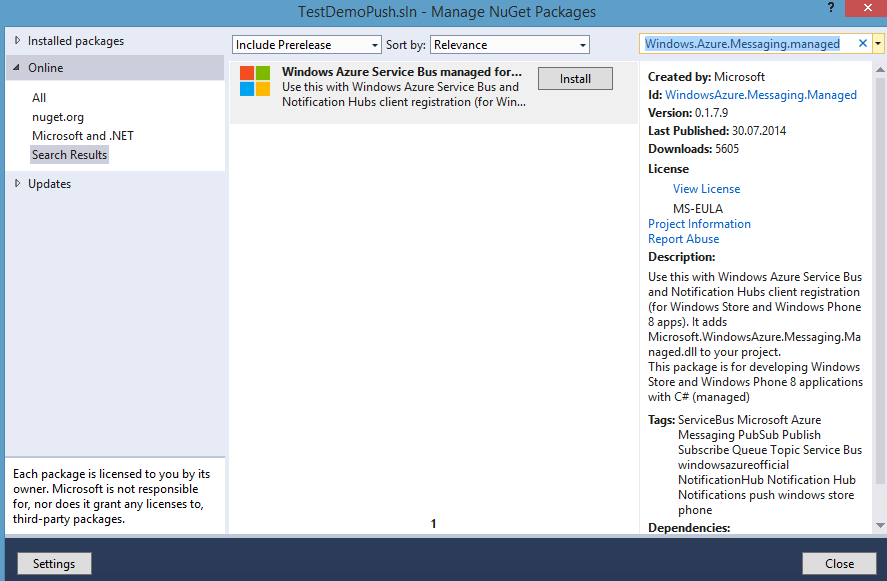
Next, select the installation package for the desired project:

Now we have downloaded, installed and added links to Azure Messaging libraries to all projects using the WindowsAzure.Messaging.Managed NuGet package.
Open the App.xaml.cs file from the shared Shared project and include the following libraries:
using Windows.Networking.PushNotifications; using Microsoft.WindowsAzure.Messaging; using Windows.UI.Popups; In the same place, we add the InitNotifictionAsync method:
private async void InitNotificationsAsync() { var channel = await PushNotificationChannelManager.CreatePushNotificationChannelForApplicationAsync(); var hub = new NotificationHub("TestDemoPushHub", "Endpoint=sb://testdemopushhub-ns.servicebus.windows.net/;SharedAccessKeyName=DefaultListenSharedAccessSignature;SharedAccessKey=z2Sj7sgwGpkvTyE/H5QyiffCpwCjV/PmJBY1h4WhXac="); var result = await hub.RegisterNativeAsync(channel.Uri); // Displays the registration ID so you know it was successful if (result.RegistrationId != null) { var dialog = new MessageDialog("Registration successful: " + result.RegistrationId); dialog.Commands.Add(new UICommand("OK")); await dialog.ShowAsync(); } } ", "Endpoint = sb: //testdemopushhub-ns.servicebus.windows.net/; SharedAccessKeyName = DefaultListenSharedAccessSignature; SharedAccessKey = z2Sj7sgwGpkvTyE / H5QyiffCpwCjV / PmJBY1h4WhXac ="); private async void InitNotificationsAsync() { var channel = await PushNotificationChannelManager.CreatePushNotificationChannelForApplicationAsync(); var hub = new NotificationHub("TestDemoPushHub", "Endpoint=sb://testdemopushhub-ns.servicebus.windows.net/;SharedAccessKeyName=DefaultListenSharedAccessSignature;SharedAccessKey=z2Sj7sgwGpkvTyE/H5QyiffCpwCjV/PmJBY1h4WhXac="); var result = await hub.RegisterNativeAsync(channel.Uri); // Displays the registration ID so you know it was successful if (result.RegistrationId != null) { var dialog = new MessageDialog("Registration successful: " + result.RegistrationId); dialog.Commands.Add(new UICommand("OK")); await dialog.ShowAsync(); } } This method gets the URI channel for the application from the WNS, then registers this URI channel with the notification hub. When creating the hub variable, we will not forget to specify the name of our notification hub and the connection string with Listen access:
var hub = new NotificationHub("<hub name>", "<connection string with listen access>"); ("TestDemoPushHub", "Endpoint=sb://testdemopushhub-ns.servicebus.windows.net/;SharedAccessKeyName=DefaultListenSharedAccessSignature;SharedAccessKey=z2Sj7sgwGpkvTyE/H5QyiffCpwCjV/PmJBY1h4WhXac="); Where the data for the necessary variables is obtained from the connection information for the notification hub in Azure:
hub name = TestDemoPush;
connection string listen access = DefaultListenSharedAccessSignature;
In the OnLaunched event handler in App.xaml.cs, add a call to the InitNotificationsAsync () method.
This is necessary so that the URI channel for your notifications is registered each time the application is launched.
In the solution browser, find and configure the Package.appxmanifest file:

Set the Toast capable setting to Yes.
Now the application is ready to receive notifications.
The main function of the application is to show the result of the channel registration:

Send notifications to the application.
Create a console application through which we will send push notifications:
Click Tools-> NuGet Package Manager-> Package Manager Console

Thus, we will add the link to Azure Service Bus SDK.
Let's connect the following library in the project: using Microsoft.ServiceBus.Notifications;
And add a method for sending notifications:
private static async void SendNotificationAsync() { NotificationHubClient hub = NotificationHubClient .CreateClientFromConnectionString("<connection string with full access>", "<hub name>"); var toast = @"<toast><visual><binding template=""ToastText01""><text id=""1"">Hello from a .NET App!</text></binding></visual></toast>"; await hub.SendWindowsNativeNotificationAsync(toast); } In the method, we create an object of type NotificationHubClient, where we fill in the necessary data for the connection:
connection string with full access = DefaultFullSharedAccessSignature (of your Service Bus);
hub name = TestDemoPushHub.
And then we create and fill in the data of the variable itself, which is responsible for the content of the notification:
<toast><visual><binding template=""ToastText01""><text id=""1"">Hello, guys!</text></binding></visual></toast>"; In the body of the program, call the written method:
SendNotificationAsync ();
We launch and receive push notifications from the TestDemoPush application to the phone:

Let's look at the notifications in the Notification Center :

When you click on any of them go to the application.
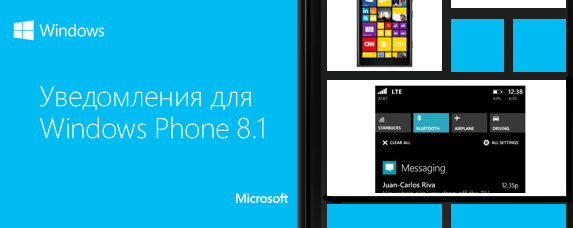
Notification Center
A few more words about one of the key innovations in Windows Phone 8.1 - the Notification Center (Action Center). Called it swipe down from the top of the screen. All new messages, notifications, mentions and reminders from various applications get into it. Also in the Notification Center are four switches that can be changed to call any settings.
Now users choose which of the applications can display notifications in the Notification Center, and application developers have received special APIs that enable them to choose which of the actions will be available from the notification center. Using these APIs and mechanisms, application developers can manage pop-up notifications.
New features for developers:
- Delete one or more notifications;
- Tagging and notification groups;
- Replacing outdated notification with a new one;
- Setting the notification validity period;
- “Goast Toast” - notifications that appear only in the Notification Center.
Notification Center is available only for the phone.
Learn more about the capabilities of the Notification Center for Developers in this course .
Conclusion
Notifications in Windows Phone 8.1 are a whole set of various tools, giving the developer the opportunity to choose the way his application communicates with the user. Nevertheless, I advise you to pay particular attention to the incredibly convenient and powerful WNS service, whose benefits were particularly noticeable on mobile devices.
useful links
Channel 9: Building Apps for Windows Phone 8.1
Microsoft Azure: Getting Started with Notification Hubs
MVA: Placement and promotion of applications in the Windows Store
Microsoft Virtual Academy (MVA) Training Courses
Microsoft Azure Portal
Windows Development Center
Download free or trial Visual Studio 2013
How to publish an application in the Windows Store
Download sample application from this article.
Source: https://habr.com/ru/post/234727/
All Articles