TestLink - pain and tears tester or a panacea? Implementation experience
As in many other startups in our projects, in the first year of existence, mountains of code were born, which, although well covered by unit tests, were still not covered in terms of functional testing. At first, we did a small check list. There were no problems until the project had several testers who know all the details of the project. But, as it always happens, if one person leaves the small team, then it is necessary to find an adequate replacement for him. And here there are great difficulties.
Our project has a very complex structure: only one section can have documentation of more than 100 pages. A plus, of course, is a locomotive from undocumented features and individual customer desires, which novice team members can take for bugs.
Fortunately, in our company there is and is actively developing the direction of working with students and novice specialists. The lack of personnel can be easily eliminated, but how quickly to connect a beginner to work? It was decided to introduce detailed test cases describing the whole set of project functions. To solve the problem at the first stage, we decided not to chase for paid solutions, but to use one of the free test management systems. The choice fell on TestLink.
TestLink itself is written in PHP, and there were no special problems with the installation. We created a database, gave the rights to the daddy, and the installation went smoothly.
')
Next, we started a project in the system, created the project structure and started writing tests. The very purpose of implementing this system was to enable us to identify the usefulness or uselessness of such systems for our projects.
After we wrote and tested our tests, it’s time to test the system in public. We distributed ready-made tests among novice employees and interns. The first run showed that the use of detailed tests made it possible to find a lot of bugs in hidden places of the project, which usually didn’t reach because of the priority of other features.
TestLink is currently not fully used. It includes the ability to use not only tests, but also conditions. The use of conditions is seen as a very promising feature of this system. Conditions refer to tests as many to many, which allows to implement several of the following usage models:
Due to the fact that our tests have not yet managed to acquire conditions, we will not mention them below.
The quality of testing after the introduction of TestLink, clearly, has increased. We are very grateful to this test management system for the detailed reports after running the tests and for introducing us to how to approach testing. Now we have a good debugging system for testing our project, thanks to which the new employee will literally half a day be fully involved in the work with the project and, having independently run all the tests, will be able to understand up to 80% of the project functions.
Despite all the advantages, we are faced with a number of shortcomings of the system. Naturally, everything is very subjective, and for other companies our claims will seem unfounded. We do not exclude the possibility that some of the shortcomings can be eliminated by examining the documentation or by digging a little in the code, but the goal was a little different. We needed to quickly assess the usefulness of such a system within our company.
Advantages:
Disadvantages:
We will demonstrate the work of the system on examples from our projects. A complete overview of the system does not make sense. The main message, in this case, aims to show how the system looks inside, and whether you can get on with it or not even install it. Therefore, we omit the stages of installing the system on the server, as well as the stages of the establishment of the project.
The first thing that the tester sees when opening TestLink is the start screen (Fig. 1).
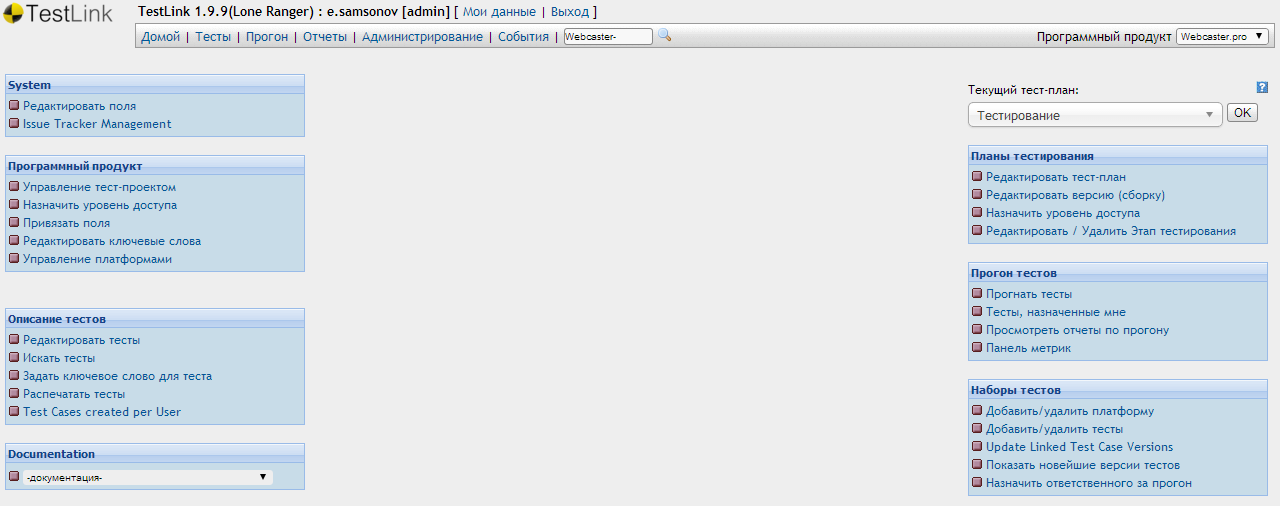
Fig. 1 - Start screen for working with a project in TestLink
From here begins any activity in the project. Here is performed:
The test editing page includes such features as:
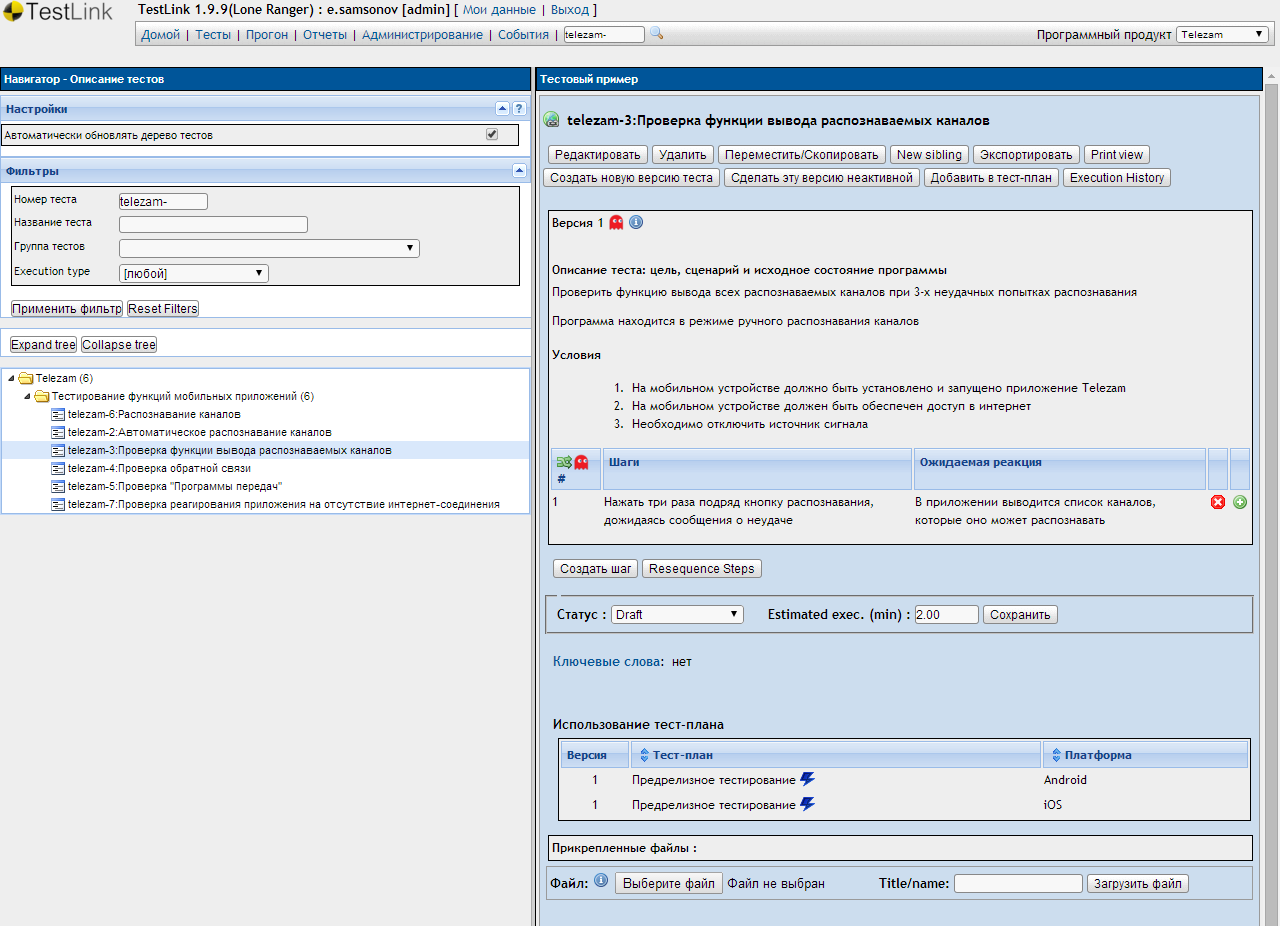
Fig. 2 - Test Editing in TestLink
Next, consider the distribution of tests on test plans.
To do this, the tests should be divided into different groups, which can then be used for runs that are suitable for the given conditions. In Figure 3 it can be seen that in this case the tests are distributed according to the types of testing that we conduct for the selected project. For other projects, we have different options for splitting into test plans, for example, on projects where there is no separation of tests into groups and we need to run all tests without exception each time, we have started test plans for Production and Staging environments.
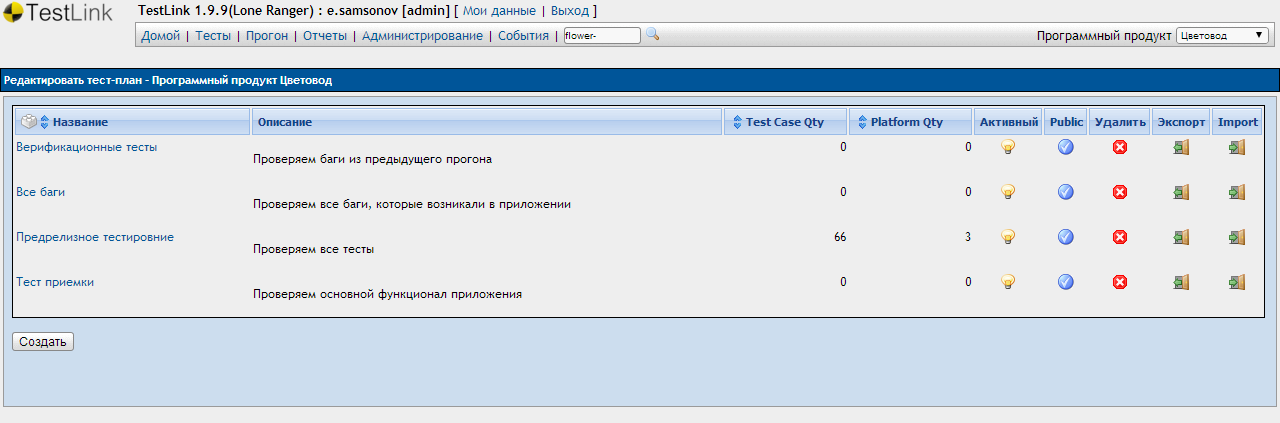
Fig. 3 - Editing a test plan
Assigning tests to your team members is easy. In the left part of the window (Fig. 4), you can select either one test or a group of tests, as well as use filters to find the necessary tests. You can then assign a tester who is responsible for running a specific test on a specific platform using check boxes and drop-down lists on the right side of the section.
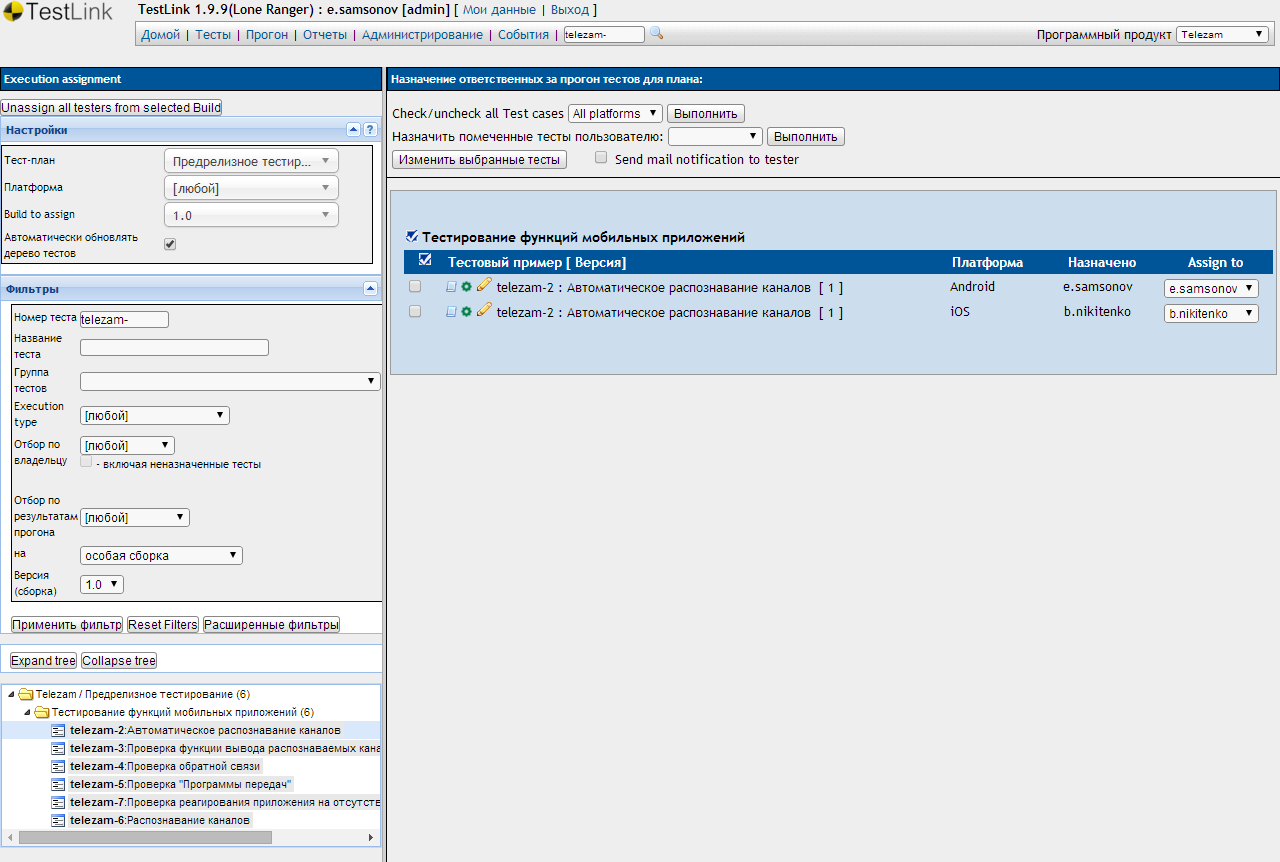
Fig. 4 - Distribution of tasks for testers in TestLink
After distribution of tests, the run looks like in Figure 5. The following is available on it:
In addition to these elements, you can see additional information:
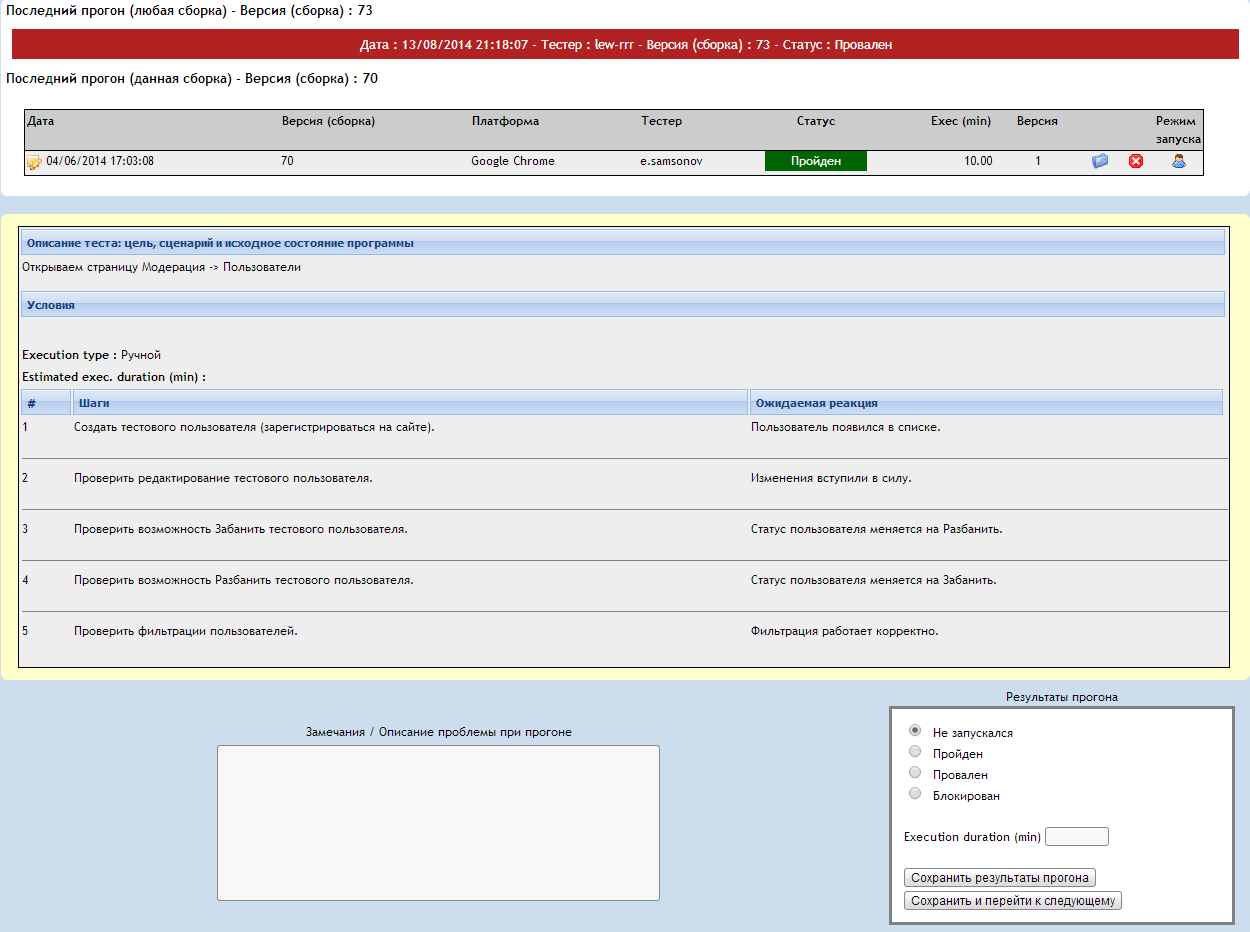
Fig. 5 - Test run in TestLink
Immediately after the distribution of tests, we can already observe the appearance of data on testers' reports in the “Reports” section of TestLink. The section presents many options:
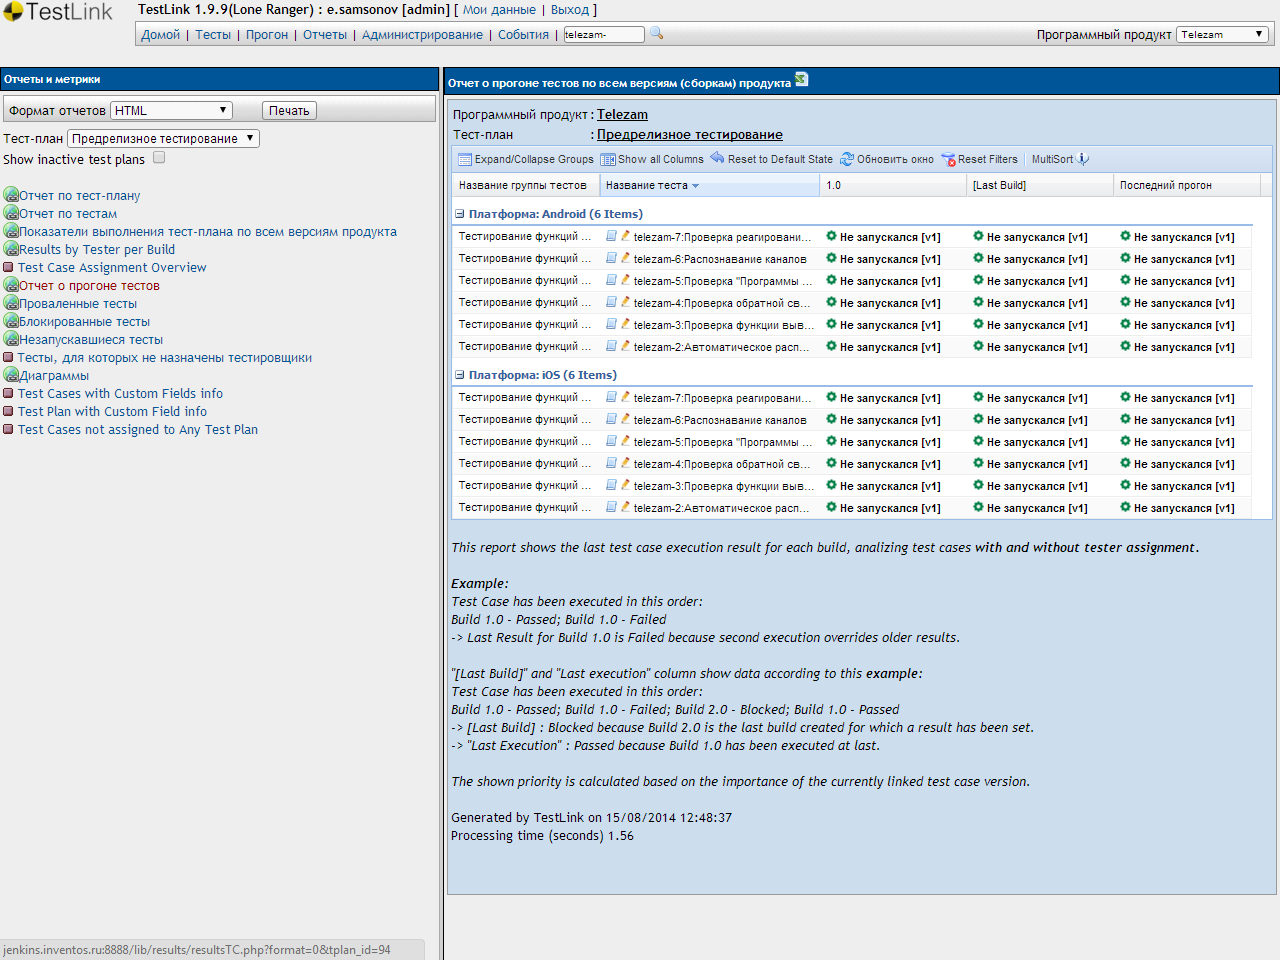
Fig. 6 - TestLink report generation system
I hope our experience in implementing TestLink will open up new horizons for you. It is possible that someone will finally abandon the documentation in the tables. We would like to hear in the comments your opinion about TestLink or about similar developments, how you use them, what is the degree of integration of your tools, which is convenient and inconvenient.
Our project has a very complex structure: only one section can have documentation of more than 100 pages. A plus, of course, is a locomotive from undocumented features and individual customer desires, which novice team members can take for bugs.
Fortunately, in our company there is and is actively developing the direction of working with students and novice specialists. The lack of personnel can be easily eliminated, but how quickly to connect a beginner to work? It was decided to introduce detailed test cases describing the whole set of project functions. To solve the problem at the first stage, we decided not to chase for paid solutions, but to use one of the free test management systems. The choice fell on TestLink.
Implementation
TestLink itself is written in PHP, and there were no special problems with the installation. We created a database, gave the rights to the daddy, and the installation went smoothly.
')
Next, we started a project in the system, created the project structure and started writing tests. The very purpose of implementing this system was to enable us to identify the usefulness or uselessness of such systems for our projects.
How we use team resources and TestLink
After we wrote and tested our tests, it’s time to test the system in public. We distributed ready-made tests among novice employees and interns. The first run showed that the use of detailed tests made it possible to find a lot of bugs in hidden places of the project, which usually didn’t reach because of the priority of other features.
TestLink is currently not fully used. It includes the ability to use not only tests, but also conditions. The use of conditions is seen as a very promising feature of this system. Conditions refer to tests as many to many, which allows to implement several of the following usage models:
- Link tests that affect the same set of functions with one condition. This will allow you to efficiently and quickly create incremental runs, for example, for hot fixes.
- Put in the conditions of some restrictions that must be achieved for a successful test.
Due to the fact that our tests have not yet managed to acquire conditions, we will not mention them below.
Impact of TestLink on testing quality
The quality of testing after the introduction of TestLink, clearly, has increased. We are very grateful to this test management system for the detailed reports after running the tests and for introducing us to how to approach testing. Now we have a good debugging system for testing our project, thanks to which the new employee will literally half a day be fully involved in the work with the project and, having independently run all the tests, will be able to understand up to 80% of the project functions.
Pros and cons of TestLink
Despite all the advantages, we are faced with a number of shortcomings of the system. Naturally, everything is very subjective, and for other companies our claims will seem unfounded. We do not exclude the possibility that some of the shortcomings can be eliminated by examining the documentation or by digging a little in the code, but the goal was a little different. We needed to quickly assess the usefulness of such a system within our company.
Advantages:
- Developed role system. It is possible to set up access for different employees in a very flexible way and also to promptly take away these same rights.
- Simple and clear project structuring system. Project - Test group - Test - Steps (Fig. 2).
- Easy distribution of tests among testers. You can select groups of tests or individual tests, as well as simply copy the distribution of tests from the previous release (Fig. 3).
- Beautiful reports on the runs in various formats, including the possibility of mailing to all employees who are responsible and interested in the results (Fig. 4).
Disadvantages:
- There are no links to individual pages within the system. Instead of sending a link to a colleague, you have to name the project, the test group and the test number.
- The problem with the test version. In our case, with the default settings, it is impossible to view different versions of tests from the test run window or in the edit section by selecting Compare versions.
- Integration with Redmine. It exists, but it was not possible to fully configure it to work with our Redmine on the move in both directions (either additional plugins or permissions are needed).
- Usability Without preparation, it is not obvious which buttons to press so that everything works (Fig. 1).
TestLink mini-features overview
We will demonstrate the work of the system on examples from our projects. A complete overview of the system does not make sense. The main message, in this case, aims to show how the system looks inside, and whether you can get on with it or not even install it. Therefore, we omit the stages of installing the system on the server, as well as the stages of the establishment of the project.
The first thing that the tester sees when opening TestLink is the start screen (Fig. 1).
Fig. 1 - Start screen for working with a project in TestLink
From here begins any activity in the project. Here is performed:
- editing / creating tests;
- assigning users to run;
- the creation of assemblies;
- edit the settings of the project itself.
The test editing page includes such features as:
- create / edit a new test;
- creating / editing a group of tests;
- work with test versions;
- create / edit steps in tests.
Fig. 2 - Test Editing in TestLink
Next, consider the distribution of tests on test plans.
To do this, the tests should be divided into different groups, which can then be used for runs that are suitable for the given conditions. In Figure 3 it can be seen that in this case the tests are distributed according to the types of testing that we conduct for the selected project. For other projects, we have different options for splitting into test plans, for example, on projects where there is no separation of tests into groups and we need to run all tests without exception each time, we have started test plans for Production and Staging environments.
Fig. 3 - Editing a test plan
Assigning tests to your team members is easy. In the left part of the window (Fig. 4), you can select either one test or a group of tests, as well as use filters to find the necessary tests. You can then assign a tester who is responsible for running a specific test on a specific platform using check boxes and drop-down lists on the right side of the section.
Fig. 4 - Distribution of tasks for testers in TestLink
After distribution of tests, the run looks like in Figure 5. The following is available on it:
- Description of all steps that need to be performed;
- The field for entering comments;
- Mark the test progress.
In addition to these elements, you can see additional information:
- Previous runs;
- The platform on which to check;
- Description of the product assembly;
- Description of the test plan (not shown in Figure 5).
Fig. 5 - Test run in TestLink
Immediately after the distribution of tests, we can already observe the appearance of data on testers' reports in the “Reports” section of TestLink. The section presents many options:
- Tracking the results of the run;
- Export to popular formats;
- Sending reports by mail to interested parties;
- Grouping of tests according to various criteria presented in the left part of Figure 6.
Fig. 6 - TestLink report generation system
Conclusion
I hope our experience in implementing TestLink will open up new horizons for you. It is possible that someone will finally abandon the documentation in the tables. We would like to hear in the comments your opinion about TestLink or about similar developments, how you use them, what is the degree of integration of your tools, which is convenient and inconvenient.
Source: https://habr.com/ru/post/234483/
All Articles