Cuckoo - proprietary automated malware analysis lab

A month ago, the portal in my new job was hacked. Leadership asked the question "How?". During a brief search and analysis of connections to the servers, the PC of the employee from whom the connection was established at about the same time was found. The employee did not know anything about the burglary, but during the conversation he remembered one case, shortly before the burglary he received a document from a “company employee” who did not open. The file was in exe format, the whole story began with this.
The directors of the Directorate set the task to analyze the file and understand what it does and what data the attacker could have gone. I have never come across the topic of analyzing malicious files, and the most logical thing was to find some information in Google.
For several days I found and read a huge number of malware analysis manuals, almost all manuals offered to analyze the software manually, using sandboxes and various utilities, but the easiest and fastest of all ways to analyze the virus was malwr.com - the automatic file analysis service in sandbox. I registered, downloaded the virus, got "in the queue" and waited, only after a day the news appeared on the main page:

')
On July 24th, during the daytime, the service stopped its operation for an indefinite time due to the increasing load.
After looking at the site pages and the description, I came across a reference to the analysis platform used - Cuckoo Sandbox - and decided to learn more about the program.
What kind of animal is this "Cuckoo"?
Cuckoo Sandbox is a system for automatically researching malware, exploits, malicious scripts, documents, archives and links. The system is able to check pdf, doc, xls, rtf documents, Python scripts, JS, DLL libraries, binaries, jar and much more.
How does it work?
In a specially prepared virtual system, Python 2.7 is installed, the Cuckoo agent is added to autoload, which will interact with the sandbox, network interfaces are specially configured to intercept and further analyze network traffic. After all the manipulations, a snapshot of the file system, also a Snapshot, is taken The sandbox loads the file being tested, determines its type and, in accordance with the file type, makes the necessary manipulations, all changes inside the sandbox are recorded into the report. After work, the system restores snapshot and the virtual system returns to its original state.
Cuckoo Sandbox is capable of:
- Monitoring calls to win32 API functions
- Network activity dump
- Dump and memory analysis
- Creating screenshots during analysis
- Saving copies of all files created and uploaded during the verification process
- Tracing instructions performed by the malicious process
- Creating a convenient report in json, mmdef, maec, html-formats
- Absolute isolation of the environment in which malware is launched
Warming up the public interest, I’ll post a small screen of those signatures that the sandbox identified in one file attached to a spam letter:
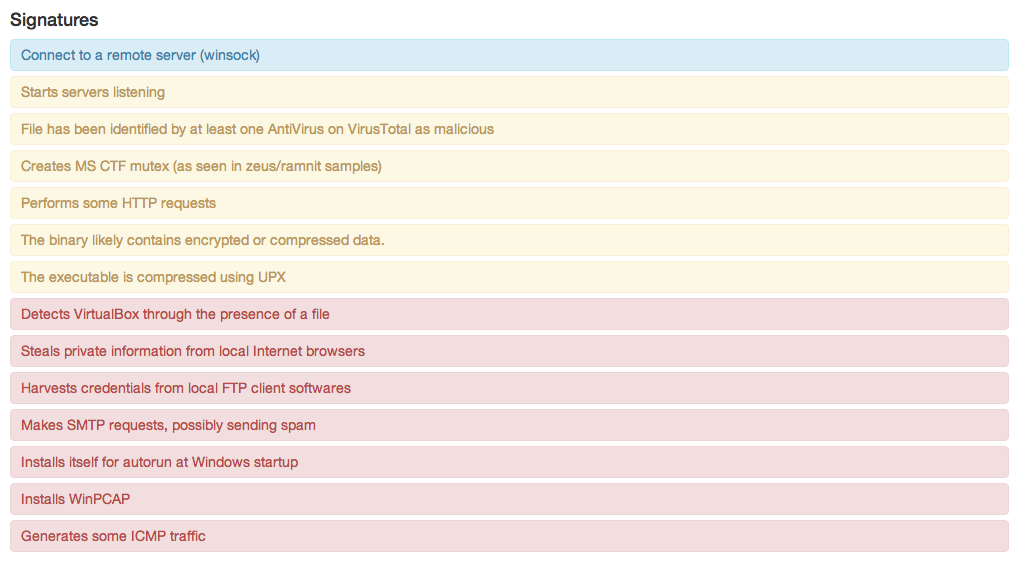
You must admit that this gives much more information about any file than the classic anti-virus “Trojan.Gen” (you can consider this a “stone in the garden” of Symantec).
Here I posted the analysis of the file in HTML format , how it is created by the sandbox.
Cuckoo Sandbox is well documented and its installation , including, on some sites there are instructions for installing it, but at the moment not a single instruction works exactly as written. During the setup, I ran into a lot of problems, after which I decided to write here a complete and current guide for installation and configuration, with all the nuances, additions and modifications. For the laziest, I prepared a script that will configure and install the sandbox automatically, let's start.
Install and configure Cuckoo, with all the subtleties and additional utilities.
All subsequent installation was carried out on VPS Digitalocean (2GB Ram / 40GB SSD / Ubuntu 14.04 x32).
Note: if you decide to try building a sandbox on the same hosting - you should not choose London DC, you will have problems accessing some links.
Ubuntu is selected on the recommendation of the developers, as the system on which the sandbox was tested directly.
The installation plan will look like this:
- Installing dependencies and packages required by utilities and sandboxes
- Installing Utilities and Cuckoo Sandbox
- Cuckoo Sandbox setup
- Installing and configuring Virtualbox
- Installing or loading a virtual system, setting it up
- Web interface
- Autoload
- Cuckoo extras and features
- Ready script installation and configuration Cuckoo
- Bonus
Installing dependencies and packages required by utilities and sandboxes
If you are too lazy to do it yourself or read, go directly to the Ready script item. Please note, the script was tested and built only under Ubuntu 14.04 LTS x32, operation on other OSes is not guaranteed. If you decide to figure it out for yourself, then the next chapter is for you.
Install all dependencies:
cd /tmp apt-get update apt-get install git automake mongodb mingw32 dkms unzip wget python python-sqlalchemy python-bson python-pip python-dpkt python-jinja2 python-magic python-mysqldb python-gridfs python-libvirt python-bottle python-pefile python-chardet -y apt-get install python-dev libxml2-dev libxslt1-dev libevent-dev libpcre3 libpcre3-dev zlib1g-dev libtool libpcre++-dev –y apt-get install mariadb-server -y It is advisable to do the following installations one by one, as I wrote:
pip install lxml pip install cybox==2.0.1.4 pip install maec==4.0.1.0 pip install django pip install py3compat pip install pymongo Note: Pymongo can only be installed via PIP, if you install it via APT - the web interface will not work.
Installing Utilities and Cuckoo Sandbox
SSDEEP
(ssdeep is a tool for recursively computing and comparing contextual partial hashes, better known as fuzzy hashing)
apt-get install ssdeep python-pyrex subversion libfuzzy-dev -y svn checkout http://pyssdeep.googlecode.com/svn/trunk/ pyssdeep cd pyssdeep python setup.py build python setup.py install pip install pydeep Yara
(YARA is a tool that helps virus analysts identify and classify examples of malware)
cd /tmp wget https://github.com/plusvic/yara/archive/v2.1.0.tar.gz tar xzf v2.1.0.tar.gz cd yara-2.1.0 chmod +x build.sh ./build.sh make install cd yara-python python setup.py build python setup.py install Distorm3
(Distorm3 - disassembler)
cd /tmp wget http://distorm.googlecode.com/files/distorm3.zip unzip distorm3.zip cd distorm3 python setup.py build python setup.py install Volatility
(Volatility is a Python framework designed to study the memory dumps of the operating system)
add-apt-repository ppa:pi-rho/security apt-get update apt-get install volatility Note: Do not build the package from source (as described in some installation manuals for 2012-2013), install from the repo as in this article, otherwise the web ui will not work, collected by Volatility from any sources and any version breaks report upload to MongoDB ( without Mongo, the new web interface will not work), with the version from the repository there is no such problem.
Install the Cuckoo Sandbox
First add the user:
useradd cuckoo usermod -a -G vboxusers cuckoo id cuckoo Now install:
Stable
cd /opt wget http://downloads.cuckoosandbox.org/1.1/cuckoo_1.1.tar.gz tar xzf cuckoo_1.1.tar.gz Dev
cd /opt git clone https://github.com/cuckoobox/cuckoo.git Note: In the example below, the stable version was used, I recommend also using the stable version.
Cuckoo Sandbox setup
Configure Cuckoo community signatures
cd /opt/cuckoo ./utils/community.py --signatures --force Now configure the Cuckoo database:
mysql -u root -p > create database cuckoo; > grant all privileges on cuckoo.* to cuckoo@localhost identified by 'cuck00pass' ; > flush privileges; > quit; Customize cuckoo
- File /opt/cuckoo/conf/cuckoo.conf
Turn on memory dump entry:memory_dump = on
Set up a connection to the database:connection = mysql://cuckoo:cuck00pass\@localhost/cuckoo
The server is weak, so we increase the time limits:default = 240 critical = 1200 vm_state = 600 - File /opt/cuckoo/conf/memory.conf
There is only 40 GB on the server, therefore we disable saving of memory dumps:delete_memdump = yes - File /opt/cuckoo/conf/processing.conf
Turn on RAM analysis:memory = yes
Note: in the key parameter you can enter your own API key for the virustotal.com service - vim /opt/cuckoo/conf/virtualbox.conf
Change the Virtualbox mode:mode = headless
Change the name of the virtual machine from cuckoo1 to WindowsXP:machines = WindowsXP [WindowsXP] label = WindowsXP - File /opt/cuckoo/conf/reporting.conf
Let's enable importing reports to MongoDB for web interface operation[mongodb] enabled = yes
This completes the Cuckoo setup, now let's get started with Virtualbox and the guest OS.
Installing and configuring Virtualbox
Virtualbox and all necessary components
wget -q http://download.virtualbox.org/virtualbox/debian/oracle_vbox.asc -O- | sudo apt-key add – sh -c 'echo "deb http://download.virtualbox.org/virtualbox/debian trusty contrib" >> /etc/apt/sources.list.d/virtualbox.list' apt-get update apt-get install virtualbox-4.3 cd /tmp VBOX_LATEST_VERSION=$(curl http://download.virtualbox.org/virtualbox/LATEST.TXT) wget http://download.virtualbox.org/virtualbox/${VBOX_LATEST_VERSION}/Oracle_VM_VirtualBox_Extension_Pack-{VBOX_LATEST_VERSION}.vbox-extpack vboxmanage extpack install /tmp/Oracle_VM_VirtualBox_Extension_Pack-${VBOX_LATEST_VERSION}.vbox-extpack cd /opt wget http://dlc.sun.com.edgesuite.net/virtualbox/${VBOX_LATEST_VERSION}/VBoxGuestAdditions_${VBOX_LATEST_VERSION}.iso Installing or loading a virtual system, setting it up
We have 2 options for installing the OS:
- Download it from the site
- Install manually
The first option is the fastest, but also not the most stable. The use of this OS for non-commercial purposes is permitted and there will be no problems with the license.
The second option is longer and more reliable, I chose the last one, but I will describe both in order.
Download virtual OS from the site
wget https://az412801.vo.msecnd.net/vhd/VMBuild_20131127/VirtualBox/IE6_WinXP/Linux/IE6.WinXP.For.LinuxVirtualBox.sfx chmod +x IE6.WinXP.For.LinuxVirtualBox.sfx ./IE6.WinXP.For.LinuxVirtualBox.sfx vboxmanage import IE6\ -\ WinXP.ova --vsys 0 --unit 10 --disk=/root/VirtualBox\ VMs/WindowsXP/WindowsXP.vmdk --memory 1024 --vmname WindowsXP Manual OS installation
vboxmanage createvm --name "WindowsXP" --ostype WindowsXP --register vboxmanage modifyvm "WindowsXP" --memory 1000 --acpi on --boot1 dvd vboxmanage createhd --filename "WindowsXP.vdi" --size 20000 vboxmanage storagectl "WindowsXP" --name "IDE" --add ide --controller PIIX4 vboxmanage storageattach "WindowsXP" --storagectl "IDE" --port 0 --device 0 --type hdd --medium "WindowsXP.vdi" Note: The following instructions are equally acceptable for both methods.
Configuring the network
vboxmanage hostonlyif create vboxmanage modifyvm "WindowsXP" --nic1 hostonly --hostonlyadapter1 vboxnet0 --nicpromisc1 allow-all --hwvirtex off --vtxvpid off Configure shared folders
mkdir -p /opt/cuckoo/shares/setup mkdir -p /opt/cuckoo/shares/WindowsXP vboxmanage sharedfolder add "WindowsXP" --name "WindowsXP" --hostpath /opt/cuckoo/shares/WindowsXP --automount vboxmanage sharedfolder add "WindowsXP" --name setup --hostpath /opt/cuckoo/shares/setup --automount --readonly vboxmanage modifyvm "WindowsXP" --nictrace1 on --nictracefile1 /opt/cuckoo/shares/WindowsXP/dump.pcap Enable RDP access
vboxmanage modifyvm "WindowsXP" --vrdeport 5000 --vrde on Port can specify any
This is where the configuration of the virtual containers is complete, it remains to configure iptables, tcpdump, and if you chose to install from scratch, you need to install Windows.
Iptables rules and kernel parameter changes
iptables -A FORWARD -o eth0 -i vboxnet0 -s 192.168.56.0/24 -m conntrack --ctstate NEW -j ACCEPT iptables -A FORWARD -m conntrack --ctstate ESTABLISHED,RELATED -j ACCEPT iptables -A POSTROUTING -t nat -j MASQUERADE sysctl -w net.ipv4.ip_forward=1 tcpdump
setcap cap_net_raw,cap_net_admin=eip /usr/sbin/tcpdump getcap /usr/sbin/tcpdump Raise the interface
ifconfig vboxnet0 192.168.56.1 Now go directly to the guest OS itself:
Install Windows
Upload your image to the server and connect it to the virtual machine:
vboxmanage storageattach "WindowsXP" --storagectl "IDE" --port 0 --device 1 --type dvddrive --medium /patch/to/licensed/windows.iso Turn on
vboxmanage startvm "WindowsXP" --type headless After this command, you can connect to the virtual OS via RDP on port 5000 and install it. After installation, connect and install VBoxGuestAdditions:
vboxmanage storageattach "WindowsXP" --storagectl "IDE" --port 0 --device 1 --type dvddrive --medium /opt/VBoxGuestAdditions_4.3.14.iso Note: your add-ons version may be different.
If you have downloaded a ready-made virtual system, in any case, update GuestAdditions is necessary.
After installation we reboot.
Insist guest OS
- Configure the connection to the network as follows (you can specify any dns):

- Install VboxTools from the disk that is connected to the system.
- Install Pyton 2.7: http://python.org/download/
- Installing http://www.activestate.com/activepython
- Install the PIL Python module to create screenshots: http://www.pythonware.com/products/pil/
- Disable automatic update of Windows.
- Disable firewall.
- Copy the agent from the setup network folder to the folder C: \ Python27,
We set the agent to autoload, for this we add to the registry branch (start-> run-> regedit) HKLM \ SOFTWARE \ Microsoft \ Windows \ CurrentVersion \ Run string parameter
Name: 'Agent'
Type: 'REG_SZ'
Content: "C: \ Python27 \ agent.pyw"
- We enable IE, in the settings we set the home page with an empty tab, optionally in the browser properties turn off all protective mechanisms.
- Disable SSDP: start-> execute-> msconfig and in the service section disable the “SSDP Discovery Service” so that the network requests of this service are not included in the reports.
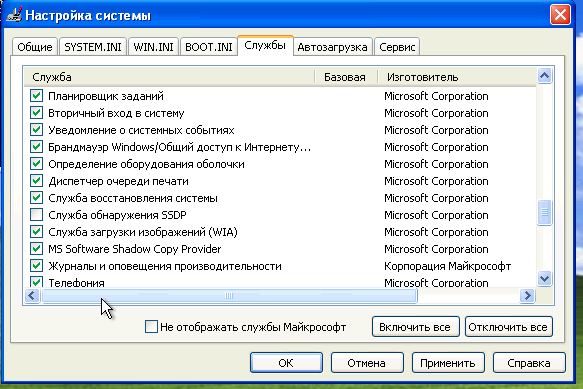
- Reboot and in the pop-up window that appears when loading, select “Do not display this message when rebooting” and OK.
- After restarting the guest OS, start-> execute-> cmd and type netstat –na in the console and see if there is an agent on port 8000

- Optionally install various vulnerable software of old versions (browsers, Flash player, Java, Acrobat Reader ...): http://www.oldapps.com
Note: if you have a license for the office, it is better to install it, and it is better to install more, Skype, ICQ, mail client, one way or another, some malicious software tries to collect data from these applications or exploit them. For example, the hacker who hacked our site, after several unsuccessful attempts to get into the network again, collected a virus that exploits the vulnerability CVE2012-0158, without Microsoft Office, it would not be possible to calculate.
This completes the installation of the guest OS.
We do snapshot (without turning off the guest OS)
vboxmanage snapshot "WindowsXP" take "WindowsXPSnap01" --pause And turn off:
vboxmanage controlvm "WindowsXP" poweroff Web interface
The Cuckoo Sandbox has 2 web interfaces, new and old. The one that is less informative, has fewer features and is much less convenient than the new one:
Old interface:
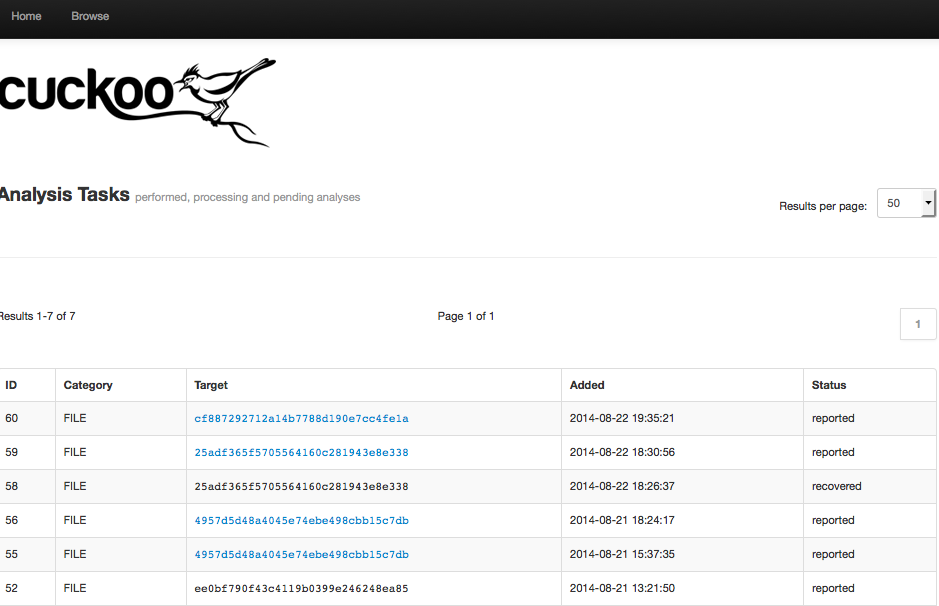
New interface:

The old interface comes up without a database, without Django, simply by running the web.py script from the utils folder, so if that's enough for you, use it, but I recommend spending 5 minutes of your valuable time and taking up a new web interface.
Install Apache:
apt-get install apache2 Apache chose I know him better and worked with him longer, if you want, you can configure Nginx or Unicorn.
The file /etc/apache2/sites-enabled/000-default.conf is deleted
Create the file /etc/apache2/sites-enabled/cuckoo.conf with the following content:
<VirtualHost *:80> ServerName cuckoo.local ServerAdmin webmaster@localhost DocumentRoot /opt/cuckoo/web ErrorLog ${APACHE_LOG_DIR}/error.log CustomLog ${APACHE_LOG_DIR}/access.log combined WSGIScriptAlias / /opt/cuckoo/web/web/wsgi.py <Directory /opt/cuckoo/web/web> <Files wsgi.py> Require all granted </Files> </Directory> Alias /static /opt/cuckoo/web/static <Directory /opt/cuckoo/web/static/> Require all granted </Directory> </VirtualHost> In the /opt/cuckoo/web/web/wsgi.py file we find:
import os os.environ.setdefault("DJANGO_SETTINGS_MODULE", "web.settings") And change to:
import os, sys sys.path.append('/opt/cckoo') sys.path.append('/opt/cuckoo/web') os.chdir('/opt/cuckoo/web/') os.environ.setdefault("DJANGO_SETTINGS_MODULE", "web.settings") correct rights:
chown -R cuckoo:cuckoo /opt/cuckoo/ We change the user from which apache will be launched in the / etc / apache2 / envvars file
APACHE_RUN_USER=www-data APACHE_RUN_GROUP=www-data on
APACHE_RUN_USER=cuckoo APACHE_RUN_GROUP=cuckoo Install the wsgi support module:
aptitude install libapache2-mod-wsgi -y Autoload software
Interface autoloading
In the /etc/rc.local file to the line exit 0 enter:
VBoxManage list vms > /dev/null ifconfig vboxnet0 192.168.56.1 Sandbox autostart
apt-get install supervisor Create the file /etc/supervisor/conf.d/cuckoo.conf with the following content:
[program:cuckoo] command=python cuckoo.py directory=/opt/cuckoo [program:cuckoo-api] command=python api.py directory=/opt/cuckoo/utils We carry out:
supervisord -c /etc/supervisor/supervisord.conf supervisorctl -c /etc/supervisor/supervisord.conf reload Autoloading iptables rules
apt-get install iptables-persistent Done, now after the reboot, all services will start and everything will work.
Cuckoo extras and features
PEID Signatures
Install a new database of signatures, in the new database they are 2 times more:
cd /tmp wget http://research.pandasecurity.com/blogs/images/userdb.txt mv userdb.txt /opt/cuckoo/data/peutils/UserDB.TXT ClamAV Yara Rules + AlienVault Labs APT Threat Signatures
Note: when you try to download the ClamAV-Yara rules conversion script from London DC digitalocean, the error “Request doesn’t matter from your country That's all we know.”
apt-get install clamav -y wget http://db.local.clamav.net/main.cvd wget http://db.local.clamav.net/daily.cvd sigtool -u main.cvd sigtool -u daily.cvd wget http://malwarecookbook.googlecode.com/svn-history/r5/trunk/3/3/clamav_to_yara.py python clamav_to_yara.py -f main.ndb -o main.yar python clamav_to_yara.py -f daily.ndb -o daily.yar mkdir /opt/cuckoo/data/yara/clamav mv *.yar /opt/cuckoo/data/yara/clamav/ The converted database will give an error, referring to the wrong signature EOL_0_94_2, delete it:
delete lines from /opt/cuckoo/data/yara/clamav/main.yar file
«rule EOL_0_94_2 { strings: $a0 = { This ClamAV version has reached End of Life! Please upgrade to version 0.95 or later. For more information see www.clamav.net/eol-clamav-094 and www.clamav.net/download }^M condition: $a0 }» Or simply execute the following commands:
RM_EOL=$(sed -n '/EOL_0_94_2/{=}' main.yar) for n in {1..8}; do sed -i "${RM_EOL}d" main.yar; done Next, set the APT threat rules from AlienVaults:
git clone https://github.com/AlienVault-Labs/AlienVaultLabs.git mv AlienVaultLabs/malware_analysis/ /opt/cuckoo/data/yara/ And connect these rules to Cuckoo:
Fill in the /opt/cuckoo/data/yara/index_binary.yar file:
include "clamav/main.yar" include "clamav/daily.yar" include "malware_analysis/CommentCrew/apt1.yara" include "malware_analysis/FPU/fpu.yar" include "malware_analysis/Georbot/GeorBotBinary.yara" include "malware_analysis/Georbot/GeorBotMemory.yara" include "malware_analysis/Hangover/hangover.yar" include "malware_analysis/KINS/kins.yar" include "malware_analysis/OSX_Leverage/leverage.yar" include "malware_analysis/TheMask_Careto/mask.yar" include "malware_analysis/Urausy/urausy_skypedat.yar" Zer0m0n or hide our sandbox
Any malicious file can try to check the presence of debuggers or virtual environment before executing, the result will be disappointing. Here is what the Paranoid Fish test shows when loading its executable file for verification:
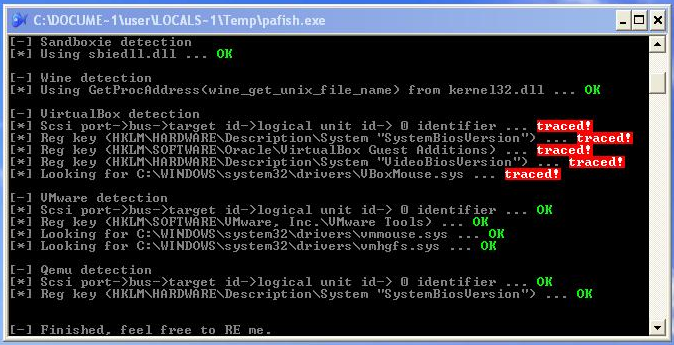
This can be easily corrected with Zer0m0n.
zer0m0n is the driver for the Cuckoo Sandbox, which will perform a kernel analysis during the execution of malware. He is able to almost completely hide the "virtuality" of the OS and allows you to bypass the detection of Cuckoo malicious files.
Install it:
cd /tmp git clone https://github.com/conix-security/zer0m0n.git cd zer0m0n/bin cp cuckoo.patch /opt/cuckoo cd /opt/cuckoo patch -p1 < ./cuckoo.patch cp /tmp/zer0m0n/bin/logs_dispatcher.exe /opt/cuckoo/analyzer/windows/dll/ cp /tmp/zer0m0n/bin/zer0m0n.sys /opt/cuckoo/analyzer/windows/dll/ cp -rf /tmp/zer0m0n/signatures/* /opt/cuckoo/modules/signatures/ Let's correct the rights:
chown -R cuckoo:cuckoo /opt/cuckoo/ After that, the web interface will allow you to select the scan in the additional options, by default - Userland or with zer0m0n Kernelland:
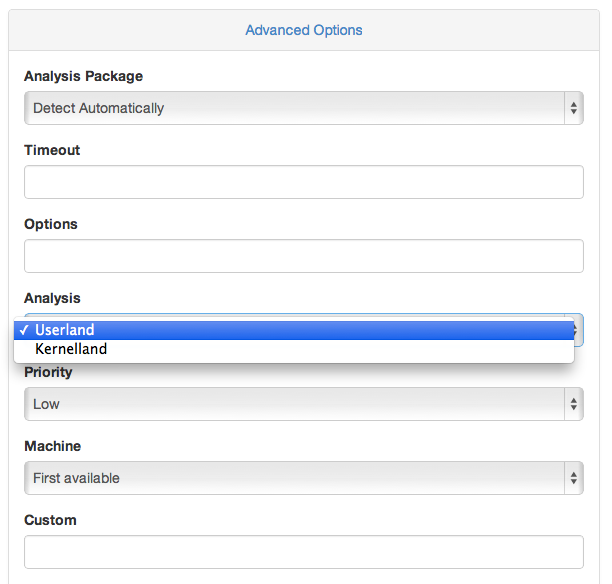
If you launch the scan via the console - use the option kernel_analysis = yes
Run the check again:

Ready script installation and configuration Cuckoo
As promised, I post the finished script. It will automatically configure everything except the guest OS. After the script has completed, you will need to return to the item for setting up the guest OS and configure it.
setup_cuckoo.sh
#!/bin/bash #-------------------------------------------# # Cuckoo Sandbox # Ubuntu 14.04 #-------------------------------------------# # cd /tmp apt-get update apt-get install git automake mongodb mingw32 dkms unzip wget python python-sqlalchemy python-bson python-pip python-dpkt python-jinja2 python-magic python-gridfs python-mysqldb python-libvirt python-bottle python-pefile python-chardet -y apt-get install python-dev libxml2-dev libxslt1-dev libevent-dev libpcre3 libpcre3-dev zlib1g-dev libtool libpcre++-dev -y debconf-set-selections <<< 'mariadb-server-5.5 mysql-server/root_password password supersecretpassw0rd' debconf-set-selections <<< 'mariadb-server-5.5 mysql-server/root_password_again password supersecretpassw0rd' apt-get install mariadb-server -y # pip install lxml pip install cybox==2.0.1.4 pip install maec==4.0.1.0 pip install django pip install py3compat pip install pymongo # SSDEEP apt-get install ssdeep python-pyrex subversion libfuzzy-dev -y svn checkout http://pyssdeep.googlecode.com/svn/trunk/ pyssdeep cd pyssdeep python setup.py build python setup.py install pip install pydeep # Yara cd /tmp wget https://github.com/plusvic/yara/archive/v2.1.0.tar.gz tar xzf v2.1.0.tar.gz cd yara-2.1.0 chmod +x build.sh ./build.sh make install cd yara-python python setup.py build python setup.py install # Distorm3 cd /tmp wget http://distorm.googlecode.com/files/distorm3.zip unzip distorm3.zip cd distorm3/ python setup.py build python setup.py install # Volatility add-apt-repository ppa:pi-rho/security -y apt-get update apt-get install volatility -y # Cuckoo useradd cuckoo usermod -a -G vboxusers cuckoo cd /opt wget http://downloads.cuckoosandbox.org/1.1/cuckoo_1.1.tar.gz tar xzf cuckoo_1.1.tar.gz # Cuckoo (https://github.com/cuckoobox/community) cd /opt/cuckoo ./utils/community.py --signatures --force #-------------------------------------------# # Virtualbox #-------------------------------------------# wget -q http://download.virtualbox.org/virtualbox/debian/oracle_vbox.asc -O- | sudo apt-key add - sh -c 'echo "deb http://download.virtualbox.org/virtualbox/debian trusty contrib" >> /etc/apt/sources.list.d/virtualbox.list' apt-get update apt-get install virtualbox-4.3 -y cd /tmp VBOX_LATEST_VERSION=$(curl http://download.virtualbox.org/virtualbox/LATEST.TXT) wget http://download.virtualbox.org/virtualbox/${VBOX_LATEST_VERSION}/Oracle_VM_VirtualBox_Extension_Pack-${VBOX_LATEST_VERSION}.vbox-extpack vboxmanage extpack install /tmp/Oracle_VM_VirtualBox_Extension_Pack-${VBOX_LATEST_VERSION}.vbox-extpack cd /opt wget http://dlc.sun.com.edgesuite.net/virtualbox/${VBOX_LATEST_VERSION}/VBoxGuestAdditions_${VBOX_LATEST_VERSION}.iso # vboxmanage createvm --name "WindowsXP" --ostype WindowsXP --register vboxmanage modifyvm "WindowsXP" --memory 1000 --acpi on --boot1 dvd vboxmanage createhd --filename "WindowsXP.vdi" --size 20000 vboxmanage storagectl "WindowsXP" --name "IDE" --add ide --controller PIIX4 vboxmanage storageattach "WindowsXP" --storagectl "IDE" --port 0 --device 0 --type hdd --medium "WindowsXP.vdi" vboxmanage hostonlyif create vboxmanage modifyvm "WindowsXP" --nic1 hostonly --hostonlyadapter1 vboxnet0 --nicpromisc1 allow-all --hwvirtex off --vtxvpid off # mkdir -p /opt/cuckoo/shares/setup mkdir -p /opt/cuckoo/shares/WindowsXP vboxmanage sharedfolder add "WindowsXP" --name "WindowsXP" --hostpath /opt/cuckoo/shares/WindowsXP --automount vboxmanage sharedfolder add "WindowsXP" --name setup --hostpath /opt/cuckoo/shares/setup --automount --readonly vboxmanage modifyvm "WindowsXP" --nictrace1 on --nictracefile1 /opt/cuckoo/shares/WindowsXP/dump.pcap cp /opt/cuckoo/agent/agent.py /opt/cuckoo/shares/setup/agent.pyw # RDP 5000 vboxmanage modifyvm "WindowsXP" --vrdeport 5000 --vrde on # iptables iptables -A FORWARD -o eth0 -i vboxnet0 -s 192.168.56.0/24 -m conntrack --ctstate NEW -j ACCEPT iptables -A FORWARD -m conntrack --ctstate ESTABLISHED,RELATED -j ACCEPT iptables -A POSTROUTING -t nat -j MASQUERADE sysctl -w net.ipv4.ip_forward=1 # tcpdump setcap cap_net_raw,cap_net_admin=eip /usr/sbin/tcpdump getcap /usr/sbin/tcpdump # Cuckoo mysql -uroot -psupersecretpassw0rd -e "create database cuckoo" mysql -uroot -psupersecretpassw0rd -e "grant all privileges on cuckoo.* to cuckoo@localhost identified by 'cuck00pass'" mysql -u root -psupersecretpassw0rd -e "flush privileges" # Cuckoo sed -i -e "s@connection =@connection = mysql://cuckoo:cuck00pass\@localhost/cuckoo@" /opt/cuckoo/conf/cuckoo.conf sed -i -e "s@memory_dump = off@memory_dump = on@" /opt/cuckoo/conf/cuckoo.conf sed -i -e "s@default = 120@default = 240@" /opt/cuckoo/conf/cuckoo.conf sed -i -e "s@critical = 600@critical = 1200@" /opt/cuckoo/conf/cuckoo.conf sed -i -e "s@vm_state = 300@vm_state = 600@" /opt/cuckoo/conf/cuckoo.conf sed -i -e "s@delete_memdump = no@delete_memdump = yes@" /opt/cuckoo/conf/memory.conf sed -i -e "s@enabled = no@enabled = yes@" /opt/cuckoo/conf/processing.conf sed -i -e "s@enabled = no@enabled = yes@" /opt/cuckoo/conf/reporting.conf sed -i -e "s@enabled = no@enabled = yes@" /opt/cuckoo/conf/processing.conf sed -i -e "s@mode = gui@mode = headless@" /opt/cuckoo/conf/virtualbox.conf sed -i -e "s@cuckoo1@WindowsXP@" /opt/cuckoo/conf/virtualbox.conf # apt-get install apache2 -y mv /etc/apache2/sites-enabled/000-default.conf /etc/apache2/sites-enabled/000-default.conf.bak cat > /etc/apache2/sites-enabled/cuckoo.conf <<DELIM <VirtualHost *:80> ServerName cuckoo.local ServerAdmin webmaster@localhost DocumentRoot /opt/cuckoo/web ErrorLog /var/log/apache2/error.log CustomLog /var/log/apache2//access.log combined WSGIScriptAlias / /opt/cuckoo/web/web/wsgi.py <Directory /opt/cuckoo/web/web> <Files wsgi.py> Require all granted </Files> </Directory> Alias /static /opt/cuckoo/web/static <Directory /opt/cuckoo/web/static/> Require all granted </Directory> </VirtualHost> DELIM aptitude install libapache2-mod-wsgi -y mv /opt/cuckoo/web/web/wsgi.py /opt/cuckoo/web/web/wsgi.py.bak cat > /opt/cuckoo/web/web/wsgi.py <<DELIM import os, sys sys.path.append('/opt/cuckoo') sys.path.append('/opt/cuckoo/web') os.chdir('/opt/cuckoo/web/') os.environ.setdefault("DJANGO_SETTINGS_MODULE", "web.settings") from django.core.wsgi import get_wsgi_application application = get_wsgi_application() DELIM chown -R cuckoo:cuckoo /opt/cuckoo/ # vboxnet0 sed -i -e "s@exit 0@@" /etc/rc.local echo 'VBoxManage list vms > /dev/null' >> /etc/rc.local echo 'ifconfig vboxnet0 192.168.56.1' >> /etc/rc.local echo 'exit 0' >> /etc/rc.local # Cuckoo apt-get install supervisor -y cat > /etc/supervisor/conf.d/cuckoo.conf <<DELIM [program:cuckoo] command=python cuckoo.py directory=/opt/cuckoo [program:cuckoo-api] command=python api.py directory=/opt/cuckoo/utils DELIM supervisord -c /etc/supervisor/supervisord.conf supervisorctl -c /etc/supervisor/supervisord.conf reload # Iptables cat > /etc/network/if-up.d/00-iptables <<DELIM #!/bin/sh iptables-restore < /etc/firewall.conf DELIM iptables-save >/etc/firewall.conf # PEiD cd /tmp wget http://research.pandasecurity.com/blogs/images/userdb.txt mv userdb.txt /opt/cuckoo/data/peutils/UserDB.TXT #ClamAV Yara cd /tmp apt-get install clamav -y wget http://db.local.clamav.net/main.cvd wget http://db.local.clamav.net/daily.cvd sigtool -u main.cvd sigtool -u daily.cvd wget https://malwarecookbook.googlecode.com/svn-history/r5/trunk/3/3/clamav_to_yara.py python clamav_to_yara.py -f main.ndb -o main.yar python clamav_to_yara.py -f daily.ndb -o daily.yar #, ClamAV EOL_0_94_2, , Yara RM_EOL=$(sed -n '/EOL_0_94_2/{=}' main.yar) for n in {1..8}; do sed -i "${RM_EOL}d" main.yar; done mkdir /opt/cuckoo/data/yara/clamav mv *.yar /opt/cuckoo/data/yara/clamav/ git clone https://github.com/AlienVault-Labs/AlienVaultLabs.git mv AlienVaultLabs/malware_analysis/ /opt/cuckoo/data/yara/ mv /opt/cuckoo/data/yara/index_binary.yar /opt/cuckoo/data/yara/index_binary.yar.bak cat > /opt/cuckoo/data/yara/index_binary.yar <<DELIM include "signatures/embedded.yar" include "signatures/vmdetect.yar" include "clamav/main.yar" include "clamav/daily.yar" include "malware_analysis/CommentCrew/apt1.yara" include "malware_analysis/FPU/fpu.yar" include "malware_analysis/Georbot/GeorBotBinary.yara" include "malware_analysis/Georbot/GeorBotMemory.yara" include "malware_analysis/Hangover/hangover.yar" include "malware_analysis/KINS/kins.yar" include "malware_analysis/OSX_Leverage/leverage.yar" include "malware_analysis/TheMask_Careto/mask.yar" include "malware_analysis/Urausy/urausy_skypedat.yar" DELIM #Zer0m0n git clone https://github.com/conix-security/zer0m0n.git cd zer0m0n/bin cp cuckoo.patch /opt/cuckoo cd /opt/cuckoo patch -p1 < ./cuckoo.patch cp /tmp/zer0m0n/bin/logs_dispatcher.exe /opt/cuckoo/analyzer/windows/dll/ cp /tmp/zer0m0n/bin/zer0m0n.sys /opt/cuckoo/analyzer/windows/dll/ cp -rf /tmp/zer0m0n/signatures/* /opt/cuckoo/modules/signatures/ chown -R cuckoo:cuckoo /opt/cuckoo/ Bonus
As a bonus, I'll post the instructions for integrating the Cuckoo Sandbox with the Maltego program.
We will integrate the system with the REST API sandbox service that runs on port 8090.
I work on a mac and performed the following actions on mac os 10.9.4, but on any Linux system everything should be installed and working in the same way without problems:
To get started, download Maltego from the site and unpack it into the application folder.
After we open the program:

She will offer to enter or register, register, log in (do not bother with captcha, enter anything, it does not work), then download and install the files necessary for integrating the sandbox with Maltego from the developer repository:
sudo -s git clone https://github.com/bostonlink/cuckooforcanari.git cd cuckooforcanari python setup.py install canari create-profile cuckooforcanari Now you need to import the cuckoo config into Matlego:
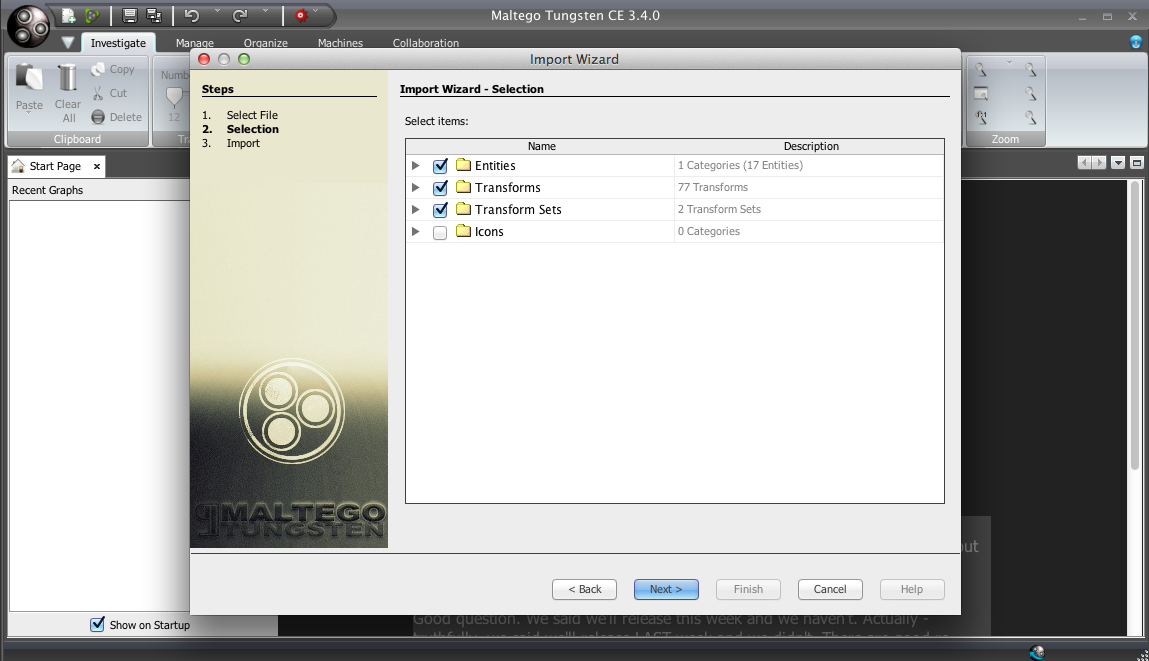
Click on the program icon in the upper left corner -> import -> Import Configuration and select the configuration from the folder downloaded from github:

We export everything:
Done, now open the configuration file, enter the host, port and folder where you will add the malware:
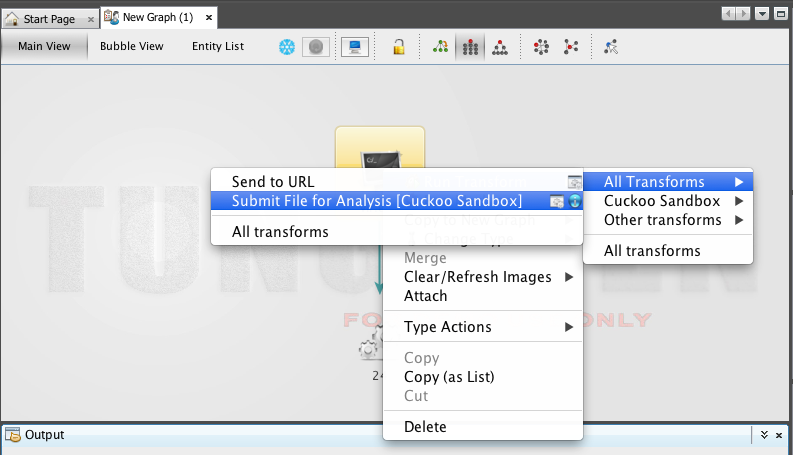
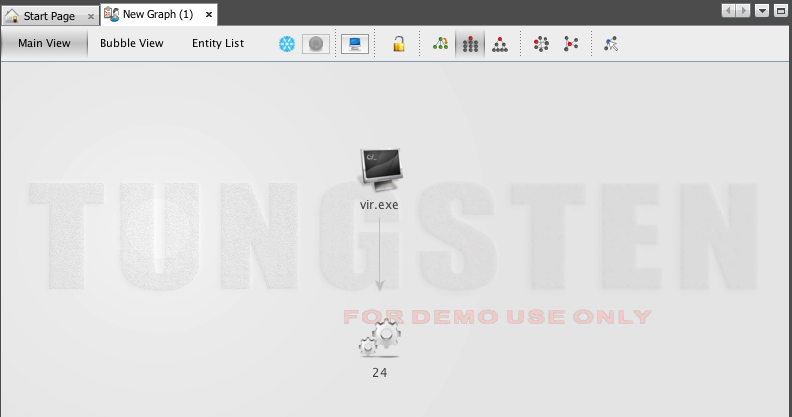
vim ~/.canari/cuckooforcanari.conf Done, now in the program we create a new chart, drag the Cuckoo Malware Sample icon onto the chart, rename the file to the name of your virus and load it via the Submit File For Analisys:
After downloading you will see the task number:
Upon completion of the scan, you can receive any data in the form of graphs:

Read more about this in the official video from the developer:
Another bonus, a book I found online , is a good guide to using the Cuckoo Sandbox to analyze malicious files.
And if you use Symantec Endpoint Protection 12.1 antivirus at work, you can use the console utility under Windows SEPQuarantineTool.zip which is not officially supported by Symantec, but I found a link to it in their support . With this utility, you can pull out and restore files from quarantine, via curl for Windows, upload files to the server for scanning, using the REST API and using the same utility, put files back to quarantine. Thus, automating the analysis of threats and making black lists of sites and servers, where viruses are thrown.
In conclusion, I want to say that this tool helped to accomplish all the tasks, and the logs and malicious files of the hacker that was mentioned at the very beginning of the article are now analyzed in just a few minutes and allow you to understand the whole picture of the malware used by the hacker:
Thanks for attention.
List of used sources
docs.cuckoosandbox.org
xakep.ru/articles/57409
lanswer.blogspot.ru/2012/11/add-cucksandbox-to-ubuntu-service.html
reverselab.info/page/cuckoo-sandbox
www.alienvault.com/blogs/tag/yara
www.securitylab.ru/analytics/441524.php
www.modern.ie/ru-ru
www.aldeid.com/wiki/PEiD
blog.prowling.nu/2014/08/cuckoo-sandbox-django-interface-with.html
github.com/conix-security/zer0m0n
github.com/bostonlink/cuckooforcanari
santi-bassett.blogspot.ru/2013/01/installing-cuckoo-sandbox-on-virtualbox.html
Source: https://habr.com/ru/post/234467/
All Articles