Replacing the Nvidia Boot agent module in the BIOS of the motherboard
Let me introduce myself, my name is Alexander Belov, I work at the Moscow State College of Information Technology as a system administrator.
In my service about 300 computers, of which about 70 percent of computers are in educational laboratories. Quite often, there is a question of quick diagnostics of the system unit, for example, launching system utilities for checking RAM and hard disk, restoring the operating system, etc.
At first, I used several bootable flash drives to load the necessary utilities. But it turned out that some bios in the motherboards are so old that they do not support booting from USB or the transfer speed is limited to USB 1.0. Plus, the total size of the recovery images exceeds 100 GB, so it took a lot of different flash drives to drag.
')
At the same time there were attempts to try to download all this stuff from the network. I stopped on using the lan boot rom of the network card on the client side and the tftp server with the pxelinux utility on the server side, respectively. Utilities memtest, mhdd, all sorts of Linux, acronis almost without any problems downloaded over the network, just to have enough memory on the computer.
You can even load winpe (bartpe), pre-integrating a special driver into the image.
An attempt was made to transfer the automatic installation system of the OS to the network. It works like this - a specialist downloads a special winpe build based on win7 from a flash drive, after loading the network is initialized and the script loads a list of possible images from the network for recovery. The specialist is to select the desired image and wait for it to unpack.
WinPE 3 (the recovery system is based on it) is distributed by microsoft as a wim image. This is a file-based archive and, unlike iso images, it is not so easy to download via the network. There is an iPXE project that aims to open source the implementation of the PXE protocol. A solution was found on one of the pages . For the PXELINUX bootloader, it looks like this:
The solution is operational and has been tested on a variety of hardware configurations. Errors occurred if the machine had less than 512 MB of memory or there were no necessary drivers for starting the network in the boot wim image.
And here I came across one oddity. In one classroom, this download method did not work, namely, the network card was not initialized (there was a link, but data transfer was not possible). It was experimentally established that the driver had nothing to do with it. The same WinPE image loaded from a flash drive worked fine. Suspicion fell on the Nvidia Boot Agent. After a brief search of information on the Internet, several references to the Nvidia Boot Agent module were found. The bug was that the module did not turn off after downloading data through the network and prevented the OS from initializing the network card. In this case, the download using the ipxe image was successful.
There was a question - is it possible to replace the Nvidia Boot Agent with the iPXE module. After short experiments, a solution was found.
Attention: Be careful - you use all the above components at your own risk and risk, I do not give any guarantees, and I do not bear any responsibility for the consequences of use!
so
Motherboard: ASUS M2NPV-VM
BIOS Version: 1401
Required utilities: CBROM32 v198
1. Download the penultimate bios 1401 from asus. Unfortunately, the last bios does not suit us for a simple reason - there is not enough space to enable the iPXE module.
2. Download CBROM32 v198
3. We look at what is in our bios:
Under number 12 is the NVPXES.NIC module, we will replace it.
4. It's time to go to the site, select “Advanced, for experienced users”, then “ROM binary (flashable image) (.rom)” and indicate the DEV and VEN characteristics of your network card (VEN 10DE DEV 0269 for our case), and finally , click Proceed.
5. Rename the downloaded iPXE modules to NVPXES.NIC in order to be correctly determined by the CBROM utility. We will replace the module in bios (not paying attention to the percentages):
6. Check the changes:
12 module was removed, in its place installed 17.
7. Copy the modified bios to the USB flash drive, stick it into the computer, go to bios and flash the new bios using the built-in utility Asus EZ Flash.
8. Enjoy buggy-free networking!
As a bonus - color pxe menu ala BIOS.
In my service about 300 computers, of which about 70 percent of computers are in educational laboratories. Quite often, there is a question of quick diagnostics of the system unit, for example, launching system utilities for checking RAM and hard disk, restoring the operating system, etc.
At first, I used several bootable flash drives to load the necessary utilities. But it turned out that some bios in the motherboards are so old that they do not support booting from USB or the transfer speed is limited to USB 1.0. Plus, the total size of the recovery images exceeds 100 GB, so it took a lot of different flash drives to drag.
')
At the same time there were attempts to try to download all this stuff from the network. I stopped on using the lan boot rom of the network card on the client side and the tftp server with the pxelinux utility on the server side, respectively. Utilities memtest, mhdd, all sorts of Linux, acronis almost without any problems downloaded over the network, just to have enough memory on the computer.
You can even load winpe (bartpe), pre-integrating a special driver into the image.
An attempt was made to transfer the automatic installation system of the OS to the network. It works like this - a specialist downloads a special winpe build based on win7 from a flash drive, after loading the network is initialized and the script loads a list of possible images from the network for recovery. The specialist is to select the desired image and wait for it to unpack.
WinPE 3 (the recovery system is based on it) is distributed by microsoft as a wim image. This is a file-based archive and, unlike iso images, it is not so easy to download via the network. There is an iPXE project that aims to open source the implementation of the PXE protocol. A solution was found on one of the pages . For the PXELINUX bootloader, it looks like this:
DEFAULT vesamenu.c32 PROMPT 0 FONT /pxelinux.cfg/fonts/cyr_a8x16.psf INCLUDE /pxelinux.cfg/menu_color.conf MENU TITLE LABEL winpxe86drivers MENU LABEL Windows 7 x86 (with drivers) COM32 linux.c32 /wimboot APPEND wimboot initrdfile=/install/7x86d/boot/bootmgr,/install/7x86d/boot/bcd,/install/7x86d/boot/fonts/chs_boot.ttf,/install/7x86d/boot/fonts/cht_boot.ttf,/install/7x86d/boot/fonts/jpn_boot.ttf,/install/7x86d/boot/fonts/kor_boot.ttf,/install/7x86d/boot/fonts/wgl4_boot.ttf,/install/7x86d/boot/boot.sdi,/install/7x86d/boot.wim LABEL winpxe86 MENU LABEL Windows 7 x86 COM32 linux.c32 /wimboot APPEND wimboot initrdfile=/install/7x86/boot/bootmgr,/install/7x86/boot/bcd,/install/7x86/boot/fonts/chs_boot.ttf,/install/7x86/boot/fonts/cht_boot.ttf,/install/7x86/boot/fonts/jpn_boot.ttf,/install/7x86/boot/fonts/kor_boot.ttf,/install/7x86/boot/fonts/wgl4_boot.ttf,/install/7x86/boot/boot.sdi,/install/7x86/boot.wim MENU SEPARATOR LABEL back MENU LABEL KERNEL /vesamenu.c32 APPEND /pxelinux.cfg/maintenance.conf The solution is operational and has been tested on a variety of hardware configurations. Errors occurred if the machine had less than 512 MB of memory or there were no necessary drivers for starting the network in the boot wim image.
And here I came across one oddity. In one classroom, this download method did not work, namely, the network card was not initialized (there was a link, but data transfer was not possible). It was experimentally established that the driver had nothing to do with it. The same WinPE image loaded from a flash drive worked fine. Suspicion fell on the Nvidia Boot Agent. After a brief search of information on the Internet, several references to the Nvidia Boot Agent module were found. The bug was that the module did not turn off after downloading data through the network and prevented the OS from initializing the network card. In this case, the download using the ipxe image was successful.
There was a question - is it possible to replace the Nvidia Boot Agent with the iPXE module. After short experiments, a solution was found.
Attention: Be careful - you use all the above components at your own risk and risk, I do not give any guarantees, and I do not bear any responsibility for the consequences of use!
so
Motherboard: ASUS M2NPV-VM
BIOS Version: 1401
Required utilities: CBROM32 v198
1. Download the penultimate bios 1401 from asus. Unfortunately, the last bios does not suit us for a simple reason - there is not enough space to enable the iPXE module.
2. Download CBROM32 v198
3. We look at what is in our bios:
C:\1>CBROM.EXE 1401.BIN /D CBROM.EXE V1.98 [08/27/08] (C)Phoenix Technologies 2001-2008 ******** 1401.BIN BIOS component ******** No. Item-Name Original-Size Compressed-Size Original-File-Name ================================================================================ 0. System BIOS 20000h(128.00K) 14AB9h(82.68K) 1.BIN 1. XGROUP CODE 0E7A0h(57.91K) 09FD7h(39.96K) awardext.rom 2. CPU micro code 02000h(8.00K) 003EFh(0.98K) CPUCODE.BIN 3. ACPI table 0706Eh(28.11K) 02B92h(10.89K) ACPITBL.BIN 4. EPA LOGO 0168Ch(5.64K) 002AAh(0.67K) AwardBmp.bmp 5. YGROUP ROM 0C370h(48.86K) 05325h(20.79K) awardeyt.rom 6. GROUP ROM[ 0] 07BA0h(30.91K) 030C3h(12.19K) _EN_CODE.BIN 7. BIOSF0 01F60h(7.84K) 01561h(5.34K) _DMI.BIN 8. BIOSF9 0F550h(61.33K) 00797h(1.90K) _RT.BIN 9. BIOSF7 007A0h(1.91K) 005F5h(1.49K) _Xsetup.BIN 10. OEM0 CODE 0D9F0h(54.48K) 00698h(1.65K) BGROUP.BIN 11. PCI ROM[A] 0C000h(48.00K) 0703Ch(28.06K) NVRAID.ROM 12. PCI ROM[B] 0E000h(56.00K) 07271h(28.61K) NVPXES.NIC 13. VGA ROM[1] 0F000h(60.00K) 0A9FEh(42.50K) C51PV0.ROM 14. LOGO BitMap 4B30Ch(300.76K) 092ECh(36.73K) M2NPV-VM.BMP 15. OEM1 CODE 00BAFh(2.92K) 006D3h(1.71K) PMU.BIN 16. GV3 0414Eh(16.33K) 0113Eh(4.31K) AGESACPU.ROM 17. BIOSF6 0E20Ch(56.51K) 0790Dh(30.26K) EZFLASH.EXE (BB) Compress BT-VGA 05E00h(23.50K) 04266h(16.85K) C51PV0BB.ROM Total compress code space = 65000h(404.00K) Total compressed code size = 57ADDh(350.72K) Remain compress code space = 0D523h(53.28K) *** NVMM 4.062.1906/19/06 <¦ * Start Offset => 0, End Offset => 1b00 *** ** Micro Code Information ** Bridge ID | Bridge ID North South Patch ID CPUID | North South Patch ID CPUID ---------------------------------------+---------------------------------------- 0062 00000414 | 0068 0000040A| 006D 000004 1B 0083 0000068| Under number 12 is the NVPXES.NIC module, we will replace it.
4. It's time to go to the site, select “Advanced, for experienced users”, then “ROM binary (flashable image) (.rom)” and indicate the DEV and VEN characteristics of your network card (VEN 10DE DEV 0269 for our case), and finally , click Proceed.
5. Rename the downloaded iPXE modules to NVPXES.NIC in order to be correctly determined by the CBROM utility. We will replace the module in bios (not paying attention to the percentages):
C:\1>CBROM.EXE 1401.BIN /PCI NVPXES.NIC CBROM.EXE V1.98 [08/27/08] (C)Phoenix Technologies 2001-2008 Adding NVPXES.NIC ........ 98.5% 6. Check the changes:
C:\1>CBROM.EXE 1401.BIN /D CBROM.EXE V1.98 [08/27/08] (C)Phoenix Technologies 2001-2008 ******** 1401.BIN BIOS component ******** No. Item-Name Original-Size Compressed-Size Original-File-Name ================================================================================ 0. System BIOS 20000h(128.00K) 14AB9h(82.68K) 1.BIN 1. XGROUP CODE 0E7A0h(57.91K) 09FD7h(39.96K) awardext.rom 2. CPU micro code 02000h(8.00K) 003EFh(0.98K) CPUCODE.BIN 3. ACPI table 0706Eh(28.11K) 02B92h(10.89K) ACPITBL.BIN 4. EPA LOGO 0168Ch(5.64K) 002AAh(0.67K) AwardBmp.bmp 5. YGROUP ROM 0C370h(48.86K) 05325h(20.79K) awardeyt.rom 6. GROUP ROM[ 0] 07BA0h(30.91K) 030C3h(12.19K) _EN_CODE.BIN 7. BIOSF0 01F60h(7.84K) 01561h(5.34K) _DMI.BIN 8. BIOSF9 0F550h(61.33K) 00797h(1.90K) _RT.BIN 9. BIOSF7 007A0h(1.91K) 005F5h(1.49K) _Xsetup.BIN 10. OEM0 CODE 0D9F0h(54.48K) 00698h(1.65K) BGROUP.BIN 11. PCI ROM[A] 0C000h(48.00K) 0703Ch(28.06K) NVRAID.ROM 12. VGA ROM[1] 0F000h(60.00K) 0A9FEh(42.50K) C51PV0.ROM 13. LOGO BitMap 4B30Ch(300.76K) 092ECh(36.73K) M2NPV-VM.BMP 14. OEM1 CODE 00BAFh(2.92K) 006D3h(1.71K) PMU.BIN 15. GV3 0414Eh(16.33K) 0113Eh(4.31K) AGESACPU.ROM 16. BIOSF6 0E20Ch(56.51K) 0790Dh(30.26K) EZFLASH.EXE 17. PCI ROM[B] 11E00h(71.50K) 119D5h(70.46K) NVPXES.NIC (BB) Compress BT-VGA 05E00h(23.50K) 04266h(16.85K) C51PV0BB.ROM Total compress code space = 65000h(404.00K) Total compressed code size = 62241h(392.56K) Remain compress code space = 02DBFh(11.44K) *** NVMM 4.062.1906/19/06 <¦ * Start Offset => 0, End Offset => 1b00 *** ** Micro Code Information ** Bridge ID | Bridge ID North South Patch ID CPUID | North South Patch ID CPUID ---------------------------------------+---------------------------------------- 0062 00000414 | 0068 0000040A| 006D 000004 1B 0083 0000068| 12 module was removed, in its place installed 17.
7. Copy the modified bios to the USB flash drive, stick it into the computer, go to bios and flash the new bios using the built-in utility Asus EZ Flash.
8. Enjoy buggy-free networking!
As a bonus - color pxe menu ala BIOS.
PXE menu color

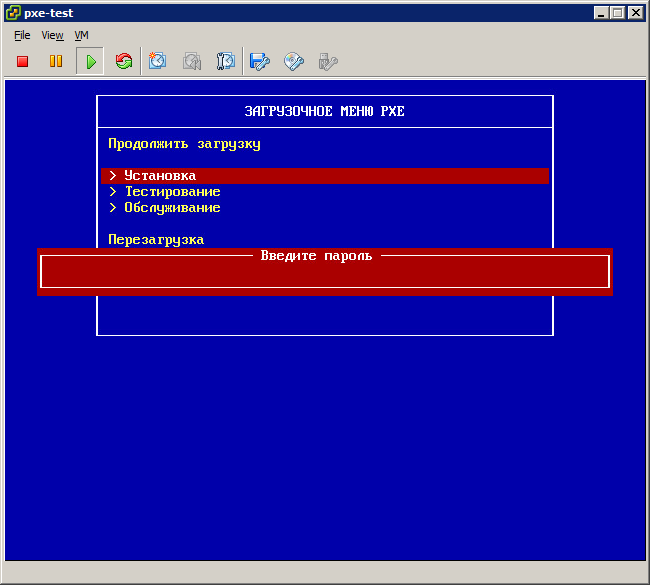
menu color screen 0 #00000000 #00000000 none menu color border 0 #ffFFFFFF #00000000 none menu color title 0 #ffFFFFFF #00000000 none menu color unsel 0 #ffFFFF55 #00000000 none menu color hotkey 0 #ffFFFFFF #00000000 none menu color sel 0 #ffFFFFFF #ffAA0000 none menu color hotsel 0 #ff0000AD #00000000 none menu color disabled 0 #ff505655 #00000000 none menu color scrollbar 0 #ffA8A8A8 #00000000 none menu color tabmsg 0 #ffFFFFFF #00000000 none menu color cmdmark 0 #ffFFFFFF #00000000 none menu color cmdline 0 #ffFFFFFF #00000000 none menu color pwdborder 0 #ffFFFFFF #ffAA0000 none menu color pwdheader 0 #ffFFFFFF #ffAA0000 none menu color pwdentry 0 #ffFFFFFF #ffAA0000 none menu color timeout_msg 0 #ffFFFFFF #00000000 none menu color timeout 0 #ffFFFFFF #00000000 none menu color help 0 #ffFFFFFF #00000000 none menu color msg07 0 #ffFFFFFF #00000000 none menu background #0000AA Source: https://habr.com/ru/post/234435/
All Articles