Implementing gesture sequences in Unity 3D using the TouchScript library
For many gaming applications, especially those working on small screens of mobile devices, it is very important to reduce the area occupied by the controls in order to maximize the part of the screen intended for displaying the main content. To do this, you can configure touch targets (touch targets) so that they handle various combinations of gestures. Thus, the number of touch targets on the screen will be reduced to a minimum. For example, two interface elements, one of which causes the gun to fire, and the second to rotate, can be replaced by one, allowing you to perform both actions with one continuous touch.
In this article, I will discuss how to set up a scene for controlling the controller from the first person using touch targets. First of all, you need to adjust the touch targets for the base position of the controller and rotation, and then expand their set of functions. The latter can be achieved by existing interface elements, without adding new objects. The scene that we will have will demonstrate the wide capabilities of Unity 3D in Windows * 8 as a platform for processing various sequences of gestures.
Set the depth of the main camera (it is part of the controller) to level -1. Let's create a separate element of the camera interface with support for an orthogonal projection, with a width of 1 and a height of 0.5, as well as the flags of Don't Clear. Then create a GUIWidget layer and make it a mask of the camera interface.
Place the main interface elements that control the controller on the stage in the field of view of the orthogonal camera. Add a sphere for each finger of your left hand. The little finger sphere makes the controller move to the left, the ring finger sphere - forward, the middle finger - to the right, and the index finger - back. The sphere of the thumb allows you to jump and launch spherical shells at an angle of 30 degrees clockwise.
For the right-hand interface element, create a cube (square in orthogonal projection). Set up a shift gesture for this cube and bind it to the MouseLook.cs script. This interface element provides the same features as the touchpad of an Ultrabook device.
We place these interface elements out of the field of view of the main camera, and set the GUIWidget as a layer. In fig. 1 you can see how the interface elements allow you to launch projectiles and control the position of the controller on the stage.
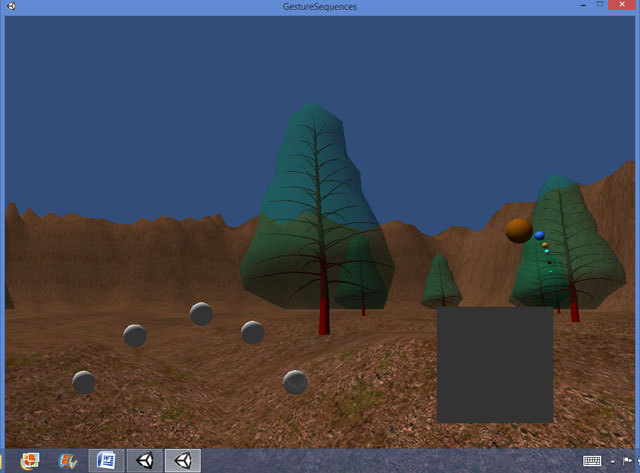
Figure 1. First-person controller scene with landscape and spherical projectiles fired.
In this scene, shells launched from the controller fly through the trees. To fix this, you need to add a grid or collider to each tree. Another problem on this stage - low forward speed - occurs when you try to look down using the touch pad at the same time as moving forward using the sphere of the ring finger. To solve this problem, you can limit the viewing angle when looking down while holding the forward button.
')
Adjust the scene to support multiple touches performed more often than the set period, change the launch angle of the projectiles and try to launch the projectile. In this case, you can adjust the angle to increase exponentially depending on the number of tangencies using float variables in the script for the sphere of the thumb on the left. These variables control the angle and time since the launch of the last projectile:
Next, we configure the Update cycle in the script for the sphere of the thumb so that the projectile launch angle decreases if the touch of the sphere of the thumb is performed more often than once every half second. In the event that touches follow less often than once every half second, or the projectile launch angle decreases to 0 degrees, the projectile launch angle will return to 30 degrees. The result is the following code:
Such a code will produce a shelling effect, in which continuous touches will launch projectiles at a constantly decreasing angle (see Fig. 2). This effect can be allowed to customize users or make available under certain conditions in the game or simulation mode.

Figure 2. Continuous touches lead to a change in the launch direction of the shells.
To do this, you need to program a logical variable (panned) and a variable of type float, so that they mark the time elapsed from the last scaling gesture:
Set the timeSinceScale variable to 0.0f when executing the scaling gesture, and set the panned variable to True when executing the shift gesture. The field of view of the main camera of the scene is configured in the Update cycle, as can be seen in the script for the rectangle-touch panel:
Consider the functions onScale and onPan. Please note that the float timeSincePan variable does not allow the field of view to constantly increase when the touch panel is used to control the camera:

Figure 3. The main camera of the scene with the image approximated by the rectangle of the touch panel on the right.
To support this function, let's add a float variable and a boolean variable that will allow us to mark the time from the gestures of releasing the sphere of the little finger and the gesture of clicking on it:
When setting up the scene for the first time, I gave the little pink sphere script access to the InputController controller script so that the little pink sphere on the left could cause the controller to move left. The variable that controls the horizontal speed of the controller is not in the InputController script, but in the CharacterMotor script. You can transfer the script of the sphere of the left little finger to the CharacterMotor script in the same way:
The onFlick function in our script only allows you to set the flicked logical variable to a value equal to True.
The Update function in the script is called once per frame and changes the controller movement horizontally as follows:
Thanks to this code, you can increase the speed of movement horizontally. To do this, press and release the sphere of the little finger, and then hold on it for half a second. You can adjust the slow motion horizontally in various ways. For example, you can use it to press and release the sphere of the index finger, and then click on it. Notice that the CHCharacterMotor.movement method contains not only the maxSidewaysSpeed parameter, but also gravity, maxForwardsSpeed, maxBackwardsSpeed, and others. The use of various gestures of the TouchScript library and objects that process gestures, in combination with these parameters, provides ample opportunities and various strategies for developing touch interfaces in Unity 3D scenes. When creating touch interfaces for such applications, you can try various options and choose the most efficient and ergonomic.
In this example, I use a half second time interval to determine whether an action is performed or not. You can also configure multiple time intervals, although this will complicate the interface. For example, a sequence of pressing and releasing gestures and following for half a second behind them can increase the speed of movement horizontally, and a similar sequence with an interval from half a second to a second can reduce the speed. Using time intervals in this way, you can not only customize the user interface more flexibly, but also add hidden secrets to the scene.
In cases where the sequence of gestures did not work correctly, we managed to find a suitable alternative solution. One of the tuning tasks was to get the workflow to work properly using the Time.deltaTime function on the existing device. Thus, the scene we created in Unity 3D for this article confirms the viability of Windows 8 on Ultrabook devices as a platform for developing applications using gesture sequences.
In this article, I will discuss how to set up a scene for controlling the controller from the first person using touch targets. First of all, you need to adjust the touch targets for the base position of the controller and rotation, and then expand their set of functions. The latter can be achieved by existing interface elements, without adding new objects. The scene that we will have will demonstrate the wide capabilities of Unity 3D in Windows * 8 as a platform for processing various sequences of gestures.
Setting up the scene in Unity * 3D
First you need to adjust the scene. To do this, import into Unity * 3D a landscape resource in .fbx format with mountains and trees, exported from Autodesk 3D Studio Max *. Place the controller in the center of the landscape.Set the depth of the main camera (it is part of the controller) to level -1. Let's create a separate element of the camera interface with support for an orthogonal projection, with a width of 1 and a height of 0.5, as well as the flags of Don't Clear. Then create a GUIWidget layer and make it a mask of the camera interface.
Place the main interface elements that control the controller on the stage in the field of view of the orthogonal camera. Add a sphere for each finger of your left hand. The little finger sphere makes the controller move to the left, the ring finger sphere - forward, the middle finger - to the right, and the index finger - back. The sphere of the thumb allows you to jump and launch spherical shells at an angle of 30 degrees clockwise.
For the right-hand interface element, create a cube (square in orthogonal projection). Set up a shift gesture for this cube and bind it to the MouseLook.cs script. This interface element provides the same features as the touchpad of an Ultrabook device.
We place these interface elements out of the field of view of the main camera, and set the GUIWidget as a layer. In fig. 1 you can see how the interface elements allow you to launch projectiles and control the position of the controller on the stage.
Figure 1. First-person controller scene with landscape and spherical projectiles fired.
In this scene, shells launched from the controller fly through the trees. To fix this, you need to add a grid or collider to each tree. Another problem on this stage - low forward speed - occurs when you try to look down using the touch pad at the same time as moving forward using the sphere of the ring finger. To solve this problem, you can limit the viewing angle when looking down while holding the forward button.
')
Multiple touches
On the base scene there is a controller from the first person, which launches the shells at a certain angle from the center (see Figure 1). The default angle is set to 30 degrees clockwise.Adjust the scene to support multiple touches performed more often than the set period, change the launch angle of the projectiles and try to launch the projectile. In this case, you can adjust the angle to increase exponentially depending on the number of tangencies using float variables in the script for the sphere of the thumb on the left. These variables control the angle and time since the launch of the last projectile:
private float timeSinceFire = 0.0f; private float firingAngle = 30.0f; Next, we configure the Update cycle in the script for the sphere of the thumb so that the projectile launch angle decreases if the touch of the sphere of the thumb is performed more often than once every half second. In the event that touches follow less often than once every half second, or the projectile launch angle decreases to 0 degrees, the projectile launch angle will return to 30 degrees. The result is the following code:
timeSinceFire += Time.deltaTime; if(timeSinceFire <= 0.5f) { firingAngle += -l.0f; } else { firingAngle = 30.0f; } timeSinceFire = 0.0f; if(firingAngle <= 0) { firingAngle = 30; } projectileSpawnRotation = Quaternion.AngleAxis(firingAngle,CH.transform.up); Such a code will produce a shelling effect, in which continuous touches will launch projectiles at a constantly decreasing angle (see Fig. 2). This effect can be allowed to customize users or make available under certain conditions in the game or simulation mode.
Figure 2. Continuous touches lead to a change in the launch direction of the shells.
Scrolling scaling
We set up a square in the bottom right of the screen in Figure. 1 to work in a mode similar to the touch panel on the keyboard. With the gesture of shift, the square does not move, but turns the main camera of the scene up, down, left and right with the help of the script of the MouseLook controller. Similarly, the zoom gesture (similar to stretching / compressing on other platforms) does not scale the square, but changes the field of view of the main camera, thanks to which the user can zoom in or out on the main camera (see Figure 3). Adjust the controller so that the shift gesture immediately after scaling returns the field of view of the camera to the default value of 60 degrees.To do this, you need to program a logical variable (panned) and a variable of type float, so that they mark the time elapsed from the last scaling gesture:
private float timeSinceScale; private float timeSincePan; private bool panned; Set the timeSinceScale variable to 0.0f when executing the scaling gesture, and set the panned variable to True when executing the shift gesture. The field of view of the main camera of the scene is configured in the Update cycle, as can be seen in the script for the rectangle-touch panel:
timeSinceScale += Time.deltaTime; timeSincePan += Time.deltaTime; if(panned && timeSinceScale >= 0.5f && timeSincePan >= 0.5f) { fieldOfView += 5.0f; panned = false; } if(panned && timeSinceScale <= 0.5f) { fieldOfView = 60.0f; panned = false; } Camera.main.fieldOfView = fieldOfView; Consider the functions onScale and onPan. Please note that the float timeSincePan variable does not allow the field of view to constantly increase when the touch panel is used to control the camera:
private void onPanStateChanged(object sender, GestureStateChangeEventArgs e) { switch (e.State) { case Gesture.GestureState.Began: case Gesture.GestureState.Changed: var target = sender as PanGesture; Debug.DrawRay(transform.position, target.WorldTransformPlane.normal); Debug.DrawRay(transform.position, target.WorldDeltaPosition.normalized); var local = new Vector3(transform.InverseTransformDirection(target.WorldDeltaPosition).x, transform.InverseTransformDirection(target.WorldDeltaPosition).y, 0); targetPan += transform.InverseTransformDirection(transform.TransformDirection(local)); //if (transform.InverseTransformDirection(transform.parent.TransformDirection(targetPan -startPos)).y < 0) targetPan = startPos; timeSincePan = 0.0f; panned = true; break; } } private void onScaleStateChanged(object sender, GestureStateChangeEventArgs e) { switch (e.State) { case Gesture.GestureState.Began: case Gesture.GestureState.Changed: var gesture = (ScaleGesture)sender; if (Math.Abs(gesture.LocalDeltaScale) > 0.01 ) { fieldOfView *= gesture.LocalDeltaScale; if(fieldOfView >= 170){fieldOfView = 170;} if(fieldOfView <= 1){fieldOfView = 1;} timeSinceScale = O.Of; } break; } } Figure 3. The main camera of the scene with the image approximated by the rectangle of the touch panel on the right.
Push, release with a click
If you press and release the sphere of the little finger, and then hold it for half a second, you can increase the horizontal speed of the controller.To support this function, let's add a float variable and a boolean variable that will allow us to mark the time from the gestures of releasing the sphere of the little finger and the gesture of clicking on it:
private float timeSinceRelease; private bool flicked; When setting up the scene for the first time, I gave the little pink sphere script access to the InputController controller script so that the little pink sphere on the left could cause the controller to move left. The variable that controls the horizontal speed of the controller is not in the InputController script, but in the CharacterMotor script. You can transfer the script of the sphere of the left little finger to the CharacterMotor script in the same way:
CH = GameObject.Find("First Person Controller"); CHFPSInputController = (FPSInputController)CH.GetComponent("FPSInputController"); CHCharacterMotor = (CharacterMotor)CH.GetComponent ("CharacterMotor"); The onFlick function in our script only allows you to set the flicked logical variable to a value equal to True.
The Update function in the script is called once per frame and changes the controller movement horizontally as follows:
if(flicked && timeSinceRelease <= 0.5f) { CHCharacterMotor.movement.maxSidewaysSpeed += 2.0f; flicked = false; } timeSinceRelease += Time.deltaTime; } Thanks to this code, you can increase the speed of movement horizontally. To do this, press and release the sphere of the little finger, and then hold on it for half a second. You can adjust the slow motion horizontally in various ways. For example, you can use it to press and release the sphere of the index finger, and then click on it. Notice that the CHCharacterMotor.movement method contains not only the maxSidewaysSpeed parameter, but also gravity, maxForwardsSpeed, maxBackwardsSpeed, and others. The use of various gestures of the TouchScript library and objects that process gestures, in combination with these parameters, provides ample opportunities and various strategies for developing touch interfaces in Unity 3D scenes. When creating touch interfaces for such applications, you can try various options and choose the most efficient and ergonomic.
Problems with gesture sequences
The sequences of gestures that we used in this article depend significantly on the Time.deltaTime function. I use this function in combination with various gestures before and after the function defines the action. The two main problems I encountered when setting up these cases are the magnitude of the time interval and the nature of the gestures.Time interval
When writing this article, I used a half second interval. If I selected an interval of one tenth of a second, the device could not recognize the sequence of gestures. Although it seemed to me that the touch rate was quite high, it did not lead to the necessary actions on the screen. Perhaps this is due to delays in the operation of the device and software, so I recommend that when developing sequences of gestures take into account the performance of the target platform.Gestures
When working on this example, I was originally going to use the zoom and pan gestures, and then touch and click gestures. Scaling and shifting worked correctly, but stopped as soon as I added a touch gesture. Although I managed to set up sequences of scaling and shifting gestures, it is not very user friendly. A better option would be to configure another touch target in the interface element to handle touch gestures and hold after scaling and shifting.In this example, I use a half second time interval to determine whether an action is performed or not. You can also configure multiple time intervals, although this will complicate the interface. For example, a sequence of pressing and releasing gestures and following for half a second behind them can increase the speed of movement horizontally, and a similar sequence with an interval from half a second to a second can reduce the speed. Using time intervals in this way, you can not only customize the user interface more flexibly, but also add hidden secrets to the scene.
Conclusion
In this article, I set up a scene with different sequences of gestures in Unity * 3D using the TouchScript library on an Ultrabook device with Windows 8. The purpose of the implementation of these sequences is to reduce the area of the screen through which the user controls the application. In this case, you can select a large screen area to display attractive content.In cases where the sequence of gestures did not work correctly, we managed to find a suitable alternative solution. One of the tuning tasks was to get the workflow to work properly using the Time.deltaTime function on the existing device. Thus, the scene we created in Unity 3D for this article confirms the viability of Windows 8 on Ultrabook devices as a platform for developing applications using gesture sequences.
Source: https://habr.com/ru/post/233773/
All Articles