Tortilla - all TCP and DNS traffic from a virtual machine via TOR

A step-by-step guide to directing all TCP and DNS traffic from a virtual machine through TOR.
The topic has already been raised in 2012: “How to send all tcp traffic from the guest Windows system via Tor” using tun2socks and the TUN / TAP virtual network adapter from OpenVPN.
However, a report “TOR ... ALL-THE-THINGS!” Was presented at Black Hat USA 2013, in which they announced a new tool from CROWDSTRIKE INC by Jason Geffner called Tortilla . Tortilla is also mentioned in the official Tor FAQ in the section What should I do if I can't set a proxy for my application? . This is a virtual network adapter that is easy to install and use.
Would need:
- TOR Expert Bundle
- Tortilla
- Virtual machine
')
All settings are made on the physical computer (host system).
In the operating system of the virtual machine (guest system) you do not need to configure anything.
Installing the TOR Expert Bundle
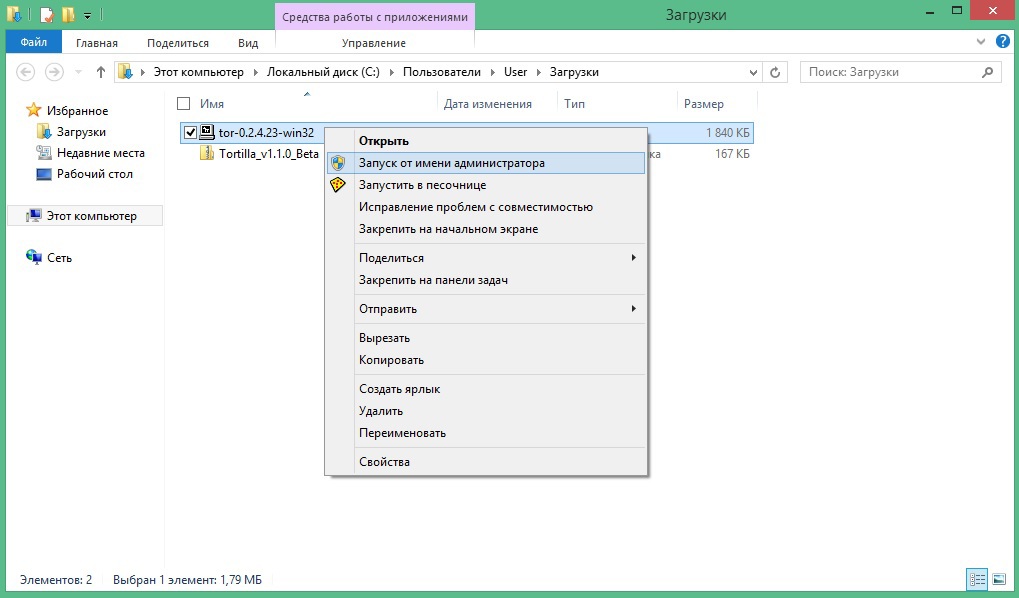
Download the installer and for correct installation run as administrator.
When the installation is complete, launch Tor.

A window will open where you expect a full connection to be established before the message
Bootstrapped 100%: Done.
Install tortilla
The Tortilla network virtual adapter driver has a special test signature and to install and work in all 64-bit and some 32-bit versions of Windows Vista and later, you need to enable support for such a signature using the Microsoft instruction .
To do this, you need to run a command prompt as an administrator.
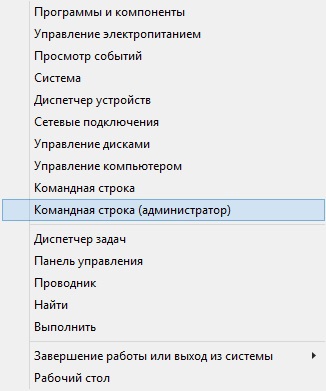
And in the opened command line window execute
Bcdedit.exe -set TESTSIGNING ON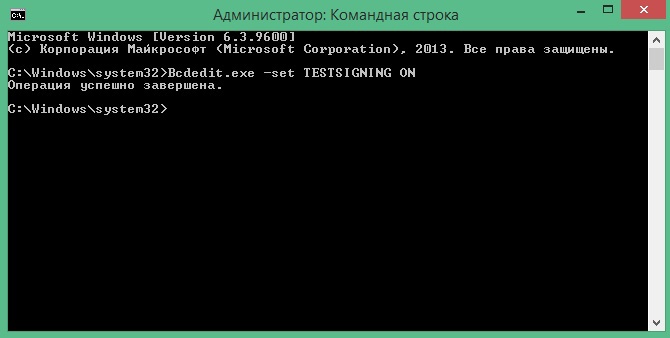
Then reboot.
Then download and unpack the archive. Launch Tortilla. A window will open.

You will be prompted to install the Tortilla driver, which you need to install anyway.

If the suggestion to install the driver does not appear, but an error will immediately appear - this means that you did not include support for the test signature of the drivers (see the beginning of the Tortilla installation).

In the end, after successfully installing the driver and running Tortilla, you should see a window with the message
Ready to receive network traffic from virtual machine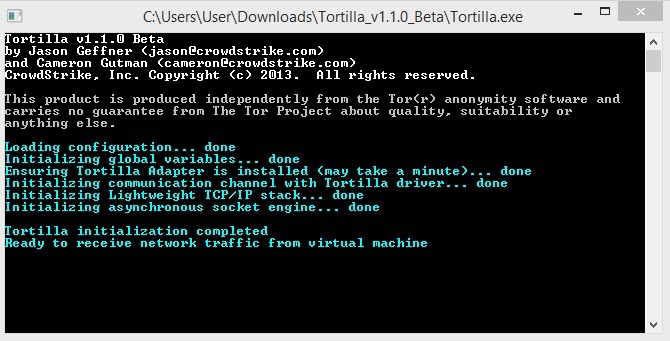
Also in the network connections you will see the new connected virtual network adapter Tortilla Adapter.

Configuring the virtual machine network on the example of VMware
In VMware, open the Virtual Network Editor . There select the VMnet0 network and in the settings specify the type of connection Bridged by selecting the network adapter from the list of Tortilla Adapter .

Then in the settings of the virtual machine, specify the type of connection Custom in the properties of the Network Adapter by selecting VMnet0 from the list.

Eventually
After starting the virtual machine in the Tortilla window, you should see what traffic ran through TOR.

Everything.
UPD. IMPORTANT.
For normal use, use TOR BROWSER BUNDLE .
Download the latest version of the TOR Browser Bundle and run it.


In the Tortilla.ini file (in the Tortilla directory) write port 9150 instead of port 9050.

Apparently the TOR Expert Bundle is not updated, and for the TOR Browser Bundle, new versions are coming out all the time, apparently related to the modification of the TOR network.
In this regard, the work through the TOR Expert Bundle is associated with constant HTTPS errors, as Many sites are now moving to encryption, this makes it difficult to work.
When working through TOR BROWSER BUNDLE, there are no HTTPS errors and JAVA applications work without failures, the speed has increased.
UPD.
Nevertheless, failures remain with HTTPS, but you can reload the TOR connection with the “New Person” option by clicking on the green bulb
 in the TOR browser.
Source: https://habr.com/ru/post/233457/
All Articles