Recover data from internal memory on Android for dummies
Now more and more smartphones go without a slot for sd-card, and the information has to be stored on the built-in memory with access to it via MTP. This connection mode does not allow the standard tools to recover phone data after a wipe or accidental deletion.
Today, using the example of Xiaomi Mi2s and Windows 8.1 bundles, I will try to tell you how to recover lost data, who is interested, welcome to Cat.
It should be noted that if you mistakenly formatted the internal memory of the smartphone / tablet / smartpad, then you should not be upset, and most importantly, in no case should you record anything in the device’s memory, so you will be able to recover more data.
The MTP protocol does not allow the computer to recognize the connected device as a USB drive and recovery programs cannot scan such a device and save data, so we will need to copy the entire internal memory section as an image of the system.
')
You will need root and USB debugging enabled.
In order to copy the system section, we need:
First install the USB drivers for your device and ADB. After that, I advise you to restart the PC.
Create a folder with the address C: \ cygwin64 \ 000 (the name does not matter, do not just use letters other than Latin), here will be our image. Copy to the folder VHDtool.exe.
During the installation, we agree to all standard installations.
After installation, FileZilla will start automatically, but you must exit the program and run it as Administrator .
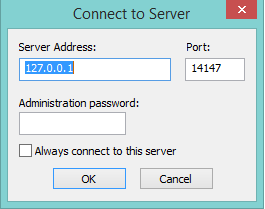
When you start FileZilla ask the name of the server, leave everything as is.
Next, go to Edit - Settings and make the following settings:
listen on those ports 40
timeout settings - the default is 120, 60, 60, and we put 0 everywhere and click OK.
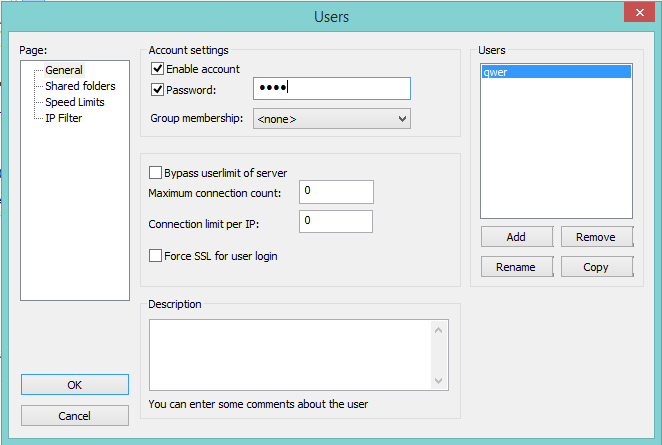
Go to edit - users. In the users window create a new user. In my case, this user qwer.
Click Add - write the name - password pass - click OK.
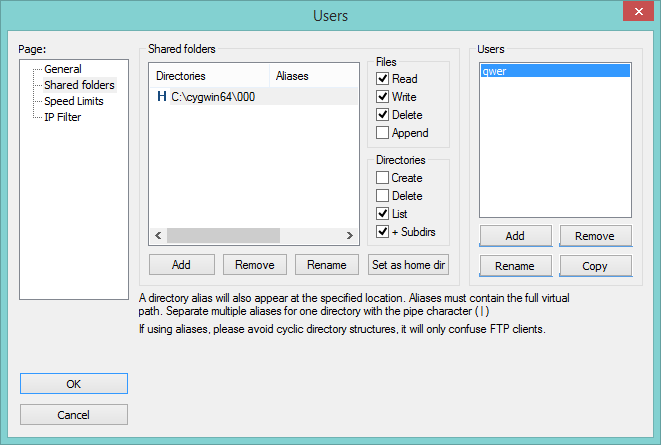
Next, in the same Users menu, on the left, select the Shared folders tab. We go there and add a folder in which our block will be uploaded. Click Add and add the folder C: \ cygwin64 \ 000. The path to this folder appears in the window. If to the left of the inscription C: \ cygwin64 \ 000 there is no letter H, then you need to click Set as home dir. Then, highlighting the line C: \ cygwin64 \ 000, you need to check Read and Write rights with check marks. Then click OK.
We will need the following files:
You can download them here .
Or pull out from the Android SDK distribution.
Copy them to the folder C: \ cygwin64 \ bin
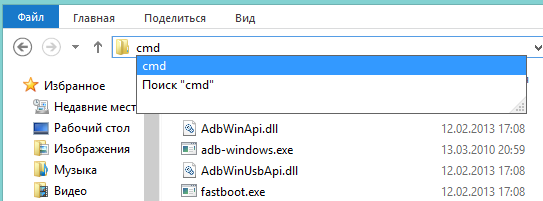
Run the console from the folder C: \ cygwin64 \ bin, for this it is enough to enter cmd in the address bar of the explorer
Enter the command:
The list of connected devices should not be empty, if after the line List of devices attached is empty, then you did not install the USB drivers or enable USB debugging.
When everything goes well, the console looks like this:
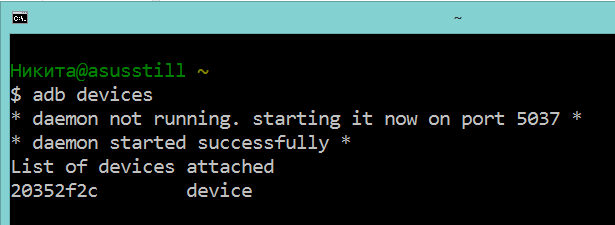
20352f2c - my Xiaomi Mi2s
We will need to connect the device via USB to your PC and turn on the modem mode via USB. I use CyanogenMod 11 and I have this mode along the path: Settings> Wireless networks> More ...> Modem mode> USB modem
Now we need to find out what IPv4 address your computer received.
Use the command line ipconfig
or
Going along the path: Control Panel \ Network and Internet \ Network and Sharing Center
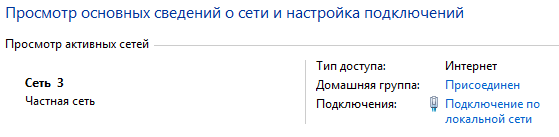
Click on the 'Local Area Connection' text below Information and copy the IPv4 address.
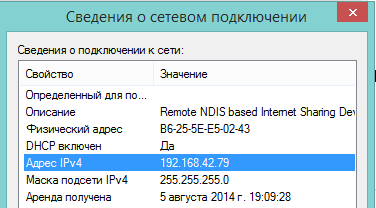
In my case it is 192.168.42.79
Important! Each time the USB cable is reconnected and the modem mode is turned on / off, the IPv4 modem will change.
All memory in your device is divided into logical blocks, we do not need to download everything, it is enough to understand which section contains erased information.
Now we need to look at the list of memory blocks, for this we enter the following commands line by line:
Hint: if you are too lazy to manually rewrite commands or you are afraid to make a mistake, you can use copying, but inserting the line into the console in the usual way will not work, so you need to right-click on the console window, then select edit> paste.

After that, the list_of_partitions.txt file will appear in the internal memory, which we need to copy to the PC and study.
You can copy it to our 000 folder using a simple command (it should be executed in a separate command window):
The internal memory in my device is 32 GB. Therefore, I am looking for the largest partition, in my case it is mmcblk0p27 with a size of 25.6 GB, you most likely will have a different name, or will not have any postscript p **. Of course, no one guarantees that the largest section will be the one on which your photos, videos, documents, etc. have recently been laid, but in 90% of cases this turns out to be exactly the section of memory we need. Otherwise, you will have to copy all the images and check each of them in order.
If you have already closed the cmd window, then run it again.
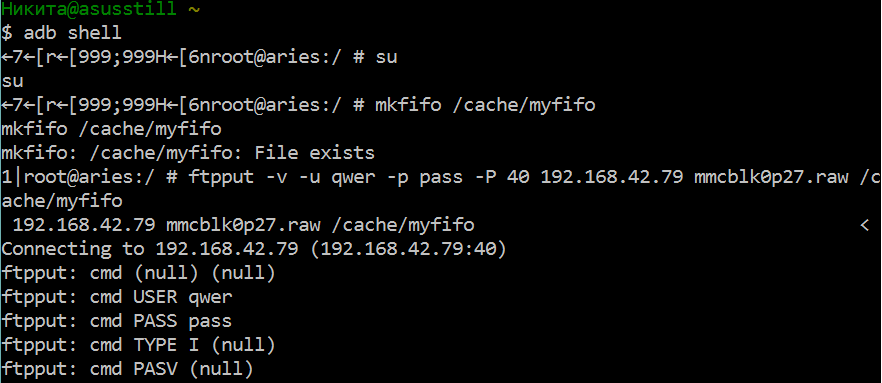
Enter commands line by line:
Do not forget to make the appropriate adjustments to the code!
We decipher what is written:
qwer - FileZilla account name (if you have your own)
pass - password for the FileZilla account (if you have changed yours)
40 - FileZilla server port
192.168.42.79 - FileZilla server address (you have your own)
mmcblk0p27.raw - a copied memory block (you have your own)
Open the second command window and enter the commands:
Do not forget to fix mmcblk0p27 on the number of your block!
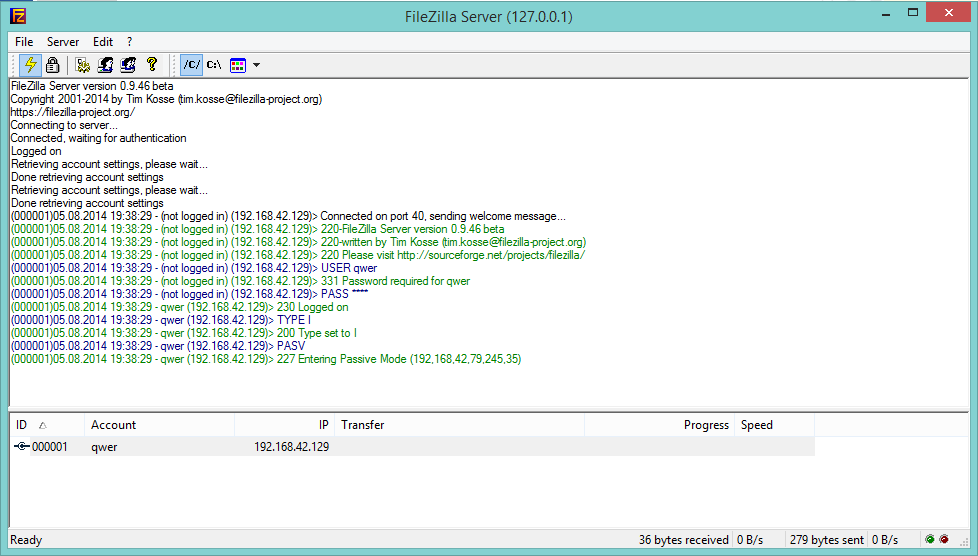
We look into the FileZilla window and see that the download of mmcblk0p27.raw to the C: \ cygwin64 \ 000 folder has started, now you can close the cygwin windows and take a tea break.
Are you back? File downloaded? Fine. Turn off the phone, connect the Internet. Run Cygwin.bat and enter the following commands.
Do not forget to fix mmcblk0p27 on the number of your block!
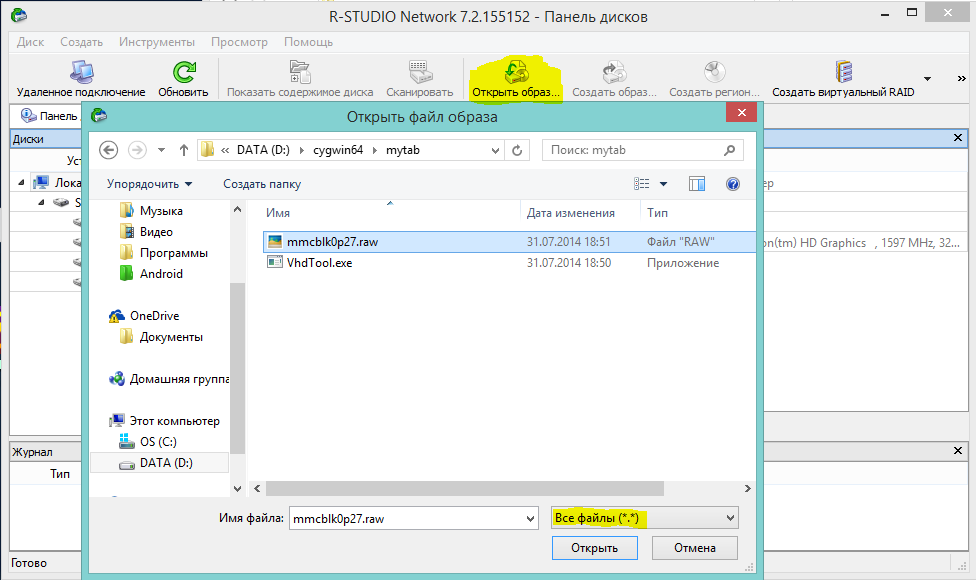
My conversion took a couple of seconds. At the output, we get all the same mmcblk0p27.raw file in the C: \ cygwin64 \ 000 folder, but a bit different. This converted file can be mounted as a virtual disk, or, for example through R-studio, you can restore data directly from our image. I did that.
Hint: important points marked yellow.
My goal was to use a popular language to explain how to copy the system partition from an android device to a PC, maybe some people would blame me for the difficulties associated with a USB modem and ftp, and they would say that it was probably easier to get the image out. My answer is this: I tried it in other ways, described on w3bsit3-dns.com and xda-developers, it didn’t work for me, but I didn’t get to ftp from the second attempt, and when I wrote this article, everything went like clockwork.
I managed to restore all the lost photos without loss in quality and even what I did not think to restore. In the course of the recovery, photographs appeared that were taken in August last year, when I just bought the phone and tested the camera.
In conclusion, I would also like to mention another small utility that recovers data - DiskDigger undelete . It is free, good functionality, but unfortunately, after 40% it fell out with me with an error.
PS Now I will do backup more often ...
PPS Many thanks to bakatrouble for a visual experiment in the comments and help in optimizing the process.
Today, using the example of Xiaomi Mi2s and Windows 8.1 bundles, I will try to tell you how to recover lost data, who is interested, welcome to Cat.
It should be noted that if you mistakenly formatted the internal memory of the smartphone / tablet / smartpad, then you should not be upset, and most importantly, in no case should you record anything in the device’s memory, so you will be able to recover more data.
The MTP protocol does not allow the computer to recognize the connected device as a USB drive and recovery programs cannot scan such a device and save data, so we will need to copy the entire internal memory section as an image of the system.
')
Preparing Android Device
You will need root and USB debugging enabled.
PC preparation
In order to copy the system section, we need:
- VHDtool ;
- Drivers for your device (in case of problems habrahabr.ru/post/205572 );
- ADB ( adbdriver.com or developer.android.com );
- FileZilla server.
First install the USB drivers for your device and ADB. After that, I advise you to restart the PC.
VHDtool
Create a folder with the address C: \ cygwin64 \ 000 (the name does not matter, do not just use letters other than Latin), here will be our image. Copy to the folder VHDtool.exe.
Filezilla
During the installation, we agree to all standard installations.
After installation, FileZilla will start automatically, but you must exit the program and run it as Administrator .
When you start FileZilla ask the name of the server, leave everything as is.
Next, go to Edit - Settings and make the following settings:
listen on those ports 40
timeout settings - the default is 120, 60, 60, and we put 0 everywhere and click OK.
Go to edit - users. In the users window create a new user. In my case, this user qwer.
Click Add - write the name - password pass - click OK.
Next, in the same Users menu, on the left, select the Shared folders tab. We go there and add a folder in which our block will be uploaded. Click Add and add the folder C: \ cygwin64 \ 000. The path to this folder appears in the window. If to the left of the inscription C: \ cygwin64 \ 000 there is no letter H, then you need to click Set as home dir. Then, highlighting the line C: \ cygwin64 \ 000, you need to check Read and Write rights with check marks. Then click OK.
Adb
We will need the following files:
- adb.exe
- AdbWinApi.dll
- adb-windows.exe
- AdbWinUsbApi.dll
- fastboot.exe
You can download them here .
Or pull out from the Android SDK distribution.
Copy them to the folder C: \ cygwin64 \ bin
ADB operation check
Run the console from the folder C: \ cygwin64 \ bin, for this it is enough to enter cmd in the address bar of the explorer
Enter the command:
adb devices The list of connected devices should not be empty, if after the line List of devices attached is empty, then you did not install the USB drivers or enable USB debugging.
When everything goes well, the console looks like this:
20352f2c - my Xiaomi Mi2s
USB modem mode
We will need to connect the device via USB to your PC and turn on the modem mode via USB. I use CyanogenMod 11 and I have this mode along the path: Settings> Wireless networks> More ...> Modem mode> USB modem
Screenshot
Now we need to find out what IPv4 address your computer received.
Use the command line ipconfig
or
Going along the path: Control Panel \ Network and Internet \ Network and Sharing Center
Click on the 'Local Area Connection' text below Information and copy the IPv4 address.
In my case it is 192.168.42.79
Important! Each time the USB cable is reconnected and the modem mode is turned on / off, the IPv4 modem will change.
What memory block do we need?
All memory in your device is divided into logical blocks, we do not need to download everything, it is enough to understand which section contains erased information.
Now we need to look at the list of memory blocks, for this we enter the following commands line by line:
adb shell su find /dev/block/platform/ -name 'mmc*' -exec fdisk -l {} \; > /sdcard/list_of_partitions.txt Hint: if you are too lazy to manually rewrite commands or you are afraid to make a mistake, you can use copying, but inserting the line into the console in the usual way will not work, so you need to right-click on the console window, then select edit> paste.
After that, the list_of_partitions.txt file will appear in the internal memory, which we need to copy to the PC and study.
You can copy it to our 000 folder using a simple command (it should be executed in a separate command window):
adb pull /sdcard/list_of_partitions.txt C:/cygwin64/000 My file is
Disk /dev/block/platform/msm_sdcc.1/mmcblk0p27: 25.6 GB, 25698483712 bytes 4 heads, 16 sectors/track, 784255 cylinders Units = cylinders of 64 * 512 = 32768 bytes Disk /dev/block/platform/msm_sdcc.1/mmcblk0p27 doesn't contain a valid partition table Disk /dev/block/platform/msm_sdcc.1/mmcblk0p26: 3758 MB, 3758096384 bytes 4 heads, 16 sectors/track, 114688 cylinders Units = cylinders of 64 * 512 = 32768 bytes Disk /dev/block/platform/msm_sdcc.1/mmcblk0p26 doesn't contain a valid partition table Disk /dev/block/platform/msm_sdcc.1/mmcblk0p25: 402 MB, 402653184 bytes 4 heads, 16 sectors/track, 12288 cylinders Units = cylinders of 64 * 512 = 32768 bytes Disk /dev/block/platform/msm_sdcc.1/mmcblk0p25 doesn't contain a valid partition table … The internal memory in my device is 32 GB. Therefore, I am looking for the largest partition, in my case it is mmcblk0p27 with a size of 25.6 GB, you most likely will have a different name, or will not have any postscript p **. Of course, no one guarantees that the largest section will be the one on which your photos, videos, documents, etc. have recently been laid, but in 90% of cases this turns out to be exactly the section of memory we need. Otherwise, you will have to copy all the images and check each of them in order.
Copy the memory section on the PC.
If you have already closed the cmd window, then run it again.
Enter commands line by line:
adb shell su mkfifo /cache/myfifo ftpput -v -u qwer -p pass -P 40 192.168.42.79 mmcblk0p27.raw /cache/myfifo Do not forget to make the appropriate adjustments to the code!
We decipher what is written:
qwer - FileZilla account name (if you have your own)
pass - password for the FileZilla account (if you have changed yours)
40 - FileZilla server port
192.168.42.79 - FileZilla server address (you have your own)
mmcblk0p27.raw - a copied memory block (you have your own)
Open the second command window and enter the commands:
adb shell su dd if=/dev/block/mmcblk0p27 of=/cache/myfifo Do not forget to fix mmcblk0p27 on the number of your block!
We look into the FileZilla window and see that the download of mmcblk0p27.raw to the C: \ cygwin64 \ 000 folder has started, now you can close the cygwin windows and take a tea break.
Convert and restore
Are you back? File downloaded? Fine. Turn off the phone, connect the Internet. Run Cygwin.bat and enter the following commands.
cd C:/cygwin64/000/ VhdTool.exe /convert mmcblk0p27.raw Do not forget to fix mmcblk0p27 on the number of your block!
My conversion took a couple of seconds. At the output, we get all the same mmcblk0p27.raw file in the C: \ cygwin64 \ 000 folder, but a bit different. This converted file can be mounted as a virtual disk, or, for example through R-studio, you can restore data directly from our image. I did that.
Hint: important points marked yellow.
Results
My goal was to use a popular language to explain how to copy the system partition from an android device to a PC, maybe some people would blame me for the difficulties associated with a USB modem and ftp, and they would say that it was probably easier to get the image out. My answer is this: I tried it in other ways, described on w3bsit3-dns.com and xda-developers, it didn’t work for me, but I didn’t get to ftp from the second attempt, and when I wrote this article, everything went like clockwork.
I managed to restore all the lost photos without loss in quality and even what I did not think to restore. In the course of the recovery, photographs appeared that were taken in August last year, when I just bought the phone and tested the camera.
In conclusion, I would also like to mention another small utility that recovers data - DiskDigger undelete . It is free, good functionality, but unfortunately, after 40% it fell out with me with an error.
PS Now I will do backup more often ...
PPS Many thanks to bakatrouble for a visual experiment in the comments and help in optimizing the process.
Source: https://habr.com/ru/post/232399/
All Articles