Let's pedal Vim
In this post we will talk about the pedal widely known in narrow circles for switching Vim from Normal mode to Insert mode and back. Inspired by the examples of such handicrafts in the open spaces of the network, I decided to make my own version, with preference and poetess.
Make a pedal, which is a USB HID device, pressing and holding it prints
Order a Chinese PCsensor USB footswitch pedal and program it accordingly.
')
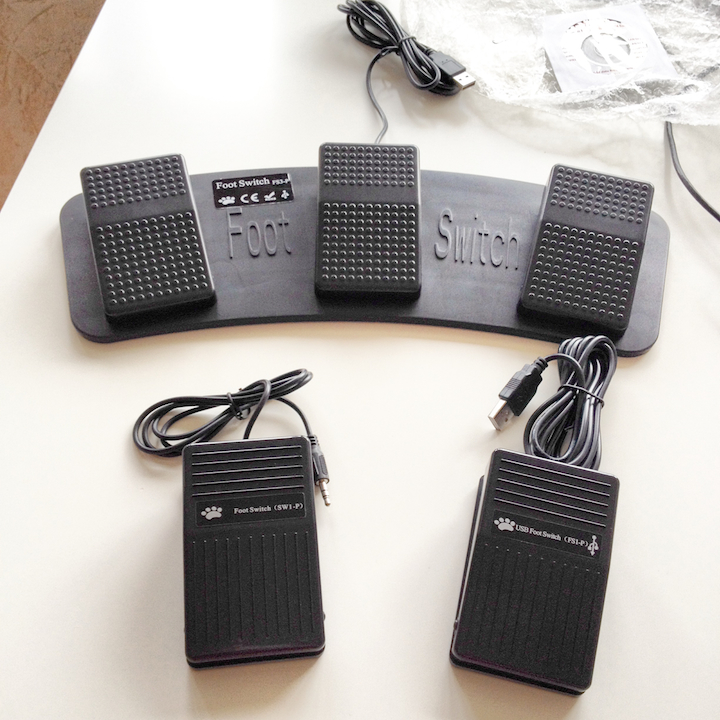
In theory, everything seems very simple. I ordered one regular USB pedal, one triple pedal and one mechanical pedal with a button without a controller. As soon as I received the package with the pedals, I was immediately confronted with the harsh reality. I did not take into account the fact that the PCsensor pedal can only work as one key . This is only suitable for very primitive solutions. For our task it is necessary to have at least two keys , moreover, triggered by different events. This is not to mention the fact that the software for programming pedals is available only under Windows. Under Mac and Linux, the pedal is almost useless if you are not able to write a driver to configure this device yourself.
Alexander Levchuk, whose development I was inspired, used a rough hack - he took two optical sensors from two pedals and put them in one case. One sensor is triggered when pressed and programmed to
Now that the problem has been studied, you can proceed to a solution. So: one pedal, one sensor, one USB wire and one controller that can pretend to be a USB HID device. Search did not even have to. I have long been fond of Arduino and microcontrollers. The Arduino line-up includes Leonardo ATmega32u4 and Due versions based on the Atmel SAM3X8E Cortex-M3 ARM chip, which can work as a USB peripheral device. However, both boards are too large and their functions are clearly redundant for our simple task. Began to look for micro-versions of the same boards.
I do not remember in what ways I came across the DF Robot Beetle solution and its Chinese clone on dx.com . The price of the issue is about 10 dollars. It was decided to order three at once.

As seen in the photo, the controller has a very small size, a reduced (compared to the Arduino) number of contacts and no extra protruding elements. At the same time it has compatibility with Arduino at the program level. Thus, I not only got rid of the redundancy of the classical Arduino-platform in favor of the necessary and sufficient compactness, but added new features inherent in this platform.
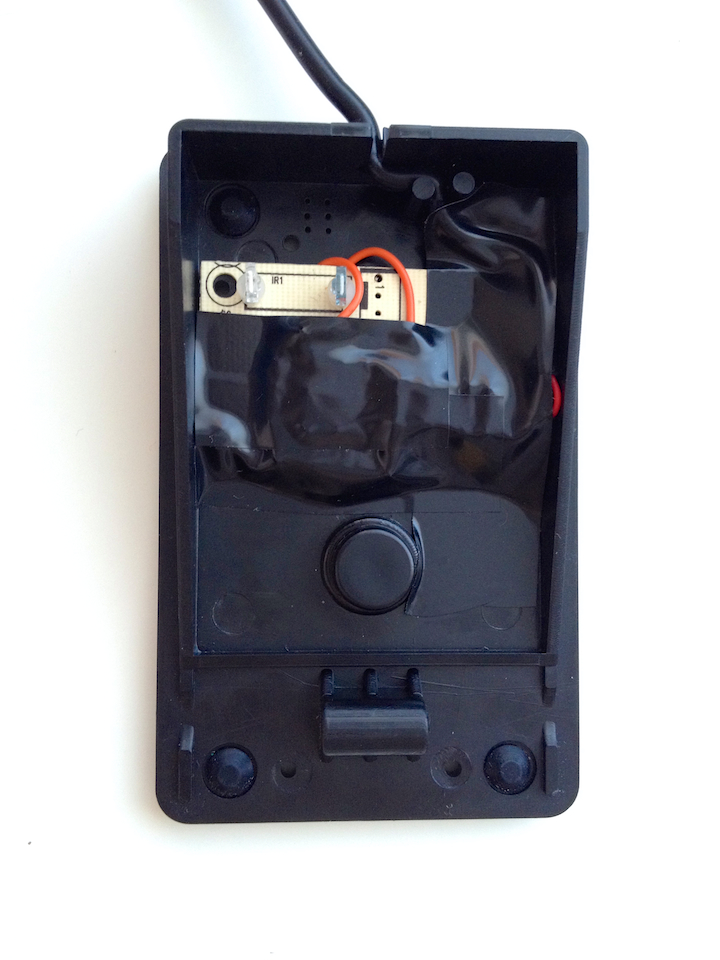
Everything! It remains to connect optical pedal sensors to the controller, write the firmware and carefully assemble the device into the case. I just soldered an already existing optical pedal sensor to one of the Arduino inputs (in this case, D9). I found pedals + and - on the board, connected them to the Arduino and brought the signal from the photodiode to the digital input. Just in case, cut off the factory chip-drop on the pedal board, so as not to give false signals.
Unfortunately, I will not paint here on a multitude of screens, which wires where to solder, because it runs the risk of having to tell me how to turn on the soldering iron and where to buy tin. For people who can use a soldering iron, everything is quite simple and obvious.
The principle of operation of the firmware is indecently simple. The presence of signals at the controller's 9 pin is checked (the
It is worth listing the unobvious features of my solution:
The comments accept ideas for the further development of the project. Thanks for attention!
Task
Make a pedal, which is a USB HID device, pressing and holding it prints
i , and when you release Esc .Decision
Order a Chinese PCsensor USB footswitch pedal and program it accordingly.
')
In theory, everything seems very simple. I ordered one regular USB pedal, one triple pedal and one mechanical pedal with a button without a controller. As soon as I received the package with the pedals, I was immediately confronted with the harsh reality. I did not take into account the fact that the PCsensor pedal can only work as one key . This is only suitable for very primitive solutions. For our task it is necessary to have at least two keys , moreover, triggered by different events. This is not to mention the fact that the software for programming pedals is available only under Windows. Under Mac and Linux, the pedal is almost useless if you are not able to write a driver to configure this device yourself.
Alexander Levchuk, whose development I was inspired, used a rough hack - he took two optical sensors from two pedals and put them in one case. One sensor is triggered when pressed and programmed to
i , and the other is programmed to generate Esc when released. And since each sensor is an independent USB HID controller, its device takes up two USB ports of a computer at once! There are few advantages from such a solution - to get one Vim-pedal you will need two ordinary PCsensor pedals, but you do not need to fence your own controller.Now that the problem has been studied, you can proceed to a solution. So: one pedal, one sensor, one USB wire and one controller that can pretend to be a USB HID device. Search did not even have to. I have long been fond of Arduino and microcontrollers. The Arduino line-up includes Leonardo ATmega32u4 and Due versions based on the Atmel SAM3X8E Cortex-M3 ARM chip, which can work as a USB peripheral device. However, both boards are too large and their functions are clearly redundant for our simple task. Began to look for micro-versions of the same boards.
I do not remember in what ways I came across the DF Robot Beetle solution and its Chinese clone on dx.com . The price of the issue is about 10 dollars. It was decided to order three at once.
As seen in the photo, the controller has a very small size, a reduced (compared to the Arduino) number of contacts and no extra protruding elements. At the same time it has compatibility with Arduino at the program level. Thus, I not only got rid of the redundancy of the classical Arduino-platform in favor of the necessary and sufficient compactness, but added new features inherent in this platform.
Everything! It remains to connect optical pedal sensors to the controller, write the firmware and carefully assemble the device into the case. I just soldered an already existing optical pedal sensor to one of the Arduino inputs (in this case, D9). I found pedals + and - on the board, connected them to the Arduino and brought the signal from the photodiode to the digital input. Just in case, cut off the factory chip-drop on the pedal board, so as not to give false signals.
Unfortunately, I will not paint here on a multitude of screens, which wires where to solder, because it runs the risk of having to tell me how to turn on the soldering iron and where to buy tin. For people who can use a soldering iron, everything is quite simple and obvious.
Iron
- USB Foot Switch (PCsensor).
- DF Robot Beetle , also known as Jtron Beetle .
- Soldering iron, experience of its use and related materials.
- A set of wires.
- MicroUSB cord.
Soft
- The pedal for Vim is compatible with any operating system with a USB keyboard and Vim itself.
- For firmware controller will need an Arduino IDE . This shell runs on three main systems - Windows, Mac and Linux.
- Source code firmware. Just open the code in the Arduino IDE, compile and flash the controller.
- To expand the capabilities of the pedal and to implement the functions of the mouse - use the library Mouse and keyboard .
The principle of operation of the firmware is indecently simple. The presence of signals at the controller's 9 pin is checked (the
buttonState variable). If the signal changes from 0 to 1 - the pedal is pressed, send Esc, i . If the signal changes from 1 to 0 - the pedal is released, send Esc . Probably, it is not necessary to explain that before i I also send Esc to exit from the already included Insert mode.Assembly
- The first prototype. In the photo on the left - the Arduino-controller, on the right - the controller board and PCsensor sensors. Three wires are a plus, a signal and a common one. The bottom red is a plus, the top red is a minus, the blue is a signal.

- Here we skip the process of the controller firmware using the Arduino IDE - this is a common place. The source code of the program is available . For the firmware, select the Leonardo board and the corresponding USB port in the settings.
- Attempt to pre-assemble the pedal with the new controller.

- Surprisingly, it all worked immediately and did not require adjustment. I almost forgot to say. To build the structure, we need a microUSB plug connector, to which I soldered a regular long cord from the pedal. For people who can hold a soldering iron, modification of the cord should not be a problem.
- Appearance of the ready decision.

Demonstration
Additional features
It is worth listing the unobvious features of my solution:
- You can change the logic of the pedal on the fly, without disconnecting and even without getting the pedal from its place.
- Add input of whole lines and pieces of text.
- Use almost all Arduino software features (but do not forget about the limited external contacts on the board).
- You can write software on the side of the computer that will send the application context to the controller, and the pedal will change the mode of operation.
- You can add a simple tablet-sized squeaker to add an audible indication (for example, for the visually impaired).
- You can configure the pedal so that it performs the functions of a mouse. And, not limited to mouse buttons.
- And finally, the killer feature is the legendary flashing Arduino LED ! (not used in this project)
What's next?
- Then I would like to collect three-pedal version of the device. Maybe for Vim too, maybe for other applications (Sublime Text, Atom). For this solution, you also need only one Arduino.
- The Bluetooth version of the pedal can be implemented on a Bluefruit EZ-key controller. Honestly, I was on it and wanted to make the pedal initially. Imagine how awesome it would be to have a wireless pedal! But alas, due to problems with delivery to Russia, this item is almost impossible to order either on Adafruit or Amazon (I found out). If someone can do it - be sure to email me.
Links
- vim-clutch of Alexander Levchuk.
- USB Foot Switch Taiwanese company PCsensor.
- DF Robot Beetle.
- Jtron Beetle .
- Arduino Leonardo .
- Arduino IDE .
- Library Mouse and Keyboard for Arduino.
- GitHub project repository .
The comments accept ideas for the further development of the project. Thanks for attention!
Source: https://habr.com/ru/post/232177/
All Articles