Reverse engineering firmware Chinese Android-tablet

The Chinese have a special idea about copyright - they simply have no effect on them. At the same time, they protect their achievements with various technical means, for some reason “forgetting” to share them with their clients. It would seem a hopeless situation: a batch of Chinese tablets arrived, and the task was to flash them in such a way that the customer’s content was not erased when the settings were reset, while there was stock firmware in an unknown bin-format, but the SDK was missing. What to do, how to build custom firmware? Only one way out - to apply reverse engineering.
Intelligence service
The device, which had to work with, was built on the basis of GeneralPlus GP330xx SoC , and its system software was developed using the OpenPlatform SDK, and although the Chinese declare their readiness to provide source codes, they do not. Despite the complexity of the task, optimism was added by the root access included in the device by default. Therefore, the learning process began with the launch of ADB Shell.
')
The entire disk space of the tablet consisted of one large NAND flash device block (
/dev/block/nanda ), broken into sections: Disk /dev/block/nanda: 7457 MB, 7457472512 bytes 4 heads, 16 sectors/track, 227584 cylinders Units = cylinders of 64 * 512 = 32768 bytes Device Boot Start End Blocks Id System /dev/block/nanda1 257 174335 5570528 b Win95 FAT32 /dev/block/nanda2 174336 207103 1048576 83 Linux /dev/block/nanda3 207104 223487 524288 83 Linux /dev/block/nanda4 223488 227583 131072 83 Linux A part of the memory was allocated for the so-called Internal SD card. It is necessary to dwell on this term in more detail. In Android, each application program runs in its sandbox and uses the system API to access files. This API allows access to Internal Storage and External Storage. In this case, the external memory is divided into removable storage media (SD card, which is inserted into the slot at the end of the device) and internal (non-removable) storage (an internal memory section that mimics the SD card). In this tablet, the largest partition has been set aside for the internal SD card - / dev / block / nanda1. Therefore, it was decided to split it into two sections, highlighting one of them for the content of the customer, and the second for the internal SD card.
The device / dev / block / nanda is marked up using the MBR, not GPT, so the maximum number of primary partitions is four. Using fdisk, the partition / dev / block / nanda1 was deleted, and in its place an extended-partition was created with two subsections / dev / block / nanda5 and / dev / block / nanda6.
We conjure sections
Looking through the list of mounted devices, we see that the / dev / block / vold / 253: 97 partition is mounted on / mnt / sdcard.
root@android:/etc # mount ... /dev/block/vold/253:97 /mnt/sdcard vfat rw,dirsync,nosuid,nodev,noexec,relatime,uid=1000,gid=1015,fmask=0602,dmask=0602,allow_utime=0020,codepage=cp437,iocharset=iso8859-1,shortname=mixed,utf8,errors=remount-ro 0 0 /dev/block/vold/253:97 /mnt/secure/asec vfat rw,dirsync,nosuid,nodev,noexec,relatime,uid=1000,gid=1015,fmask=0602,dmask=0602,allow_utime=0020,codepage=cp437,iocharset=iso8859-1,shortname=mixed,utf8,errors=remount-ro 0 0 ... What is the relationship between / dev / block / vold / 253: 97 and / dev / block / nanda1? Vold is a Volume Management daemon, a demon for mounting external media. It has a configuration file with syntax similar to the standard nix fstab called vold.fstab:
## Vold 2.0 Generic fstab ... dev_mount sdcard /mnt/sdcard auto /devices/virtual/block/nanda /devices/virtual/block/nanda/nanda1 /devices/virtual/block/nanda/nanda2 /devices/virtual/block/nanda/nanda3 /devices/virtual/block/nanda/nanda4 ... At first glance, everything is clear: / mnt / sdcard is the mount path, auto is an automatic selection of the first partition to be mounted from the list of partitions listed below (/ devices / virtual / ...). However, the vold.fstab file in this device was, in fact, a “stub”. When making modifications to the dev_mount sdcard ... line (for example, mount a newly created partition other than / devices / virtual / block / nanda / nanda1), the demon refused to work. It is difficult to say for sure whether this is related to a customized kernel or to a customized daemon, but, be that as it may, the motives of the developers of such a decision are not clear.
Thus, it turned out that neither / dev / block / nanda5 nor / dev / block / nanda6 can be mounted using vold. Then you could go in two ways:
- Manually start mounting an SD card from init scripts. True, this path could not guarantee 100% compatibility with all Android internals, in other words, it would be impossible to vouch for the stability of the system, removing from it the key component of "communication" with external drives - vold.
- Take the open source vold and try to build it for this device. There are also no guarantees, moreover, it could require a fair amount of time, which, as always, was not enough.
For this method of solving the problem, shell scripts called via ADB would have to be written and the resulting firmware binary would not work, and this, in turn, would increase the cost of the work of the customer’s technical specialists, so this way was reserved and research continued in a new direction.
The decision came suddenly
Faced with such a problem, I decided once again to carefully examine what was in our hands. Of particular interest was the flash driver, which, in addition to the firmware.bin firmware file itself, contained a number of additional support resources: bootheader.bin, bootpack.bin, bootresource.bin, scanram.bin, updater.bin. They are also necessary, but not relevant for our task. Of greater interest are the files that are used by the flasher to download its own code to the device: small_isp.bin, cmdline, initrd and kernel.
This device used for firmware the so-called ISP mode (this is the designation of one of the programming modes of flash memory). The algorithm of the flash driver can be divided into four stages:
- The technician reboots the device in firmware mode, holding the <Home + Power> button while holding it on.
- The flasher recognizes the device via USB and reboots it into ISP mode.
- The flasher downloads to the Linux device, transferring the cmdline, initrd and kernel files.
The kernel file is the OS kernel, the initrd is the firmware partition on the device side, the cmdline is the kernel parameters that contain the size of the initrd file. - Once loaded on a device, Linux begins to receive the main firmware files from the flasher, unpack them and write them in accordance with the internal algorithms.
What were these internal algorithms? The decision came suddenly. It turned out that the initrd contained the source codes of the flasher in the Lua language, as well as the binaries of the additional Lua modules. To unpack the initrd, run the following commands:
# mkdir initrd-unpacked # cd initrd-unpacked # gunzip < ../initrd | cpio -i --make-directories For reverse packaging (if necessary; for example, for testing modified versions of scripts):
# find ./ | cpio -H newc -o > initrd.cpio # gzip initrd.cpio # mv initrd.cpio.gz initrd This may seem strange, but for some reason, the developers actually invented their own firmware format, while leaving the scripts operating with this format openly in the initrd.
Pluto
Tablet firmware headers were packed using the Pluto module, which packs Lua tables into a binary format. The Lua programming language generally makes extensive use of plug-ins, which are so-libraries that add one or another API. In addition to everything, as followed from the documentation, Pluto was platform and architecture dependent. Intel and ARM (on which the tablet was built) are significantly different: Intel uses little-endian byte order in the representation of numbers, and ARM - big-endian.
And here a serious problem arose: the standard Pluto module did not unpack the data. Different versions of Lua and even different CPU architectures (x86, x86_64, ARM) have been tried. It turned out that just the firmware developers used their own, with nothing compatible version of Pluto.
In order to unpack the data, I had to use the QEMU emulator for the ARM architecture and install Debian Linux on it. And then install Lua and put the pluto.so module extracted from the initrd into the Lua modules directory.

Connecting Lua Modules
The Lua programming language is extended with external plug-ins that can be written in both Lua and C. In the latter case, these are regular so-libraries that export a number of API functions.
They are connected using therequirefunction, and the variablepackage.cpathis responsible for the search path for binary modules. The proprietary LZO-module has its own connection feature, which is in its name -lua_lzo.so. In this case, the module itself is called lzo, which is why its connection instead of the usual one:package.cpath = package.cpath .. "/home/mikhail/lua_so/?.so require ;lzo;
should be done like this:package.cpath = package.cpath .. /home/mikhail/lua_so/lua_?.so require lzo
Also pay attention to the package manager LuaRocks, which allows you to install modules from a single repository and conveniently connect them. For example, in this study, the nixio and MD5 modules were connected via LuaRocks.
Lzo
A separate complexity was also presented by the LZO compression algorithm. The fact is that the data format for this archiving algorithm is not standardized, so it’s difficult to write an unpacker without knowing how the file was packed. However, among the inita Lua modules was the lua_lzo.so module. The method described in the previous paragraph came to the rescue, however, complicated by the fact that lua_lzo.so required depending on the system library liblzo.so (which was taken from the same initrd) and non-standard connection of the module via package.cpath.
LZO compression algorithm
LZO is a family of block compression algorithms with characteristics important for portable computers:
- very high unpacking speed;
- low memory consumption;
- block unpacking of data, portions of small size.
In terms of reverse engineering, it has two drawbacks:
- LZO includes nine compression algorithms, and each of them has its own unpacker.
- The file structure of LZO archives is not standardized, different libraries generate different structures.
In our case, the archived data had the following format:
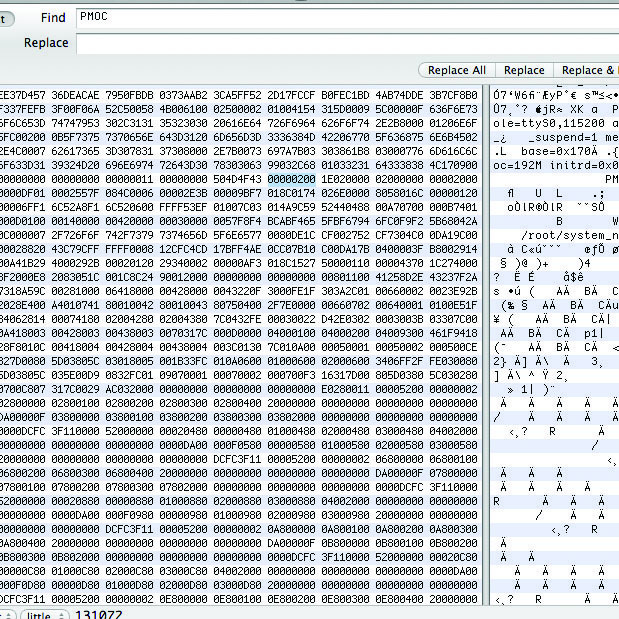
- Magic sequence ("PMOC").
- The size of the data block used for packaging (131072). Let me remind you that in ARM little-endian system is used, which means that this number corresponds to the hex value 0x00000200 (see. Fig. 3).
- Data blocks containing:
- The block size (for example, 1816).
- Packed data of the size indicated above.
This means that a block of packed data of 1816 bytes in size will be unpacked into 128 kilobytes of information.
Unpacking is performed in a loop, in blocks of data. For unpacking functions are used:
handle = >lzo.decompressInit(header), where header is the magic number + size of the archive block, handle is the handle used in the other two functions... = lzo.decompressPorcess(handle)lzo.decompressFinish(handle)
It is noteworthy that you need to know exactly the size of the archive so that the unpacking is successful. Otherwise, unpacking hangs on the status ofDECOMPRESS_NEED_MORE_DATA. The archive size is specified in header 2 (see fig. 1).
Compression of data is more difficult, since the compression functions are not documented and their performance was detected by trial. Functions are similar:
handle, header= lzo.compressInit(blockSize)...= lzo.compressProcess(handle, data)lzo.compressFinish(handle)
The distinctive moment of compression from decompression is that before recording a block of data obtained as a result of executing the function lzo.compressProcess, it is necessary to record the size of the packed block of data. This follows from the general documentation on the LZO compression algorithm and from the analysis of the archive obtained by parsing the original firmware.
As a result, investigating the source code of the scripts, trying to understand their logic of operation, data formats, as well as conducting a lot of experiments, the firmware was unpacked.
Resize system partition
The unpacked file of the system partition (
system.bin ) was an image of the ext4 file system. In order to record customer data, it was necessary to expand it to 1 GB. To do this, do the following:- Extend the file system itself.
- In header 2, in the partition table, reduce the
nanda1partition by 1 GB and increase thenanda2partition by the samenanda2. - Archive
system.bin, recalculate the checksums and write them into the headers.
The very same resize of the system partition is performed by the following commands:
# mkdir system_new # losetup /dev/loop0 system.bin # e2fsck -f /dev/loop0 # resize2fs /dev/loop0 2G # mount /dev/loop0 system_new ... # umount system_new # losetup -d /dev/loop0 Work with data section
As part of the solution of this problem, part of the changes in the system were made not only in/system , but also in /data . To do this, it was necessary to unpack dataImage.tar.gz , make the necessary changes and pack back. You should do the same with userImage.tar.gz if you want to make changes to the content of the SD card.For packing with saving access rights we use the following commands:
# tar cvf - . | gzip -9 - > ../user.tar.gz # tar cvfp - . | gzip -9 - > ../data.tar.gz Replacing applications by default
The customer needed not only to record his content in the device's permanent memory, but also to replace the standard launcher with his own application, providing the required User Experience.Replacing the launcher (and other applications by default) was done by editing the files /data/system/packages.list and /data/system/packages.xml. First, the default settings were performed on the device, then the contents of the files were partially transferred to the firmware.
The packages.list file is a list of packages installed on the system. The required launcher package is called com.soaw.launcher and is added with the line:
com.soaw.launcher 10068 1 /data/data/com.soaw.launcher And <packages.xml is a database of packages installed in the system and their metadata, such as certificates, access rights, default applications and so on. The default setting for the programs is two entries. The first entry is launcher’s metadata. Pay attention to the index attribute in the cert tag, its value must be one greater than the existing one in the file, in order to avoid the confusion of certificates.
package name="com.soaw.launcher" codePath="/system/app/SOAWLauncher.apk" nativeLibraryPath="/data/data/com.soaw.launcher/lib" flags="1" ft="141c2c2bbe0" it="141c2c2bbe0" ut="141c2c2bbe0" version="1" userId="10068" sigs count=1; cert index=20; key=... /sigs/package The next entry is the default program settings. Here you can select launcher and media player software.
<preferred-activities> <item name="com.soaw.launcher/.activity.HomeActivity" match="100000" set="2"> <set name="com.android.launcher/com.android.launcher2.Launcher"/> <set name="com.soaw.launcher/.activity.HomeActivity"/> <filter> <action name="android.intent.action.MAIN"/> <cat name="android.intent.category.HOME"/> <cat name="android.intent.category.DEFAULT"/> </filter> </item> <item name="com.android.gallery3d/.app.MovieActivity" match="600000" set="2"> <set name="com.generalplus.GaGaPlayer/.MoviePlayerActivity"/> <set name="com.android.gallery3d/.app.MovieActivity"/> <filter> <action name="android.intent.action.VIEW"/> <cat name="android.intent.category.DEFAULT"/> <type name="video/mp4"/> </filter> </item> </preferred-activities> System settings
As you know, Android has a SQLite database of system settings, which can be modified during the preparation of the firmware image. The database file is located in /data/data/com.android.providers.settings/databases/settings.db.
The bottom panel is hidden in the system table with the following entries:
navigation_bar_mode = 4 navigation_bar_buttons_show = 0 navigation_bar_buttons_need_show = 0 The lock screen is disabled in the secure table:
coockscreen.disabled = 1 Init scripts
Android init scripts are written to
/ at the time the device boots, and therefore, although they can be edited directly on the device, they will be overwritten with the original files the next time you reboot. Most likely, they are located in the initrd, but research on this topic has not been conducted.Conclusion
Our life is a process. Closed software systems - darkness. The process of knowledge is dark and there is reverse engineering. This approach helped not only to solve the main business problem - to release custom firmware, but also to learn more about the internal Android device in general, which is undoubtedly very interesting for a real hacker. It is important to remember that reverse engineering is a legal and universal tool. Without it, the world would never know about the most dangerous backdoors in the firmware of leading manufacturers of network equipment, about hardware “bookmarks” in microprocessors, about data leaks in popular Internet applications. If someone invented the “black box”, then there will always be someone who can understand how it works.
Posted by: Mikhail Emelchenkov

First published in the magazine " Hacker " from 02/2014.
Subscribe to "Hacker"


Source: https://habr.com/ru/post/231825/
All Articles