WordPress Optimization. Competition "UPU for the year for the best ideas!"
According to HackerTarget.com, 20.9% of sites on the Alexa list ( 104,684 out of 500,000) work on CMS WordPress. From a small blogging engine, WordPress has grown into a universal site development platform, spawning an entire ecosystem.
The Aberdeen Group conducted a study, according to which the increase in site loading time by 1 second has the following consequences:
40% of mobile customers leave the online store, whose pages load longer than 3 seconds.
In this article we will touch on the WordPress optimization theme. For a better disclosure of the topic in future articles, we are holding a contest: send us recommendations on how to optimize WordPress, not included in this article. The author of the most complete and useful optimization tips will be given VPS 1024 per year . At the end of the article there is a link to register a free Cloud VPS for experiments with WordPress optimization.
')
Let's determine the download time of the site. For testing, we will use the GTMetrix service.

Received page load time on the network 2.62 seconds.
Also check the site service WebPageTest . The test results are below.

The time of the first site loading is 2.112 seconds. Site reload time: 1.325 seconds.
To optimize images in the WordPress theme (as well as all media files), install the WP Smush.it plugin . Next, go to the Media section of the WordPress admin panel and click Bulk Smush.it. Used graphics will be compressed without loss.

You can reduce the number of requests to the server using CSS sprites. Sprites table - one large image of small graphic elements of the site. Thanks to CSS, you can display each element individually using the background-position property.

The main advantage of sprites is a one-time download of all elements at once and a decrease in the number of HTTP requests.
To create a sprite, you can use the service spriteme.org . Move the SpriteMe link into the browser's bookmarks bar. Open an optimized website and click on the SpriteMe in the bookmarks bar.

On the right, a service window opens with the suggestion to create sprites from WordPress theme pictures. Click Make sprite to create. You can also move to this window and other images to merge into a sprite. After clicking on Make sprite, check that the WordPress theme has not changed and all controls are in place. SpriteMe does not work perfectly and in case of problems you will have to do sprites yourself. If everything went well, click export CSS . A new window will open with the CSS that you want to change on the site. Download the resulting sprite and save it to your WordPress theme folder. Open in any text editor css used themes. According to the rules provided by Sprite Me, find the images that are combined into a sprite, and replace with a sprite with CSS. After editing the CSS, check that the design of the site has not changed. When editing other templates, the process of debugging CSS may take some time.
If SpriteMe did not help you, you can generate sprites from a set of theme images using the CSS Sprite Generator service . The service is good because it allows you to upload a set of images at once, rather than uploading images individually, as suggested by CSS-sprites.com .
Guides on using CSS sprites generated by yourself are provided in the following articles: CSS Background Image Sprites: A Beginner's Guide and Creating easy and useful CSS Sprites .
When uploading pictures to the site, do not forget to cut off the unused space of the picture (for example, white background), reduce the size of the picture to the required in the blog. If you upload larger images and use the width and height attributes, the images will take longer to load. Also always pre-define these attributes when uploading pictures.
Before uploading images, check that they are in the optimal format. The most suitable formats are PNG (8 / 24bit), JPG, GIF (for small images). Illustrations with a small amount of colors are well preserved in PNG 8bit. Photos and images with a large number of colors are well preserved in JPEG (use when saving the smallest quality that does not spoil the visual image). This advice may seem trivial, but it allows you to significantly reduce the amount of downloaded images.
Saving with the highest quality (494.5 kb):

Saving with average quality (94.34 kb):

Using Gravatar slows down site performance. If you do not need to display avatars, you can disable it in the Settings -> Discussion section of the WordPress administration panel.
You can go the other way:
After installing FV Gravatar Cache, you need to enable the cron operation in the plugin settings:
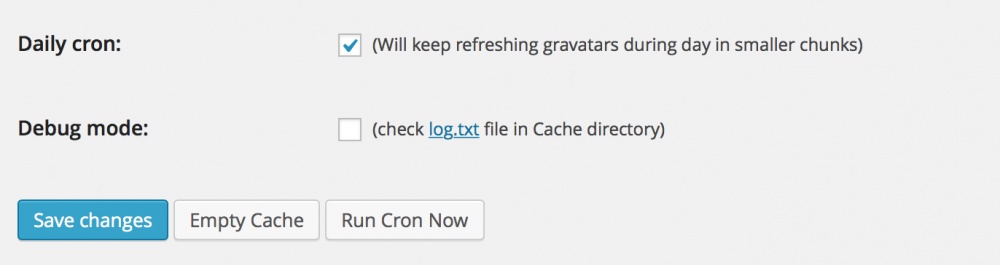
Here you can immediately start the task.
JQuery Image lazy load WP allows you to download images only at the moment when the user views them on the screen. The function may not work when using a cache that generates static files. To enable this feature, install the jQuery Image Lazy Load WP plugin. Tests of competing BJ Lazy Load and Lazy Load plug-ins were conducted, but the results of these plug-ins were worse than those of JQuery Image lazy load WP, on average, by 0.40 seconds on the tested sites.
Adding images with only text to the site is not a good idea. This increases the number of requests to the server and does not allow search engines to read the text in pictures correctly. If possible, use text styled in CSS in logos. Google provides a rich set of fonts for use on the web, which will help in many cases to refuse images with text.
Disable unused extensions. This will help reduce the load on the CPU hosting. Install the P3 plug-in already mentioned above, which will allow you to see which plug-ins consume more memory and have a negative impact on the performance of the site as a whole.
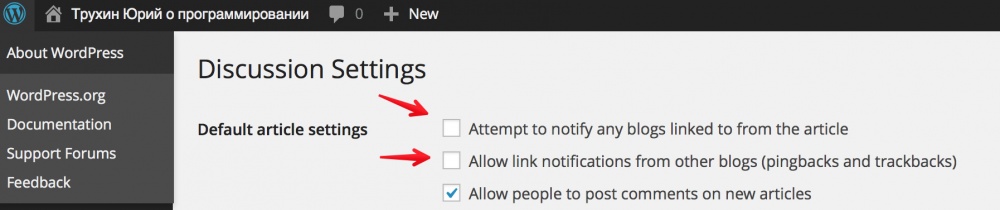
Pingback is a type of comment that is created when you link to another post. Referring to another post in the comments, the post author will see a pingback in his comments.
Trackback - type of comments with a special link. Typically, blogs that want to take a trackback, post a link at the end of posts. The link is inserted into another blog and is used for comments in the original post.
If you do not need these features, you can disable them, thereby freeing up some server resources. In the WordPress admin panel, go to the Settings -> Discussion section and disable “Attempt to notify any blogs linked to the article” and “Allow link notifications from other blogs (pingbacks and trackbacks)”. Remember to save your changes.
Using the Akismet plug- in , which is included in the WordPress installation by default, can significantly reduce the amount of comment spam and ultimately reduce the load on the server.
Before the browser establishes a network connection with the web server, the browser resolves the name of the site to the ip – address. DNS records can be cached by the client’s browser and the operating system. If the correct entry is still in the client’s cache, there is no delay. However, if the client needs to perform a DNS lookup over the network, the delays can be quite large, depending on the location of the DNS server. Reducing the DNS lookup time is more important than other types of queries.
Every time you request resources (images, CSS files, JavaScript files, etc.) from other host names, you increase the number of DNS lookups for your site visitors.
If the host name is in another domain or subdomain, this increases the number of DNS lookups.
pic1.sitename.ru ≠ pic2.sitename.ru ≠ google.com
Limit the amount of resources from which you take the content to 4-5 maximum.
To see all external resources used on your site, open Firebug in Firefox on the site and go to the NET -> ALL section.

For more on this rule in the Yahoo! for developers.
Take out JavaScript and CSS to external files whenever possible. This will allow you to collect one from different CSS files and merge JavaScript files.
Most browsers first parse the javascript files placed on top before loading other resources, since javascript can change the functionality of the page. This can reduce the parallelization of content downloads.
If you put the scripts on top, your visitors may see a blank page before the end of JavaScript loading. This can be bad for performance. Therefore, scripts should be placed below the page.
CSS files should be placed on top of the page in the header. If this is not the case, a negative effect on the parallelization of the load is also possible.
Install and activate Use Google Libraries . Some JavaScript libraries distributed with WordPress are also hosted by the Google AJAX Libraries API . The plugin will allow WordPress to use the CDN from Google instead of using files from your WordPress installation. More details about the benefits of this approach are described in the article “3 reasons why you should let Google host jQuery for you” .
Also install and activate the W3 Total Cache plugin. To activate effective caching in memory, you need to install Memcached on the server. We use Cloud VPS from Infobox with Ubuntu 14.04.
Install Memcached:
Restarting Memcached
Compile and install Memcached support module for PHP
In order for minification to work, W3 needs Total Cache.
You can determine the location of java with the command
Also for the minification we need yuicompressor.
Go to the WordPress administration panel in the section Performance-> Minify (if there is no such section, go to the plugins section, find the W3 Total Cache and click Settings).
Turn on the rewrite URL structure .
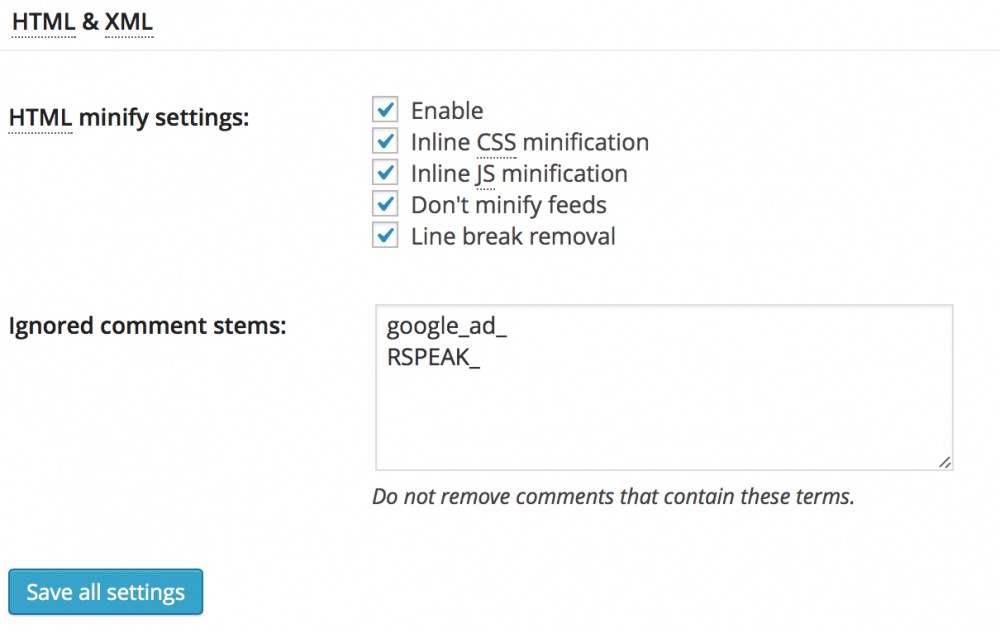
Activate HTML and XML optimizations:
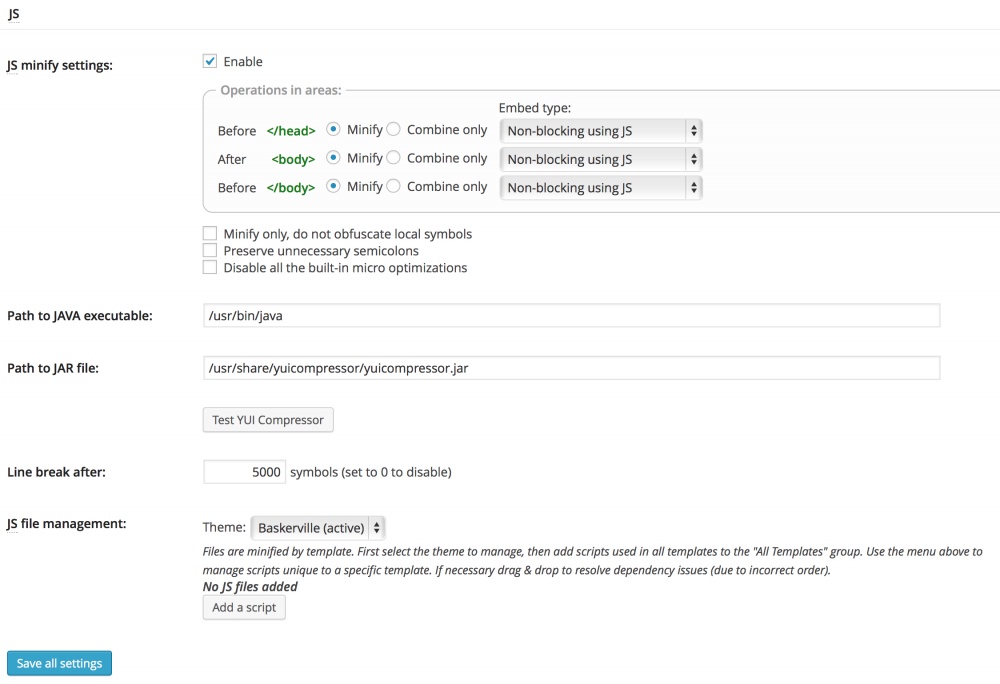
JavaScript Optimization:
Optimization for CSS:
Now let's configure in the section Performance -> Page Cache :

Further in the section Performance -> Browser Cache :

If you are using a CDN, disable compression. CDN already has compression.
Optimization for CSS, JavaScript and Media in the Browser Cache section:
CDN allows you to get static content (such as images, CSS-files and JavaScript-files) from different locations of the world. Your visitors will open content faster from a server located geographically closer to it. CDN is optimized to handle static content faster than most hosting sites. Also, CDN reduces the network load to the main server and reduces the likelihood of the server dropping from excessive load. Another feature of the CDN is to improve the parallelization of data loading. Most browsers have restrictions on the resources that they download from a single host (domain or subdomain). Even if there are 10 pictures on your page, the browser will load in parallel only 2 pictures each.
However, we still don’t want problems with DNS lookups. Google gives us advice:
You should not use 1 host for less than 6 resources. Less than 2 resources on a host are really bad. You should never use more than 5 hosts (apart from servers that you do not have control over, such as servers that handle advertisements for your site).
Make sure that no host handles more than 50% of the load from all the hosts.
In this example, we will configure the CDN from CloudFlare. Install the CloudFlare plugin.
1. Create an account with CloudFlare
2. Add your site:
3. Adjust the performance and security levels, as well as select the data plan (the free plan does not support SSL and has other restrictions ).
4. Change your DNS server.
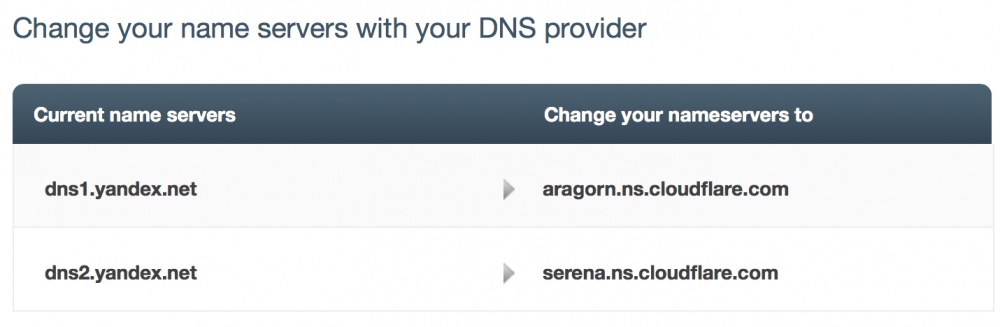
Turn on the CloudFlare CDN DNS management section for your domain (click on the cloud icon to turn orange).

After that, in the Plugins-> CloudFlare section, set the correct data for accessing the CDN network from CloudFlare: domain name, email and API key.
GTMetrix site verification results .

Site loading time was 1.38 seconds. Before optimizations, the time was 2.62 seconds.
As a result of optimizations, the site loading time was reduced by 2 times. Site ratings also increased with Google Page Speed and Yahoo! YSlow.
Now check the site with the WebPageTest service.

The first download time of the site is 1.401 seconds Site reload time 0.477 seconds. Before optimizations, the time of the first site loading was 2.112 seconds. Site reload time 1.325 seconds.
As a result of optimizations, the time of the first site loading was reduced by 25%. The site reload time was reduced by almost 3 times.
We are sure that this is only the first step in WordPress optimization. Send your optimization ideas, confirmed by tests, to trukhinyuri@infoboxcloud.com . For the best set of recommendations, the author will receive a year of VPS 1024 from the Infobox . So that you can try to install and optimize WordPress, we provide a trial version of Cloud VPS for 15 days for free. Sign up on the link .
Successful WordPress Optimizations!
The Aberdeen Group conducted a study, according to which the increase in site loading time by 1 second has the following consequences:
- 11% reduction in the number of page views;
- decrease in customer satisfaction by 16%;
- decrease in the rate of conversion of visitors into buyers by 7%.
40% of mobile customers leave the online store, whose pages load longer than 3 seconds.
In this article we will touch on the WordPress optimization theme. For a better disclosure of the topic in future articles, we are holding a contest: send us recommendations on how to optimize WordPress, not included in this article. The author of the most complete and useful optimization tips will be given VPS 1024 per year . At the end of the article there is a link to register a free Cloud VPS for experiments with WordPress optimization.
')
WordPress performance testing before optimizations
Let's determine the download time of the site. For testing, we will use the GTMetrix service.
Received page load time on the network 2.62 seconds.
Also check the site service WebPageTest . The test results are below.
The time of the first site loading is 2.112 seconds. Site reload time: 1.325 seconds.
Optimizing a WordPress Theme
Squeeze graphics without loss
To optimize images in the WordPress theme (as well as all media files), install the WP Smush.it plugin . Next, go to the Media section of the WordPress admin panel and click Bulk Smush.it. Used graphics will be compressed without loss.
Use CSS Sprites
You can reduce the number of requests to the server using CSS sprites. Sprites table - one large image of small graphic elements of the site. Thanks to CSS, you can display each element individually using the background-position property.
The main advantage of sprites is a one-time download of all elements at once and a decrease in the number of HTTP requests.
To create a sprite, you can use the service spriteme.org . Move the SpriteMe link into the browser's bookmarks bar. Open an optimized website and click on the SpriteMe in the bookmarks bar.
On the right, a service window opens with the suggestion to create sprites from WordPress theme pictures. Click Make sprite to create. You can also move to this window and other images to merge into a sprite. After clicking on Make sprite, check that the WordPress theme has not changed and all controls are in place. SpriteMe does not work perfectly and in case of problems you will have to do sprites yourself. If everything went well, click export CSS . A new window will open with the CSS that you want to change on the site. Download the resulting sprite and save it to your WordPress theme folder. Open in any text editor css used themes. According to the rules provided by Sprite Me, find the images that are combined into a sprite, and replace with a sprite with CSS. After editing the CSS, check that the design of the site has not changed. When editing other templates, the process of debugging CSS may take some time.
If SpriteMe did not help you, you can generate sprites from a set of theme images using the CSS Sprite Generator service . The service is good because it allows you to upload a set of images at once, rather than uploading images individually, as suggested by CSS-sprites.com .
Guides on using CSS sprites generated by yourself are provided in the following articles: CSS Background Image Sprites: A Beginner's Guide and Creating easy and useful CSS Sprites .
WordPress Image Optimization
When uploading pictures to the site, do not forget to cut off the unused space of the picture (for example, white background), reduce the size of the picture to the required in the blog. If you upload larger images and use the width and height attributes, the images will take longer to load. Also always pre-define these attributes when uploading pictures.
File formats
Before uploading images, check that they are in the optimal format. The most suitable formats are PNG (8 / 24bit), JPG, GIF (for small images). Illustrations with a small amount of colors are well preserved in PNG 8bit. Photos and images with a large number of colors are well preserved in JPEG (use when saving the smallest quality that does not spoil the visual image). This advice may seem trivial, but it allows you to significantly reduce the amount of downloaded images.
Saving with the highest quality (494.5 kb):
Saving with average quality (94.34 kb):
Gravatar and avatars
Using Gravatar slows down site performance. If you do not need to display avatars, you can disable it in the Settings -> Discussion section of the WordPress administration panel.
You can go the other way:
- cache avatar avatar by cron;
- cache avatars in the comments;
- store one copy of the avatar image per user for those whose account is not associated with gravatar.
After installing FV Gravatar Cache, you need to enable the cron operation in the plugin settings:
Here you can immediately start the task.
jQuery Image lazy load
JQuery Image lazy load WP allows you to download images only at the moment when the user views them on the screen. The function may not work when using a cache that generates static files. To enable this feature, install the jQuery Image Lazy Load WP plugin. Tests of competing BJ Lazy Load and Lazy Load plug-ins were conducted, but the results of these plug-ins were worse than those of JQuery Image lazy load WP, on average, by 0.40 seconds on the tested sites.
Do not use pictures with text
Adding images with only text to the site is not a good idea. This increases the number of requests to the server and does not allow search engines to read the text in pictures correctly. If possible, use text styled in CSS in logos. Google provides a rich set of fonts for use on the web, which will help in many cases to refuse images with text.
Site cleaning
Disable unused extensions. This will help reduce the load on the CPU hosting. Install the P3 plug-in already mentioned above, which will allow you to see which plug-ins consume more memory and have a negative impact on the performance of the site as a whole.
Disable Pingback and Trackback (optional)
Pingback is a type of comment that is created when you link to another post. Referring to another post in the comments, the post author will see a pingback in his comments.
Trackback - type of comments with a special link. Typically, blogs that want to take a trackback, post a link at the end of posts. The link is inserted into another blog and is used for comments in the original post.
If you do not need these features, you can disable them, thereby freeing up some server resources. In the WordPress admin panel, go to the Settings -> Discussion section and disable “Attempt to notify any blogs linked to the article” and “Allow link notifications from other blogs (pingbacks and trackbacks)”. Remember to save your changes.
Reduce comment spam
Using the Akismet plug- in , which is included in the WordPress installation by default, can significantly reduce the amount of comment spam and ultimately reduce the load on the server.
Caching and Minification
Limit DNS lookup to 1-5 different host names
Before the browser establishes a network connection with the web server, the browser resolves the name of the site to the ip – address. DNS records can be cached by the client’s browser and the operating system. If the correct entry is still in the client’s cache, there is no delay. However, if the client needs to perform a DNS lookup over the network, the delays can be quite large, depending on the location of the DNS server. Reducing the DNS lookup time is more important than other types of queries.
Every time you request resources (images, CSS files, JavaScript files, etc.) from other host names, you increase the number of DNS lookups for your site visitors.
If the host name is in another domain or subdomain, this increases the number of DNS lookups.
pic1.sitename.ru ≠ pic2.sitename.ru ≠ google.com
Limit the amount of resources from which you take the content to 4-5 maximum.
To see all external resources used on your site, open Firebug in Firefox on the site and go to the NET -> ALL section.
For more on this rule in the Yahoo! for developers.
Make JavaScript and CSS external
Take out JavaScript and CSS to external files whenever possible. This will allow you to collect one from different CSS files and merge JavaScript files.
Put links to CCS files on top, and links to JavaScript files from below
Most browsers first parse the javascript files placed on top before loading other resources, since javascript can change the functionality of the page. This can reduce the parallelization of content downloads.
If you put the scripts on top, your visitors may see a blank page before the end of JavaScript loading. This can be bad for performance. Therefore, scripts should be placed below the page.
CSS files should be placed on top of the page in the header. If this is not the case, a negative effect on the parallelization of the load is also possible.
Enable caching and minification
Install and activate Use Google Libraries . Some JavaScript libraries distributed with WordPress are also hosted by the Google AJAX Libraries API . The plugin will allow WordPress to use the CDN from Google instead of using files from your WordPress installation. More details about the benefits of this approach are described in the article “3 reasons why you should let Google host jQuery for you” .
Also install and activate the W3 Total Cache plugin. To activate effective caching in memory, you need to install Memcached on the server. We use Cloud VPS from Infobox with Ubuntu 14.04.
Install Memcached:
apt-get install memcached <strong>/etc/memcached.conf</strong>: #/etc/memcached.conf #Memcached , -d # logfile /var/log/memcached.log # -m 256 # -p 11211 # localhost -l 127.0.0.1 Restarting Memcached
/etc/init.d/memcached restart Compile and install Memcached support module for PHP
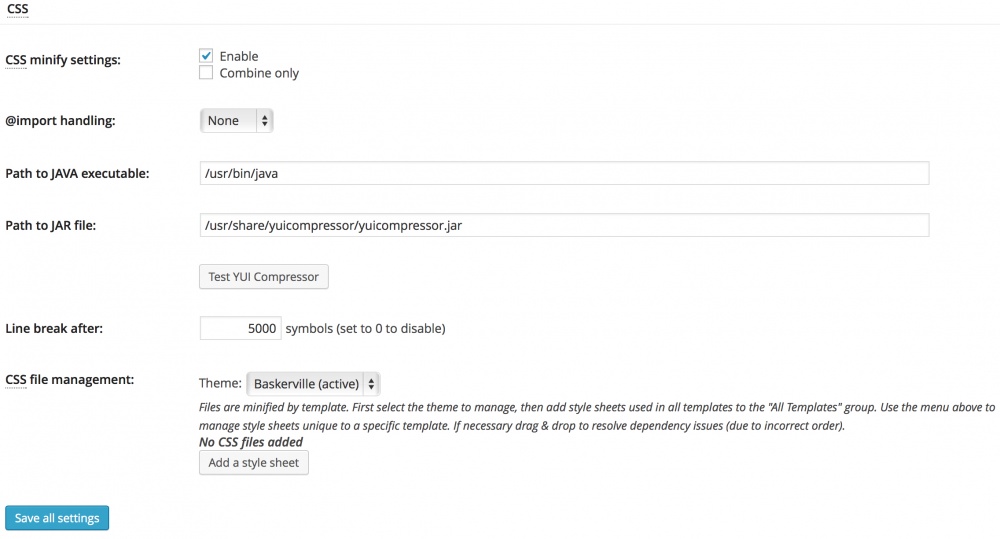
apt-get install php5-dev libmemcache-dev pecl download memcache tar xzvf memcache-2.2.7.tgz cd memcache-2.2.7/ phpize && ./configure --enable-memcache && make cp modules/memcache.so /usr/lib/php5/20121212/ echo 'extension=memcache.so' >> /etc/php5/apache2/php.ini /etc/init.d/apache2 restart In order for minification to work, W3 needs Total Cache.
apt-get -y install software-properties-common add-apt-repository ppa:webupd8team/java apt-get update apt-get install oracle-java8-installer You can determine the location of java with the command
which java Also for the minification we need yuicompressor.
wget https://github.com/downloads/yui/yuicompressor/yuicompressor-2.4.7.zip unzip yuicompressor-2.4.7.zip cd yuicompressor-2.4.7 apt-get -y install ant ant cd build mkdir /usr/share/yuicompressor mv yuicompressor-2.4.7.jar yuicompressor.jar cp yuicompressor.jar /usr/share/yuicompressor/ Go to the WordPress administration panel in the section Performance-> Minify (if there is no such section, go to the plugins section, find the W3 Total Cache and click Settings).
Turn on the rewrite URL structure .
Activate HTML and XML optimizations:
JavaScript Optimization:
Optimization for CSS:
Now let's configure in the section Performance -> Page Cache :
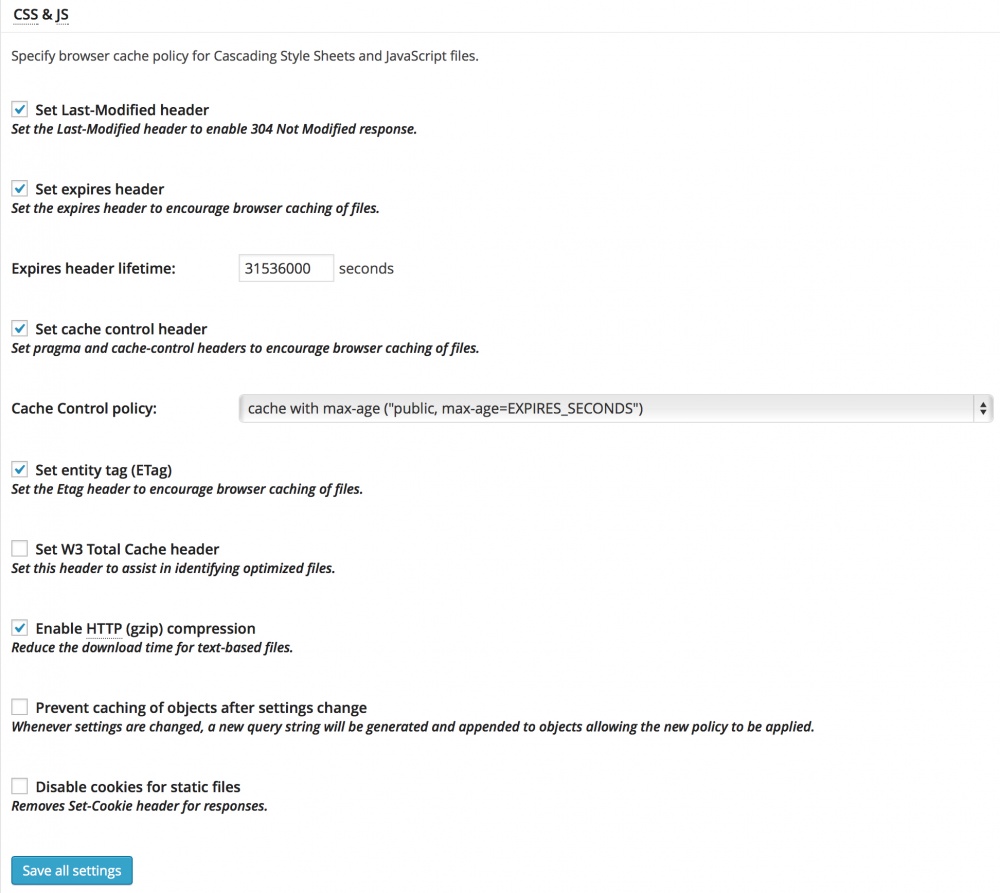
Further in the section Performance -> Browser Cache :
If you are using a CDN, disable compression. CDN already has compression.
Optimization for CSS, JavaScript and Media in the Browser Cache section:
Use CDN
CDN allows you to get static content (such as images, CSS-files and JavaScript-files) from different locations of the world. Your visitors will open content faster from a server located geographically closer to it. CDN is optimized to handle static content faster than most hosting sites. Also, CDN reduces the network load to the main server and reduces the likelihood of the server dropping from excessive load. Another feature of the CDN is to improve the parallelization of data loading. Most browsers have restrictions on the resources that they download from a single host (domain or subdomain). Even if there are 10 pictures on your page, the browser will load in parallel only 2 pictures each.
However, we still don’t want problems with DNS lookups. Google gives us advice:
You should not use 1 host for less than 6 resources. Less than 2 resources on a host are really bad. You should never use more than 5 hosts (apart from servers that you do not have control over, such as servers that handle advertisements for your site).
Make sure that no host handles more than 50% of the load from all the hosts.
CDN Setup
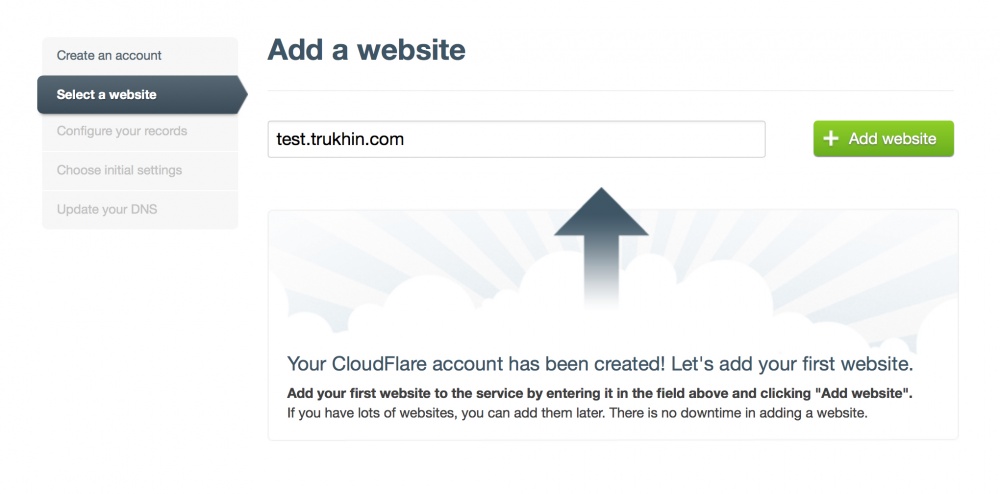
In this example, we will configure the CDN from CloudFlare. Install the CloudFlare plugin.
1. Create an account with CloudFlare
2. Add your site:
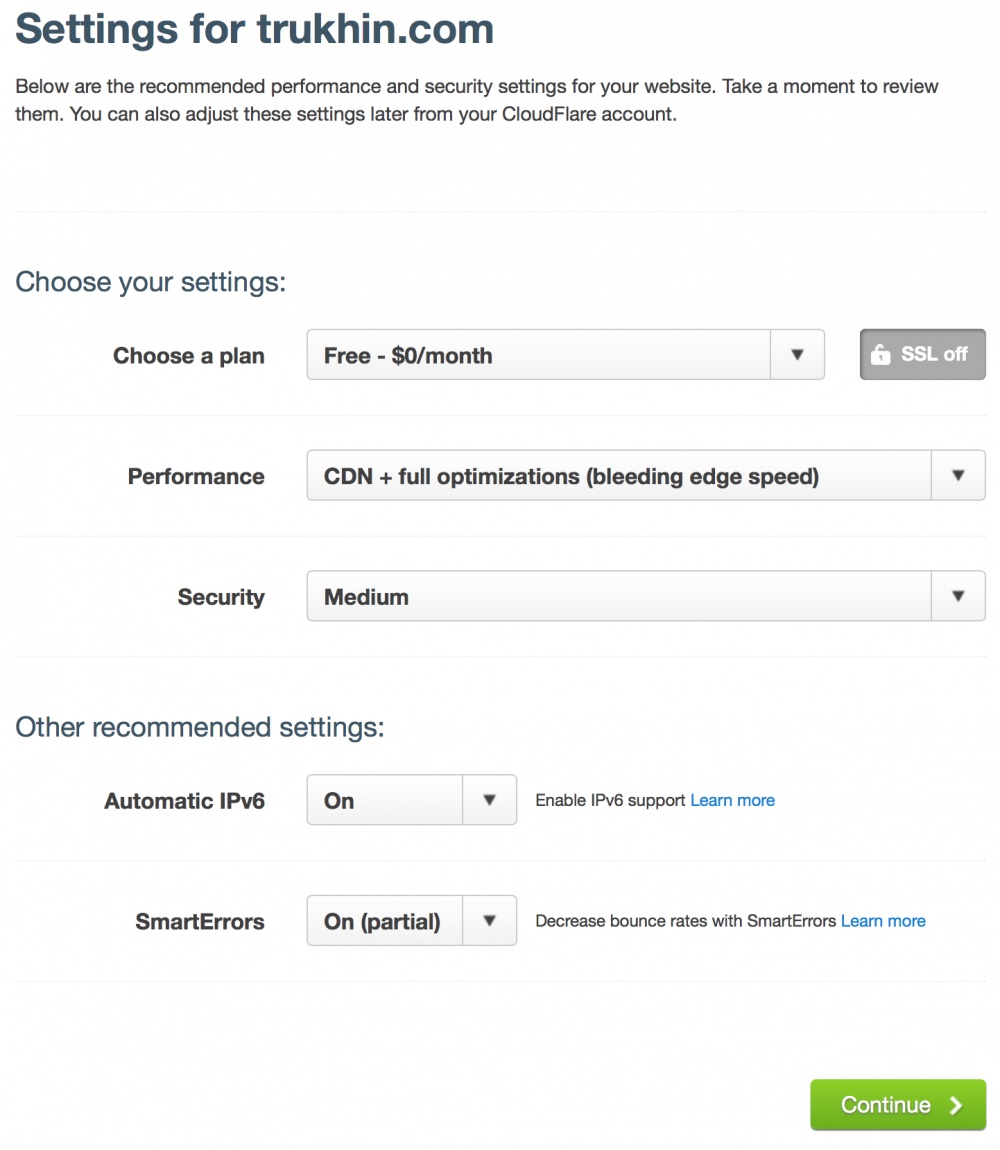
3. Adjust the performance and security levels, as well as select the data plan (the free plan does not support SSL and has other restrictions ).
4. Change your DNS server.
Turn on the CloudFlare CDN DNS management section for your domain (click on the cloud icon to turn orange).
After that, in the Plugins-> CloudFlare section, set the correct data for accessing the CDN network from CloudFlare: domain name, email and API key.
WordPress performance testing after optimizations
GTMetrix site verification results .
Site loading time was 1.38 seconds. Before optimizations, the time was 2.62 seconds.
As a result of optimizations, the site loading time was reduced by 2 times. Site ratings also increased with Google Page Speed and Yahoo! YSlow.
Now check the site with the WebPageTest service.
The first download time of the site is 1.401 seconds Site reload time 0.477 seconds. Before optimizations, the time of the first site loading was 2.112 seconds. Site reload time 1.325 seconds.
As a result of optimizations, the time of the first site loading was reduced by 25%. The site reload time was reduced by almost 3 times.
We are sure that this is only the first step in WordPress optimization. Send your optimization ideas, confirmed by tests, to trukhinyuri@infoboxcloud.com . For the best set of recommendations, the author will receive a year of VPS 1024 from the Infobox . So that you can try to install and optimize WordPress, we provide a trial version of Cloud VPS for 15 days for free. Sign up on the link .
Successful WordPress Optimizations!
Source: https://habr.com/ru/post/231719/
All Articles