Network Virtualization in Hyper-V. Configuring the HNV gateway based on Windows Server 2012 R2
In several previous posts on network virtualization technology (Hyper-V Network Virtualization, HNV), I talked about the architecture , settings , and new HNV features in Windows Server 2012 R2. Today we will talk about, perhaps, the most difficult topic - building an HNV gateway based on Windows Server 2012 R2 to provide virtualized network segments with access to the outside world. There will be a lot of screenshots.
In most cases, virtual machines (VMs) deployed in virtualized networks require interaction with the outside world — to communicate with other data center facilities, to access the Internet, to access the corporate network of a company that has located these VMs in the data center etc. For the HNV technology, the outside world is anything outside the virtualized network. And before moving on, it is necessary to once again decide on terminology, which over the two years of its existence, HNV slightly changed.
So, the defining concept of HNV is the Customer Network, which has a unique Routing Domain ID (RDID). This is the very same virtualized network. There are several synonyms for the Customer Network, depending on which tool you use:
But all these terms are the essence of the Customer Network. Each customer network consists of one or more virtual subnets (Virtual Subnet), and each virtual subnet has its own unique 24-bit VSID. Packets are routed between VMs belonging to the same customer’s network, regardless of whether these machines are located on the same virtual subnet or on different, on the same physical host, or on different ones. But if you need communication with the outside world, that is, you need to transfer packets outside the Customer Network, then the HNV Gateway (HNVGW) must be configured.
')
The HNV gateway can be either a complete hardware solution or a host based on Windows Server 2012 R2. Currently, three hardware solutions are available on the market:
In this post, I will focus on creating an HNV gateway based on Windows Server 2012 R2, while managing HNV in my demo network, including setting up the gateway, will be done using System Center 2012 R2 Virtual Machine Manager (VMM). Using the following abbreviation VMM, I assume it is version R2, unless explicitly stated otherwise.
Recall that, strictly speaking, HNV is a technology of Windows Server 2012 and higher, and it can be configured without VMM, simply using PowerShell cmdlets. I cite links to examples of relevant scripts without using and using an HNV gateway. But in real-world scenarios, VMM is used to manage HNV, which takes on the role of centrally storing and distributing HNV policies.
Architecturally, the Windows Server 2012 R2-based HNV Gateway is a physical host running one or more VMs that route packets from virtualized networks to the outside world and back. I pay attention, it is a physical host. Implementing an HNV gateway just as a virtual machine does not work out, if only because a packet of encapsulation (see the HNV concept post) requires the Hyper-V role, but does not support embedded Virtualization Hyper-V.
To be fair, it is worth noting that, technically, a gateway can also be built on the basis of Windows Server 2012. But at the same time, firstly, the gateway with Windows Server 2012 will require starting as many VMs as you have Customer Networks, and scaling such a solution is difficult. Secondly, to manage such a gateway using VMM, you will need to write a provider for VMM. Using the same Windows Server 2012 R2 + System Center 2012 R2 Virtual Machine Manager - it is almost ready HNV-gateway "out of the box." In Windows Server 2012 R2, a multi-tenant gateway is implemented, which allows you to use one VM to route the traffic of different virtualized networks, and a system provider has already been built into System Center 2012 R2 Virtual Machine Manager to manage this gateway.
What are the options for working HNV-gateway? There are two.
The first option implements the routing of traffic from the Customer Network to the data center network, and the routing can be both direct and address translation (NAT).
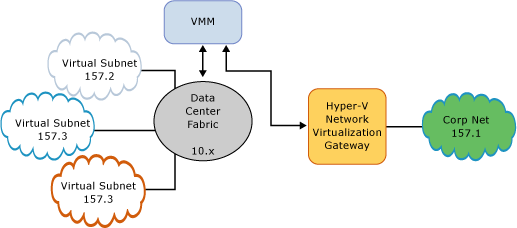
The figure shows direct routing, which makes sense if the CA-address spaces of different tenants (Customer Networks) do not overlap and they need access to the corporate network. Or, as in the figure, there is only one tenant with several subnets. For a private cloud, when tenants, for example, are virtualized networks of various departments of a large enterprise, it is quite possible.
When using NAT to each tenant, the HNV gateway assigns a dedicated IP address on its external interface, and all packets from the tenant's virtual machines are sent to the outside world with this dedicated IP in the "Sender IP address" field.
The second option involves building a network-to-network tunnel from the HNV gateway to the required point, for example, via the Internet to the customer’s corporate network.

This is just a typical hoster scenario, when the customer's VMs are located in the hoster's data center and are connected via VPN to the customer's network. In this case, the HNV technology allows the customer to save the IP settings and not be afraid for the operation of the software inside the VM, and for the hoster to place the virtual servers with the desired IP by the customer, isolating these virtual machines from other VMs and not configuring VLANs.
Concluding the architectural section of the post, I’ll note briefly what is the multi-tenancy of the gateway based on Windows Server 2012 R2.
Imagine that in the data center the networks of two customers, Contoso and Woodgrove , are virtualized using exactly the same CA spaces: 10.0.0.0/24. How to "dissolve" the packages of these customers on the HNV-gateway? The first possible solution is to create your VM on the gateway for each customer and specify it in the settings of the corresponding customer network as the default gateway. Thus, packets sent to the outside world from Contoso will always come to the network interface of one VM gateway, packets from Woodgrove to the interface of the second VM, etc. As mentioned, the Windows Server 2012 gateway would use this approach .

In Windows Server 2012 R2, the ability to use so-called cells (compartments) has appeared for routing. For each tenant, a virtual cell is created in the virtual machine (compartment), which includes virtual network interfaces, IP addresses, a routing table, an ARP table, etc. The elements of one cell are isolated from the elements of another cell. Packet routing from Contoso is therefore within the corresponding cell and does not intersect, does not affect the routing of Woodgrove packets in another cell, even if the entries in the routing tables of these cells look the same. This approach allows you to use one VM to route packets of different tenants without any conflicts.

As seen in fig. above, there is a default cell (default compartment), which includes the network settings that are specified when creating a VM, and two cells for tenants that appeared during the HNV gateway configuration process.
Fortified by theory, we proceed directly to the creation of a gateway. For simplicity, I will consider a non-clustering version of the gateway, although it is clear that in a real data center, such an important element of virtualization involves working in high availability mode. A detailed document on how to make the HNV Gateway highly accessible can be found here .
The main steps to create a gateway include the following:
Let's take it in order.
This item is described in some detail in one of the previous posts , so I’ll show only how logical and virtual networks look in my Contoso laboratory candlestick data center.

For our task, we need three logical networks: the external segment (Contoso_External_LN01), the network to control the gateway (Contoso_Management_LN01) and the network (Contoso_HNV_LN01), over which the virtualized networks are actually created. The IP pool of the Contoso_HNV_LN01 network sets the PA space, and the checkbox allowing the use of HNV technology must be marked in the properties of this network.

VM networks (VM Networks, they are also customer networks, they are Customer Networks) look like this:

You see two VM networks for Adatum and Fabrikam using intersecting address space (10.30.1.0/24). In the Gateway Connection column, you can see that so far none of the VM networks use the gateway.
In general, any host running Windows Server 2012 R2 that VMM manages can be configured as an HNV gateway. In an amicable way, this host should have several physical network interfaces looking into the desired segments (external, control segment, HNV segment). However, from the architectural part of the post, it follows that the VM is actually routing the packets in the gateway. Therefore, how many physical network cards should be in the host acting as a gateway is determined by performance, reliability (timing can be used, for example) and, of course, the logic of how and where you want to send packets. Specifically, in my booth, the host gateway contains only one physical network interface, so far this is enough for me for experiments.
But in any case, in the properties of the host selected for the gateway role, this checkbox should be set

It will prevent the launch on the gateway of any "ordinary" VM, involving the use of HNV. In a real situation, you are unlikely to run anything else on the gateway other than the components of the gateway itself.
Now let's talk about the VM itself that will route the packets using the compartments. The easiest way is to deploy it using the service template. In this case, you can immediately tell VMM so that when deploying a VM, the RRAS service was raised in it, so that two of them would be raised on a cluster for high availability of such machines. But, first, we agreed to do everything with our hands in order to better understand what happens, secondly, the service templates do not support second-generation VMs, which are deployed, and they work more brightly.
Therefore, I created a second-generation VM template based on VHDX with a Windows Server 2012 R2 image. In this process, there is nothing unusual, I will show only the network settings in the template.

You see three virtual network adapters (vNIC): one is connected to the external network (see fig.), The second is connected to the management network, the third can be left in the Not Connected state in the template, and during or immediately after the VM is deployed, connect it through the virtual switch (Hyper-V Extensible Switch) to a network that uses HNV. Usually, when describing a gateway, this network is called Backend.
Now we deploy the VM based on this template to the host that we chose and configured as a gateway in the previous paragraph. Pay attention to the name that you give to this VM. It will be needed later in the configuration of the gateway.
After the VM has been deployed, go into it, connect the network adapter to the Backend network, turn off the Firewall and for convenience, rename the network adapters so that the names reflect their purpose, for example

Now the VM (I called it GatewayVM01 ) needs to install the Remote Access role. This is done as standard via Server Manager , Manage -> Add Roles and Features . Click Next , until we reach the choice of role, select Remote Access , then Next , until we reach Role Services , where we mark two services

Click on Next and Install . After the installation is complete, click the Open the Getting Started Wizard.

and in the wizard window that opens, select Deploy VPN only .

As a result, the well-known RRAS console will open, from which it can be seen that the service has not yet been configured.

Thus, we set up the host and the corresponding VM, and now everything is ready to add this “preset” as an HNV gateway to the VMM console for further configuration.
In the VMM console, go to the Fabric section, click Add Resources, and select Network Service . On the first page of the wizard we give the gateway a meaningful name and description.

Then select Microsoft as the manufacturer and Microsoft Windows Server Gateway in the list of models.

On the Credentials page, you must select Run As account to access the device. This entry must have administrative rights to the VM gateway. In our case, the VM was not included in the domain, so we specify the entry with the password of the local administrator. If there is no such record in VMM, you can immediately create it.

Perhaps the most interesting parameter is the Connection String , in which using the three parameters VMHost , GatewayVM and BackendSwitch, you must specify the name of the host and VM “ stubs ” and the name of the virtual switch on the host through which the VM connects to the Backend network. Please note that there are no spaces in the connection string; the separator is a semicolon ( ; ).

In addition to the three listed above, there are several other parameters, a description of which can be found here (see Section 16). In particular, DirectRoutingMode = True will configure the gateway to work in direct routing mode.
With the connection string specified above, certificates are not used, so on the Certificates page, just click Next .
On the Provider page, click the Test button and make sure that all tests pass without errors.

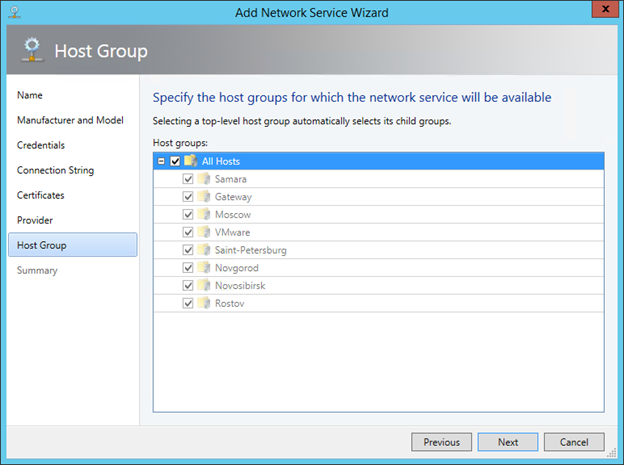
On the Host Group page, we indicate which host groups can use this gateway.
We check the settings on the Summary page, and if everything is correct, click Finish .

Verify that the related tasks in the Jobs section completed successfully. It remains to configure the network interfaces of the newly created HNV gateway. In the Fabric -> Networking -> Network Service section of the VMM console, right-click the gateway, select Properties and go to the Connectivity tab. Here you need to enable Front End Connection and Back End Connection and select the correct VM network adapters and the corresponding logical subnet sites.

Now, VMM knows which adapters of the VM the gateway is intended for, and properly configures the RRAS service inside this VM. When jobs are completed, in the RRAS VM console of the gateway you will see that the service is running and works as a multi-tenant gateway.

Things to do, configure the required VM networks to use the HNV-created gateway.
In the VMM console, go to the VMs and Services section, click on VM Networks , select the required VM network, and click the Properties button. Go to the Connectivity tab and enable the use of the HNV gateway by this network. For the Fabrikam network, for example, we enable NAT

VMM will automatically allocate from the IP pool of the logical network associated with the external interface of the HNV gateway, the address to which the sender addresses of all packets from the Fabrikam network will be transmitted. But you can manually select an IP from the pool, specifying it in the IP address field

Having closed the properties window, in the lower part of the VMM console you can see which specific external address is used for this VM network.

We do the same for the Adatum network and all other virtualized networks that need external access with NAT support.
Now let's see how the connection to the outside world is configured via VPN, that is, we are implementing the Hybrid Cloud (Site to site VPN) script. At the same time, I assume that the VPN device in the corporate network is already configured, using the IKEv2 protocol and Preshared Key based authentication, which is typical for network-to-network tunnels, and we know its external IP.
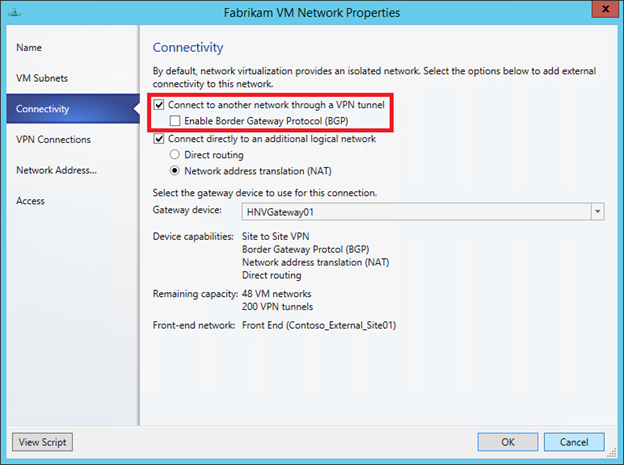
In the properties of the same VM Fabrikam network, on the already familiar Connectivity tab, mark the topmost checkbox
At the same time, in the properties window of the VM network, a new VPN Connections tab appears, where you need to click Add to add the VPN connection, specify its name and IP address of the VPN device to which the tunnel is built

In the Authentication section, we indicate the prepared Run As account entry with the specified Preshared Key,

and in the section Routes we register the necessary routes, for example

As you might notice, BGP support has been implemented to dynamically update routes.
You can look at the advanced settings in Advanced , say, change the VPN protocol or encryption settings, but if nothing is required, then click OK. At the bottom of the VMM console for the configured VM network, something like this will now appear.

As soon as from any VM running on the virtualized Fabrikam network, we try to ping the address from the subnet specified with the VPN tunnel settings, for example, 10.30.50.101, the HNV gateway will raise the tunnel and establish connection with the specified VPN device, and through it with corporate network

It is done!
If the information from this post was not enough, you can use the detailed step- by -step guide to create a laboratory stand.
One question remains open: how are packets actually routed when using an HNV gateway, what does it look like inside the gateway? But this is already a difficulty level of 400 for the most sophisticated. :) Although, if there are any, I'm ready to write.
Hope the material was helpful.
Thank!
In most cases, virtual machines (VMs) deployed in virtualized networks require interaction with the outside world — to communicate with other data center facilities, to access the Internet, to access the corporate network of a company that has located these VMs in the data center etc. For the HNV technology, the outside world is anything outside the virtualized network. And before moving on, it is necessary to once again decide on terminology, which over the two years of its existence, HNV slightly changed.
Terminology
So, the defining concept of HNV is the Customer Network, which has a unique Routing Domain ID (RDID). This is the very same virtualized network. There are several synonyms for the Customer Network, depending on which tool you use:
- in VMM, this is the VM Network;
- in PowerShell, this is a Routing Domain;
- in many articles and blogs this is Tenant or Tenant Virtual Network.
But all these terms are the essence of the Customer Network. Each customer network consists of one or more virtual subnets (Virtual Subnet), and each virtual subnet has its own unique 24-bit VSID. Packets are routed between VMs belonging to the same customer’s network, regardless of whether these machines are located on the same virtual subnet or on different, on the same physical host, or on different ones. But if you need communication with the outside world, that is, you need to transfer packets outside the Customer Network, then the HNV Gateway (HNVGW) must be configured.
')
Options for the implementation of the gateway
The HNV gateway can be either a complete hardware solution or a host based on Windows Server 2012 R2. Currently, three hardware solutions are available on the market:
- by nAppliance
- by Iron Networks
- from F5
In this post, I will focus on creating an HNV gateway based on Windows Server 2012 R2, while managing HNV in my demo network, including setting up the gateway, will be done using System Center 2012 R2 Virtual Machine Manager (VMM). Using the following abbreviation VMM, I assume it is version R2, unless explicitly stated otherwise.
Recall that, strictly speaking, HNV is a technology of Windows Server 2012 and higher, and it can be configured without VMM, simply using PowerShell cmdlets. I cite links to examples of relevant scripts without using and using an HNV gateway. But in real-world scenarios, VMM is used to manage HNV, which takes on the role of centrally storing and distributing HNV policies.
Gateway architecture
Architecturally, the Windows Server 2012 R2-based HNV Gateway is a physical host running one or more VMs that route packets from virtualized networks to the outside world and back. I pay attention, it is a physical host. Implementing an HNV gateway just as a virtual machine does not work out, if only because a packet of encapsulation (see the HNV concept post) requires the Hyper-V role, but does not support embedded Virtualization Hyper-V.
To be fair, it is worth noting that, technically, a gateway can also be built on the basis of Windows Server 2012. But at the same time, firstly, the gateway with Windows Server 2012 will require starting as many VMs as you have Customer Networks, and scaling such a solution is difficult. Secondly, to manage such a gateway using VMM, you will need to write a provider for VMM. Using the same Windows Server 2012 R2 + System Center 2012 R2 Virtual Machine Manager - it is almost ready HNV-gateway "out of the box." In Windows Server 2012 R2, a multi-tenant gateway is implemented, which allows you to use one VM to route the traffic of different virtualized networks, and a system provider has already been built into System Center 2012 R2 Virtual Machine Manager to manage this gateway.
What are the options for working HNV-gateway? There are two.
Private Cloud (Routing)
The first option implements the routing of traffic from the Customer Network to the data center network, and the routing can be both direct and address translation (NAT).
The figure shows direct routing, which makes sense if the CA-address spaces of different tenants (Customer Networks) do not overlap and they need access to the corporate network. Or, as in the figure, there is only one tenant with several subnets. For a private cloud, when tenants, for example, are virtualized networks of various departments of a large enterprise, it is quite possible.
When using NAT to each tenant, the HNV gateway assigns a dedicated IP address on its external interface, and all packets from the tenant's virtual machines are sent to the outside world with this dedicated IP in the "Sender IP address" field.
Hybrid Cloud (Site to site VPN)
The second option involves building a network-to-network tunnel from the HNV gateway to the required point, for example, via the Internet to the customer’s corporate network.
This is just a typical hoster scenario, when the customer's VMs are located in the hoster's data center and are connected via VPN to the customer's network. In this case, the HNV technology allows the customer to save the IP settings and not be afraid for the operation of the software inside the VM, and for the hoster to place the virtual servers with the desired IP by the customer, isolating these virtual machines from other VMs and not configuring VLANs.
Concluding the architectural section of the post, I’ll note briefly what is the multi-tenancy of the gateway based on Windows Server 2012 R2.
Imagine that in the data center the networks of two customers, Contoso and Woodgrove , are virtualized using exactly the same CA spaces: 10.0.0.0/24. How to "dissolve" the packages of these customers on the HNV-gateway? The first possible solution is to create your VM on the gateway for each customer and specify it in the settings of the corresponding customer network as the default gateway. Thus, packets sent to the outside world from Contoso will always come to the network interface of one VM gateway, packets from Woodgrove to the interface of the second VM, etc. As mentioned, the Windows Server 2012 gateway would use this approach .
In Windows Server 2012 R2, the ability to use so-called cells (compartments) has appeared for routing. For each tenant, a virtual cell is created in the virtual machine (compartment), which includes virtual network interfaces, IP addresses, a routing table, an ARP table, etc. The elements of one cell are isolated from the elements of another cell. Packet routing from Contoso is therefore within the corresponding cell and does not intersect, does not affect the routing of Woodgrove packets in another cell, even if the entries in the routing tables of these cells look the same. This approach allows you to use one VM to route packets of different tenants without any conflicts.
As seen in fig. above, there is a default cell (default compartment), which includes the network settings that are specified when creating a VM, and two cells for tenants that appeared during the HNV gateway configuration process.
Gateway creation
Fortified by theory, we proceed directly to the creation of a gateway. For simplicity, I will consider a non-clustering version of the gateway, although it is clear that in a real data center, such an important element of virtualization involves working in high availability mode. A detailed document on how to make the HNV Gateway highly accessible can be found here .
The main steps to create a gateway include the following:
- setting up logical networks and VM networks;
- configure host for gateway role
- VM preparation for gateway
- adding a gateway to VMM
- configure the gateway for specific networks VM
Let's take it in order.
Setting up logical networks and VM networks
This item is described in some detail in one of the previous posts , so I’ll show only how logical and virtual networks look in my Contoso laboratory candlestick data center.
For our task, we need three logical networks: the external segment (Contoso_External_LN01), the network to control the gateway (Contoso_Management_LN01) and the network (Contoso_HNV_LN01), over which the virtualized networks are actually created. The IP pool of the Contoso_HNV_LN01 network sets the PA space, and the checkbox allowing the use of HNV technology must be marked in the properties of this network.
VM networks (VM Networks, they are also customer networks, they are Customer Networks) look like this:
You see two VM networks for Adatum and Fabrikam using intersecting address space (10.30.1.0/24). In the Gateway Connection column, you can see that so far none of the VM networks use the gateway.
Configuring Host for Gateway Role
In general, any host running Windows Server 2012 R2 that VMM manages can be configured as an HNV gateway. In an amicable way, this host should have several physical network interfaces looking into the desired segments (external, control segment, HNV segment). However, from the architectural part of the post, it follows that the VM is actually routing the packets in the gateway. Therefore, how many physical network cards should be in the host acting as a gateway is determined by performance, reliability (timing can be used, for example) and, of course, the logic of how and where you want to send packets. Specifically, in my booth, the host gateway contains only one physical network interface, so far this is enough for me for experiments.
But in any case, in the properties of the host selected for the gateway role, this checkbox should be set
It will prevent the launch on the gateway of any "ordinary" VM, involving the use of HNV. In a real situation, you are unlikely to run anything else on the gateway other than the components of the gateway itself.
VM preparation for gateway
Now let's talk about the VM itself that will route the packets using the compartments. The easiest way is to deploy it using the service template. In this case, you can immediately tell VMM so that when deploying a VM, the RRAS service was raised in it, so that two of them would be raised on a cluster for high availability of such machines. But, first, we agreed to do everything with our hands in order to better understand what happens, secondly, the service templates do not support second-generation VMs, which are deployed, and they work more brightly.
Therefore, I created a second-generation VM template based on VHDX with a Windows Server 2012 R2 image. In this process, there is nothing unusual, I will show only the network settings in the template.
You see three virtual network adapters (vNIC): one is connected to the external network (see fig.), The second is connected to the management network, the third can be left in the Not Connected state in the template, and during or immediately after the VM is deployed, connect it through the virtual switch (Hyper-V Extensible Switch) to a network that uses HNV. Usually, when describing a gateway, this network is called Backend.
Now we deploy the VM based on this template to the host that we chose and configured as a gateway in the previous paragraph. Pay attention to the name that you give to this VM. It will be needed later in the configuration of the gateway.
After the VM has been deployed, go into it, connect the network adapter to the Backend network, turn off the Firewall and for convenience, rename the network adapters so that the names reflect their purpose, for example
Now the VM (I called it GatewayVM01 ) needs to install the Remote Access role. This is done as standard via Server Manager , Manage -> Add Roles and Features . Click Next , until we reach the choice of role, select Remote Access , then Next , until we reach Role Services , where we mark two services
Click on Next and Install . After the installation is complete, click the Open the Getting Started Wizard.
and in the wizard window that opens, select Deploy VPN only .
As a result, the well-known RRAS console will open, from which it can be seen that the service has not yet been configured.
Thus, we set up the host and the corresponding VM, and now everything is ready to add this “preset” as an HNV gateway to the VMM console for further configuration.
Add Gateway to VMM
In the VMM console, go to the Fabric section, click Add Resources, and select Network Service . On the first page of the wizard we give the gateway a meaningful name and description.
Then select Microsoft as the manufacturer and Microsoft Windows Server Gateway in the list of models.
On the Credentials page, you must select Run As account to access the device. This entry must have administrative rights to the VM gateway. In our case, the VM was not included in the domain, so we specify the entry with the password of the local administrator. If there is no such record in VMM, you can immediately create it.
Perhaps the most interesting parameter is the Connection String , in which using the three parameters VMHost , GatewayVM and BackendSwitch, you must specify the name of the host and VM “ stubs ” and the name of the virtual switch on the host through which the VM connects to the Backend network. Please note that there are no spaces in the connection string; the separator is a semicolon ( ; ).
In addition to the three listed above, there are several other parameters, a description of which can be found here (see Section 16). In particular, DirectRoutingMode = True will configure the gateway to work in direct routing mode.
With the connection string specified above, certificates are not used, so on the Certificates page, just click Next .
On the Provider page, click the Test button and make sure that all tests pass without errors.
On the Host Group page, we indicate which host groups can use this gateway.
We check the settings on the Summary page, and if everything is correct, click Finish .
Verify that the related tasks in the Jobs section completed successfully. It remains to configure the network interfaces of the newly created HNV gateway. In the Fabric -> Networking -> Network Service section of the VMM console, right-click the gateway, select Properties and go to the Connectivity tab. Here you need to enable Front End Connection and Back End Connection and select the correct VM network adapters and the corresponding logical subnet sites.
Now, VMM knows which adapters of the VM the gateway is intended for, and properly configures the RRAS service inside this VM. When jobs are completed, in the RRAS VM console of the gateway you will see that the service is running and works as a multi-tenant gateway.
Things to do, configure the required VM networks to use the HNV-created gateway.
Configure a gateway for specific VM networks
In the VMM console, go to the VMs and Services section, click on VM Networks , select the required VM network, and click the Properties button. Go to the Connectivity tab and enable the use of the HNV gateway by this network. For the Fabrikam network, for example, we enable NAT
VMM will automatically allocate from the IP pool of the logical network associated with the external interface of the HNV gateway, the address to which the sender addresses of all packets from the Fabrikam network will be transmitted. But you can manually select an IP from the pool, specifying it in the IP address field
Having closed the properties window, in the lower part of the VMM console you can see which specific external address is used for this VM network.
We do the same for the Adatum network and all other virtualized networks that need external access with NAT support.
Now let's see how the connection to the outside world is configured via VPN, that is, we are implementing the Hybrid Cloud (Site to site VPN) script. At the same time, I assume that the VPN device in the corporate network is already configured, using the IKEv2 protocol and Preshared Key based authentication, which is typical for network-to-network tunnels, and we know its external IP.
In the properties of the same VM Fabrikam network, on the already familiar Connectivity tab, mark the topmost checkbox
At the same time, in the properties window of the VM network, a new VPN Connections tab appears, where you need to click Add to add the VPN connection, specify its name and IP address of the VPN device to which the tunnel is built
In the Authentication section, we indicate the prepared Run As account entry with the specified Preshared Key,
and in the section Routes we register the necessary routes, for example
As you might notice, BGP support has been implemented to dynamically update routes.
You can look at the advanced settings in Advanced , say, change the VPN protocol or encryption settings, but if nothing is required, then click OK. At the bottom of the VMM console for the configured VM network, something like this will now appear.
As soon as from any VM running on the virtualized Fabrikam network, we try to ping the address from the subnet specified with the VPN tunnel settings, for example, 10.30.50.101, the HNV gateway will raise the tunnel and establish connection with the specified VPN device, and through it with corporate network
It is done!
If the information from this post was not enough, you can use the detailed step- by -step guide to create a laboratory stand.
One question remains open: how are packets actually routed when using an HNV gateway, what does it look like inside the gateway? But this is already a difficulty level of 400 for the most sophisticated. :) Although, if there are any, I'm ready to write.
Hope the material was helpful.
Thank!
Source: https://habr.com/ru/post/231713/
All Articles