Swift Tutorial - iOS8 Application Development [Part 1, Hello World!]
Foreword
Recently, Apple introduced to the public a rather important change in the development of iOS applications, announcing a new programming language, Swift. I made a decision: studying this language step by step, I will tell in my articles about everything that I managed to find. This is just the first of many posts on this topic, but I hope you decide to study the language with me!
It is very likely that many code examples presented in posts will be changed later. This is partly because my programming style is to write now to test the idea, and then do refactoring, and also partly because for me (like many others) Swift is a completely new programming language. So, most likely, as soon as I learn something new, the course of these lessons will change.
So, I'm going to start with a fairly simple application. I will also explain how the code works. Ready? Go…
UPD: Article written in accordance with the changes in Xcode 6 Beta 5
')
The basics
Swift abolishes the use of the variable declaration standard, which uses the type name before declaring a variable, instead of which the keyword
var is used to declare, as in JavaScript.So, for example, this string is objective-C
NSString *myString = @"This is my string."; in Swift will be replaced by this
var myString = "This is my string." Use the
let keyword to declare constants. let kSomeConstant = 40 In this case,
kSomeConstant implicitly defined as an integer. If you want to specify a type, then you can do it like this: let kSomeConstant: Int = 40 Something about Clean Code
The author of the translation recommends using the second example of the declaration of constants. A rather illustrative example is described in the official documentation:
In this translation author agrees with Helecta (see the corresponding post )
let implicitInteger = 70 let implicitDouble = 70.0 let explicitDouble: Double = 70 In this translation author agrees with Helecta (see the corresponding post )
Both arrays and dictionaries are described using
[] var colorsArray = ["Blue", "Red", "Green", "Yellow"] var colorsDictionary = ["PrimaryColor":"Green", "SecondaryColor":"Red"] This is not everything, but I believe that these basics are important enough for further reading of the textbook. So let's move on to
Hello, World!Hello, World!
First of all, we will write the simplest application that you can imagine to get started -
Hello, World!Our application will only do one thing: type the phrase “Hello, World!” Into the console. To do this, we will need an installed IDE Xcode, which requires a developer account to download. If you have an account, feel free to download it from the official Xcode 6 beta 4 website, preferably before reading below.

So, you have installed your copy of the IDE. Now, let's output “Hello, World!” To the console. This example not only demonstrates the simplest application you can write, but also, importantly, shows that the development environment is set up correctly.
In Xcode, create a project using a single view application template ("Single View Application").

Make sure you select Swift as the application language.

You should now find the AppDelegate.swift file in the project hierarchy. Inside, locate the following line:
"// Override point for customization after application launch." Replace this line with our amazing code:
println("Hello World") 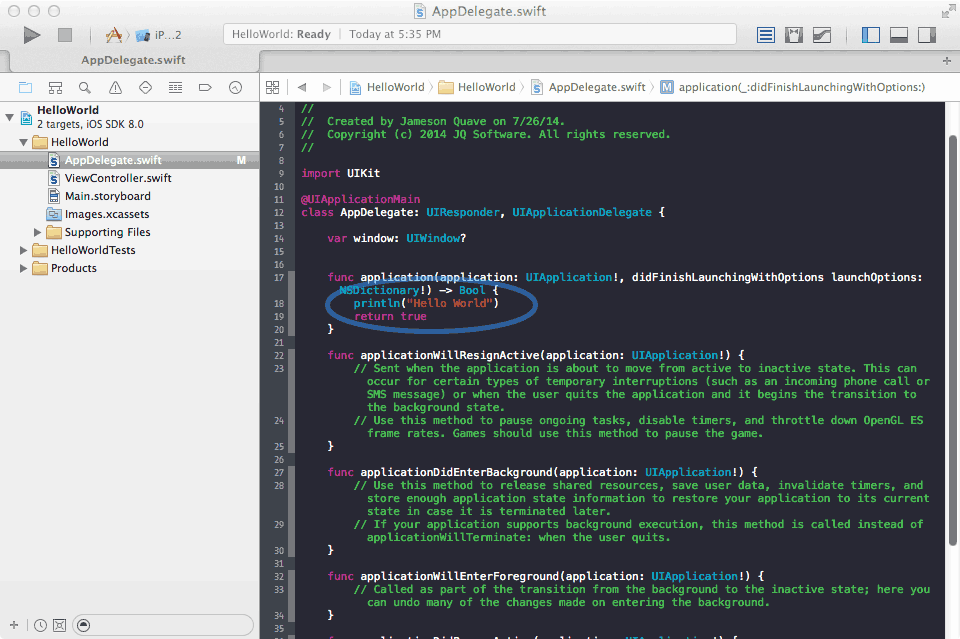
Now click "Run". You should see the downloaded empty application and the words
Hello, World! printed in the console located at the bottom of the Xcode window. Note that this will not be displayed in the iPhone simulator.
Congratulations! You have just written your first application in Swift! True, it will not receive any awards, prizes, only your own applause. And now, let's dig a little deeper ...
Add Table View
In this section we will try to add material to the screen. Open the Main.storyboard file in Xcode, transfer the
Table View object from the Object Library (“Object Library”) to the application screen, drag the table so that it coincides with the edges. Then change the height by dragging the top edge, leaving a small space on top (this is necessary for the status bar). If you run the application, you will see an empty table in the simulator.
Now you need to create a delegate and data source for the table. This is easiest to do in the interface constructor. Press the "Command" key, click and drag the
Table View to the View Controller object in the hierarchy of the .storyboard file, and select "data source". Repeat with the “delegate” option.Note: I received a whole ton of questions about the above because Many people report that they do not have a tabular view. Therefore, I recorded a video explaining how the connection of Storyboard objects in the code works. To view, go to full screen mode and select the 720p option so that you can see everything that interests you. This will be slightly different from the XCode interface, but everything works functionally as well.
And now let's dive into the protocol methods for the table view. Because of the use of
UITableViewDataSource and UITableViewDelegate we have to change the class definition.Open the file and replace the line
class ViewController: UIViewController { the next
class ViewController: UIViewController, UITableViewDataSource, UITableViewDelegate { If you press the "Command" key and click on one of these protocols, you will see the "mandatory" functions. For a table view, at least these two are necessary:
func tableView(tableView: UITableView!, numberOfRowsInSection section: Int) -> Int func tableView(tableView: UITableView!, cellForRowAtIndexPath indexPath: NSIndexPath!) -> UITableViewCell! Change our
View Controller class by adding these two functions: func tableView(tableView: UITableView!, numberOfRowsInSection section: Int) -> Int { return 10 } func tableView(tableView: UITableView!, cellForRowAtIndexPath indexPath: NSIndexPath!) -> UITableViewCell! { let cell: UITableViewCell = UITableViewCell(style: UITableViewCellStyle.Subtitle, reuseIdentifier: "MyTestCell") cell.textLabel.text = "Row #\(indexPath.row)" cell.detailTextLabel.text = "Subtitle #\(indexPath.row)" return cell } The first method returns the number of lines in the section. In our example, the “magic” number 10 is used, but instead, as a rule, the length of the array controller should be used. Our code is intentionally simplified.
In the second method, pure magic happens. We create an instance of the
UITableViewCell ( cell ) class using the Subtitle cell style. Then we assign the text value of this cell the value "Row #\(indexPath.row)" . In Swift, the values of variables are embedded in a similar way into a row without conversion (thus, we get rows like "Row #1" , "Row #2" )Detailed text label (
detailTextLabel ) is available only when using the cell class Subtitle , which we use in this example.When you launch the application, you will see a delightful list of cells with headings and subtitles, showing their row numbers. This is one of the most common ways to display data in iOS, you will see that it will come in handy more than once. You can see the full text of the code on github .
In the next post, we explore the use of the iTunes Search API to create an application that can search and display albums within the iTunes Store.
The question of further transfer
Dear Habraludi! If you have read this translation, help the author decide on the future cycle.
All you need is to participate in the survey.
Source: https://habr.com/ru/post/231541/
All Articles