We write on Kotlin for Android
About two years ago, I discovered that there are no convenient applications for me in the Android Market to account for the time spent on different projects. As a real bummer, I decided not to look for the required, but to write it myself. It turned out to be a bit more complicated than it seemed at the beginning, and I abandoned everything in the sluggish hobby mode: the embodiment of my desire lived for more than a year, slowly moving from the idea to the alpha version.
And then all of a sudden, kind people offered to tell me how to write for Android on Kotlin. It seemed to me that this is a good sign, and I quickly rewrote the application on Kotlin, finished it and posted it on Google Play.
An important clarification: this article is just about how to write under Android on Kotlin. It will be interesting only to those who want to try Kotlin, and to those who want to understand why to try it. The application I wrote is very, very simple (and by itself does not apply to JetBrains). In his code, it is guaranteed that something can be improved; it is laid out on Github for example only, and not as a sample of a delightful code. It works, and if you want to try it, you can put it here . But once again: this is a demo, its goal is to be not a perfect application, but an introduction to Kotlin for Android.
')

So as not to delay the most interesting, we mention only the most important advantages of Kotlin:
On Kotlin, you can write much faster than on Jav, and the code, in my opinion, is more beautiful.
By the way, on github'e already more than 200 repositories with code on Kotlin'e, and if we talk about mobile applications, then Kotlin was used in the development of the Telegram messenger.
IDE is required for work For obvious reasons, I prefer IntelliJ IDEA, however JetBrains makes the Kotlin plugin for Eclipse, and vim lovers can use a separate language compiler.
Next, we will assume that anyone who wants to try Kotlin in the Android case will use IntelliJ IDEA. To work, you will need to install the Kotlin plugin and make sure that the computer is gradle and the Android SDK (this has nothing to do with Kotlin, this is necessary for developing for Android on anything).
I already had a partially written application when I decided to bring it to the end. Everything was written in Java.
The essence of the application: there is a list of red tasks on the screen, if you click on a task, it turns green and time goes: this means that the user is working on the task. Once stopped, he clicks on it again, and the task turns red again, showing how little time he spent on it. The application blindly trusts the user without checking it in any way: this is not “big brother watching you” from oDesk.
I wanted to rewrite what was written in Java on Kotlin, the soul requested 100% code on Kotlin, despite the fact that in one project you can use Java and Kotlin code at the same time. It turned out that everything is simple with the inherited code: next to src / main / java we create the folder src / main / kotlin , and put classes in it. Files in Kotlin do not end in .java , but in .kt . There was a pleasant moment to the place: Kotlin does not require a “one class - one file” correspondence. You can stuff as many classes into one file as you want according to the logic of the application. In my application there were only two logical parts - working with a database and a screen user interface, so that the number of files could be reduced.
The Kotlin plugin for IntelliJ IDEA can convert .java files to .kt files by performing a neat translation from Java to Kotlin. You can do this by right-clicking on the file and the context menu, but you can do it right when copying Java code to a .kt file (the plugin will ask if it will be converted).
Kotlin code is compact: for example, a class with a constructor and getters / setters are described like this:
Let's look at the code that creates a dialog for entering text by clicking on the button.
Java:
Kotlin:
Agree, the code on Kotlin'e is easier to read. For the attentive reader, we note that this is, of course, only a code fragment, since when creating a dialogue, not only the “OK” button is needed, but also the “Cancel” button. The complete code is laid out on Github .
What makes it possible to shorten the code? For example, in Kotlin'e this form of writing is possible: if an instance of a class with one abstract method is expected as a parameter, you can simply pass a lambda there: this is exactly what is shown in the example above.
Please note that in Kotlin'e you can omit the type of the variable, since it will be derived from the right side of the assignment:
An interesting feature of the syntax in Kotlin is: if parameters are passed to a function, and the last parameter is a function, then it can be taken out of the brackets. This is what we see in the fragment, where lambda is transmitted in setPositiveButton, which will work when the “OK” button is pressed:
The same can be written as
You are free to choose which option seems easier to read.
Another nice thing is the ability to directly use libraries written in Java from code in Kotlin.
For example, to properly process special characters and Unicode in project names when saving them in SQLite, I used the functions StringEscapeUtils.escapeJava and StringEscapeUtils.unescapeJava from the popular library, which is enough to import with the import statement (and fit the dependencies in the project properties):
In Kotlin, functional literals (aka lambda functions) are not allowed to use return, since the functional literal returns the value calculated in the last expression. So, in the setOnTouchListener call, it is expected that the last call parameter is a function that returns a boolean . This value actually returns the gestureDetector.onTouchEvent (aEvent) .
Java:
Kotlin:
You cannot write return gestureDetector.onTouchEvent (aEvent) in the code of the functional literal on Kotlin, the result of calling gestureDetector.onTouchEvent (aEvent) will be returned.
Similarly, returning values by functions defined by the "=" sign works like this:
To get rid of long strings that are difficult to read and give a suboptimal byte code, Kotlin uses string templates:
Here projectToDelete is a string variable. The syntax of this pattern is familiar to anyone who has dealt with environment variables in UNIX, for example. Templates for strings composed of text and the values of many variables, especially with formatting, are especially convenient:
By the way, an interesting story came out with formatting along the way: the String type in Kotlin is its own, and there is no format method in it, so I had to import java.lang.String.format explicitly and then access it. Surprisingly, by the way, neither Java nor Kotlin still has the secondsToHumanReadableString method that converts an integer number of seconds into a format string
It is very convenient to use when for multiple choice and with with to reduce calls to methods and properties - both are enough even in a small Android application. In my case, this made the code easier to read, for example:
Without with would be alert.setPositiveButton, alert.setNegativeButton, alert.create, alert.show . When also improves readability:
If you create build.gradle with your hands and / or build a project with gradle without an IDE, then read how to make friends with gradle, Kotlin and Android on Kotlinlang.org .
I don’t know if Android Studio users have such a problem, but for a person familiar with IntelliJ IDEA, working with Gradle may raise the question of how to compile .apk for a release, not for debugging.
To do this, IDEA has a Gradle plugin, which opens by clicking on the tab to the right:
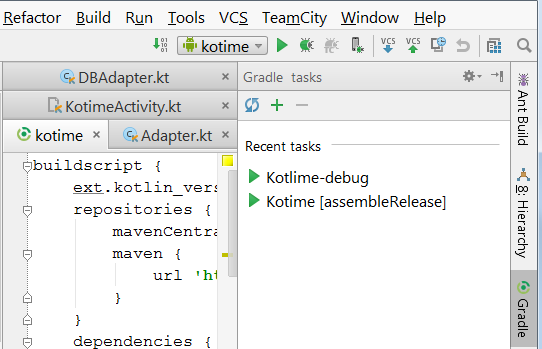
By default IDEA collects * -debug-unsigned.apk , i.e. what you don't put on google play. To make it * -release-signed.apk , you need to generate a key for the signature, put it in the keystore, and enter a few lines in the build.gradle of your project so that Gradle knows where to get the key. To build a release, select the assembleRelease task in the Gradle window by double-clicking on it.
You either already know about how to create a key and sign an application, or you can read more on stackoverflow .
Recently opened our new site about Kotlin kotlinlang.org , which is hosted on Jekyll + Github. Than this decision is good, on Habré recently already wrote .
If in the article some code examples seemed beautiful to you, then this is undoubtedly the merit of Natalia Ukhorska , who works with us in the Kotlin team. I am very grateful to Natasha for the advice, without which this article would have been shorter, and the code less similar to the classic Kotlin.
We will be very happy if the hours saved by using Kotlin can be spent on the beach. Goodrest of summer!
UPD from 07/31/1412, 18:55 : corrected some terms and formulations.
And then all of a sudden, kind people offered to tell me how to write for Android on Kotlin. It seemed to me that this is a good sign, and I quickly rewrote the application on Kotlin, finished it and posted it on Google Play.
An important clarification: this article is just about how to write under Android on Kotlin. It will be interesting only to those who want to try Kotlin, and to those who want to understand why to try it. The application I wrote is very, very simple (and by itself does not apply to JetBrains). In his code, it is guaranteed that something can be improved; it is laid out on Github for example only, and not as a sample of a delightful code. It works, and if you want to try it, you can put it here . But once again: this is a demo, its goal is to be not a perfect application, but an introduction to Kotlin for Android.
')
Again something new. And why should I know?
So as not to delay the most interesting, we mention only the most important advantages of Kotlin:
- compact code. Quick to write, easy to read, fewer induced errors;
- Built-in error protection, first of all, nullability, i.e. the requirement for the programmer to explicitly indicate that a certain variable can be null;
- ease of development (in my opinion, even a novice Java developer will master Kotlin without difficulty).
On Kotlin, you can write much faster than on Jav, and the code, in my opinion, is more beautiful.
By the way, on github'e already more than 200 repositories with code on Kotlin'e, and if we talk about mobile applications, then Kotlin was used in the development of the Telegram messenger.
Well, well, where to start something?
IDE is required for work For obvious reasons, I prefer IntelliJ IDEA, however JetBrains makes the Kotlin plugin for Eclipse, and vim lovers can use a separate language compiler.
Next, we will assume that anyone who wants to try Kotlin in the Android case will use IntelliJ IDEA. To work, you will need to install the Kotlin plugin and make sure that the computer is gradle and the Android SDK (this has nothing to do with Kotlin, this is necessary for developing for Android on anything).
Java was first
I already had a partially written application when I decided to bring it to the end. Everything was written in Java.
The essence of the application: there is a list of red tasks on the screen, if you click on a task, it turns green and time goes: this means that the user is working on the task. Once stopped, he clicks on it again, and the task turns red again, showing how little time he spent on it. The application blindly trusts the user without checking it in any way: this is not “big brother watching you” from oDesk.
I wanted to rewrite what was written in Java on Kotlin, the soul requested 100% code on Kotlin, despite the fact that in one project you can use Java and Kotlin code at the same time. It turned out that everything is simple with the inherited code: next to src / main / java we create the folder src / main / kotlin , and put classes in it. Files in Kotlin do not end in .java , but in .kt . There was a pleasant moment to the place: Kotlin does not require a “one class - one file” correspondence. You can stuff as many classes into one file as you want according to the logic of the application. In my application there were only two logical parts - working with a database and a screen user interface, so that the number of files could be reduced.
The Kotlin plugin for IntelliJ IDEA can convert .java files to .kt files by performing a neat translation from Java to Kotlin. You can do this by right-clicking on the file and the context menu, but you can do it right when copying Java code to a .kt file (the plugin will ask if it will be converted).
We write code on Kotlin'e
Kotlin code is compact: for example, a class with a constructor and getters / setters are described like this:
class Item (val project: String, var status: String, var secondsSpent: Long, var lastactivated: Long) Let's look at the code that creates a dialog for entering text by clicking on the button.
Java:
addButton.setOnClickListener(new OnClickListener() { public void onClick(View v) { AlertDialog.Builder alert = new AlertDialog.Builder (this); alert.setPositiveButton("OK", new DialogInterface.OnClickListener() { public void onClick(DialogInterface dialog, int which) { result = input.getText().toString() } }); } } Kotlin:
addButton.setOnClickListener() { var alert = AlertDialog.Builder(this); alert.setPositiveButton("") { dialog, whichButton -> result = input.getText().toString() } } Agree, the code on Kotlin'e is easier to read. For the attentive reader, we note that this is, of course, only a code fragment, since when creating a dialogue, not only the “OK” button is needed, but also the “Cancel” button. The complete code is laid out on Github .
What makes it possible to shorten the code? For example, in Kotlin'e this form of writing is possible: if an instance of a class with one abstract method is expected as a parameter, you can simply pass a lambda there: this is exactly what is shown in the example above.
Please note that in Kotlin'e you can omit the type of the variable, since it will be derived from the right side of the assignment:
| Java | Kotlin |
|---|---|
| AlertDialog.Builder alert = new AlertDialog.Builder (this); | val alert = AlertDialog.Builder (this) |
An interesting feature of the syntax in Kotlin is: if parameters are passed to a function, and the last parameter is a function, then it can be taken out of the brackets. This is what we see in the fragment, where lambda is transmitted in setPositiveButton, which will work when the “OK” button is pressed:
alert.setPositiveButton("") { dialog, whichButton -> result = input.getText().toString() } The same can be written as
alert.setPositiveButton("", { dialog, whichButton -> result = input.getText().toString() } ) You are free to choose which option seems easier to read.
Using Java libraries in Kotlin code
Another nice thing is the ability to directly use libraries written in Java from code in Kotlin.
For example, to properly process special characters and Unicode in project names when saving them in SQLite, I used the functions StringEscapeUtils.escapeJava and StringEscapeUtils.unescapeJava from the popular library, which is enough to import with the import statement (and fit the dependencies in the project properties):
import org.apache.commons.lang3.StringEscapeUtils Return value
In Kotlin, functional literals (aka lambda functions) are not allowed to use return, since the functional literal returns the value calculated in the last expression. So, in the setOnTouchListener call, it is expected that the last call parameter is a function that returns a boolean . This value actually returns the gestureDetector.onTouchEvent (aEvent) .
Java:
gestureListener = new View.OnTouchListener() { public boolean onTouch(View v, MotionEvent event) { return gestureDetector.onTouchEvent(event); } }; Kotlin:
getListView()?.setOnTouchListener() { v, aEvent -> gestureDetector.onTouchEvent(aEvent) } You cannot write return gestureDetector.onTouchEvent (aEvent) in the code of the functional literal on Kotlin, the result of calling gestureDetector.onTouchEvent (aEvent) will be returned.
In fact, there are special cases where a nonlocal return should be used in a functional literal. If interested, the details are in the documentation for Kotlin
Similarly, returning values by functions defined by the "=" sign works like this:
override fun getCount() = data.size() String patterns
To get rid of long strings that are difficult to read and give a suboptimal byte code, Kotlin uses string templates:
setMessage(" $projectToDelete?") Here projectToDelete is a string variable. The syntax of this pattern is familiar to anyone who has dealt with environment variables in UNIX, for example. Templates for strings composed of text and the values of many variables, especially with formatting, are especially convenient:
secondsSpent.setText("${format("%02d", hours)}:${format("%02d",minutes)}:${format("%02d", seconds)}") By the way, an interesting story came out with formatting along the way: the String type in Kotlin is its own, and there is no format method in it, so I had to import java.lang.String.format explicitly and then access it. Surprisingly, by the way, neither Java nor Kotlin still has the secondsToHumanReadableString method that converts an integer number of seconds into a format string
HH: MM: SS.
when and with
It is very convenient to use when for multiple choice and with with to reduce calls to methods and properties - both are enough even in a small Android application. In my case, this made the code easier to read, for example:
with (alert) { setPositiveButton("") { dialog, whichButton -> ... ... } setNegativeButton("") { dialog, whichButton -> } // "" create() show() } Without with would be alert.setPositiveButton, alert.setNegativeButton, alert.create, alert.show . When also improves readability:
when (item.status) { "active" -> { item.status = "inactive" ... ... } "inactive" -> { item.status = "active" ... ... } } Compiling with Gradle
If you create build.gradle with your hands and / or build a project with gradle without an IDE, then read how to make friends with gradle, Kotlin and Android on Kotlinlang.org .
I don’t know if Android Studio users have such a problem, but for a person familiar with IntelliJ IDEA, working with Gradle may raise the question of how to compile .apk for a release, not for debugging.
To do this, IDEA has a Gradle plugin, which opens by clicking on the tab to the right:
By default IDEA collects * -debug-unsigned.apk , i.e. what you don't put on google play. To make it * -release-signed.apk , you need to generate a key for the signature, put it in the keystore, and enter a few lines in the build.gradle of your project so that Gradle knows where to get the key. To build a release, select the assembleRelease task in the Gradle window by double-clicking on it.
You either already know about how to create a key and sign an application, or you can read more on stackoverflow .
On a note
Recently opened our new site about Kotlin kotlinlang.org , which is hosted on Jekyll + Github. Than this decision is good, on Habré recently already wrote .
If in the article some code examples seemed beautiful to you, then this is undoubtedly the merit of Natalia Ukhorska , who works with us in the Kotlin team. I am very grateful to Natasha for the advice, without which this article would have been shorter, and the code less similar to the classic Kotlin.
We will be very happy if the hours saved by using Kotlin can be spent on the beach. Good
UPD from 07/31/1412, 18:55 : corrected some terms and formulations.
Source: https://habr.com/ru/post/231525/
All Articles