We make video chat in a web browser with a minimum of labor costs
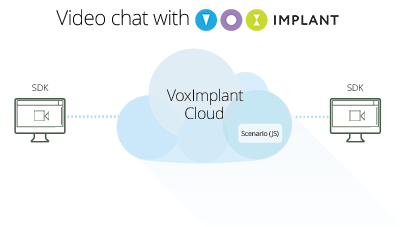 To implement the functionality of video chat in the browser, there are two of the most appropriate of the technology - WebRTC and Flash. Each technology has a number of features, for example, Flash can use H.264 video codecs or Sorenson, and VP8 is currently available in WebRTC, which makes these two approaches poorly compatible with each other (transcoding video on the fly is very expensive operation), besides video chat is better to do peer-to-peer whenever possible, is it worth saying that connecting Flash and WebRTC will not come out directly. In our example, we will consider a video call option from a WebRTC call to WebRTC, using the VoxImplant platform. In general, you can make a choice of a specific option, up to a dynamic choice of technology, depending on whom we are calling. Details, as usual, under the cut.
 Creating an application, users, script, and configuration
First we need the VoxImplant developer account ( registered here ), after entering the VoxImplant control panel in the Applications section we create a new application and call it videochat. To organize a simple video chat, we will need at least 2 users - testuser1 and testuser2, create them in the Users section and link them to the application using the Assign applications button (similarly, you can attach already created users to the application while editing the application). When calling from user to user, a call processing script is still called, which is written in Javascript and executed by the VoxEngine engine. Create a new script in the Scenarios section, let's call it User2User, when using peer-to-peer mode, the script will look like this:
VoxEngine.forwardCallToUserDirect(); If in the future you want to drive video through the server (forcibly), you can use
VoxEngine.forwardCallToUser(null, true); , but in this case calls will cost money.If you need to control the alarm, for example, to terminate a call at some point from the server side, then you can use the following script instead of the forwardCallToUserDirect helper:
')
var call1, call2; VoxEngine.addEventListener(AppEvents.CallAlerting, function(e) { call1 = e.call; call2 = VoxEngine.callUserDirect(e.call, e.destination, e.displayName, e.headers); call2.addEventListener(CallEvents.Connected, handleCallConnected); }); function handleCallConnected(e) { call1.answerDirect(call2); // , , - setTimeout(VoxEngine.terminate, 5000); } After creating the script, we need to bind it to the application through the rule (Rule) - go to the Applications section and edit our application, in the Rules tab we create a new rule (Add rule). You can call it as you like, for example, Intercom, the Pattern specifies a regular expression - the rule works if the number matches this expression, leave. * And drag our User2User script from Available to Assigned and save the rule. We save the application, it remains only to make the client using VoxImplant Web SDK .
Creating a web client
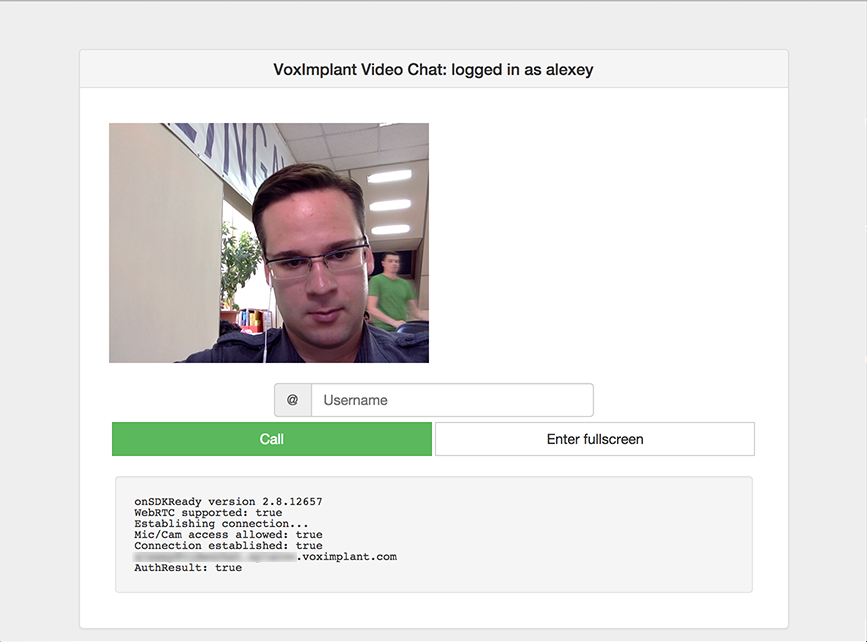
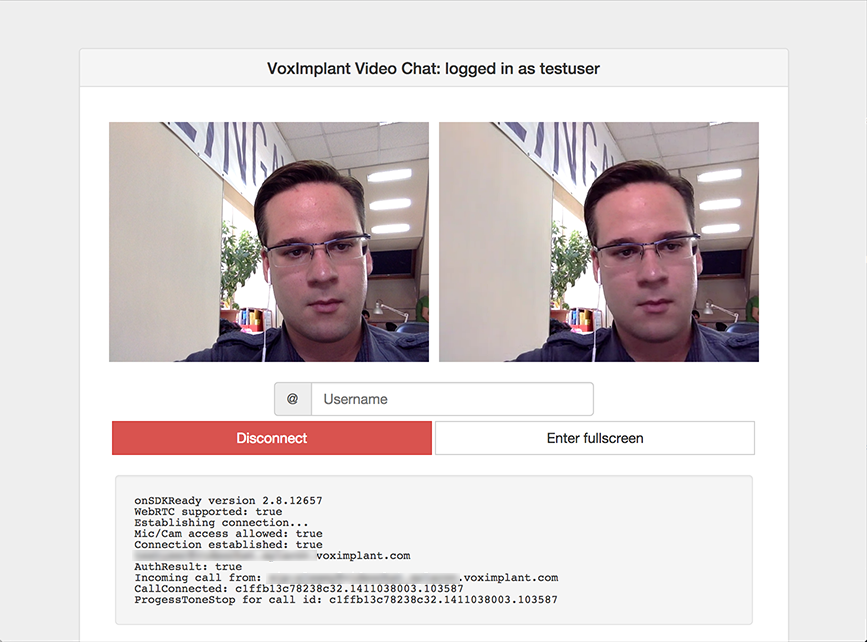
The client will only need the file voximplant.min.js, which lies on the cdn, as well as a basic understanding of how the Web SDK works. To make it all look more or less decently, you can use Bootstrap. I see no reason to dump all the code from an HTML file here, we’ll analyze only the main points, but you can always get a deeper look by downloading files from our page on GitHub .
// SDK <script type="text/javascript" src="//cdn.voximplant.com/edge/voximplant.min.js"></script> // HTML function log(str) { document.getElementById("log").innerHTML += str+"<br/>"; } // VoxImplant var voxAPI = VoxImplant.getInstance(); // voxAPI.on(VoxImplant.Events.SDKReady, onSdkReady); voxAPI.on(VoxImplant.Events.ConnectionEstablished, onConnectionEstablished); voxAPI.on(VoxImplant.Events.ConnectionFailed, onConnectionFailed); voxAPI.on(VoxImplant.Events.ConnectionClosed, onConnectionClosed); voxAPI.on(VoxImplant.Events.AuthResult, onAuthResult); voxAPI.v(VoxImplant.Events.IncomingCall, onIncomingCall); voxAPI.on(VoxImplant.Events.MicAccessResult, onMicAccessResult); // SDK try { voxAPI.init({ micRequired: true, // / VoxImplant videoSupport: true // }); } catch(e) { // , log(e.message); } // SDK - function onSdkReady(){ voxAPI.connect(); // / } // function onMicAccessResult(e) { if (e.result) { // / } else { // / } } // VoxImplant function onConnectionEstablished() { // - , // application_user, application_name, account_name application_user_password voxAPI.login(application_user+"@"+application_name+"."+account_name+".voximplant.com", application_user_password); } // VoxImplant function onConnectionFailed() { // - UDP } // function onConnectionClosed() { // connect } function onAuthResult(e) { if (e.result) { // - } else { // , e.code, } } var currentCall = null; // // function onIncomingCall(e) { currentCall = e.call; // currentCall.on(VoxImplant.CallEvents.Connected, onCallConnected); currentCall.on(VoxImplant.CallEvents.Disconnected, onCallDisconnected); currentCall.on(VoxImplant.CallEvents.Failed, onCallFailed); // . . currentCall.answer(null, {}, { receiveVideo: true, sendVideo: true }); } // function createCall() { // application_username - , ( ) currentCall = voxAPI.call(application_username, { receiveVideo: true, sendVideo: true }, "TEST CUSTOM DATA", {"X-DirectCall": "true"}); // currentCall.on(VoxImplant.CallEvents.Connected, onCallConnected); currentCall.on(VoxImplant.CallEvents.Disconnected, onCallDisconnected); currentCall.on(VoxImplant.CallEvents.Failed, onCallFailed); } // function onCallConnected(e) { // voxAPI.sendVideo(true); currentCall.showRemoteVideo(true); } // function onCallDisconnected(e) { currentCall = null; } // function onCallFailed(e) { // e.code, e.reason } Here are all the basic functions and events that we need. Naturally, this is naked JS, you need to fasten styles and layout to this. The version we posted on github looks like this:
If you need support, both Flash and WebRTC will have to switch the client application to the appropriate mode, because we did not implement WebRTC <> Flash video calls. We hope that in the near future WebRTC support will appear in IE12, and behind it in Safari. If you need the option “call from the site to the operator”, then you can make 2 operator applications, one using WebRTC, the other using Flash, and send calls from the site, depending on which SDK mode the site visitor is on or on another operator.
Project files on GitHub
Source: https://habr.com/ru/post/231383/
All Articles