Installing OpenFOAM on Ubuntu 14.04

OpenFOAM is a freely available computational fluid dynamics toolkit for operations with fields (scalar, vector and tensor). Today it is one of the “completed” and well-known applications designed for FVM computing. In particular, the package allows us to solve the hydrodynamic problems of Newtonian and non-Newtonian viscous fluids in both incompressible and compressible approximation, taking into account convective heat exchange and gravity. To simulate turbulent flows, it is possible to use RANS models, LES and DNS methods. Perhaps the solution subsonic, transonic and supersonic problems.
Currently installation packages are available for the following OS versions.
- 12.04 LTS codename precise
- 12.10 codename quantal
- 13.04 codename raring
- 13.10 codename saucy
However, the Ubuntu OS 14.04 installation package is missing. Therefore, for version 14.04, you need to build OpenFOAM 2.3 yourself. This is not a simple enough task for newbies who recently use this operating system.
This article is dedicated to.
Attention assembly process can take up to 6 hours.
')
We will work in a guest operating system running a system based on the Hyper-V hypervisor. If you are using Hyper-V with Ubuntu for the first time, then the resolution when connecting to a virtual machine may be different from the resolution of your screen. This can be corrected as follows. Call the command prompt, enter the following command.
sudo nano /etc/default/grub Find the line with GRUB_CMDLINE_LINUX_DEFAULT and complete it with “video = hyperv_fb: 1600x900”. Where instead of 1600x900 substitute the resolution of your monitor. In my case, she looked like that.
GRUB_CMDLINE_LINUX_DEFAULT="quiet splash video=hyperv_fb:1600x900" Next, update the settings with the command
sudo update-grub Changes will come after restarting the virtual machine.
To build we need to install the necessary packages.
- Switch to root mode.
sudo -s - Perform package installation.
apt-get install build-essential git-core cmake flex bison zlib1g-dev qt4-dev-tools\ libqt4-dev gnuplot libreadline-dev \ libncurses-dev libxt-dev libopenmpi-dev openmpi-bin\ libboost-system-dev libboost-thread-dev libgmp-dev libmpfr-dev - Log out of root mode.
exit
Create a folder in for OpenFOAM and go into it.
mkdir $HOME/OpenFOAM cd $HOME/OpenFOAM The following commands will download the source code.
git clone git://github.com/OpenFOAM/OpenFOAM-2.3.x.git wget http://downloads.sourceforge.net/project/foam/foam/2.3.0/ThirdParty-2.3.0.tgz Also source codes are available here.
Unzip ThirdParty-2.3.0.tgz using the tar utility with the x keys to unzip the z type of the .gz f archive to write the archive to a file (the following parameter specifies the file name). Next, delete the archive we no longer need.
tar xzf ThirdParty-2.3.0.tgz rm ThirdParty-2.3.0.tgz Let's return to the home directory and set the environment variables.
cd gedit .bashrc In the text editor that opens, add the following line to the end of the file.
source $HOME/OpenFOAM/OpenFOAM-2.3.0/etc/bashrc Let's make these environment variables available and test one of them.
. .bashrc echo $FOAM_INST_DIR Using the environment variable, go to the desired directory and compile it.
cd $WM_THIRD_PARTY_DIR ./Allwmake Compile ParaView - a postprocessor for viewing results and geometries.
./makeParaView4 The final step is to compile OpenFOAM ( Attention this operation is the longest )
cd $WM_PROJECT_DIR ./Allwmake It remains to copy the learning tasks and check the result of the compilation.
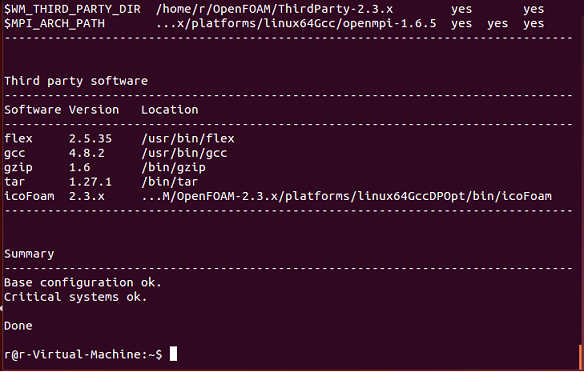
cd mkdir -p $FOAM_RUN cp -r $FOAM_TUTORIALS $FOAM_RUN foamInstallationTest > log.foamInstallationTest cat log.foamInstallationTest If all is well you will have the following on the screen.
Perform a parallel calculation of the motorcycle.
d $FOAM_RUN cd tutorial/incompressible/simpleFoam/motorBike/ ./Allrun After calculation, it remains to see what we get.
paraFoam 
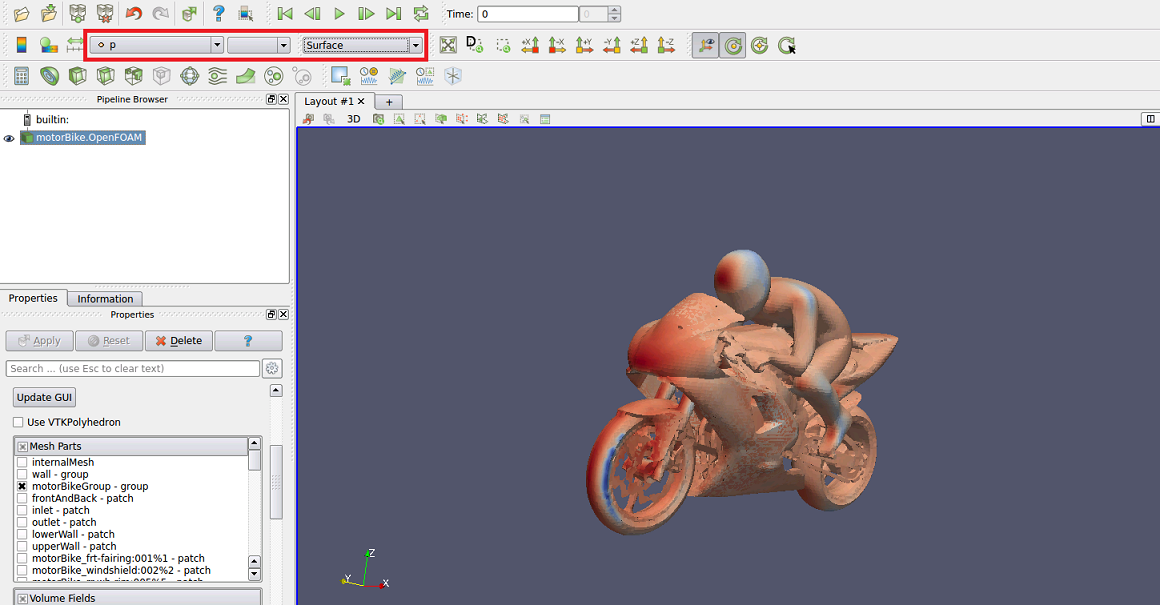
Let's display only the motorcycle that we are interested in. The remaining checkboxes must be removed and left as shown.

Click Apply it will be green
Display the pressure distribution. By setting the parameters in the red square, you should get the following picture.
I hope this manual will help in the work of novice users OpenFOAM.
PS> If you find a mistake or a defect, write to me.
Source: https://habr.com/ru/post/231219/
All Articles