Qt 5.3: low start on mobile cross platform
Greetings to all who are interested in cross-platform development for mobile devices! Until recently, I was very skeptical about the tools that allow you to create non-native applications that would work on a number of platforms at once. However, at one point, curiosity and the desire to try something new still outweighed restraint. The choice fell on Qt 5.3. Why? Because Qt is open and free for non-commercial and commercial (under the LGPL license) use, has a long history (was published in 1996) and a sufficient number of quality projects (offhand - Skype, 2GIS applications) implemented using these libraries.
The purpose of the publication is to acquaint readers with mobile development on the latest version of Qt: show the implementation of the main elements of client-server applications and highlight possible "pitfalls" when working with Qt libraries.
The required level of training and experience is minimal (knowledge of the basics of C ++, an elementary skill in local server configuration).
The material for the convenience of perception is divided into 4 parts: “Pitfalls”, the story of one project and work on the bugs, Basics of client-server development, Summary.
1. "Pitfalls"
1.1. Incompatibility of different versions of libraries.
Qt is updated quite often, which, on the one hand, is good, but, on the other hand, it sometimes makes development a nightmare. This happens because the new versions are not compatible with their predecessors (meaning major versions), some of the functionality which at best becomes obsolete, at worst - becomes more inaccessible. The result is an abundance of irrelevant materials / examples on the Web that cannot be used in version 5.3. In general, unfortunately, the valid information on Qt 5.3 is negligible: describing a problem in a search engine, we find ourselves in the documentation (documentation is of good quality, but in most cases there is not enough one general theory) or examples for versions 4.6 or 4.8, which, as a rule, are useless for Qt 5.3. Official guides and examples, again, basically describe very trivial cases, which, as a rule, in reality you practically never encounter. I will not mention literature, things are approximately the same with it (relevant for older versions). However, these disadvantages are partially compensated by the active community (the official forum is qt-project.org/forums ).
')
1.2. A little "raw" support for Android / iOS functionality.
Speaking to the forehead, there is currently no WebView implementation for these platforms. Perhaps not the worst drawback, but for example, it’s worth while forgetting about simple work with geo maps. The second problem is the inability to get an IMEI device (for example, to implement identification on the server): in older versions, the QtMobility library served for this purpose, in newer versions it is not available, a full replacement for the former one is not yet implemented. However, even these shortcomings are realistic to solve, but this requires “immersion” to the native level for each platform (for example, getting IMEI on Android - habrahabr.ru/sandbox/77966 ), but this, IMHO, contradicts the original idea of platform-independent development. Also note the presence of some minor bugs in the development environment itself (Qt Creator) - sometimes, for example, no changes were applied to QML files without restarting the IDE.
1.3. Bug tracking.
Communicating with other developers (Android, iOS, Web) I got the impression that some programmers are not eager to use libraries where C ++ is used as the main language. In fact, when developing small applications, most of the unpleasant situations arose because of the specifics of Qt itself, rather than C ++. As a rule, error messages are not very meaningful: the “file not found”, “undefined reference” and several other messages may indicate lines of code in the class when the problem may be, for example, the lack of a module connection in the * .pro file , an incorrect method call in a completely different place in the program, and so on. To track errors (so as not to look for the latter almost blindly), the logs are very helpful: the qDebug () function is in C ++ code and console.log () is in QML. Almost all the next part of the publication, to which we have already approached, is devoted to the topic of errors.
2. The history of one project and work on the bugs
This part is about errors that I made when developing a small client-server application. It will describe the path to the solutions proposed in the next section. Section can be skipped without harm for further reading.
Thesis about the goal: an application that allows:
- register in the service;
- log in;
- display lists;
- send requests to the server and parse the received responses.
In general, everything is very simple. I wanted to use my familiar Android idioms: to separate logic and UI, so as not to prescribe everything in one code. Looking at the UI forms [1] in Qt, I decided that such a “desktop” view for the user interface would not work explicitly: even on devices with large screens, it is difficult to get through some elements. I didn’t want to dive into the styles of UI-forms, so for layout and design it was decided to use QML-files (about them in more detail in the next part).
1. Appearance of the UI-form on the Android-device.
To connect the interface created in QML with the C ++ backend, I used this example - habrahabr.ru/post/138837 . A good working example (the author seems to have encountered the same problems at the time that I had when meeting Qt). However, due to the obsolescence of the Qt version used in the example (4.7.4), I later encountered some problems. The first one is the fair ListView brakes when running on Android. The reason is the old version QML (QtQuick 1.0).
Fix, change import in QML from QtQuick 1.0 to 2.2. But not everything is so simple, because the old backend using QtDeclarative / QDeclarativeView is relevant only for QtQuick 1.0. Remaking - qt-project.org/doc/qt-5/qtquick-porting-qt5.html . In general, as it turned out, QtQuick 1.0 is not very friendly with mobile platforms - there were some oddities in it, for example, when the keyboard appeared during input - the interface was either compressed twice so that it was completely visible simultaneously with the keyboard, or kept its size so that half of the screen behind the keyboard was not visible. QtQuick 2.2 was pleasantly surprised in this respect, because when opening the input, the intefice was now carefully pulled up so that there was no distortion and the input field was not lost sight of.
Now everything seems to be fine, ListView flies, but a new surprise appears. Initially, I made the application in such a way that each window had its own class with an interface attached to it (using a QML file). When we open a new window, an instance of the corresponding class is created, this window is displayed above, the old one does not disappear anywhere. When we close the current window, the class instance is deleted, and the previous window becomes visible again. Something like multiple activations with backstack on Android. And here is a surprise - with QtQuick 2.2, this is no longer possible (in this case, we will see just a static gray screen in Android). The reason is in bugreport - bugreports.qt-project.org/browse/QTBUG-39454 . Essence: we can use only one OpenGL window (and QtQuick 2.2 just uses it) on Android. On iOS, the windows were displayed, but their jambs appeared. Much to my regret, the desired idiom had to be abandoned. Now one main QML file is used (via QQmlApplicationEngine), and different windows and transitions between them are performed by the Loader (about it in the next section). I will not go deeper, I’ll just say that a certain part of the time was needed to also learn how to parse JSON, HttpPost requests, solve jambs with no appearance / reluctance to disappear from the keyboard, creating navigation in the manner of backstack in QML (manual processing buttons "Back") and another pair of three entities.
3. Basics of client-server development
Here will be described the solutions to which I came after a brief punching of the walls with my head in Qt. This is the main part of the publication.
So, we are ready to start! It is assumed that you already have Qt 5.3 - qt-project.org/downloads installed , to compile on Android you downloaded JDK, Android SDK, NDK, apache-ant (you will need to specify the path in Qt Creator settings), for iOS - XCODE .
So, we are ready to start! It is assumed that you already have Qt 5.3 - qt-project.org/downloads installed , to compile on Android you downloaded JDK, Android SDK, NDK, apache-ant (you will need to specify the path in Qt Creator settings), for iOS - XCODE .
3.1. Creation and preparation of the project
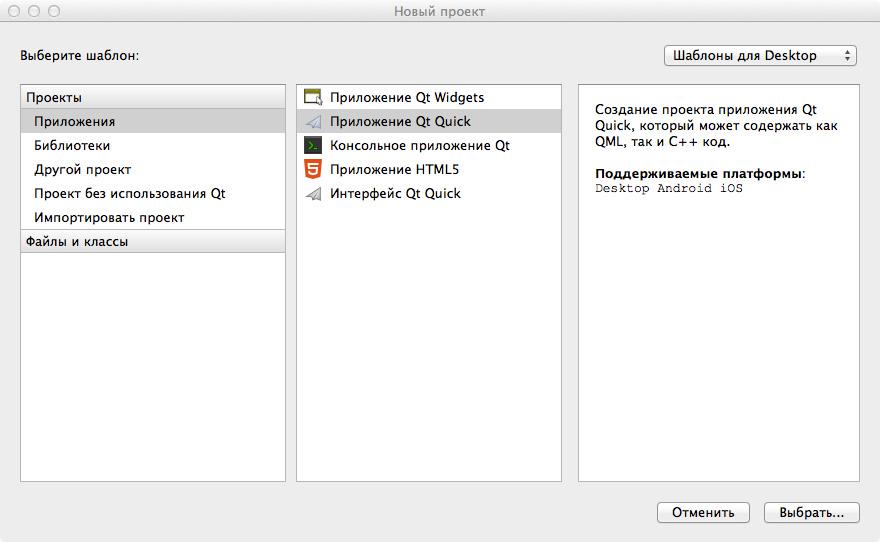
We start Qt Creator, we click "New project". Select "Qt Quick Application":
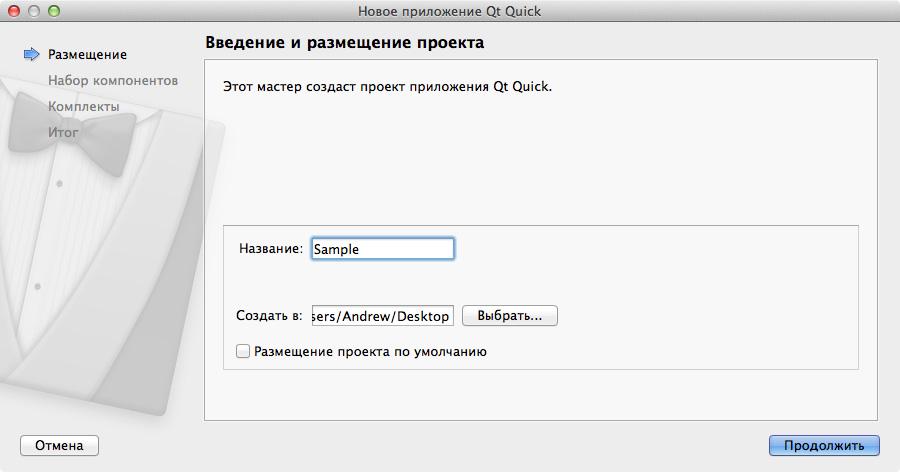
Let's call our project “Sample” (you can't use the Cyrillic alphabet in the name of the project and the path to it) so that we do not have differences in names:
The Qt Quick component set will be left on Qt Quick Controls 1.1:
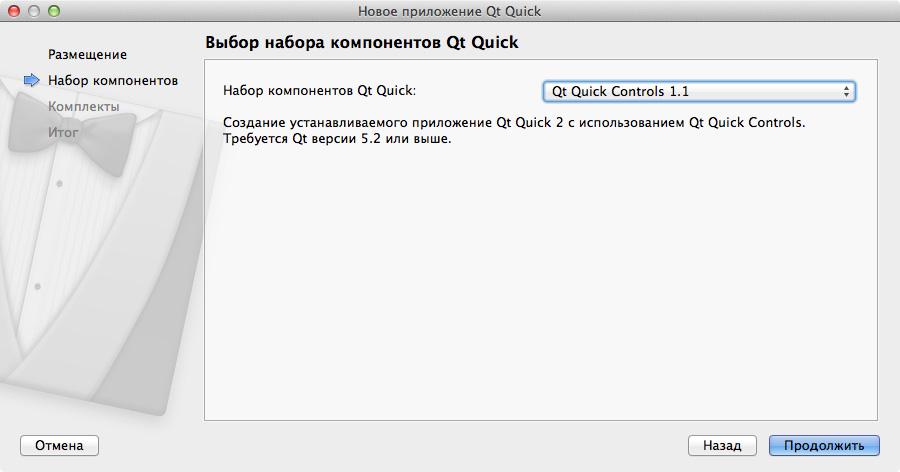
Qt Quick Controls 1.1 is a set of libraries that, in addition to the basic elements of Qt Quick 2.2, also contains various functional elements of the interface (controls). I’ll just make a reservation here that using controls increases the size of an application per megabyte 3. In my case, the assembled apk-file with controls weighed 11.6 MB, after installing it on the device, the application took slightly less than 20 MB. Plus, in my opinion, the controls slow down the launch of the application a bit (however, the problem can be solved with a loader or splashscreen). However, their use simplifies development, so we will not discard them.
Next, select the platforms on which we will run the application:
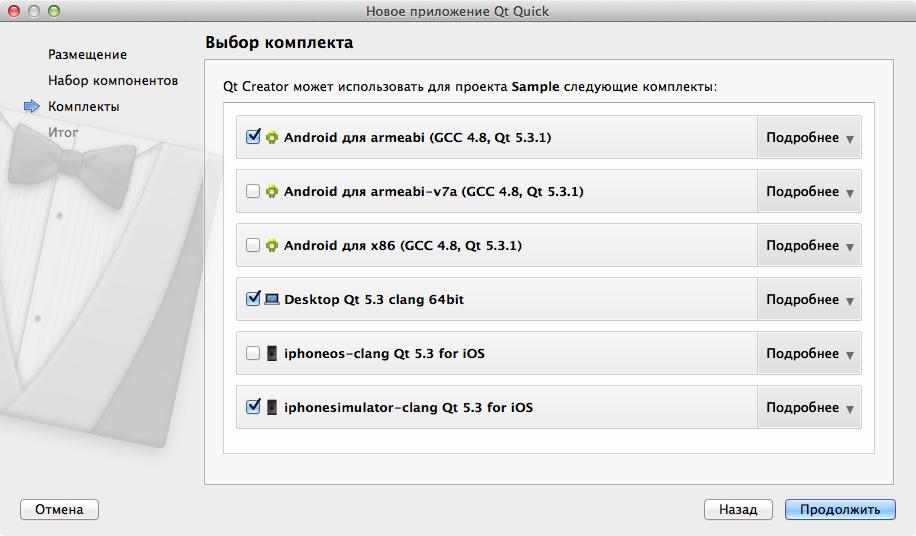
We put checkmarks in front of the required platforms: regardless of the platforms you have installed, I also recommend noting Desktop - the application starts up the fastest on it, so it's convenient to test.
We will not dwell on the connection of version control (this is done easily, in our example there is no need for this), so just click Finish:
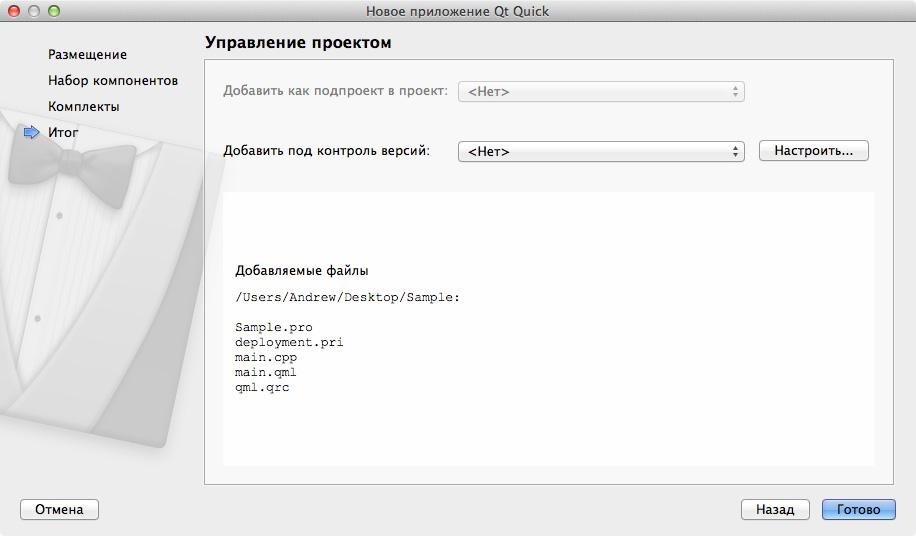
Our project is created! What does it consist of?

Let's look at the project tree. First of all, in the work we will need:
- configuration * .pro file (Sample.pro): something remotely resembling a manifest file in Android;
- source files and header files (we will create them a bit later), in which there will be an application backend;
- * .qrc-file (qml.qrc): in it we will specify all the resources necessary for the application (QML-files, images, etc.);
- QML files for the interface (for now we only have main.qml).
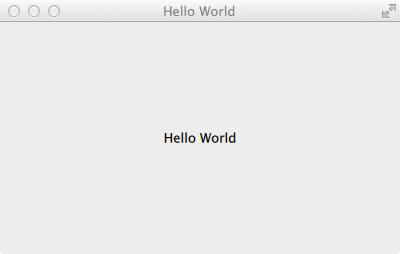
Save and run the application, on the desktop we will see something like the following:
Let's call our project “Sample” (you can't use the Cyrillic alphabet in the name of the project and the path to it) so that we do not have differences in names:
The Qt Quick component set will be left on Qt Quick Controls 1.1:
Qt Quick Controls 1.1 is a set of libraries that, in addition to the basic elements of Qt Quick 2.2, also contains various functional elements of the interface (controls). I’ll just make a reservation here that using controls increases the size of an application per megabyte 3. In my case, the assembled apk-file with controls weighed 11.6 MB, after installing it on the device, the application took slightly less than 20 MB. Plus, in my opinion, the controls slow down the launch of the application a bit (however, the problem can be solved with a loader or splashscreen). However, their use simplifies development, so we will not discard them.
Next, select the platforms on which we will run the application:
We put checkmarks in front of the required platforms: regardless of the platforms you have installed, I also recommend noting Desktop - the application starts up the fastest on it, so it's convenient to test.
We will not dwell on the connection of version control (this is done easily, in our example there is no need for this), so just click Finish:
Our project is created! What does it consist of?
Let's look at the project tree. First of all, in the work we will need:
- configuration * .pro file (Sample.pro): something remotely resembling a manifest file in Android;
- source files and header files (we will create them a bit later), in which there will be an application backend;
- * .qrc-file (qml.qrc): in it we will specify all the resources necessary for the application (QML-files, images, etc.);
- QML files for the interface (for now we only have main.qml).
Save and run the application, on the desktop we will see something like the following:
3.2. Interface creation
3.2.1. Create a button
Open the file main.qml. Remove the title, menuBar and Text. As a result, we should get:
ApplicationWindow is our root element to which children are added. It must be present in the main QML file. Immediately write two fields inside ApplicationWindow: id and objectName:
The id will be used to access the ApplicationWindow inside the QML file, the objectName is needed to find our main window from QML in C ++ code.
Parameters width and height with fixed values let them not confuse you yet. The interface will only be initially created with such dimensions, then stretch to fit the screen size of the smartphone. For this reason, a small jerking of the screen appears on Android when the application starts, how to fix it - I will describe it at the very end.
In general, syntax QML files are somewhat reminiscent of an explosive mixture of web layout and javascript logic, but the similarity is only partial. In QML, we can create not only an interface, but also logic (which is convenient, for example, to check the filling of forms), which is a plus.
Let's specify the color of our window, for this we add a line below the “height: 480” line in the ApplicationWindow
You can set a color with a hex code, some colors can be specified with a name, for example, “red”, “transparent”, etc. You can also use the created constant, more on this later. Now add to import:
Styles will be needed to customize the controls. Create a button inside ApplicationWindow. Common Code:
The width of the button is calculated relative to the width of the main window, height - relative to the height of the main screen. Here we see an example of accessing an element by id, elementary expressions for calculating the size and position of the button [see addition 1] . If we do not specify the id in front of the parameter in the expression (height in the calculation of y), then it is considered that the parameter of the current element, inside which we are, is used. All save and run:
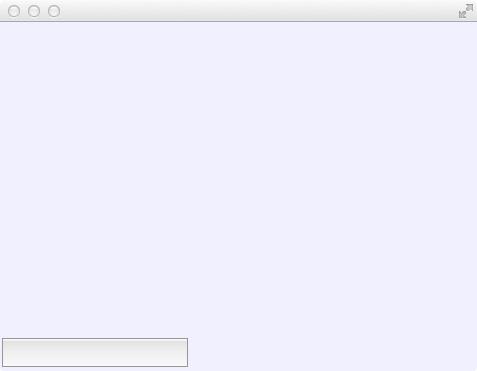
The button appeared, its dimensions are calculated relative to the size of the open window (Desktop) or the screen of the mobile device, which, in my opinion, solves problems of the same interface mapping on different devices (which is what Android hemorrhoids are usually if you do not use custom classes to create the UI).
It's time to create a style for the new button! To do this, inside the Button add:
The style for the button will consist of two parts: background and label. We will create these parts in separate QML files in order not to overload the main one. To do this, we roll Qt Creator, go into the folder of our project and create a folder there «QMLs», so that the working files are neatly laid out on the shelves.
Return to Qt Creator. Right-click on the project name in the tree (Sample) -> in the context menu, select "Add a new ...". Then select Qt, “QML File (Qt Quick 2)”:

The name is “ButtonBackground”, the path is set to the folder “QMLs” just created:
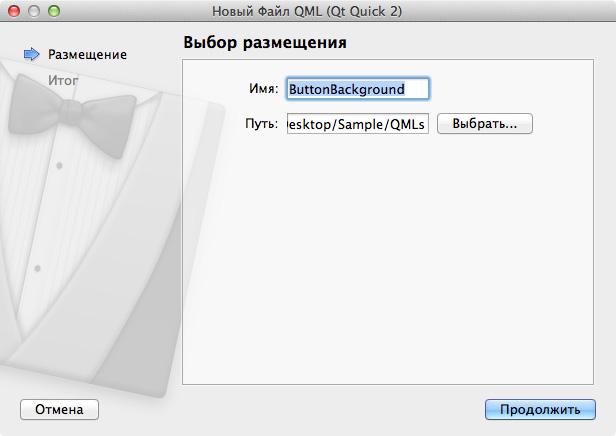
Check the prefix, version control is not needed, so just click "Finish":
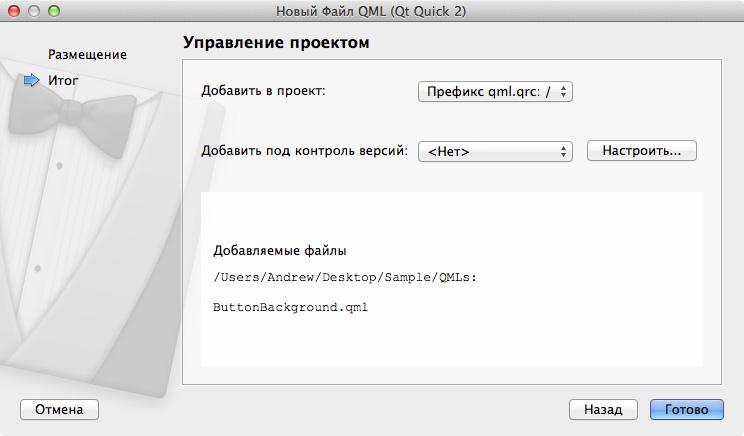
Similarly, create the file “ButtonLabel.qml”. Now our project looks like this:
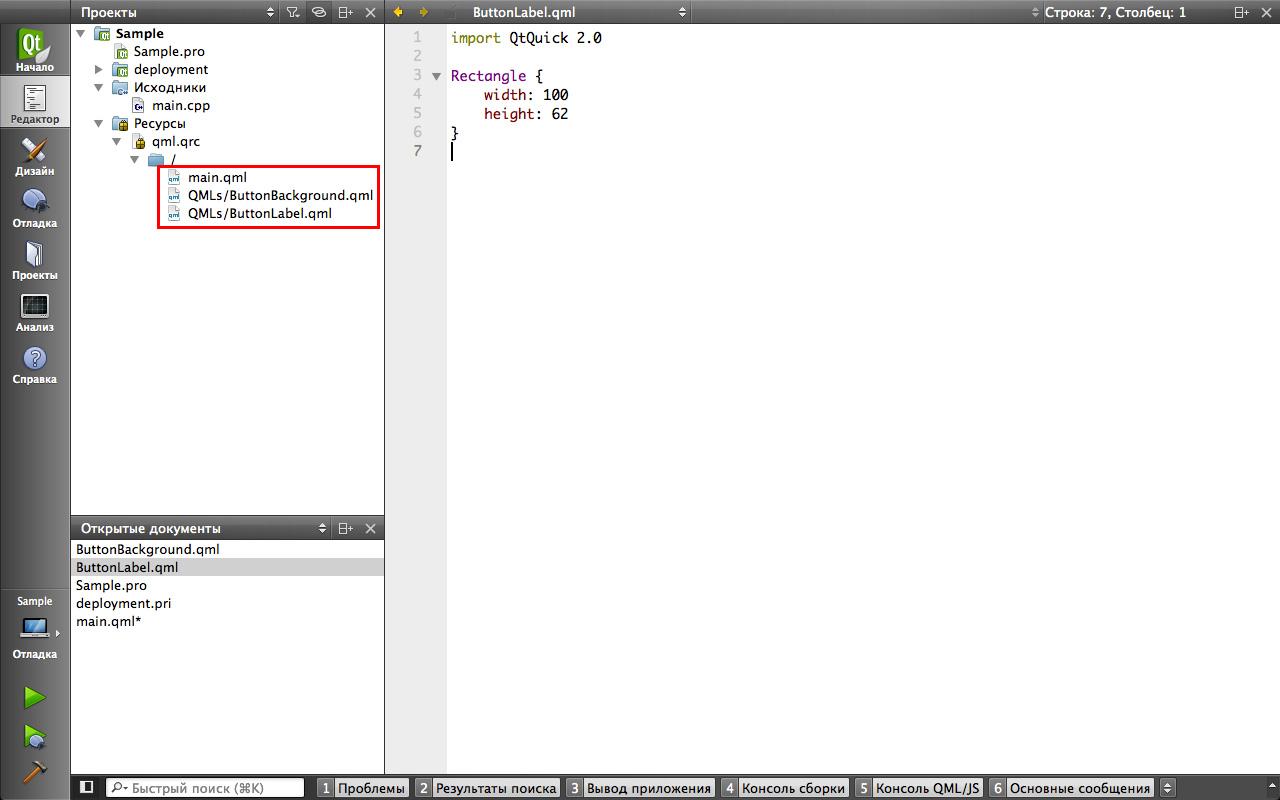
Double-click on “QMLs / ButtonBackground.qml”. Edit it as follows:
In order:
- anchors.fill: parent — so that the button background fills it completely, parent — a call to the parent element within which the current element is located;
- anchors.margins: 4 - set small indents from all sides;
- border - setting the stroke [see addition 8] ;
- radius: height / 4 - it's already interesting here; in this case, serves to round the corners (the value is calculated relative to the button height), but if you set the width and height of the Rectangle to be the same, then a sufficiently large radius value allows you to get a circle from the Rectangle;
- gradient consists of two points; Pay attention to the first point (with a zero position) - here we refer to the state of the button (control.pressed) to determine the color depending on the button pressed, we use a simple conditional operator: condition? action in case of truth: action if false;
- we can set a color instead of a gradient, for example, you can also use transparency (opacity: from 0 to 1).
Save “ButtonBackground.qml”, back to “main.qml”. Add to import our created folder "QMLs":
Now we have access to all QML files in this folder. Go back to the button style and set the newly created background. The result should be:
All save, run:

The button has become a little brighter, but it lacks a signature. Fix it. Open "ButtonLabel.qml", edit as follows:
The caption completely fills the body of the button, is centered, has a bold face. The size of the signature is calculated relative to the current orientation of the screen: it is logical that with a larger width it will be landscape, and the height - portrait [see addition 2] . Here we will not install the button text, it is inconvenient.
Open the “main.qml” again. Add the newly created “ButtonLabel” in the label style, but here we immediately indicate the text of the button [see addition 3] . It turns out as follows:
All save and run:
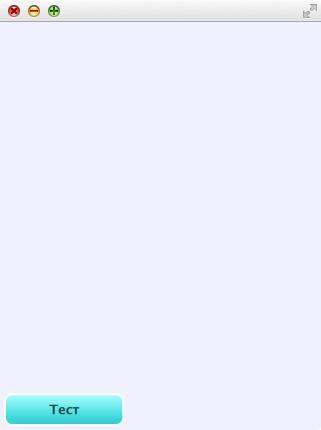
So, we have a clickable button, let's add a click handler for it, which will output a message to the log. To do this, add a line inside the button:
In the total:
We start, we check. When you click on the button in the "Application Output" panel (at the very bottom of the Qt Creator window), a new line appears: "qml: Button 'Test' clicked":

At this point, we will complete the work with our button.
import QtQuick 2.2 import QtQuick.Controls 1.1 ApplicationWindow { visible: true width: 640 height: 480 } ApplicationWindow is our root element to which children are added. It must be present in the main QML file. Immediately write two fields inside ApplicationWindow: id and objectName:
ApplicationWindow { id: mainWindow objectName: "mainWindow" visible: true width: 640 height: 480 } The id will be used to access the ApplicationWindow inside the QML file, the objectName is needed to find our main window from QML in C ++ code.
Parameters width and height with fixed values let them not confuse you yet. The interface will only be initially created with such dimensions, then stretch to fit the screen size of the smartphone. For this reason, a small jerking of the screen appears on Android when the application starts, how to fix it - I will describe it at the very end.
In general, syntax QML files are somewhat reminiscent of an explosive mixture of web layout and javascript logic, but the similarity is only partial. In QML, we can create not only an interface, but also logic (which is convenient, for example, to check the filling of forms), which is a plus.
Let's specify the color of our window, for this we add a line below the “height: 480” line in the ApplicationWindow
color: "#F0F0FF" You can set a color with a hex code, some colors can be specified with a name, for example, “red”, “transparent”, etc. You can also use the created constant, more on this later. Now add to import:
import QtQuick.Controls.Styles 1.2 Styles will be needed to customize the controls. Create a button inside ApplicationWindow. Common Code:
import QtQuick 2.2 import QtQuick.Controls 1.1 import QtQuick.Controls.Styles 1.2 ApplicationWindow { id: mainWindow objectName: "mainWindow" visible: true width: 640 height: 480 color: "#F0F0FF" Button { width: mainWindow.width / 2.5 height: mainWindow.height / 10 x: 0 y: mainWindow.height - height } } The width of the button is calculated relative to the width of the main window, height - relative to the height of the main screen. Here we see an example of accessing an element by id, elementary expressions for calculating the size and position of the button [see addition 1] . If we do not specify the id in front of the parameter in the expression (height in the calculation of y), then it is considered that the parameter of the current element, inside which we are, is used. All save and run:
The button appeared, its dimensions are calculated relative to the size of the open window (Desktop) or the screen of the mobile device, which, in my opinion, solves problems of the same interface mapping on different devices (which is what Android hemorrhoids are usually if you do not use custom classes to create the UI).
It's time to create a style for the new button! To do this, inside the Button add:
style: ButtonStyle { } The style for the button will consist of two parts: background and label. We will create these parts in separate QML files in order not to overload the main one. To do this, we roll Qt Creator, go into the folder of our project and create a folder there «QMLs», so that the working files are neatly laid out on the shelves.
Return to Qt Creator. Right-click on the project name in the tree (Sample) -> in the context menu, select "Add a new ...". Then select Qt, “QML File (Qt Quick 2)”:
The name is “ButtonBackground”, the path is set to the folder “QMLs” just created:
Check the prefix, version control is not needed, so just click "Finish":
Similarly, create the file “ButtonLabel.qml”. Now our project looks like this:
Double-click on “QMLs / ButtonBackground.qml”. Edit it as follows:
import QtQuick 2.2 Rectangle { anchors.fill: parent anchors.margins: 4 border.width: 2 border.color: "#FFFFFF" radius: height / 4 gradient: Gradient { GradientStop { position: 0; color: control.pressed ? "#00AAAA" : "#AAFFFF" } GradientStop { position: 1; color: "#00CCCC" } } // color: "#00AAAA" // opacity: 0.25 } In order:
- anchors.fill: parent — so that the button background fills it completely, parent — a call to the parent element within which the current element is located;
- anchors.margins: 4 - set small indents from all sides;
- border - setting the stroke [see addition 8] ;
- radius: height / 4 - it's already interesting here; in this case, serves to round the corners (the value is calculated relative to the button height), but if you set the width and height of the Rectangle to be the same, then a sufficiently large radius value allows you to get a circle from the Rectangle;
- gradient consists of two points; Pay attention to the first point (with a zero position) - here we refer to the state of the button (control.pressed) to determine the color depending on the button pressed, we use a simple conditional operator: condition? action in case of truth: action if false;
- we can set a color instead of a gradient, for example, you can also use transparency (opacity: from 0 to 1).
Save “ButtonBackground.qml”, back to “main.qml”. Add to import our created folder "QMLs":
import "QMLs" Now we have access to all QML files in this folder. Go back to the button style and set the newly created background. The result should be:
import QtQuick 2.2 import QtQuick.Controls 1.1 import QtQuick.Controls.Styles 1.2 import "QMLs" ApplicationWindow { id: mainWindow objectName: "mainWindow" visible: true width: 640 height: 480 color: "#F0F0FF" Button { width: mainWindow.width / 2.5 height: mainWindow.height / 10 x: 0 y: mainWindow.height - height style: ButtonStyle { background: ButtonBackground {} } } } All save, run:
The button has become a little brighter, but it lacks a signature. Fix it. Open "ButtonLabel.qml", edit as follows:
import QtQuick 2.2 Text { anchors.fill: parent horizontalAlignment: Text.AlignHCenter verticalAlignment: Text.AlignVCenter font.bold: true font.pixelSize: (mainWindow.width>mainWindow.height) ? parent.height/1.75 : parent.height / 2.5 color: "#005050" // text: "" } The caption completely fills the body of the button, is centered, has a bold face. The size of the signature is calculated relative to the current orientation of the screen: it is logical that with a larger width it will be landscape, and the height - portrait [see addition 2] . Here we will not install the button text, it is inconvenient.
Open the “main.qml” again. Add the newly created “ButtonLabel” in the label style, but here we immediately indicate the text of the button [see addition 3] . It turns out as follows:
import QtQuick 2.2 import QtQuick.Controls 1.1 import QtQuick.Controls.Styles 1.2 import "QMLs" ApplicationWindow { id: mainWindow objectName: "mainWindow" visible: true width: 640 height: 480 color: "#F0F0FF" Button { width: mainWindow.width / 2.5 height: mainWindow.height / 10 x: 0 y: mainWindow.height - height style: ButtonStyle { background: ButtonBackground {} label: ButtonLabel { text: "" } } } } All save and run:
So, we have a clickable button, let's add a click handler for it, which will output a message to the log. To do this, add a line inside the button:
onClicked: console.log("Button '' clicked") In the total:
import QtQuick 2.2 import QtQuick.Controls 1.1 import QtQuick.Controls.Styles 1.2 import "QMLs" ApplicationWindow { id: mainWindow objectName: "mainWindow" visible: true width: 640 height: 480 color: "#F0F0FF" Button { width: mainWindow.width / 2.5 height: mainWindow.height / 10 x: 0 y: mainWindow.height - height style: ButtonStyle { background: ButtonBackground {} label: ButtonLabel { text: "" } } onClicked: console.log("Button '' clicked") } } We start, we check. When you click on the button in the "Application Output" panel (at the very bottom of the Qt Creator window), a new line appears: "qml: Button 'Test' clicked":
At this point, we will complete the work with our button.
3.2.2. Create a text field
Open the "main.qml". Below the "Button" add:
Set the size, id will be needed to read the text from the field. We put the alignment in the center, indicate the placeholder.
We also add a simple regular expression for this input (the characters from 'a' to 'i' and from 'a' to 'z' in any case, no more than 16 characters in all).
Styles in the separate files will not be taken. Put a white rectangle on the background (background), set the colors for the input text and the placeholder. In the font, we customize the words with capital letters (font.capitalization = Font.Capitalize), bold and size (here we do not have access to the parent element, so we calculate the size relative to the height of the screen).
For "TextField", you can also add an inputMethodHints: field with a value, for example, Qt.ImhPreferNumbers. Depending on the value, different keypads for entry will be displayed (in the case of Qt.ImhPreferNumbers, a keyboard will appear for entering numbers [see Appendix 6] ). In this case, we will not add this field. There are also other useful parameters, for example, echoMode (you can set it to TextInput.Password to enter a password).
Separately, mention should be made of the expression inside Keys.onPressed. Here we are tracking the button press to complete the input, so that when you click on it, close the keyboard on Android devices. So, our "main.qml" finally looks like:
On the Android tablet and iPhone simulator, the current application looks like this:

To achieve logical completeness, let's also add a signature in which the greeting with our name will be displayed when you click on the button. After “TextField” in “main.qml” we add:
The caption will be located immediately below the text entry field (y: textField.height), for it we will also set the word wrap. Again, the entire "Text" can be put into a separate QML file for convenience, in this case we will not do this.
It remains to register the logic of pressing the button. We can register all the desired actions in the onClicked buttons field, but this time let's create a function for this. This is what “main.qml” will look like with the added function for the button:
As you can see, the text can be formatted (in this case tags) Save, run and check:
TextField { id: textField width: parent.width height: parent.height / 10 horizontalAlignment: Text.AlignHCenter placeholderText: " " validator: RegExpValidator { regExp: /[--a-zA-Z]{16}/ } style: TextFieldStyle { background: Rectangle {color: "white"} textColor: "#00AAAA" placeholderTextColor: "#00EEEE" font: font.capitalization = Font.Capitalize, font.bold = true, font.pixelSize = mainWindow.height / 25 } Keys.onPressed: { if (event.key == Qt.Key_Enter || event.key == Qt.Key_Return) { Qt.inputMethod.hide() event.accepted = true } } } Set the size, id will be needed to read the text from the field. We put the alignment in the center, indicate the placeholder.
We also add a simple regular expression for this input (the characters from 'a' to 'i' and from 'a' to 'z' in any case, no more than 16 characters in all).
Styles in the separate files will not be taken. Put a white rectangle on the background (background), set the colors for the input text and the placeholder. In the font, we customize the words with capital letters (font.capitalization = Font.Capitalize), bold and size (here we do not have access to the parent element, so we calculate the size relative to the height of the screen).
For "TextField", you can also add an inputMethodHints: field with a value, for example, Qt.ImhPreferNumbers. Depending on the value, different keypads for entry will be displayed (in the case of Qt.ImhPreferNumbers, a keyboard will appear for entering numbers [see Appendix 6] ). In this case, we will not add this field. There are also other useful parameters, for example, echoMode (you can set it to TextInput.Password to enter a password).
Separately, mention should be made of the expression inside Keys.onPressed. Here we are tracking the button press to complete the input, so that when you click on it, close the keyboard on Android devices. So, our "main.qml" finally looks like:
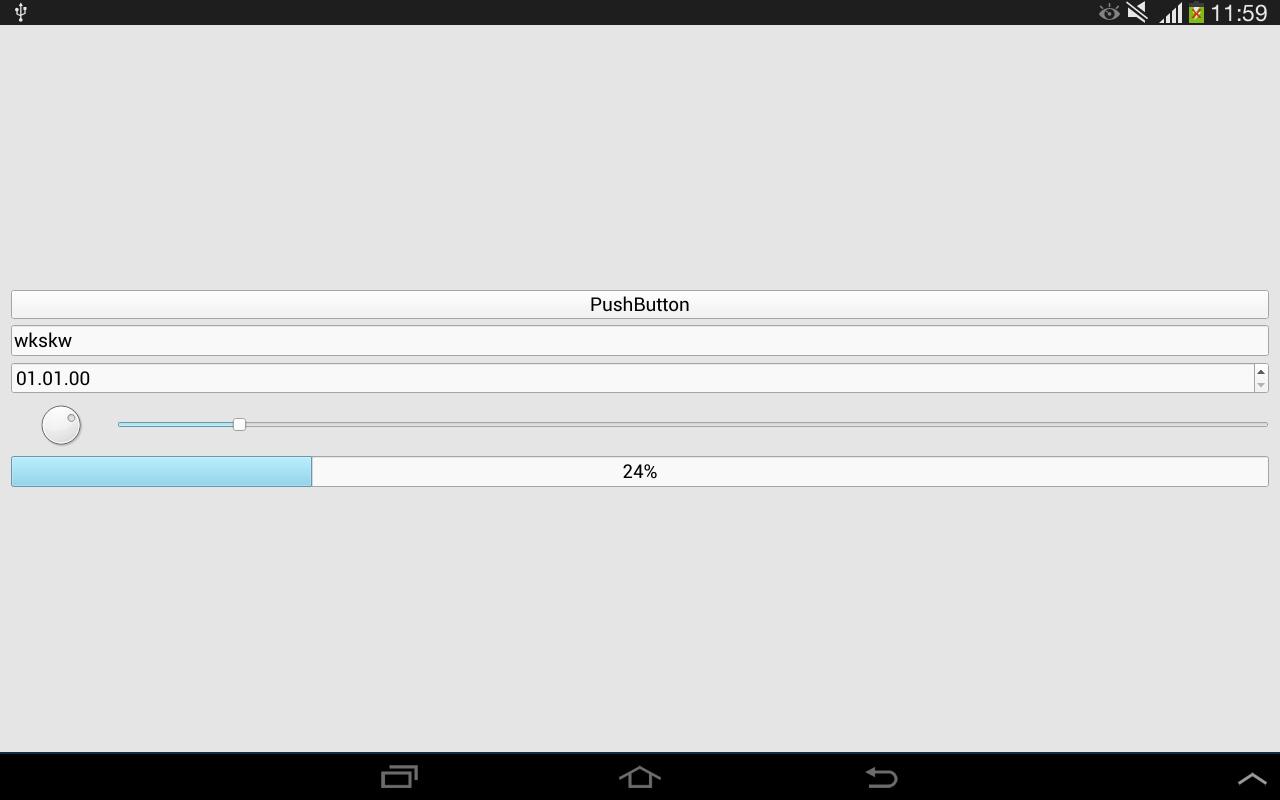
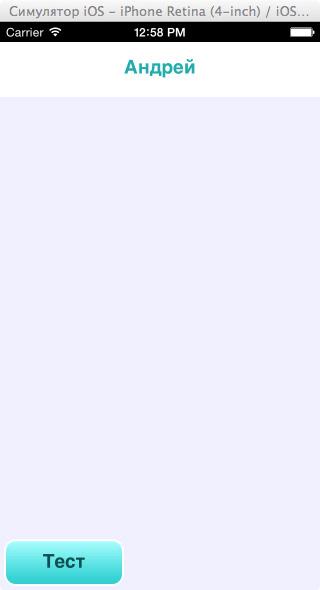
import QtQuick 2.2 import QtQuick.Controls 1.1 import QtQuick.Controls.Styles 1.2 import "QMLs" ApplicationWindow { id: mainWindow objectName: "mainWindow" visible: true width: 640 height: 480 color: "#F0F0FF" Button { width: mainWindow.width / 2.5 height: mainWindow.height / 10 x: 0 y: mainWindow.height - height style: ButtonStyle { background: ButtonBackground {} label: ButtonLabel { text: "" } } onClicked: console.log("Button '' clicked") } TextField { id: textField width: parent.width height: parent.height / 10 horizontalAlignment: Text.AlignHCenter placeholderText: " " validator: RegExpValidator { regExp: /[--a-zA-Z]{16}/ } style: TextFieldStyle { background: Rectangle {color: "white"} textColor: "#00AAAA" placeholderTextColor: "#00EEEE" font: font.capitalization = Font.Capitalize, font.bold = true, font.pixelSize = mainWindow.height / 25 } Keys.onPressed: { if (event.key == Qt.Key_Enter || event.key == Qt.Key_Return) { Qt.inputMethod.hide() event.accepted = true } } } } On the Android tablet and iPhone simulator, the current application looks like this:
To achieve logical completeness, let's also add a signature in which the greeting with our name will be displayed when you click on the button. After “TextField” in “main.qml” we add:
Text { id: text y: textField.height width: parent.width height: parent.height / 10 font.pixelSize: height / 2 horizontalAlignment: Text.AlignHCenter verticalAlignment: Text.AlignVCenter wrapMode: Text.WordWrap } The caption will be located immediately below the text entry field (y: textField.height), for it we will also set the word wrap. Again, the entire "Text" can be put into a separate QML file for convenience, in this case we will not do this.
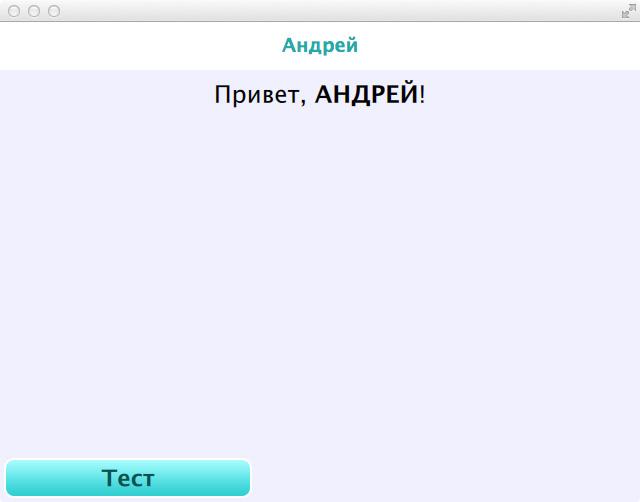
It remains to register the logic of pressing the button. We can register all the desired actions in the onClicked buttons field, but this time let's create a function for this. This is what “main.qml” will look like with the added function for the button:
import QtQuick 2.2 import QtQuick.Controls 1.1 import QtQuick.Controls.Styles 1.2 import "QMLs" ApplicationWindow { id: mainWindow objectName: "mainWindow" visible: true width: 640 height: 480 color: "#F0F0FF" Button { function hello() { if (textField.text != "") { text.text = ", <b>" + textField.text.toUpperCase() + "</b>!" } } width: mainWindow.width / 2.5 height: mainWindow.height / 10 x: 0 y: mainWindow.height - height style: ButtonStyle { background: ButtonBackground {} label: ButtonLabel { text: "" } } onClicked: hello() } TextField { id: textField width: parent.width height: parent.height / 10 horizontalAlignment: Text.AlignHCenter placeholderText: " " validator: RegExpValidator { regExp: /[--a-zA-Z]{16}/ } style: TextFieldStyle { background: Rectangle {color: "white"} textColor: "#00AAAA" placeholderTextColor: "#00EEEE" font: font.capitalization = Font.Capitalize, font.bold = true, font.pixelSize = mainWindow.height / 25 } Keys.onPressed: { if (event.key == Qt.Key_Enter || event.key == Qt.Key_Return) { Qt.inputMethod.hide() event.accepted = true } } } Text { id: text y: textField.height width: parent.width height: parent.height / 10 font.pixelSize: height / 2 horizontalAlignment: Text.AlignHCenter verticalAlignment: Text.AlignVCenter wrapMode: Text.WordWrap } } As you can see, the text can be formatted (in this case tags) Save, run and check:
3.2.3. We work with ListView
In this example, we will make two lists at once to show more features of the ListView. Add to "main.qml" below "Text":
We set identifiers and sizes of ListView. By itself, the ListView is transparent; we will not make a substrate for it.
The clip parameter is set to true: this needs to be done because otherwise, when scrolling through the list, items that become visible in the list crawl out of the bounds of the ListView.
The spacing parameter sets indents between list elements.
Next, model is essentially our data model. It is filled with the “ListModel” element, which contains several “ListElement”. “ListElement” is actually an element of our list, inside we can register the desired name-value pairs, in this case there will be only one pair.
The delegate parameter determines how each item in the list will look. With us it will be just a rectangle with the text inside. For the value of the text parameter, we specify the name parameter previously written in the model.
“MouseArea” is an area in which we can track mouse clicks or touch the screen. We fill it in by the size of the delegate. In the case of clicking, we output the index of the element to the log. Note that MouseArea also has useful onPressed fields.
and onReleased.
In general, the model prescribed in QML, we will not be needed in the future, because the backend will do the filling. However, it is convenient to make such stubs to customize the appearance of the list. It is also desirable for convenience to make clearance delegate in a separate QML-file. Well, and add that ListView has a lot of different parameters that you can try to tweak. But here we will not complicate anything else. Let's see what happened. Save, run:
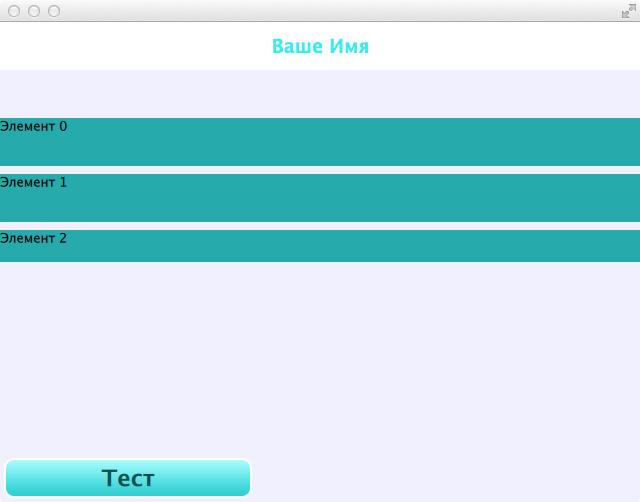
Let's try to click on the elements of the list and check the log, we should have lines like “qml: ListView el # 0 clicked!”.
Go to the second list. Add below the first list:
As models, we use links to returned images of maps. The delegate will be the image itself, the source of which (source) will be the reference specified in the model. You can also specify a local file as a source. For this you need:
- add an image to the project folder;
- in Qt Creator in the project tree, right-click on “qml.qrc” -> “Open in editor”;
- in the opened window “Add” -> “Add files” -> select the added image;
- in the “Image” of the QML file, specify as source the path to the image as follows: “qrc: / full_file_name”.
For “Image”, we also set fillMode so that the picture itself adapts to the required width / height dimensions while preserving the proportions.
The orientation parameters (set to horizontal orientation) and snapMode: ListView.SnapOneItem allow us together to achieve the effect that ListView becomes something like a ViewPager in Android.
Almost done. Now, in the project tree, open the file “Sample.pro” and add “network” to the line “QT + = qml quick widgets”, otherwise the connection to the network will not work:

Just in case, I post a listing of all the code “main.qml”:
We can run and see what happened:

In my opinion, working with ListView in QML is very simple and convenient, there are many possibilities for customization. With the help of ListView, you can also implement, for example, Spinners (pop-up lists), playing with the visibility (visible field) of the list.
IMPORTANT NOTE: for some reason, Habr replaces ¢ er in “map_url” with a cent symbol. Note that the request link must be & center = ... but without a space.
ListView { id: lvList objectName: "lvList" y: text.y + text.height width: parent.width height: parent.height * 0.3 clip: true spacing: 8 model: ListModel { ListElement { name: " 0" } ListElement { name: " 1" } ListElement { name: " 2" } } delegate: Rectangle { width: lvList.width height: lvList.height / 3 color: "#00AAAA" Text { text: name } MouseArea { anchors.fill: parent onClicked: console.log("ListView el#" + index + " clicked!") } } } We set identifiers and sizes of ListView. By itself, the ListView is transparent; we will not make a substrate for it.
The clip parameter is set to true: this needs to be done because otherwise, when scrolling through the list, items that become visible in the list crawl out of the bounds of the ListView.
The spacing parameter sets indents between list elements.
Next, model is essentially our data model. It is filled with the “ListModel” element, which contains several “ListElement”. “ListElement” is actually an element of our list, inside we can register the desired name-value pairs, in this case there will be only one pair.
The delegate parameter determines how each item in the list will look. With us it will be just a rectangle with the text inside. For the value of the text parameter, we specify the name parameter previously written in the model.
“MouseArea” is an area in which we can track mouse clicks or touch the screen. We fill it in by the size of the delegate. In the case of clicking, we output the index of the element to the log. Note that MouseArea also has useful onPressed fields.
and onReleased.
In general, the model prescribed in QML, we will not be needed in the future, because the backend will do the filling. However, it is convenient to make such stubs to customize the appearance of the list. It is also desirable for convenience to make clearance delegate in a separate QML-file. Well, and add that ListView has a lot of different parameters that you can try to tweak. But here we will not complicate anything else. Let's see what happened. Save, run:
Let's try to click on the elements of the list and check the log, we should have lines like “qml: ListView el # 0 clicked!”.
Go to the second list. Add below the first list:
ListView { id: lvPager y: lvList.y + lvList.height width: parent.width height: parent.height * 0.2 clip: true model: ListModel { ListElement { map_url: "http://maps.googleapis.com/maps/api/staticmap?size=640x320&scalse=2&sensor=false¢er=Moscow" } ListElement { map_url: "http://maps.googleapis.com/maps/api/staticmap?size=640x320&scalse=2&sensor=false¢er=London" } ListElement { map_url: "http://maps.googleapis.com/maps/api/staticmap?size=640x320&scalse=2&sensor=false¢er=Rio" } } delegate: Image { width: lvPager.width height: lvPager.height source: map_url fillMode: Image.PreserveAspectFit } orientation: ListView.Horizontal snapMode: ListView.SnapOneItem } As models, we use links to returned images of maps. The delegate will be the image itself, the source of which (source) will be the reference specified in the model. You can also specify a local file as a source. For this you need:
- add an image to the project folder;
- in Qt Creator in the project tree, right-click on “qml.qrc” -> “Open in editor”;
- in the opened window “Add” -> “Add files” -> select the added image;
- in the “Image” of the QML file, specify as source the path to the image as follows: “qrc: / full_file_name”.
For “Image”, we also set fillMode so that the picture itself adapts to the required width / height dimensions while preserving the proportions.
The orientation parameters (set to horizontal orientation) and snapMode: ListView.SnapOneItem allow us together to achieve the effect that ListView becomes something like a ViewPager in Android.
Almost done. Now, in the project tree, open the file “Sample.pro” and add “network” to the line “QT + = qml quick widgets”, otherwise the connection to the network will not work:
Just in case, I post a listing of all the code “main.qml”:
import QtQuick 2.2 import QtQuick.Controls 1.1 import QtQuick.Controls.Styles 1.2 import "QMLs" ApplicationWindow { id: mainWindow objectName: "mainWindow" visible: true width: 640 height: 480 color: "#F0F0FF" Button { function hello() { if (textField.text != "") { text.text = ", <b>" + textField.text.toUpperCase() + "</b>!" } } width: mainWindow.width / 2.5 height: mainWindow.height / 10 x: 0 y: mainWindow.height - height style: ButtonStyle { background: ButtonBackground {} label: ButtonLabel { text: "" } } onClicked: hello() } TextField { id: textField width: parent.width height: parent.height / 10 horizontalAlignment: Text.AlignHCenter placeholderText: " " validator: RegExpValidator { regExp: /[--a-zA-Z]{16}/ } style: TextFieldStyle { background: Rectangle {color: "white"} textColor: "#00AAAA" placeholderTextColor: "#00EEEE" font: font.capitalization = Font.Capitalize, font.bold = true, font.pixelSize = mainWindow.height / 25 } Keys.onPressed: { if (event.key == Qt.Key_Enter || event.key == Qt.Key_Return) { Qt.inputMethod.hide() event.accepted = true } } } Text { id: text y: textField.height width: parent.width height: parent.height / 10 font.pixelSize: height / 2 horizontalAlignment: Text.AlignHCenter verticalAlignment: Text.AlignVCenter wrapMode: Text.WordWrap } ListView { id: lvList objectName: "lvList" y: text.y + text.height width: parent.width height: parent.height * 0.3 clip: true spacing: 8 model: ListModel { ListElement { name: " 0" } ListElement { name: " 1" } ListElement { name: " 2" } } delegate: Rectangle { width: lvList.width height: lvList.height / 3 color: "#00AAAA" Text { text: name } MouseArea { anchors.fill: parent onClicked: console.log("ListView el#" + index + " clicked!") } } } ListView { id: lvPager y: lvList.y + lvList.height width: parent.width height: parent.height * 0.2 clip: true model: ListModel { ListElement { map_url: "http://maps.googleapis.com/maps/api/staticmap?size=640x320&scalse=2&sensor=false¢er=Moscow" } ListElement { map_url: "http://maps.googleapis.com/maps/api/staticmap?size=640x320&scalse=2&sensor=false¢er=London" } ListElement { map_url: "http://maps.googleapis.com/maps/api/staticmap?size=640x320&scalse=2&sensor=false¢er=Rio" } } delegate: Image { width: lvPager.width height: lvPager.height source: map_url fillMode: Image.PreserveAspectFit } orientation: ListView.Horizontal snapMode: ListView.SnapOneItem } } We can run and see what happened:
In my opinion, working with ListView in QML is very simple and convenient, there are many possibilities for customization. With the help of ListView, you can also implement, for example, Spinners (pop-up lists), playing with the visibility (visible field) of the list.
IMPORTANT NOTE: for some reason, Habr replaces ¢ er in “map_url” with a cent symbol. Note that the request link must be & center = ... but without a space.
3.2.4. Work with Loader and some animation
“Loader” is an entity that allows multi-windowing in QML. In essence, “Loader” is just some container that has a QML file as a source (in theory, you can even locate this file somewhere on an external server). It is very important here, if we refer to some element inside the Loader from QML or C ++ code, it is necessary that the container containing this element is currently loaded into the Loader, otherwise the application will crash. It is logical that we cannot access an element that does not exist at the moment, much less ask Qt to change some of its properties. You can solve the problem by keeping the boolean-flag about the activity of a specific container or at a dangerous moment (for example, when connecting to the server) to prohibit switching the contents of the loader (you can put enabled: false on the navigation buttons).
So, we will create two QML files in the QMLs folder of our project. Let's call them "Loader1.qml" and "Loader2.qml". "Loader1.qml":
Just a green rectangle. Now "Loader2.qml":
Be sure to specify focus: true. Otherwise, the Keys.onPressed section will not work.
"SequentialAnimation" - a consistent set of animations. Specify the parameter running: true, so that the animation will immediately work, loops (number of repetitions) set to infinity.
Inside SequentialAnimation has two PropertyAnimations. They are able to change any parameter (property) of the target element (target) to the desired value (to) for a certain time (duration).
I note that after stopping the animation (if we set running: false), you need to “manually” return all changed target parameters to the original ones.
It remains to create the Loader itself inside "main.qml":
Be sure to specify focus: true, so that the internal element (source) tracks button presses.
A small nuance: after working with a text field, the loader loses focus. , Keys.onPressed :
«main.qml», :
«main.qml»:
url (& center) , . , :


«Loader» . Android- «Back», .
UI QML C++ .
So, we will create two QML files in the QMLs folder of our project. Let's call them "Loader1.qml" and "Loader2.qml". "Loader1.qml":
import QtQuick 2.2 Rectangle { anchors.fill: parent color: "green" opacity: 0.2 } Just a green rectangle. Now "Loader2.qml":
import QtQuick 2.2 Rectangle { id: rect anchors.fill: parent focus: true color: "blue" opacity: 0.2 SequentialAnimation { running: true loops: SequentialAnimation.Infinite PropertyAnimation { target: rect; property: "opacity"; to: 0; duration: 500 } PropertyAnimation { target: rect; property: "opacity"; to: 0.2; duration: 500 } } Keys.onPressed: { if (event.key == Qt.Key_Back || event.key == Qt.Key_Escape) { loader.source = "qrc:/QMLs/Loader1.qml" event.accepted = true } } } Be sure to specify focus: true. Otherwise, the Keys.onPressed section will not work.
"SequentialAnimation" - a consistent set of animations. Specify the parameter running: true, so that the animation will immediately work, loops (number of repetitions) set to infinity.
Inside SequentialAnimation has two PropertyAnimations. They are able to change any parameter (property) of the target element (target) to the desired value (to) for a certain time (duration).
I note that after stopping the animation (if we set running: false), you need to “manually” return all changed target parameters to the original ones.
It remains to create the Loader itself inside "main.qml":
Loader { id: loader y: lvPager.y + lvPager.height width: parent.width height: parent.height * 0.2 focus: true source: "qrc:/QMLs/Loader1.qml" } Be sure to specify focus: true, so that the internal element (source) tracks button presses.
A small nuance: after working with a text field, the loader loses focus. , Keys.onPressed :
Keys.onPressed: { if (event.key == Qt.Key_Enter || event.key == Qt.Key_Return || event.key == Qt.Key_Back) { Qt.inputMethod.hide() loader.forceActiveFocus() event.accepted = true } } «main.qml», :
Button { width: mainWindow.width / 4.5 height: mainWindow.height / 10 x: mainWindow.width / 2 y: mainWindow.height - height style: ButtonStyle { background: ButtonBackground {} label: ButtonLabel { text: "Loader" } } onClicked: loader.setSource("qrc:/QMLs/Loader2.qml") } «main.qml»:
import QtQuick 2.2 import QtQuick.Controls 1.1 import QtQuick.Controls.Styles 1.2 import "QMLs" ApplicationWindow { id: mainWindow objectName: "mainWindow" visible: true width: 640 height: 480 color: "#F0F0FF" Button { function hello() { if (textField.text != "") { text.text = ", <b>" + textField.text.toUpperCase() + "</b>!" } } width: mainWindow.width / 2.5 height: mainWindow.height / 10 x: 0 y: mainWindow.height - height style: ButtonStyle { background: ButtonBackground {} label: ButtonLabel { text: "" } } onClicked: hello() } TextField { id: textField width: parent.width height: parent.height / 10 horizontalAlignment: Text.AlignHCenter placeholderText: " " validator: RegExpValidator { regExp: /[--a-zA-Z]{16}/ } style: TextFieldStyle { background: Rectangle {color: "white"} textColor: "#00AAAA" placeholderTextColor: "#00EEEE" font: font.capitalization = Font.Capitalize, font.bold = true, font.pixelSize = mainWindow.height / 25 } Keys.onPressed: { if (event.key == Qt.Key_Enter || event.key == Qt.Key_Return || event.key == Qt.Key_Back) { Qt.inputMethod.hide() loader.forceActiveFocus() event.accepted = true } } } Text { id: text y: textField.height width: parent.width height: parent.height / 10 font.pixelSize: height / 2 horizontalAlignment: Text.AlignHCenter verticalAlignment: Text.AlignVCenter wrapMode: Text.WordWrap } ListView { id: lvList objectName: "lvList" y: text.y + text.height width: parent.width height: parent.height * 0.3 clip: true spacing: 8 model: ListModel { ListElement { name: " 0" } ListElement { name: " 1" } ListElement { name: " 2" } } delegate: Rectangle { width: lvList.width height: lvList.height / 3 color: "#00AAAA" Text { text: name } MouseArea { anchors.fill: parent onClicked: console.log("ListView el#" + index + " clicked!") } } } ListView { id: lvPager y: lvList.y + lvList.height width: parent.width height: parent.height * 0.2 clip: true model: ListModel { ListElement { map_url: "http://maps.googleapis.com/maps/api/staticmap?size=640x320&scalse=2&sensor=false¢er=Moscow" } ListElement { map_url: "http://maps.googleapis.com/maps/api/staticmap?size=640x320&scalse=2&sensor=false¢er=London" } ListElement { map_url: "http://maps.googleapis.com/maps/api/staticmap?size=640x320&scalse=2&sensor=false¢er=Rio" } } delegate: Image { width: lvPager.width height: lvPager.height source: map_url fillMode: Image.PreserveAspectFit } orientation: ListView.Horizontal snapMode: ListView.SnapOneItem } Loader { id: loader y: lvPager.y + lvPager.height width: parent.width height: parent.height * 0.2 focus: true source: "qrc:/QMLs/Loader1.qml" } Button { width: mainWindow.width / 4.5 height: mainWindow.height / 10 x: mainWindow.width / 2 y: mainWindow.height - height style: ButtonStyle { background: ButtonBackground {} label: ButtonLabel { text: "Loader" } } onClicked: loader.setSource("qrc:/QMLs/Loader2.qml") } } url (& center) , . , :
«Loader» . Android- «Back», .
UI QML C++ .
3.3.
, QML- C++ , QML C++ , GET/POST- JSON-.
-, // , .
«qt_api», «test.php». File contents:
JSON, «test.php» (http://localhost/qt_api/test.php) .
C++ Qt Creator: «Sample» -> « …» -> «C++» / « C++». «Backend», «QQuickItem» [. 4] , :

«», «». «backend.h». :
.
. ( explicit). , , . Qt . , ( , , ), , Qt .
makeRequest. QML-, Q_INVOKABLE. id ( ).
(private) . QQmlApplicationEngine QML-. QObject QML [. 5] . QNetworkAccessManager (- DefaultHttpClient Android). , QML.
. , -. / — Qt, , , . :
:
, ( connect()) . , , , - -. , namRequest. (slotRequestFinished(QNetworkReply*)) — - QNetworkAccessManager: , namRequest finished(QNetworkReply*), , (QNetworkReply).
«backend.cpp», :
, . : .
QML- QQmlApplicationEngine.
QML:
objectName, QML. lvList:
«backend» Backend. ( Q_INVOKABLE-) QML:
«color_example» QML:
namRequest:
finished(QNetworkReply*) slotRequestFinished(QNetworkReply*):
connect 4 :
— , ;
— ;
— , ( );
— , .
makeRequest. , :
QML ( ). QString:
GET- , :
int- ( makeRequest) QString. QString::number().
(QString QByteArray):
QNetworkRequest QNetworkAccessManager GET-:
POST- , . , POST-, , CodeIgniter', «Disallowed Characters Error», .
, , .
, , , :
, . QJsonDocument JSON-. QJsonDocument QJsonDocument::fromJson(reply->readAll()), : reply->readAll(). , QNetworkReply, , ( - ).
JSON- QJsonDocument:
QJsonValue «done» JSON-:
QJsonValue — JSON-, ( , , ..). QJsonValue . , QJsonValue JSON- QJsonValue ( «number») . , , QJsonValue double. «number» (3 ).
«boolean» «done» .
JSON- Qt: JSON- , ( Android, , JSONException). (, ), .
, Qt «» JSON-, , , JSON' .
QML JSON-, .
JSON- «list» QJsonArray:
«clear» «lvList» ( «clear» ListView QML- ):
«lvList» JSON- — -, , «name» (, ListView?):
«append» «lvList» ( ):
QMetaObject::invokeMethod() :
— — , ;
— — , «lvList»;
— — , «append», «map».
:
:
. «main.cpp»:
«Backend», .
«clear», «append» ListView («lvList») «main.qml»:
C++ «append» ( ), .
:
, makeRequest() Backend:
«btnRequest», , C++ ,
— - QML-: «property», , . : id_._.
. -, :
, «color_example» «Backend»? -, :
, , , ( property «_id», ).
«main.qml»:
, . «Request» ( iPhone ) :

:
localhost/qt_api/test?id=3
123.000
json true
That's right. :). (https://www.dropbox.com/s/to9kk0l71d6ma4h/Sample.zip).
, Qt:
, . , — Android . — , ApplicationWindow [. 7] . — «Backend» QML :
QML- «ApplicationWindow» :
:). , . Android ( , , Qt, , ), . «» -> «Android» -> «».
-, // , .
«qt_api», «test.php». File contents:
<? echo json_encode(json_decode( '{ "done" : { "boolean" : true, "number" : 123, "list" : [ "field1", "field2", "field3", "field4", "field5" ] } }' )); ?> JSON, «test.php» (http://localhost/qt_api/test.php) .
C++ Qt Creator: «Sample» -> « …» -> «C++» / « C++». «Backend», «QQuickItem» [. 4] , :
«», «». «backend.h». :
#ifndef BACKEND_H #define BACKEND_H #include <QQmlApplicationEngine> #include <QQuickItem> #include <QtQuick> #include <QNetworkAccessManager> class Backend : public QQuickItem { Q_OBJECT public: explicit Backend(QQuickItem *parent = 0); Q_INVOKABLE void makeRequest(int id); private: QQmlApplicationEngine engine; QObject * mainWindow; QObject * lvList; QObject * btnRequest; QNetworkAccessManager * namRequest; static const QString color_example; signals: private slots: void slotRequestFinished(QNetworkReply*); }; #endif // BACKEND_H .
. ( explicit). , , . Qt . , ( , , ), , Qt .
makeRequest. QML-, Q_INVOKABLE. id ( ).
(private) . QQmlApplicationEngine QML-. QObject QML [. 5] . QNetworkAccessManager (- DefaultHttpClient Android). , QML.
. , -. / — Qt, , , . :
void mySignal(); :
emit mySignal(); , ( connect()) . , , , - -. , namRequest. (slotRequestFinished(QNetworkReply*)) — - QNetworkAccessManager: , namRequest finished(QNetworkReply*), , (QNetworkReply).
«backend.cpp», :
#include "backend.h" const QString Backend::color_example = "#000000"; Backend::Backend(QQuickItem *parent) : QQuickItem(parent) { engine.rootContext()->setContextProperty("color_example", color_example); engine.load(QUrl(QStringLiteral("qrc:///main.qml"))); mainWindow = engine.rootObjects().value(0); lvList = mainWindow->findChild<QObject*>("lvList"); btnRequest = mainWindow->findChild<QObject*>("btnRequest"); engine.rootContext()->setContextProperty("backend", this); namRequest = new QNetworkAccessManager(this); connect(namRequest, SIGNAL(finished(QNetworkReply*)), this, SLOT(slotRequestFinished(QNetworkReply*))); } void Backend::makeRequest(int id) { btnRequest->setProperty("enabled", "false"); // btnRequest->property("enabled"); QString prepareRequest("http://localhost/qt_api/test"); // HttpGet prepareRequest.append("?id="); prepareRequest.append(QString::number(id)); qDebug(prepareRequest.toUtf8()); QNetworkRequest request(QUrl(prepareRequest.toUtf8())); namRequest->get(request); // HttpPost /*QNetworkRequest request(QUrl(prepareRequest.toUtf8())); request.setHeader(QNetworkRequest::ContentTypeHeader, "application/x-www-form-urlencoded"); QString params("id="); params.append(QString::number(id)); qDebug(params.toUtf8()); namRequest->post(request, QByteArray(params.toUtf8()));*/ } void Backend::slotRequestFinished(QNetworkReply * reply) { if (reply->error() != QNetworkReply::NoError) { qDebug(reply->errorString().toUtf8()); } else { QJsonDocument jsonDoc = QJsonDocument::fromJson(reply->readAll()); QJsonObject jsonObj; QJsonValue jsonVal; QJsonArray jsonArr; jsonObj = jsonDoc.object(); jsonVal = jsonObj.value("done"); if (!jsonVal.isNull() && jsonVal.isObject()) { jsonObj = jsonVal.toObject(); jsonVal = jsonObj.value("number"); if (!jsonVal.isNull() && jsonVal.isDouble()) { qDebug(QString::number(jsonVal.toDouble(), 'f', 3).toUtf8()); } } if (jsonDoc.object().value("done").toObject().value("boolean").toBool()) { qDebug("json true"); } else { qDebug("json false"); } jsonArr = jsonDoc.object().value("done").toObject().value("list").toArray(); QMetaObject::invokeMethod(lvList, "clear"); for (int i=0; i<jsonArr.size(); i++) { QVariantMap map; map.insert("name", jsonArr.at(i).toString()); QMetaObject::invokeMethod(lvList, "append", Q_ARG(QVariant, QVariant::fromValue(map))); } } btnRequest->setProperty("enabled", "true"); reply->deleteLater(); } , . : .
QML- QQmlApplicationEngine.
QML:
mainWindow = engine.rootObjects().value(0); objectName, QML. lvList:
lvList = mainWindow->findChild<QObject*>("lvList"); «backend» Backend. ( Q_INVOKABLE-) QML:
engine.rootContext()->setContextProperty("backend", this); «color_example» QML:
engine.rootContext()->setContextProperty("color_example", color_example); namRequest:
namRequest = new QNetworkAccessManager(this); finished(QNetworkReply*) slotRequestFinished(QNetworkReply*):
connect(namRequest, SIGNAL(finished(QNetworkReply*)), this, SLOT(slotRequestFinished(QNetworkReply*))); connect 4 :
— , ;
— ;
— , ( );
— , .
makeRequest. , :
btnRequest->setProperty("enabled", "false"); QML ( ). QString:
QString prepareRequest(«http://localhost/qt_api/test"); GET- , :
prepareRequest.append("?id="); prepareRequest.append(QString::number(id)); int- ( makeRequest) QString. QString::number().
(QString QByteArray):
qDebug(prepareRequest.toUtf8()); QNetworkRequest QNetworkAccessManager GET-:
QNetworkRequest request(QUrl(prepareRequest.toUtf8())); namRequest->get(request); POST- , . , POST-, , CodeIgniter', «Disallowed Characters Error», .
, , .
, , , :
if (reply->error() != QNetworkReply::NoError) { qDebug(reply->errorString().toUtf8()); } , . QJsonDocument JSON-. QJsonDocument QJsonDocument::fromJson(reply->readAll()), : reply->readAll(). , QNetworkReply, , ( - ).
JSON- QJsonDocument:
jsonObj = jsonDoc.object(); QJsonValue «done» JSON-:
jsonVal = jsonObj.value("done"); QJsonValue — JSON-, ( , , ..). QJsonValue . , QJsonValue JSON- QJsonValue ( «number») . , , QJsonValue double. «number» (3 ).
«boolean» «done» .
JSON- Qt: JSON- , ( Android, , JSONException). (, ), .
, Qt «» JSON-, , , JSON' .
QML JSON-, .
JSON- «list» QJsonArray:
jsonArr = jsonDoc.object().value("done").toObject().value("list").toArray(); «clear» «lvList» ( «clear» ListView QML- ):
QMetaObject::invokeMethod(lvList, "clear"); «lvList» JSON- — -, , «name» (, ListView?):
QVariantMap map; map.insert("name", jsonArr.at(i).toString()); «append» «lvList» ( ):
QMetaObject::invokeMethod(lvList, "append", Q_ARG(QVariant, QVariant::fromValue(map))); QMetaObject::invokeMethod() :
— — , ;
— — , «lvList»;
— — , «append», «map».
:
btnRequest->setProperty("enabled", «true"); :
reply->deleteLater(); . «main.cpp»:
#include <QApplication> #include "backend.h" int main(int argc, char *argv[]) { QApplication app(argc, argv); new Backend(); return app.exec(); } «Backend», .
«clear», «append» ListView («lvList») «main.qml»:
function clear() { lvList.model.clear() } function append(newElement) { lvList.model.append(newElement) } C++ «append» ( ), .
:
model: ListModel { //ListElement { name: " 0" } //ListElement { name: " 1" } //ListElement { name: " 2" } } , makeRequest() Backend:
Button { objectName: "btnRequest" property int _id: 3 width: mainWindow.width / 4.5 height: mainWindow.height / 10 x: mainWindow.width - width y: mainWindow.height - height style: ButtonStyle { background: ButtonBackground { border.color: color_example } label: ButtonLabel { text: "Request" } } onClicked: backend.makeRequest(_id) } «btnRequest», , C++ ,
property int _id: 3 — - QML-: «property», , . : id_._.
. -, :
background: ButtonBackground { border.color: color_example } , «color_example» «Backend»? -, :
onClicked: backend.makeRequest(_id) , , , ( property «_id», ).
«main.qml»:
import QtQuick 2.2 import QtQuick.Controls 1.1 import QtQuick.Controls.Styles 1.2 import "QMLs" ApplicationWindow { id: mainWindow objectName: "mainWindow" visible: true width: 640 height: 480 color: "#F0F0FF" Button { function hello() { if (textField.text != "") { text.text = ", <b>" + textField.text.toUpperCase() + "</b>!" } } width: mainWindow.width / 2.5 height: mainWindow.height / 10 x: 0 y: mainWindow.height - height style: ButtonStyle { background: ButtonBackground {} label: ButtonLabel { text: "" } } onClicked: hello() } TextField { id: textField width: parent.width height: parent.height / 10 horizontalAlignment: Text.AlignHCenter placeholderText: " " validator: RegExpValidator { regExp: /[--a-zA-Z]{16}/ } style: TextFieldStyle { background: Rectangle {color: "white"} textColor: "#00AAAA" placeholderTextColor: "#00EEEE" font: font.capitalization = Font.Capitalize, font.bold = true, font.pixelSize = mainWindow.height / 25 } Keys.onPressed: { if (event.key == Qt.Key_Enter || event.key == Qt.Key_Return || event.key == Qt.Key_Back) { Qt.inputMethod.hide() loader.forceActiveFocus() event.accepted = true } } } Text { id: text y: textField.height width: parent.width height: parent.height / 10 font.pixelSize: height / 2 horizontalAlignment: Text.AlignHCenter verticalAlignment: Text.AlignVCenter wrapMode: Text.WordWrap } ListView { id: lvList objectName: "lvList" y: text.y + text.height width: parent.width height: parent.height * 0.3 clip: true spacing: 8 model: ListModel { //ListElement { name: " 0" } //ListElement { name: " 1" } //ListElement { name: " 2" } } delegate: Rectangle { width: lvList.width height: lvList.height / 3 color: "#00AAAA" Text { text: name } MouseArea { anchors.fill: parent onClicked: console.log("ListView el#" + index + " clicked!") } } function clear() { lvList.model.clear() } function append(newElement) { lvList.model.append(newElement) } } ListView { id: lvPager y: lvList.y + lvList.height width: parent.width height: parent.height * 0.2 clip: true model: ListModel { ListElement { map_url: "http://maps.googleapis.com/maps/api/staticmap?size=640x320&scalse=2&sensor=false¢er=Moscow" } ListElement { map_url: "http://maps.googleapis.com/maps/api/staticmap?size=640x320&scalse=2&sensor=false¢er=London" } ListElement { map_url: "http://maps.googleapis.com/maps/api/staticmap?size=640x320&scalse=2&sensor=false¢er=Rio" } } delegate: Image { width: lvPager.width height: lvPager.height source: map_url fillMode: Image.PreserveAspectFit } orientation: ListView.Horizontal snapMode: ListView.SnapOneItem } Loader { id: loader y: lvPager.y + lvPager.height width: parent.width height: parent.height * 0.2 focus: true source: "qrc:/QMLs/Loader1.qml" } Button { width: mainWindow.width / 4.5 height: mainWindow.height / 10 x: mainWindow.width / 2 y: mainWindow.height - height style: ButtonStyle { background: ButtonBackground {} label: ButtonLabel { text: "Loader" } } onClicked: loader.setSource("qrc:/QMLs/Loader2.qml") } Button { objectName: "btnRequest" property int _id: 3 width: mainWindow.width / 4.5 height: mainWindow.height / 10 x: mainWindow.width - width y: mainWindow.height - height style: ButtonStyle { background: ButtonBackground { border.color: color_example } label: ButtonLabel { text: "Request" } } onClicked: backend.makeRequest(_id) } } , . «Request» ( iPhone ) :
:
localhost/qt_api/test?id=3
123.000
json true
That's right. :). (https://www.dropbox.com/s/to9kk0l71d6ma4h/Sample.zip).
, Qt:
// QSettings, , QSettings settings("settings.ini", QSettings::IniFormat); // , QString stringToSave; // , QDate QDate date = QDate::currentDate(); // stringToSave = date.toString("ddd-dd-MM-yyyy"); // id QUuid QUuid uniq_id = QUuid::createUuid(); // id stringToSave.append(" id="); stringToSave.append(uniq_id.toByteArray()); // settings.setValue("value1", stringToSave); settings.sync(); // qDebug(settings.value("value1").toString().toUtf8()); , . , — Android . — , ApplicationWindow [. 7] . — «Backend» QML :
engine.rootContext()->setContextProperty("screen_width", this->width()); engine.rootContext()->setContextProperty("screen_height", this->height()); QML- «ApplicationWindow» :
ApplicationWindow { . . . width: screen_width height: screen_height color: "#F0F0FF" . . . :). , . Android ( , , Qt, , ), . «» -> «Android» -> «».
4.
, , . Qt, , . , , - . — .
, , , - , .
, , — Qt , QtWebEngine (, , WebView ), BLE — qt-project.org/wiki/New-Features-in-Qt-5.4 .
Qt , . , Qt .
, , !
, , , - , .
, , — Qt , QtWebEngine (, , WebView ), BLE — qt-project.org/wiki/New-Features-in-Qt-5.4 .
Qt , . , Qt .
, , !
1. UI , .. «anchors». , , :
2. , -, property, -, / UI-, .. Screen.primaryOrientation ( QtQuick.Window 2.0).
3. ( «text:»), . , .
4. C++ , QObject. QQuickItem .
5. C++ QML ( UI- ). :
— :
— - :
— QML «Connections» «ApplicationWindow», C++:
«target» — ContextProperty, , «onTestSignal:» — emit' «testSignal()».
6. «inputMethodHints» «Qt.ImhDialableCharactersOnly», .. «Qt.ImhPreferNumbers» .
7. UI «» Android QML ( ApplicationWindow) Screen.desktopAvailableWidth/Screen.desktopAvailableHeight ( QtQuick.Window 2.0).
8. :
anchors.bottom: some_element_id.top 2. , -, property, -, / UI-, .. Screen.primaryOrientation ( QtQuick.Window 2.0).
3. ( «text:»), . , .
4. C++ , QObject. QQuickItem .
5. C++ QML ( UI- ). :
— :
public: signals: void testSignal(); — - :
emit testSignal(); — QML «Connections» «ApplicationWindow», C++:
Connections{ target: backend; onTestSignal: console.log("emited!") } «target» — ContextProperty, , «onTestSignal:» — emit' «testSignal()».
6. «inputMethodHints» «Qt.ImhDialableCharactersOnly», .. «Qt.ImhPreferNumbers» .
7. UI «» Android QML ( ApplicationWindow) Screen.desktopAvailableWidth/Screen.desktopAvailableHeight ( QtQuick.Window 2.0).
8. :
border { width: 2 color: "#FFFFFF" } Source: https://habr.com/ru/post/231143/
All Articles