Flask Mega-Tutorial, Part 9: Pagination
This is the ninth article in the series, where I describe my experience of writing a Python web application using the Flask mic framework.
The purpose of this guide is to develop a fairly functional microblog application, which I decided to call
In the previous article, we made all the necessary changes to the database to support the "subscribers" paradigm, in which users can track the posts of other users.
Today, based on what we did last time, we will bring our application to mind, so that it receives and delivers real content for our users. Today we say goodbye to the last of our fake objects!
Let's start with something simple. The homepage should have a custom form for new posts.
First we define a single field form object
Next, we will add the form to the templates
Nothing extraordinary, as you can see. We simply add another form, just as we did before.
And finally, the view function that links everything together
Let's take a look at the changes we made in this function, step by step:
And finally, before we continue. Please note that before writing a new post in the database, we do this:
We can easily skip this redirect and move on to rendering. Perhaps it will even be more effective. Because everything that does this redirect, in fact, it returns us to the same function.
So why redirect? Consider what happens when a user writes a post to a blog, publishes it and presses the Refresh button. What does the Refresh command do? The browser re-sends the previous request.
Without a redirect, the last one was a POST request that sent the form, so the “Refresh” action will re-send this request, with the result that we get a second post that is identical to the first one. This is bad.
But with a redirect, we will force the browser to issue another request after submitting the form. This is a simple GET request, and now the Refresh button will simply load the page once more, instead of re-sending the form.
This simple trick allows you to avoid inserting duplicate messages if the user accidentally refreshes the page after posting.
We turn to the most interesting. We are going to pull out posts from the database and display them.
If you remember a few articles back, we made a couple of fake posts and we showed them on our main page for a long time. These fake objects were created explicitly in a Python list view function:
But in the last article, we created a query that allows us to receive all the messages from people that the user has signed up for, so we can simply replace the above lines
Now, when you launch the app, you will see posts from the database!
The
Now you can play with our application. Do not be shy. You can create multiple users, subscribe them to other users, and finally publish several messages to see how each user sees their feed.
Our application looks better than ever, but there is a problem. We shows all posts on the home page. What happens if a user is subscribed to several thousand people? Or a million? As you can imagine, sampling and processing such a large list will be extremely inefficient.
Instead, we will show a potentially large number of posts paginated.
Flask-SQLAlchemy comes with very good pagination support. If, for example, we want to get the first three posts from tracked users, we can do this:
The
The
Let's think about how we can implement pagination in our index () view function. We can start by adding a configuration item to our application that determines how many items on the page we will show.
It is a good idea to keep the global settings of the application, which may affect the behavior, in one place.
In the final application, of course, we will use a number greater than 3, but for testing it is more convenient to work with a small amount.
Next, let's decide now what the URL will look like with the page request. We have seen before that Flask allows you to take arguments in routes, so that we can add a suffix that points to the page you need:
This URL format can be easily implemented using the additional route in our view
Our new route pulls the argument with the page number and declares it as an integer. We also need to add this argument to the
Now that we have a page number, we can easily connect it to our
Notice how easy the changes go through and how little the code changes. We try to write every part of the application, not trying to guess how the other parts work, which allows us to build modular and reliable applications that are easy to test.
Now you can experience pagination by entering URLs with different line numbers into the address bar of the browser. Make sure that there are more than three posts that you see on the page.
Now we need to add links through which the user can move to the next / previous page, and fortunately for us Flask-SQLAlchemy will do most of the work.
We are going to start by making small changes to the view function. In our current version we use pagination as follows:
By doing this, we only save the elements of the Pagination object returned by the paginate method. But this object provides several very useful features, so we will keep the entire object
To copy this change, we need to change the template
What the Paginate object in the template gives us. Here are the object methods we will use:
With their help, we can do the following
Now we have two links. First we will show the link "Newer posts", which will send us to the previous page, to new posts. On the other hand, “Older posts” will send us to the next page, to older posts.
But when we are on the first page, we don’t need a link to the previous page. Such a case is easy to track using the posts.has_prev method, which returns False. In this case, we show the link text, but without the link itself. The link is not the next page is processed in the same way.
Earlier, in the article in which we added an avatar, we will define a subpattern with the HTML code for rendering a single post. We made this template to get rid of code duplication if we want to render posts on different pages.
It is time to implement this sub-template on the main page. It will be as simple as most things we do today
Amazing right? We simply replaced the old rendering code with the include of our template. This way we get a better version of rendering, with the user's avatar.
Here is a screenshot of the main page in the current state:
Now we are done with the main page. We also included messages in the user profile, but not all, but only the owner of the profile. To be consistent, we need to change the profile page to fit the main page.
Changes are similar to those we made on the main page. Here is a brief list of what we need to do:
These are the presentation function updates
Changes in the template are also quite simple
Below I post the updated version of the
Download microblog-0.9.zip.
As always, there is no database, you have to create it yourself. If you follow this series of articles, you know how to do it. If not, go back to the database article to find out.
As always, I thank you for following me. I hope to see you in the next article.
Miguel
The purpose of this guide is to develop a fairly functional microblog application, which I decided to call
microblog. in the absence of originality microblog.Content
Content
')
Part 1: Hello, World!
Part 2: Templates
Part 3: Forms
Part 4: Database
Part 5: User Login
Part 6: Profile Page and Avatars
Part 7: Unit Testing
Part 8: Subscribers, contacts and friends.
Part 9: Pagination (this article)
Part 10: Full Text Search
Part 11: Email Support
Part 12: Reconstruction
Part 13: Date and Time
Part 14: I18n and L10n
Part 15: Ajax
Part 16: Debugging, Testing, and Profiling
Part 17: Deploying to Linux (and even to Raspberry Pi!)
Part 18: Deploying to Heroku Cloud
Brief repetition
In the previous article, we made all the necessary changes to the database to support the "subscribers" paradigm, in which users can track the posts of other users.
Today, based on what we did last time, we will bring our application to mind, so that it receives and delivers real content for our users. Today we say goodbye to the last of our fake objects!
Blog posting
Let's start with something simple. The homepage should have a custom form for new posts.
First we define a single field form object
( app/forms.py) : class PostForm(Form): post = TextField('post', validators = [Required()]) Next, we will add the form to the templates
( app/templates/index.html) : <!-- extend base layout --> {% extends "base.html" %} {% block content %} <h1>Hi, {{g.user.nickname}}!</h1> <form action="" method="post" name="post"> {{form.hidden_tag()}} <table> <tr> <td>Say something:</td> <td>{{ form.post(size = 30, maxlength = 140) }}</td> <td> {% for error in form.errors.post %} <span style="color: red;">[{{error}}]</span><br> {% endfor %} </td> </tr> <tr> <td></td> <td><input type="submit" value="Post!"></td> <td></td> </tr> </table> </form> {% for post in posts %} <p> {{post.author.nickname}} says: <b>{{post.body}}</b> </p> {% endfor %} {% endblock %} Nothing extraordinary, as you can see. We simply add another form, just as we did before.
And finally, the view function that links everything together
( app/views.py) : from forms import LoginForm, EditForm, PostForm from models import User, ROLE_USER, ROLE_ADMIN, Post @app.route('/', methods = ['GET', 'POST']) @app.route('/index', methods = ['GET', 'POST']) @login_required def index(): form = PostForm() if form.validate_on_submit(): post = Post(body = form.post.data, timestamp = datetime.utcnow(), author = g.user) db.session.add(post) db.session.commit() flash('Your post is now live!') return redirect(url_for('index')) posts = [ { 'author': { 'nickname': 'John' }, 'body': 'Beautiful day in Portland!' }, { 'author': { 'nickname': 'Susan' }, 'body': 'The Avengers movie was so cool!' } ] return render_template('index.html', title = 'Home', form = form, posts = posts) Let's take a look at the changes we made in this function, step by step:
- First we import the
PostandPostFormclassesPostForm - We accept POST requests from both routes associated with the
index()view function, here we will accept new posts. - Before the post is saved in the database, it falls into this function. When we get into this function via GET, everything happens as before.
- The template now receives an additional argument, a form, which it renders into text fields.
And finally, before we continue. Please note that before writing a new post in the database, we do this:
return redirect(url_for('index')) We can easily skip this redirect and move on to rendering. Perhaps it will even be more effective. Because everything that does this redirect, in fact, it returns us to the same function.
So why redirect? Consider what happens when a user writes a post to a blog, publishes it and presses the Refresh button. What does the Refresh command do? The browser re-sends the previous request.
Without a redirect, the last one was a POST request that sent the form, so the “Refresh” action will re-send this request, with the result that we get a second post that is identical to the first one. This is bad.
But with a redirect, we will force the browser to issue another request after submitting the form. This is a simple GET request, and now the Refresh button will simply load the page once more, instead of re-sending the form.
This simple trick allows you to avoid inserting duplicate messages if the user accidentally refreshes the page after posting.
Displaying blog posts
We turn to the most interesting. We are going to pull out posts from the database and display them.
If you remember a few articles back, we made a couple of fake posts and we showed them on our main page for a long time. These fake objects were created explicitly in a Python list view function:
posts = [ { 'author': { 'nickname': 'John' }, 'body': 'Beautiful day in Portland!' }, { 'author': { 'nickname': 'Susan' }, 'body': 'The Avengers movie was so cool!' } ] But in the last article, we created a query that allows us to receive all the messages from people that the user has signed up for, so we can simply replace the above lines
( app/views.py) : posts = g.user.followed_posts().all() Now, when you launch the app, you will see posts from the database!
The
followed_post method of the User class returns a query sqlalchemy object that is configured to pull messages of interest to us. By calling the all() method on this object we get all the posts in the form of a sheet, so ultimately we will work with the structure we are used to. They are so similar that the template will not notice anything.Now you can play with our application. Do not be shy. You can create multiple users, subscribe them to other users, and finally publish several messages to see how each user sees their feed.
Pagination
Our application looks better than ever, but there is a problem. We shows all posts on the home page. What happens if a user is subscribed to several thousand people? Or a million? As you can imagine, sampling and processing such a large list will be extremely inefficient.
Instead, we will show a potentially large number of posts paginated.
Flask-SQLAlchemy comes with very good pagination support. If, for example, we want to get the first three posts from tracked users, we can do this:
posts = g.user.followed_posts().paginate(1, 3, False).items The
paginate method paginate called on any query object. It takes three arguments:- Page number, starting with 1
- number of elements per page,
- and flag error. If the flag is set to True, when going outside the bounds of the list, a 404 error is returned to the client.
- Otherwise, an empty list will be returned instead of an error.
The
paginate method returns the Pagination object. Members of this object contain a list of the elements of the requested page. There are other useful things in the Pagination object, but we will look at them a little later.Let's think about how we can implement pagination in our index () view function. We can start by adding a configuration item to our application that determines how many items on the page we will show.
# pagination POSTS_PER_PAGE = 3 It is a good idea to keep the global settings of the application, which may affect the behavior, in one place.
In the final application, of course, we will use a number greater than 3, but for testing it is more convenient to work with a small amount.
Next, let's decide now what the URL will look like with the page request. We have seen before that Flask allows you to take arguments in routes, so that we can add a suffix that points to the page you need:
http://localhost:5000/ <-- page #1 (default) http://localhost:5000/index <-- page #1 (default) http://localhost:5000/index/1 <-- page #1 http://localhost:5000/index/2 <-- page #2 This URL format can be easily implemented using the additional route in our view
( app/views.py) : from config import POSTS_PER_PAGE @app.route('/', methods = ['GET', 'POST']) @app.route('/index', methods = ['GET', 'POST']) @app.route('/index/<int:page>', methods = ['GET', 'POST']) @login_required def index(page = 1): form = PostForm() if form.validate_on_submit(): post = Post(body = form.post.data, timestamp = datetime.utcnow(), author = g.user) db.session.add(post) db.session.commit() flash('Your post is now live!') return redirect(url_for('index')) posts = g.user.followed_posts().paginate(page, POSTS_PER_PAGE, False).items return render_template('index.html', title = 'Home', form = form, posts = posts) Our new route pulls the argument with the page number and declares it as an integer. We also need to add this argument to the
index() function and set a default value, because two of the three routes do not use this argument, and for them it will be used with the default value.Now that we have a page number, we can easily connect it to our
followed_posts request, along with the POSTS_PER_PAGE variable that we defined earlier.Notice how easy the changes go through and how little the code changes. We try to write every part of the application, not trying to guess how the other parts work, which allows us to build modular and reliable applications that are easy to test.
Now you can experience pagination by entering URLs with different line numbers into the address bar of the browser. Make sure that there are more than three posts that you see on the page.
Page navigation
Now we need to add links through which the user can move to the next / previous page, and fortunately for us Flask-SQLAlchemy will do most of the work.
We are going to start by making small changes to the view function. In our current version we use pagination as follows:
posts = g.user.followed_posts().paginate(page, POSTS_PER_PAGE, False).items By doing this, we only save the elements of the Pagination object returned by the paginate method. But this object provides several very useful features, so we will keep the entire object
( app/views.py) : posts = g.user.followed_posts().paginate(page, POSTS_PER_PAGE, False) To copy this change, we need to change the template
( app/templates/index.html) : <!-- posts is a Paginate object --> {% for post in posts.items %} <p> {{post.author.nickname}} says: <b>{{post.body}}</b> </p> {% endfor %} What the Paginate object in the template gives us. Here are the object methods we will use:
- has_next: True there is at least one page after the current one
- has_prev: True if there is at least one page before the current one
- next_num: next page number
- prev_num: previous page number
With their help, we can do the following
( app/templates/index.html) : <!-- posts is a Paginate object --> {% for post in posts.items %} <p> {{post.author.nickname}} says: <b>{{post.body}}</b> </p> {% endfor %} {% if posts.has_prev %}<a href="{{ url_for('index', page = posts.prev_num) }}"><< Newer posts</a>{% else %}<< Newer posts{% endif %} | {% if posts.has_next %}<a href="{{ url_for('index', page = posts.next_num) }}">Older posts >></a>{% else %}Older posts >>{% endif %} Now we have two links. First we will show the link "Newer posts", which will send us to the previous page, to new posts. On the other hand, “Older posts” will send us to the next page, to older posts.
But when we are on the first page, we don’t need a link to the previous page. Such a case is easy to track using the posts.has_prev method, which returns False. In this case, we show the link text, but without the link itself. The link is not the next page is processed in the same way.
Implementing the sub-template Post
Earlier, in the article in which we added an avatar, we will define a subpattern with the HTML code for rendering a single post. We made this template to get rid of code duplication if we want to render posts on different pages.
It is time to implement this sub-template on the main page. It will be as simple as most things we do today
( app/templates/index.html) : <!-- posts is a Paginate object --> {% for post in posts.items %} {% include 'post.html' %} {% endfor %} Amazing right? We simply replaced the old rendering code with the include of our template. This way we get a better version of rendering, with the user's avatar.
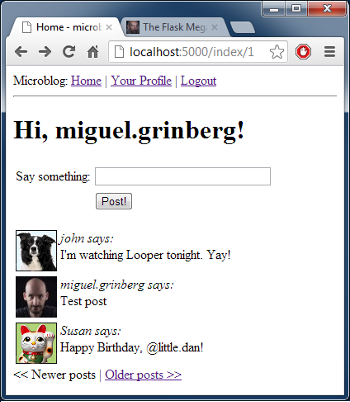
Here is a screenshot of the main page in the current state:
User profile page
Now we are done with the main page. We also included messages in the user profile, but not all, but only the owner of the profile. To be consistent, we need to change the profile page to fit the main page.
Changes are similar to those we made on the main page. Here is a brief list of what we need to do:
- add an additional route that takes the page number
- add an argument with the page number to the presentation function and assign it to 1
- replace fake posts with real ones from the database and split them into pages
- update template to use pagination object
These are the presentation function updates
( app/views.py) : @app.route('/user/<nickname>') @app.route('/user/<nickname>/<int:page>') @login_required def user(nickname, page = 1): user = User.query.filter_by(nickname = nickname).first() if user == None: flash('User ' + nickname + ' not found.') return redirect(url_for('index')) posts = user.posts.paginate(page, POSTS_PER_PAGE, False) return render_template('user.html', user = user, posts = posts) , ( ), .Changes in the template are also quite simple
( app/templates/user.html) : <!-- posts is a Paginate object --> {% for post in posts.items %} {% include 'post.html' %} {% endfor %} {% if posts.has_prev %}<a href="{{ url_for('user', nickname = user.nickname, page = posts.prev_num) }}"><< Newer posts</a>{% else %}<< Newer posts{% endif %} | {% if posts.has_next %}<a href="{{ url_for('user', nickname = user.nickname, page = posts.next_num) }}">Older posts >></a>{% else %}Older posts >>{% endif %} Final words
Below I post the updated version of the
microblog application in all the changes made in this article.Download microblog-0.9.zip.
As always, there is no database, you have to create it yourself. If you follow this series of articles, you know how to do it. If not, go back to the database article to find out.
As always, I thank you for following me. I hope to see you in the next article.
Miguel
Source: https://habr.com/ru/post/230897/
All Articles