Unlocking a Lenovo Phone by Depth Methods
I bought a Lenovo A706 somehow - and I was very pleased with it, and very satisfied. There was, however, a couple of glitches associated with the independence of the screen, although in general it was a completely suitable device. But once, in one dark, dark night in the country, misfortune happened to him. He lay himself and charged. Before that, the light disappeared, and I deliberately turned off the data transfer for the night in order to save the battery if the light goes out again. And I left him lying face down ...
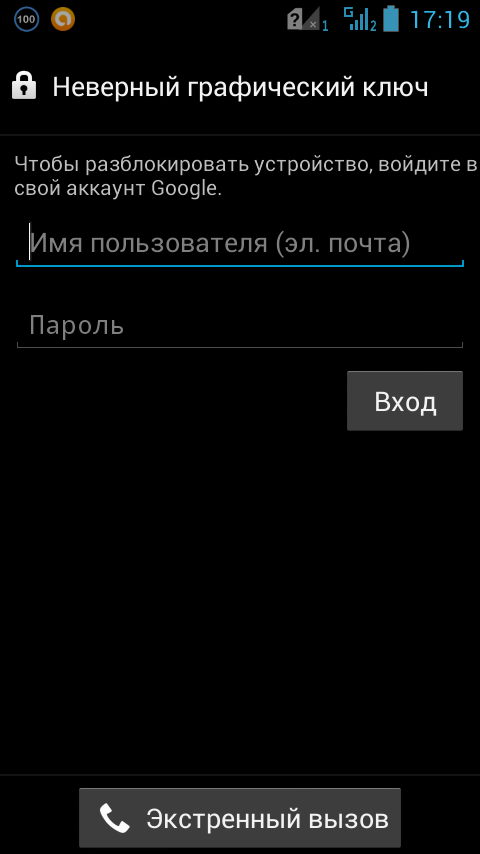
In the morning someone rang from a beautiful place far away, I didn’t have time to pick up the phone, the phone itself got the wrong pattern on the screen fifteen times (the same bug!) And plaintively asked for Google to unlock ... There is a Google account connected to the phone, but to get I can't get to it: data transmission, as we remember, is turned off - both cellular and Wi-Fi. What to do? Resetting the smartphone to default is a pity, there are unsynchronized working contacts in the notebook and notes, and this is unsporting. I decided to fight. Yes! USB debugging was also turned off, of course. And for some reason, Lenovo did not think that it makes no sense to ask for an account when extinguished communication channels with the Internet ...
After a thoughtful search and a quick study of the thematic communities on the Internet, many ways of unlocking were found - from a documented default reset to some wise programs in Recovery mode both via ADB and directly. The methods led to the fact that I as a result (as it turned out later) damaged the device configuration a little, but I could not unblock it, invariably receiving an insistent but absolutely impracticable demand to enter Google:
')
One of the ways of unlocking suggested by the collective mind was to directly manage the phone’s database via ADB Shell using SQL instructions — I could not use it, because USB debugging was turned off, and the database was not available in Recovery mode. I thought - why not fix the database files themselves? In the Recovery menu (Lenovo smartphones are entered into it by holding the Volume + and Volume- buttons in the process of switching on) there are four actions required for this:
1. Backup. Here is a copy of the phone. You have to be patient, it will take time. After the process is completed, the copy will be located on the flash card of the phone in the / backup directory in the ZIP archive format.
2. Mount. You must enable the mounting of the flash card to the computer and connect the phone via USB. The computer will see the phone's drive, and you can download the generated backup archive, as well as put the modified one in place.
3. Restore. Point to the archive with the modified database, wait for the phone to restore itself from the archive.
4. Reboot. Restart the phone with Wi-Fi finally turned on, then enter your Google account information and no longer do such nonsense.
So, the archive is received and downloaded to the hard disk of the computer. Let's take a closer look at it and make a backup just in case, as we will change the contents of the archive. It is in ZIP format and contains everything from the main memory of the phone, including the database that manages the device configuration. The Android operating system has a built-in SQLite3 database, where it stores almost all of its information. Let's get down to it.
In the archive we see the directory and file:
There is nothing interesting in the file - full table of contents of the archive and file access rights. Go to the directory
Here we see subdirectories with XML and SQLite databases that store and use various applications and operating system activities. We are interested in a well-defined subdirectory:

We change for the
Oh miracle - we have Wi-Fi enabled! We cling to the well-known phone network, enter Google account information and get the desired access to the device. Of course, this method will work with any Android device that is able to enter Recovery mode, create a backup archive and be able to recover from it. Those who wish to indulge in nostalgia instead of SQLite Database Browser can use the good old HIEW , but here we must not tear down the database file and understand its structure.
In the morning someone rang from a beautiful place far away, I didn’t have time to pick up the phone, the phone itself got the wrong pattern on the screen fifteen times (the same bug!) And plaintively asked for Google to unlock ... There is a Google account connected to the phone, but to get I can't get to it: data transmission, as we remember, is turned off - both cellular and Wi-Fi. What to do? Resetting the smartphone to default is a pity, there are unsynchronized working contacts in the notebook and notes, and this is unsporting. I decided to fight. Yes! USB debugging was also turned off, of course. And for some reason, Lenovo did not think that it makes no sense to ask for an account when extinguished communication channels with the Internet ...
After a thoughtful search and a quick study of the thematic communities on the Internet, many ways of unlocking were found - from a documented default reset to some wise programs in Recovery mode both via ADB and directly. The methods led to the fact that I as a result (as it turned out later) damaged the device configuration a little, but I could not unblock it, invariably receiving an insistent but absolutely impracticable demand to enter Google:
')
One of the ways of unlocking suggested by the collective mind was to directly manage the phone’s database via ADB Shell using SQL instructions — I could not use it, because USB debugging was turned off, and the database was not available in Recovery mode. I thought - why not fix the database files themselves? In the Recovery menu (Lenovo smartphones are entered into it by holding the Volume + and Volume- buttons in the process of switching on) there are four actions required for this:
1. Backup. Here is a copy of the phone. You have to be patient, it will take time. After the process is completed, the copy will be located on the flash card of the phone in the / backup directory in the ZIP archive format.
2. Mount. You must enable the mounting of the flash card to the computer and connect the phone via USB. The computer will see the phone's drive, and you can download the generated backup archive, as well as put the modified one in place.
3. Restore. Point to the archive with the modified database, wait for the phone to restore itself from the archive.
4. Reboot. Restart the phone with Wi-Fi finally turned on, then enter your Google account information and no longer do such nonsense.
So, the archive is received and downloaded to the hard disk of the computer. Let's take a closer look at it and make a backup just in case, as we will change the contents of the archive. It is in ZIP format and contains everything from the main memory of the phone, including the database that manages the device configuration. The Android operating system has a built-in SQLite3 database, where it stores almost all of its information. Let's get down to it.
In the archive we see the directory and file:
/backupbackup_info.txtThere is nothing interesting in the file - full table of contents of the archive and file access rights. Go to the directory
/data/data/Here we see subdirectories with XML and SQLite databases that store and use various applications and operating system activities. We are interested in a well-defined subdirectory:
/data/data/com.android.providers.settings/databases/ , where we find the settings.db file and, in the company of its journal ( settings.db-* files), we carefully extract it from the archive. Glory to God, here Google did not write anything of its own and uses the standard format! I used the SQLite Database Browser program, a link to which I was kindly provided by foreign-influenced Yandex: sqlitebrowser.org . Download the appropriate distribution and install the program, then open our file with it. In it we find several tables; We are interested in the secure table, where in the [name] field there will be values associated with WiFi:We change for the
wifi_on and wifi_saved_state values in the [value] field by one and save the changes. At the same time, because closing the database file was correct, the SQLite Database Browser will scrub the log files and leave only the bare settings.db file - this should not be intimidated. We are packing this file into an archive for the old place, without forgetting to delete from the archive the log files of our database, worn with SQLite Database Browser! In the archive in the directory /data/data/com.android.providers.settings/databases/ should be only one file settings.db . Fill the archive into the phone, in Recovery mode, we need Restore, we look forward to the end of the process and restart the phone.Oh miracle - we have Wi-Fi enabled! We cling to the well-known phone network, enter Google account information and get the desired access to the device. Of course, this method will work with any Android device that is able to enter Recovery mode, create a backup archive and be able to recover from it. Those who wish to indulge in nostalgia instead of SQLite Database Browser can use the good old HIEW , but here we must not tear down the database file and understand its structure.
Source: https://habr.com/ru/post/230511/
All Articles