Marlight: lamps for programmers
Marlight is a RGBW LED bulb controlled by a 2.4 GHz radio channel. It can be controlled both from the remote control, which directly transmits on the frequency of the light bulb, and with the help of a router, which is connected in your home Wi-Fi. With the help of a router that transmits commands sent to it over the network in the radio package for a lamp, lamps can be controlled from a mobile application, computer or home server.
I told earlier about the system for a smart home - NooLite ( 1 , 2 ), but its main drawback for ordinary users is that it must be installed using terminals, a soldering iron, cutting wiring, and so on. The downside is the high ability to customize everything to your liking, but it is not always necessary. This time I will talk about a system that has similar functions, but is designed for ordinary people - all you need to do to install it, is to simply screw the light bulb into the cartridge.
The whole system consists of three things - the bulb itself, the console and the router, each of which can be bought separately:

')

Inside is a lamp packed in plastic:

And that's it! There is nothing more inside, it is implied that a lamp that has no buttons or other controls does not need instructions. By the way, the packaging is strong enough - only one of more than 1000 lamps that have passed through the store was damaged - the basement was crushed a little. I had this very handy, and now we have the opportunity to see what is inside it, the truth about it a little further.
So, the lamp:
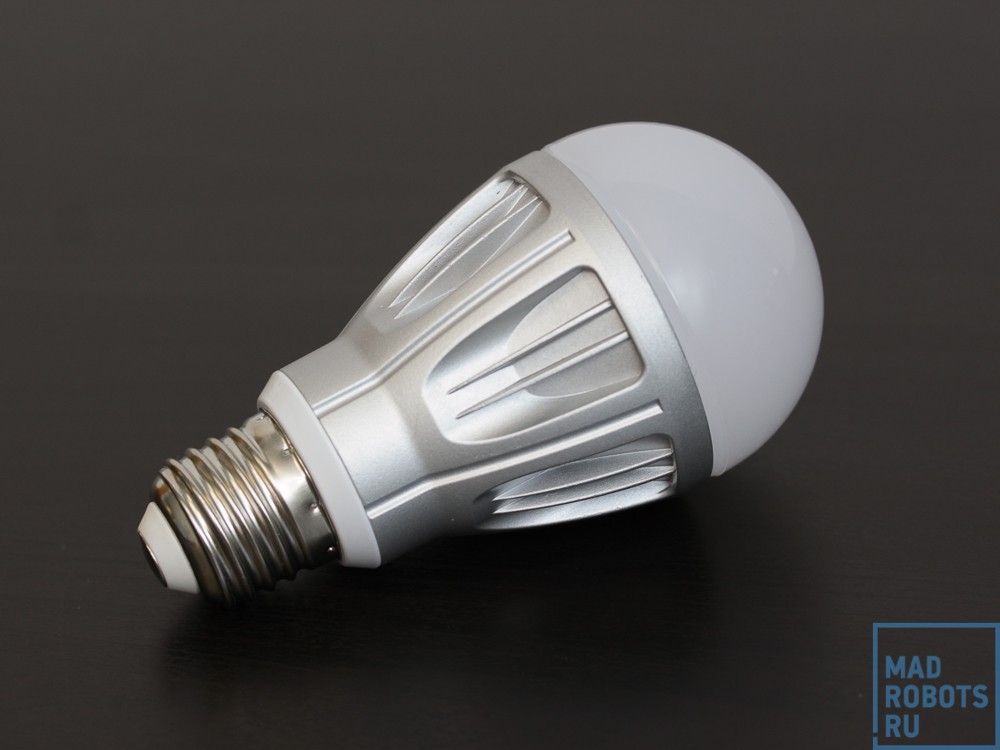
It has a base E27 - standard for household lamps:
To understand the size, you can put it next to the Ikea lamp - SPARSAM .
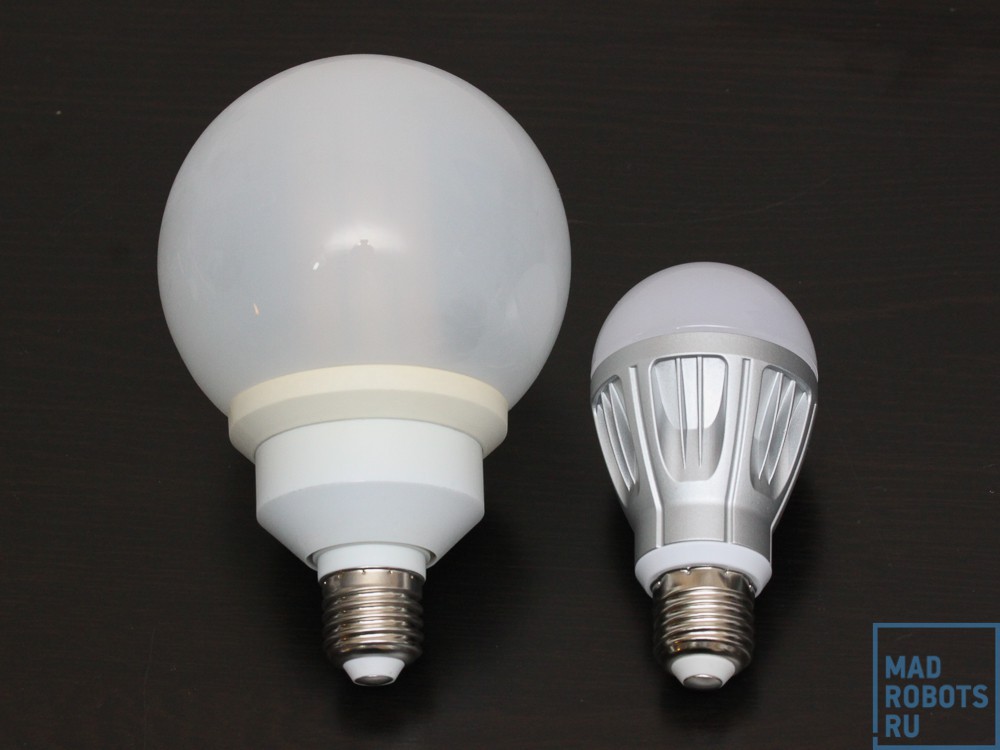
It would be nice to compare with the incandescent lamp, but I could not find one in the house. It is convenient to compare them also because they are approximately the same in brightness, but Ikeevskaya is much more yellow.
Their weight is also similar, Spars weighs 185 grams:
And marlite 179:
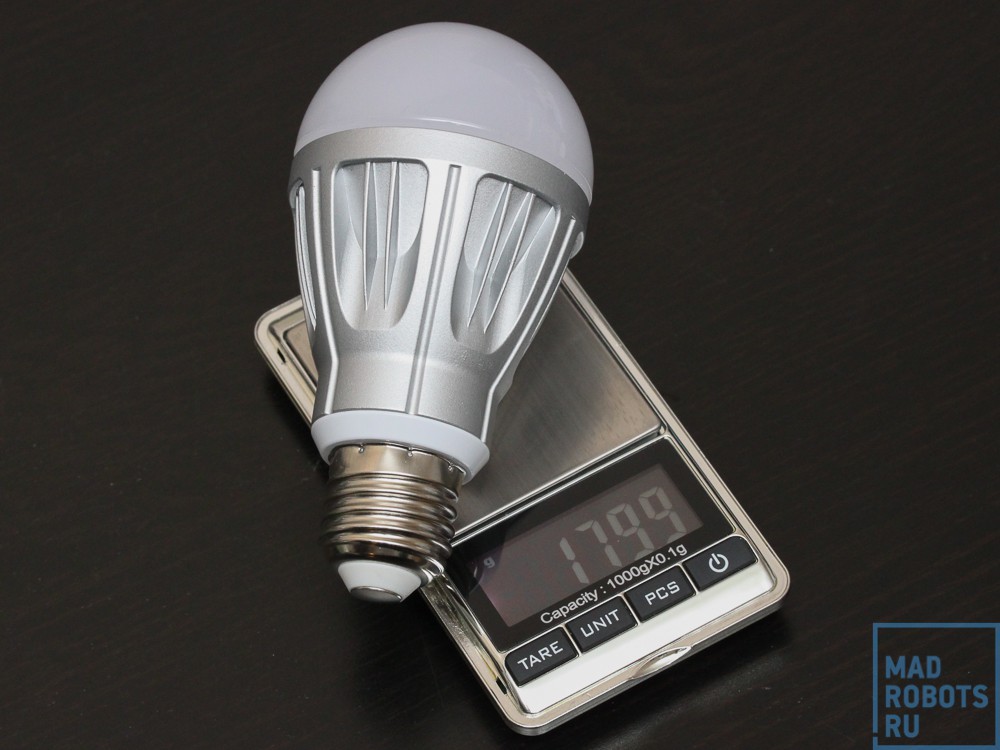
Such a small light bulb weight is due to the thick aluminum housing, which serves as a radiator for LEDs.
To compare the brightness of two lamps, I photographed them in the same position on the same settings (1/100, 2.8, 400):
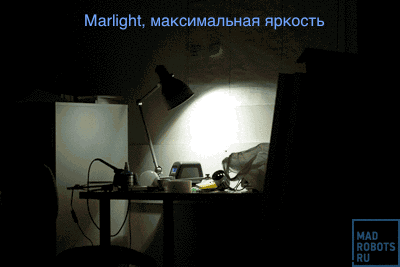
It turned out that marlight at maximum settings is even slightly brighter. Do not pay attention to what is being illuminated in different ways, because this is the lamp from which I removed the diffuser (why - it will become clear later).
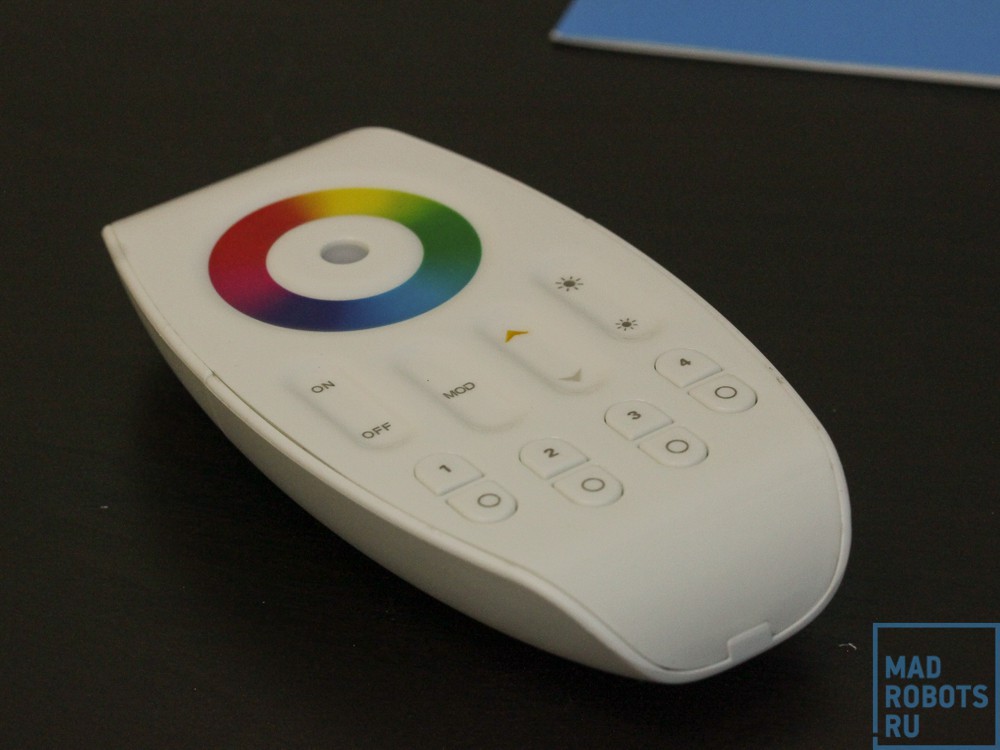
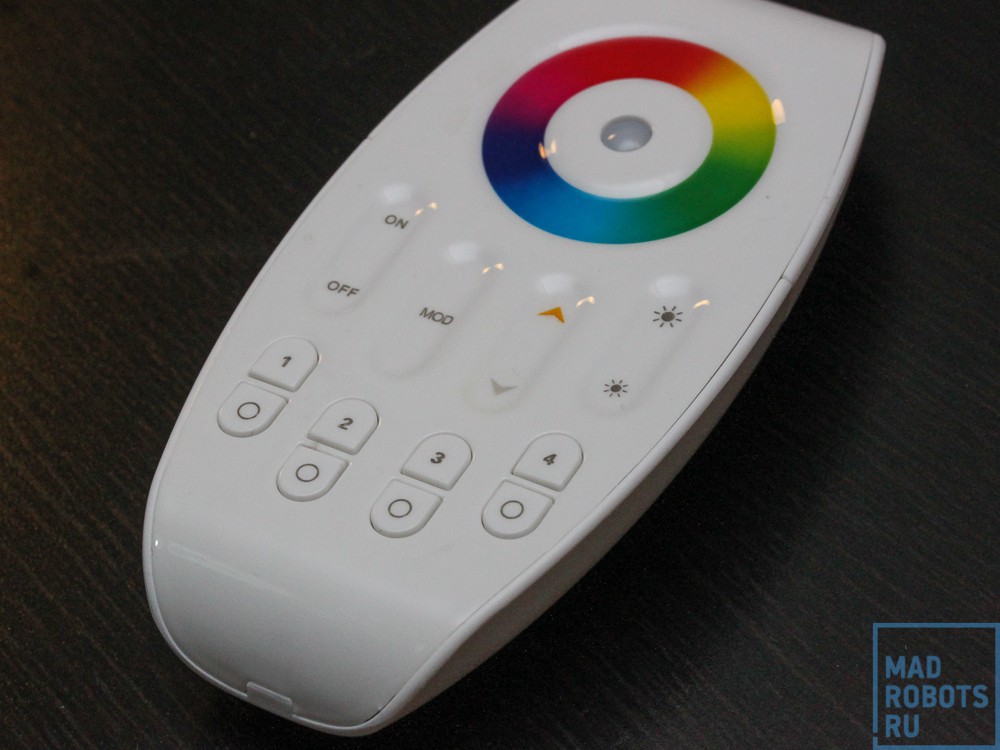
The control panel looks like this:
You can see the box in the title photo, so there’s no point in showing it. Components of the console are much richer than the lamp - it has a whole instruction in the kit:

The remote, by the way, works on three AAA batteries (which are not included):

The most interesting thing in the console (besides the viscera, of course) are the controls:
In order not to talk about which button is responsible for what, I drew such a picture:
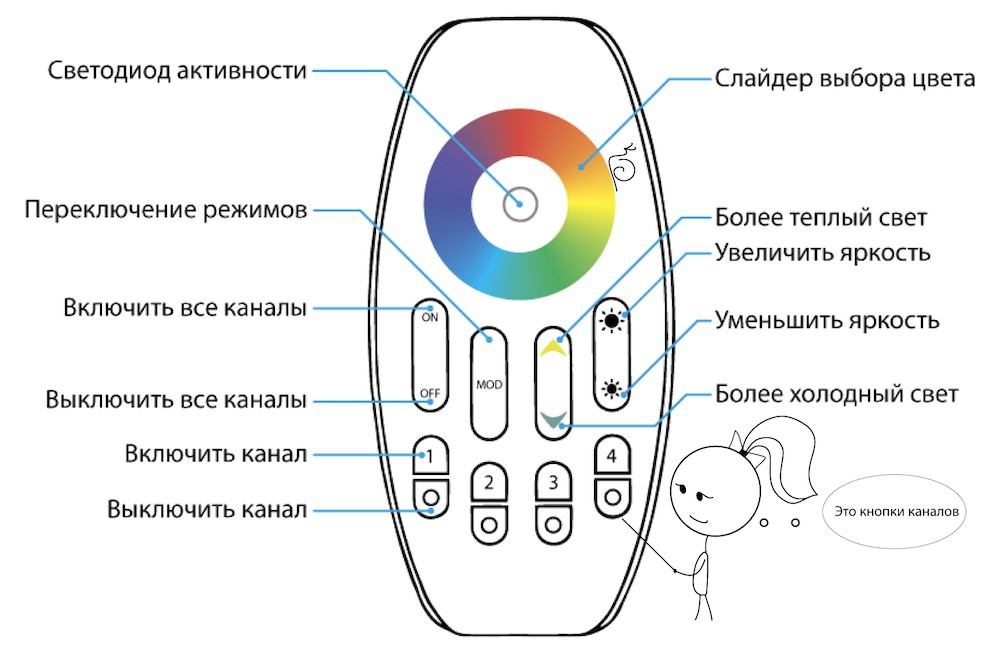
She entered into our leadership . We had to write a normal manual, because the one that comes with is not only written in bad English, but still incomplete and partly contradictory.
At the bottom of the remote - channel control buttons. As in the case of NooLite, the lamps are tied to the console, and not vice versa. In the sense that the remote control code (more precisely, the channel code on the remote control) is written to the lamp, from which it will receive commands.
Each console has 4 channels. Each channel is controlled by two buttons - turn it on and off. The power button is also the channel activation button — all the top controls (color change, brightness, light temperature) are applied to the last active channel, i.e. to the channel where you last pressed the power button. If the lamps were turned off, after pressing it, they will turn on in the “white light” mode with the previous setting of brightness and color temperature. If the lamps are already burning, then nothing will happen, but the remote will remember this channel, and all the following commands using the upper buttons will give this channel.
You can attach as many lamps as you like to each channel, as long as they are in the coverage area of the console. For example, in this video, the dude controls a bunch of bulbs at once:
One of my colleagues, who really liked these lamps (hello, fundorin ), bought 11 pieces at once and put them in all the rooms in the house. 4 channels of the console - 4 places in the house: kitchen, toilet-bathroom, living room and corridor. It turned out that from one remote control you can control the lighting in the whole apartment from anywhere. He says it is very convenient, especially turning off the light already lying in bed and dimming while lying in the bath.
Each console has serial numbers for different channels, so two remotes can control 8 sets of lamps, and neighbors cannot turn on the kitchen light when going to the toilet at night.
Light bulbs, controlled from the remote - of course, cool, on the smart home well, in general, does not pull. The most interesting thing starts when it becomes possible to connect the lamps to a computer and set up some automation. For this purpose, a connector router is used in such a box:

Her bundle is even richer than the console - in addition to the manual, she also has power cables in the kit!

Despite the USB connector, the wire is only for power - connecting the router connector to the computer will not work. No, of course, it will work, but there will be no difference compared to the power supply. It also does not have a LAN connector, all communication is via wireless connections. He can either create his own WiFi network, or connect to an existing one.
Of the interactive elements on the body of the connector, there are three LEDs:

As well as a microUSB connector for power and a hole in which the reset button is hidden:

All the necessary data for the first connection to the router are written on it:

Therefore, we will not even open the instruction - we translated everything we needed into Russian and added it to our file.
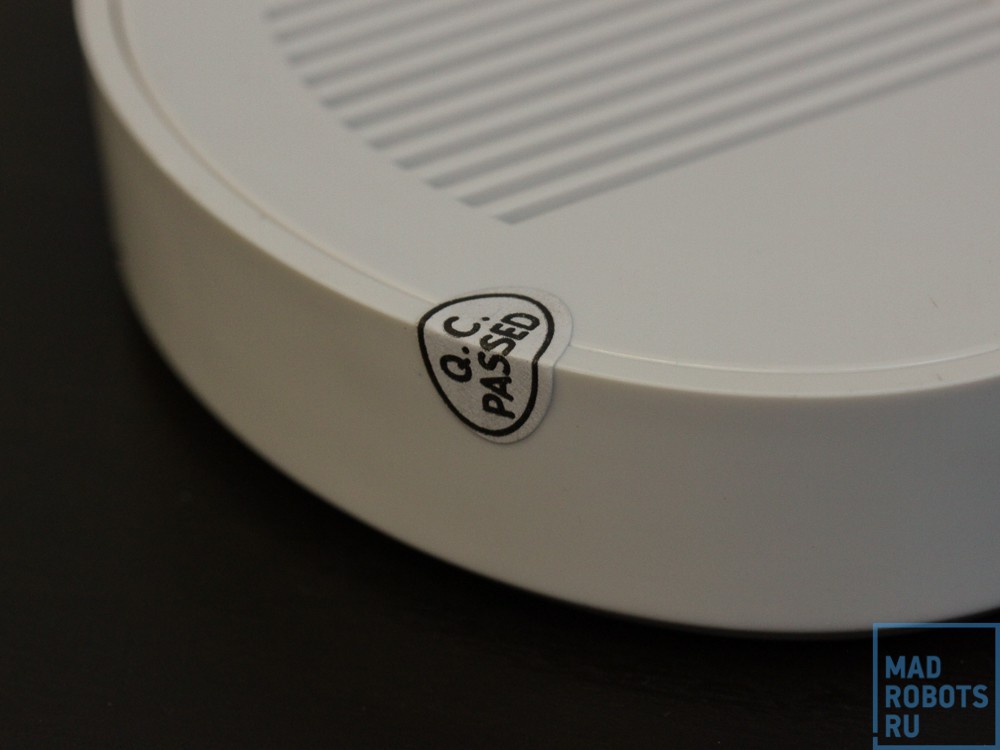
Of course, without disassembling the device at least once, you cannot be considered its full-fledged owner. We start with the router. Do not pay attention to the warranty label - just when you are a company that provides a guarantee.
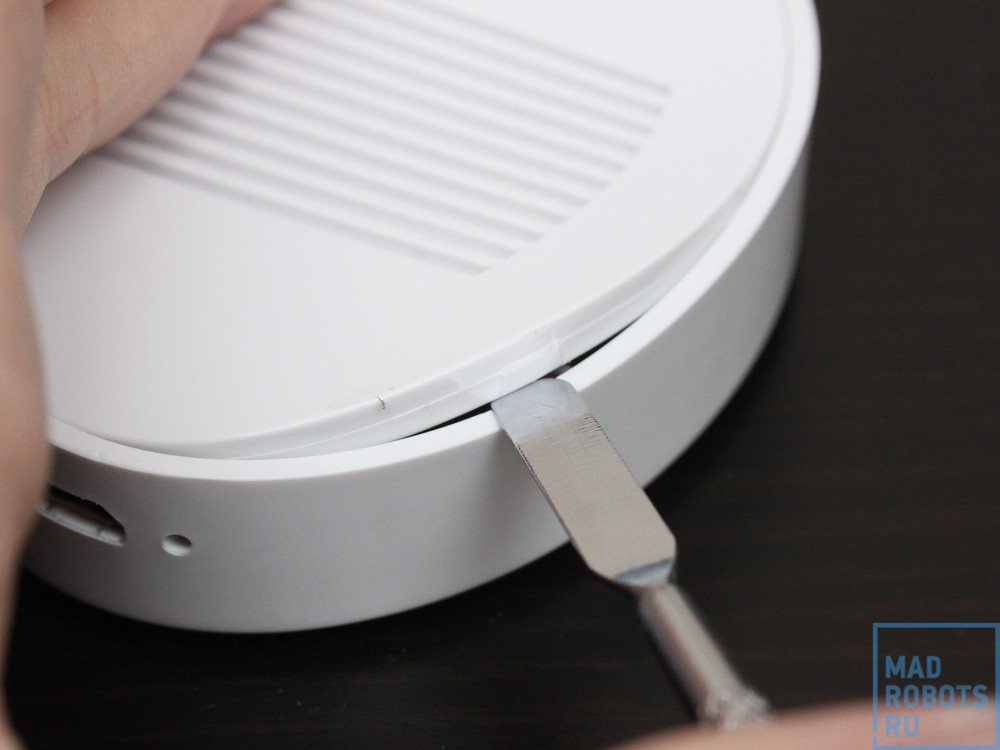
It is easy to disassemble it - there are no screws or cunning fasteners. All that is needed is to pry the bottom cover with something flat and durable to pull it out of the latches:
After removing the cover, we see the bottom part of the board, which is not interesting to look at.
But the reverse side is much more interesting:

On it, we see a 2.4 GHz transmitter with an unmarked microcircuit:
Like the main controller:

I do not understand why ordering controllers without labeling, if the firmware still cannot be counted. What will give the absence of marking? Well, okay, it is necessary to ask the Chinese. We go further and see the RTC chip - a real-time clock called DS1302 . This is such a specialized microcircuit that deals only with one thing - time counts. True, she does it perfectly - with good accuracy and very low power consumption - from a CR2032 battery it can work for about two years, even if it has not been connected to the power supply all this time.
For the very calculation of time, the “hourly” quartz is located next to the hard-to-remember frequency of 32768 Hz, which is simply a twain of 15 degrees. It is enough to reduce this frequency by 15 times in a row and we get a frequency of 1 Hz - a tick every second.
Go ahead. There is only a Wi-Fi module with a UART interface:
He is actually responsible for communicating with the local network of your router or creating your own.
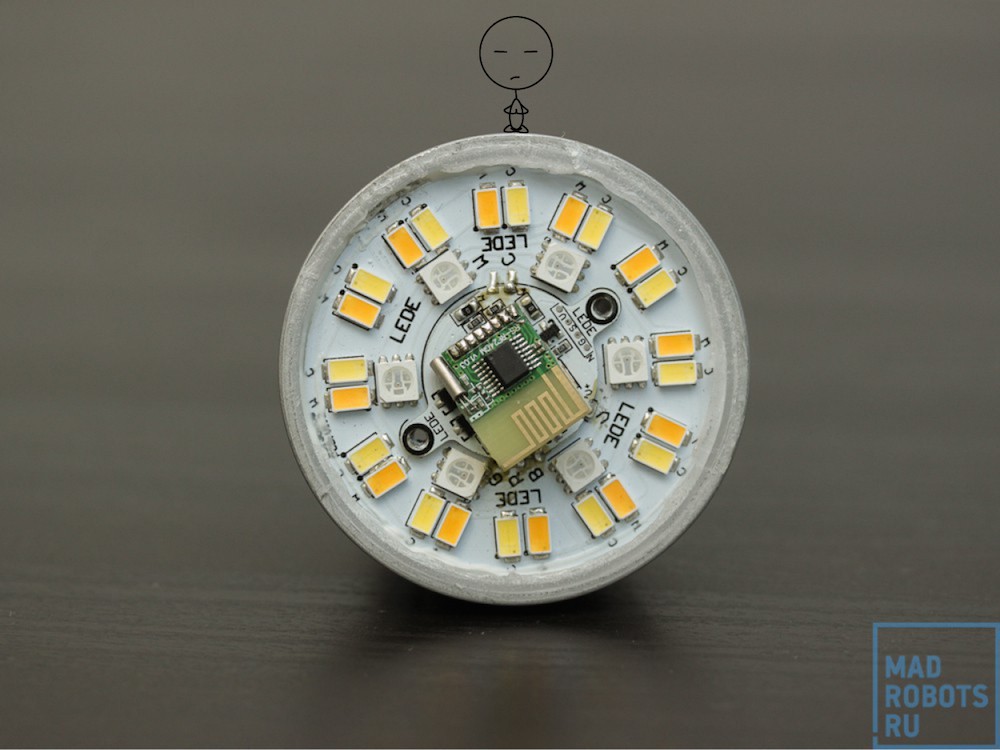
Now we analyze the lamp itself. In general, unlike the console and the router, it is completely non-separable (but the most interesting). For example, the first stage of disassembly involves cutting with a hot knife or cutting a plastic diffusing dome:
By the way, it is rather thick - almost 3 mm thick:

To break a lamp with such plastic is difficult. After trepanning the lamp, we get access to the main board:
As we can see, 30 LEDs are used for illumination - 24 white LEDs (12 warm LED and 12 cold LEDs) and 6 RGB LEDs. RGB LEDs are responsible for color lighting, and white, respectively, for white.

Moreover, as can be seen on the gif, at the same time, two types of LEDs do not work at full power - even though this would increase the brightness, it would require more cooling and a more powerful power supply. And the brightness would change during temperature control.
The disassembled lamp, by the way, to shoot without a lens is just awful, it turns out like this (by the way, subscribe ).
In the center is the radio module, already familiarly completely without marking:

Under it is the controller:

This is STM8 controller STM8S003F3 , completely normal - 16MHz, 8 Kb of memory. The controller communicates with the radio module on the SPI.
To get to the lamp power supply, you need to cut off the lamp base in a similar way:
And then climb the soldering iron deep and solder the power wires:

What fell off after that from the light bulb is the power supply:
The power supply is built on a single chip LNK606 , which is quite unusual for Chinese devices.
LNK606 is a LinkSwitch-II series chip designed specifically for the manufacture of power supplies. Due to the fact that they monitor completely all the parameters of the power supply, its scheme is very simple:

At the same time we get protection against short circuits, low network consumption without load, thermal protection and good efficiency.
So, back to the LEDs:

White LEDs are the same, differ only in the type of phosphor. "White" LEDs - in fact, blue or ultraviolet, exactly that vyrviglaznogo shade that shines us right in the eye at night. White makes them yellow substance - phosphor, which absorbs blue light and re-emits it in a different range. Combining different substances in its composition can achieve different shades of white, such as cold or warm, as was done here. A big plus of phosphor LEDs is a smooth spectrum unlike RGB assemblies:
This has a positive effect on the quality of lighting - such LEDs have a higher color rendering index - CRI , despite the fact that they can look at first glance like assemblies - emit about the same white light. But there is a nuance!
Since the color of an object determines what part of the spectrum reflects its surface, an interesting situation may arise when the spectrum of light incident on the object simply lacks a part that is reflected by the object. For example, we have a blue object that reflects waves with a length of 450 nm. If we shine this object with sunlight, then everything is fine:
The spectrum contains waves of this length and they are successfully reflected by the subject. And if we illuminate this object with a light source, whose spectrum does not look like that of sunlight? It turns out that:
This, however, about fluorescents, but not the essence. A lamp in the spectrum simply lacks some of the waves of this length, although it seems to us to be as white as the sunlight. Since there are no waves in the spectrum, the object has nothing to reflect, it will look dark.
Of course, everything is more complicated in life - almost any surface reflects not only one specific wavelength, almost always capturing the infrared and ultraviolet range, so a blue object most likely will not look black with such lighting. But here you can easily get all sorts of problems with color perception. Therefore, printers never show the result to the client in the workshop, only in the office, only under halogen or incandescent lamps.
In short, phosphor LEDs - this is good, and only they should be used to illuminate the workplace. And that someone did not know?
In general, all normal white LED lamps use phosphor LEDs, and I say this simply to the fact that Marlight can be used to illuminate the workplace, if you are satisfied with its brightness.
However, in the lamp RGB-assembly is still there, but they are used to display all the other colors. Here is one of the three-color LEDs closer, you can see three different crystals and wiring to them:
True, in my opinion, the colors are very concentrated and pure, I would like it more if they could be mixed with white to create different shades.
Another scourge of LED lighting - flicker. The LED, in contrast to the incandescent lamp, does not have thermal inertia, and if we turn on the LED directly into the network, as they do in cheap corn lamps, the LEDs blink 100 times per second, which is well noticed with fast eye movements or objects - a pencil test . There we are talking about monitors, but for lighting it works. Here, for example, looks like a "power supply" in one of the lamps in my house:
Use it to illuminate the premises, of course not. It is in the toilet.
Again, in normal lamps there is no such problem - there, as in marlaite, there is a power supply unit that converts the mains voltage to the right (constant) for the LED, eliminating flicker at all. More precisely, eliminating the flicker at maximum brightness, because the brightness decreases the PWM th, usually low frequency. Since we have disassembled the light bulb, connect an oscilloscope to it and take a look at how the brightness change works here:

Now you can turn on the light bulb and look at what is happening with the oscilloscope probes:
When it is turned on at full brightness, no ripples are expected:
Two channels of the oscilloscope are connected to the channels of warm and cold LEDs. In this case, the "warm" LEDs are lit at full capacity, and the "cold" ones are turned off altogether, which is what we see in the picture.
And now reduce the brightness of the button on the remote or in the application:
Now the constant glow of the LED periodically stops, and the human eye perceives it as a decrease in lighting due to its inertia. 240 Hz - the frequency is not very large, but coupled with a good diffuser, the eyes at medium brightness do not particularly interfere.
Here is the change of brightness in the dynamics:
Now let's change not the brightness, but the color temperature:
Obeying the fill plate, protected inside the controller, the “cold” LED turned on at 20% brightness along with white in order to shift the temperature of the light to the cooler one. But at the same time, to avoid changing the brightness (part of the cycle, both LEDs work together), the “warm” at the end of the cycle turned off exactly at the time when the “cold” was turned on, and thus the total brightness of the whole lamp did not change. If you turn on the temperature in the "average" mode, then both LEDs will work the same time, and it will look like this:
And this is how it looks in the form of animation, here the light in the first frame works in the “only warm” mode, then gradually goes to the “10% warm, 90% cold” mode, and then comes back.
To disassemble what is left of the lamp, you need to unscrew the two screws (blue arrows), and then unsolder the connection points of the processor board to the LED board (red arrows):
The boards are connected with a sandwich for a reason - the bottom board is aluminum, and the top one is made of PCB. This is done in order to remove heat from the LEDs, but at the same time not to experience problems with two-sided installation on an aluminum board. By the way, its thickness is 1.5mm:
Now, if you hook the aluminum board with something curved and pull, it is not without difficulty, but it will be separated from the radiator:

Between the bottom board and the radiator there is a thermal interface layer applied - the same as that used on the heatsinks for the processor.
In the hand there remains such a solid aluminum radiator, which makes up most of the lamp's weight:
With sadness (because this is the last thing that can be disassembled), open the console:

The upper part is the sensory ring:

Similar to the app from ST:
The lower part - the buttons, the membrane for on-off channel, touch for all other functions:

The reverse side is more interesting:

There are two unmarked chips:

And the transmitter module already familiar to us:
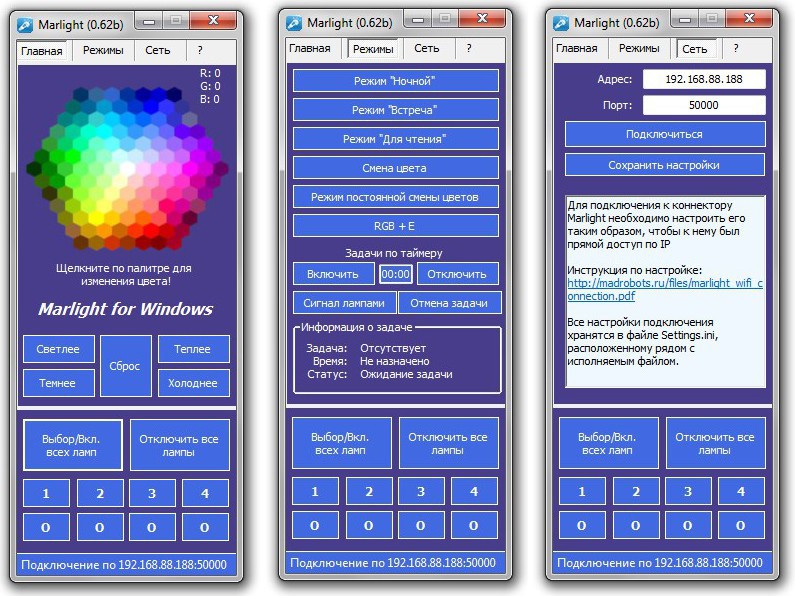
About how to control the lamps with the remote, I have already described above. Now let's talk about what applications can do. To begin with, I will show the web panel of the router - it is quite simple. You can configure the network in it, this is what the settings look like when the connector creates its wifi-socket network without encryption:
And so the connector connects to the network as a client:
You can also change the login password there:
And reload it:
The remaining settings are not needed by the user and do not need to touch them, because it is fraught with the loss of the router before resetting - they relate to the settings of the TCP <-> UART transmission to the controller, which translates them into commands for the radio module.
An application for controlling light bulbs is available for iOS and Android . They are fairly simple in functionality, and in fact duplicate the buttons on the remote control. Here is the iOS app:
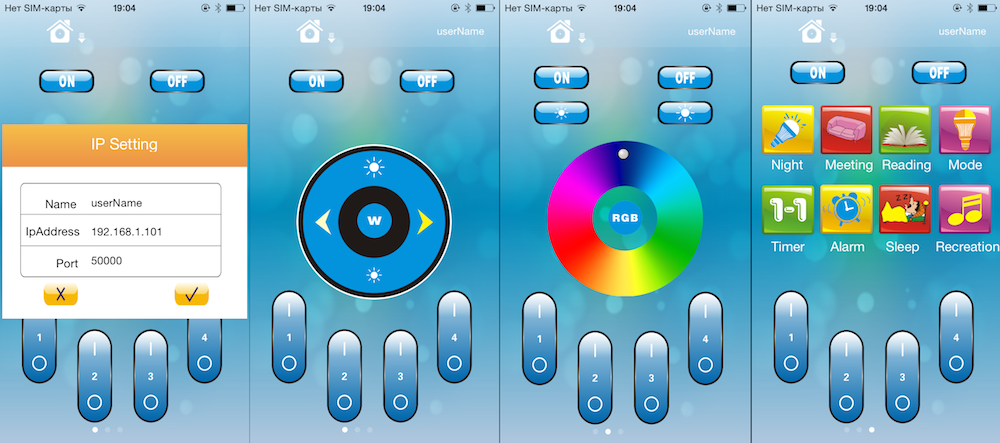
There is also a tablet application, but I don’t have it, so I won’t be able to show it. Judging by the monotony of applications, even for different platforms, it will not be any different.
As I said, for the android application is exactly the same, but it looks a little worse - in some places the buttons went.
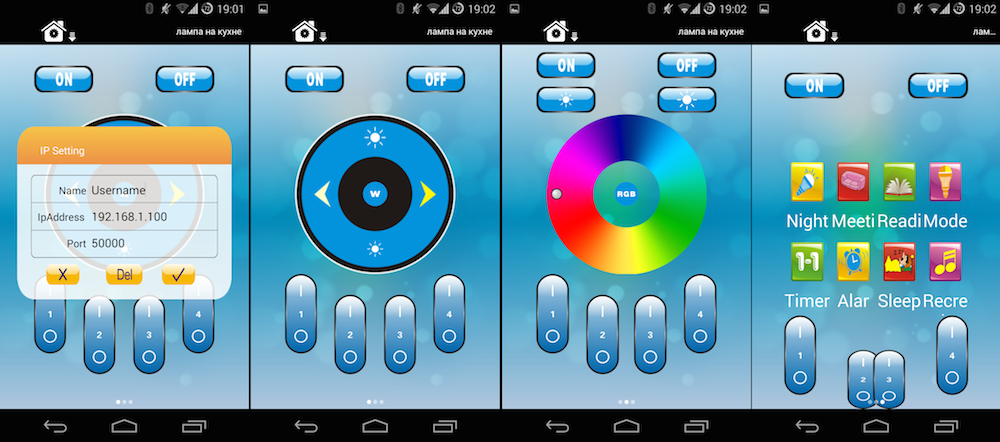
To get started, they need to specify the IP address and port. Why did I not understand the possibility of setting up the port, although it can be changed in the web interface, but why this is necessary is not clear. And in the Name field, in spite of the “UserName” prompt, it is necessary to enter not the “admin”, as written on the connector, but the name of the router. However, you can also enter admin there, you just have a connector with the name in the admin program.
As I said, the application functionality for the most part duplicates the console, except for the last screen. There are collected presets that can not be reassigned, and some more functionality - a timer, alarm clock and so on.
So we would have lived with simple applications for the phone, if we had not unexpectedly written Efimomax , who bought a light bulb, and then conducted reverse engineering of the communication program of the mobile program and the connector (it was not very difficult) and wrote the implementation in PHP and C # in as a library and a simple application.
Efimomax wrote a simple application, we were glad, thrown off in a general chat in Skype and forgot. But this message was seen by our seller in the store on the top crust , and while bored waiting for customers, he wrote down such a beautiful application.
It is functional and works pretty well. You can pick up the application with the source here . Forks and pushrequests are welcome :)
Written in PHP, the HTML looks like this:
But this is not the most important thing. The most important thing is that the script can transfer parameters from a web page or from the console.
The script itself is quite simple, the main part of it is this function:
The rest are commands, error handling, and so on.
You can find it in Github , fork and push quest as usual, welcome!
You can use it as usual, passing it the parameters via the address bar:
So calling it directly from the script inside the system:
Quite an interesting device that is quite suitable for an entry-level smart home. Of course, not without flaws, and requiring some dopilki (read "writing control software"), but quite workable, well done and cool.
The repository on github with source codes for PHP and C # .
Of course, in our store:
Lamp in the store : 990 rubles
Router in the store : 990 rubles
Remote in the store : 690 rubles
And you can also come to our offline store on the crust and live to see, touch, smell, twist in your hands, and then ask to wrap.
Due to the fact that the application for phones does not looklike shit , and working with it is just as convenient, we are changing a set of five Marlight lamps, a console and a connector for an application for your favorite operating system or mobile platform!
Conditions:
To participate, please email me at vz@madrobots.ru with the topic “Marlight Promotion”.


I told earlier about the system for a smart home - NooLite ( 1 , 2 ), but its main drawback for ordinary users is that it must be installed using terminals, a soldering iron, cutting wiring, and so on. The downside is the high ability to customize everything to your liking, but it is not always necessary. This time I will talk about a system that has similar functions, but is designed for ordinary people - all you need to do to install it, is to simply screw the light bulb into the cartridge.
Kit
The whole system consists of three things - the bulb itself, the console and the router, each of which can be bought separately:
')
Lamp
The lamp box looks like this:Inside is a lamp packed in plastic:
And that's it! There is nothing more inside, it is implied that a lamp that has no buttons or other controls does not need instructions. By the way, the packaging is strong enough - only one of more than 1000 lamps that have passed through the store was damaged - the basement was crushed a little. I had this very handy, and now we have the opportunity to see what is inside it, the truth about it a little further.
So, the lamp:
It has a base E27 - standard for household lamps:
To understand the size, you can put it next to the Ikea lamp - SPARSAM .
It would be nice to compare with the incandescent lamp, but I could not find one in the house. It is convenient to compare them also because they are approximately the same in brightness, but Ikeevskaya is much more yellow.
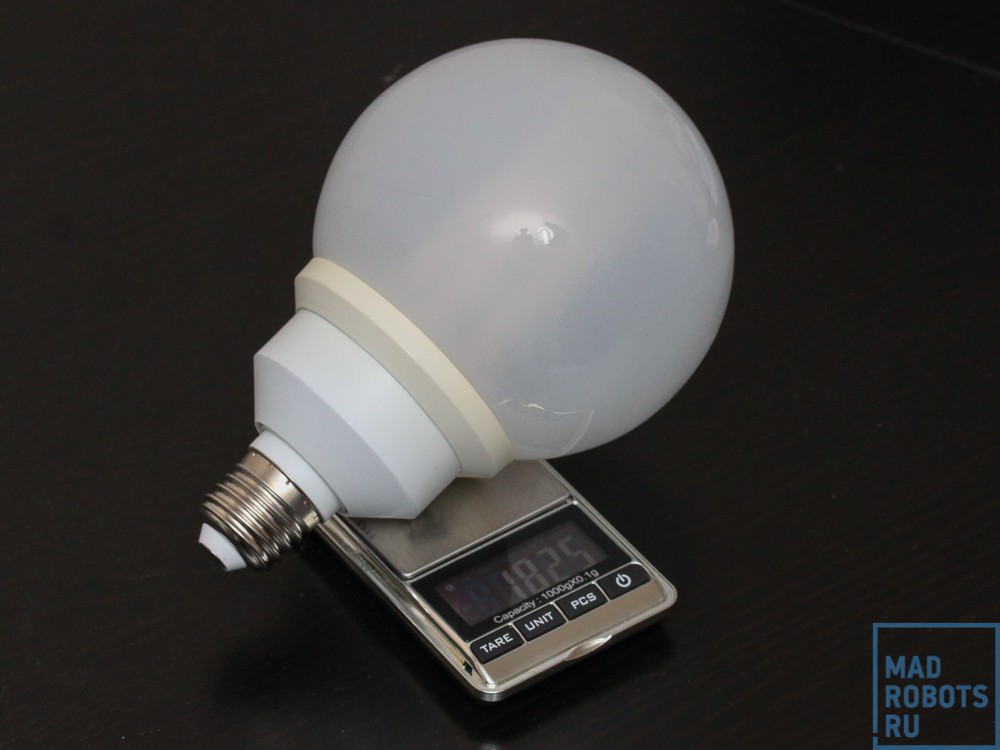
Their weight is also similar, Spars weighs 185 grams:
And marlite 179:
Such a small light bulb weight is due to the thick aluminum housing, which serves as a radiator for LEDs.
To compare the brightness of two lamps, I photographed them in the same position on the same settings (1/100, 2.8, 400):
It turned out that marlight at maximum settings is even slightly brighter. Do not pay attention to what is being illuminated in different ways, because this is the lamp from which I removed the diffuser (why - it will become clear later).
Remote controller
The control panel looks like this:
You can see the box in the title photo, so there’s no point in showing it. Components of the console are much richer than the lamp - it has a whole instruction in the kit:
The remote, by the way, works on three AAA batteries (which are not included):
The most interesting thing in the console (besides the viscera, of course) are the controls:
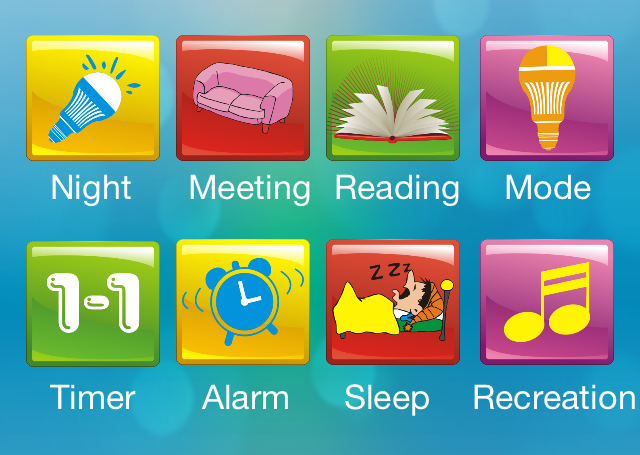
In order not to talk about which button is responsible for what, I drew such a picture:
She entered into our leadership . We had to write a normal manual, because the one that comes with is not only written in bad English, but still incomplete and partly contradictory.
At the bottom of the remote - channel control buttons. As in the case of NooLite, the lamps are tied to the console, and not vice versa. In the sense that the remote control code (more precisely, the channel code on the remote control) is written to the lamp, from which it will receive commands.
Each console has 4 channels. Each channel is controlled by two buttons - turn it on and off. The power button is also the channel activation button — all the top controls (color change, brightness, light temperature) are applied to the last active channel, i.e. to the channel where you last pressed the power button. If the lamps were turned off, after pressing it, they will turn on in the “white light” mode with the previous setting of brightness and color temperature. If the lamps are already burning, then nothing will happen, but the remote will remember this channel, and all the following commands using the upper buttons will give this channel.
You can attach as many lamps as you like to each channel, as long as they are in the coverage area of the console. For example, in this video, the dude controls a bunch of bulbs at once:
One of my colleagues, who really liked these lamps (hello, fundorin ), bought 11 pieces at once and put them in all the rooms in the house. 4 channels of the console - 4 places in the house: kitchen, toilet-bathroom, living room and corridor. It turned out that from one remote control you can control the lighting in the whole apartment from anywhere. He says it is very convenient, especially turning off the light already lying in bed and dimming while lying in the bath.
Each console has serial numbers for different channels, so two remotes can control 8 sets of lamps, and neighbors cannot turn on the kitchen light when going to the toilet at night.
The control unit - a router
Light bulbs, controlled from the remote - of course, cool, on the smart home well, in general, does not pull. The most interesting thing starts when it becomes possible to connect the lamps to a computer and set up some automation. For this purpose, a connector router is used in such a box:
Her bundle is even richer than the console - in addition to the manual, she also has power cables in the kit!
Despite the USB connector, the wire is only for power - connecting the router connector to the computer will not work. No, of course, it will work, but there will be no difference compared to the power supply. It also does not have a LAN connector, all communication is via wireless connections. He can either create his own WiFi network, or connect to an existing one.
Of the interactive elements on the body of the connector, there are three LEDs:
As well as a microUSB connector for power and a hole in which the reset button is hidden:
All the necessary data for the first connection to the router are written on it:
Therefore, we will not even open the instruction - we translated everything we needed into Russian and added it to our file.
What's inside?
The control unit - a router
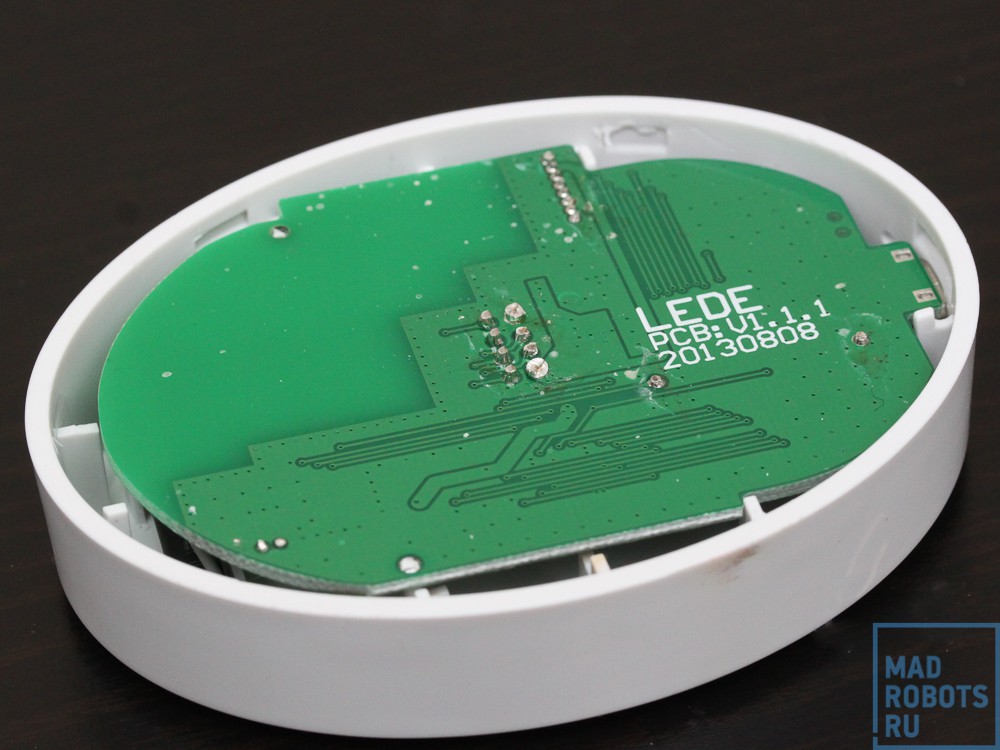
Of course, without disassembling the device at least once, you cannot be considered its full-fledged owner. We start with the router. Do not pay attention to the warranty label - just when you are a company that provides a guarantee.
It is easy to disassemble it - there are no screws or cunning fasteners. All that is needed is to pry the bottom cover with something flat and durable to pull it out of the latches:
After removing the cover, we see the bottom part of the board, which is not interesting to look at.
But the reverse side is much more interesting:
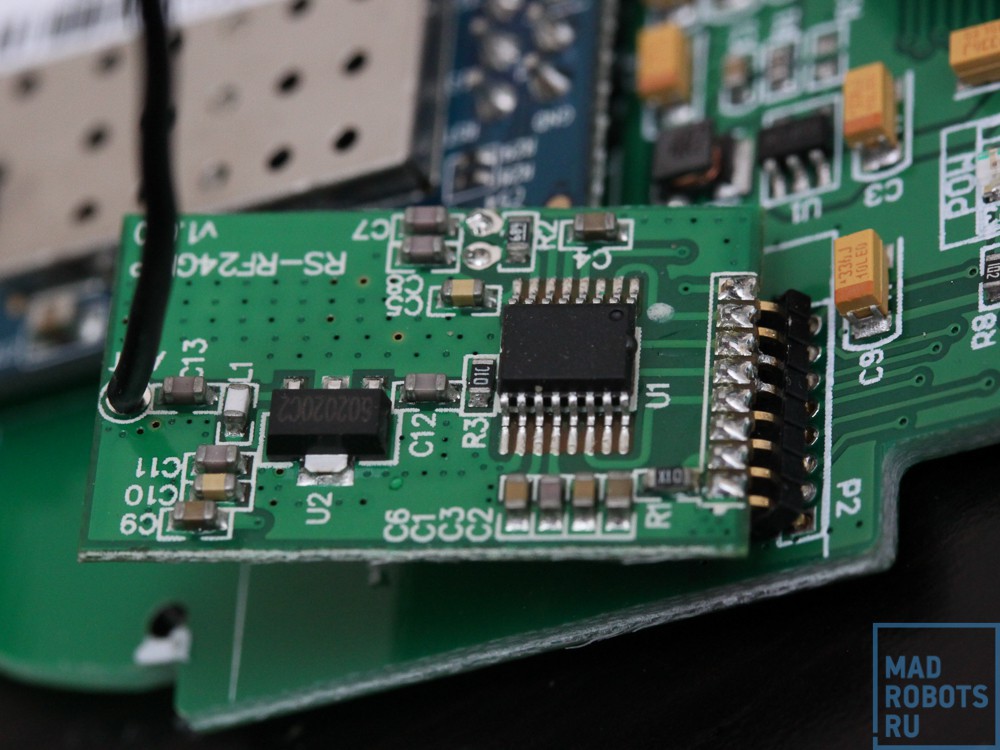
On it, we see a 2.4 GHz transmitter with an unmarked microcircuit:
Like the main controller:
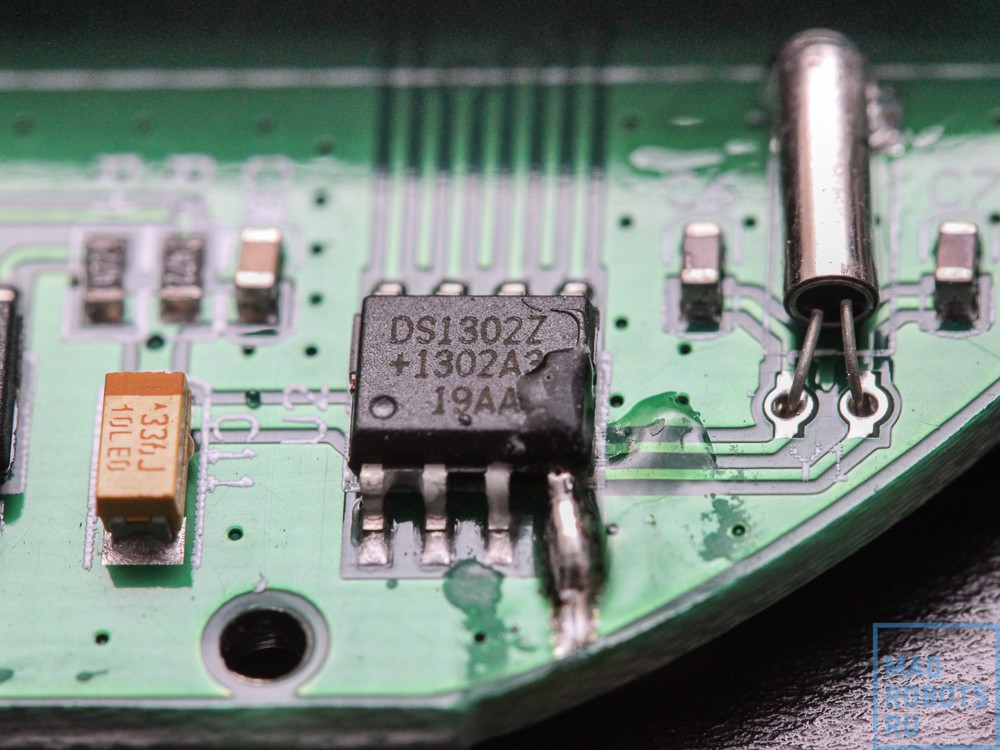
I do not understand why ordering controllers without labeling, if the firmware still cannot be counted. What will give the absence of marking? Well, okay, it is necessary to ask the Chinese. We go further and see the RTC chip - a real-time clock called DS1302 . This is such a specialized microcircuit that deals only with one thing - time counts. True, she does it perfectly - with good accuracy and very low power consumption - from a CR2032 battery it can work for about two years, even if it has not been connected to the power supply all this time.
For the very calculation of time, the “hourly” quartz is located next to the hard-to-remember frequency of 32768 Hz, which is simply a twain of 15 degrees. It is enough to reduce this frequency by 15 times in a row and we get a frequency of 1 Hz - a tick every second.
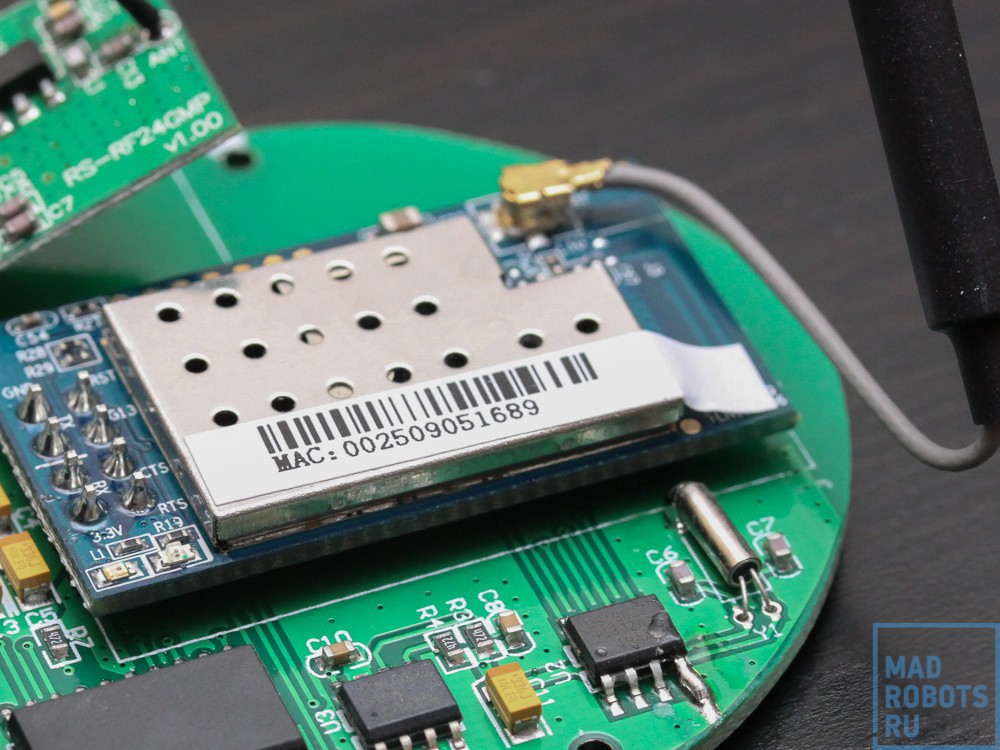
Go ahead. There is only a Wi-Fi module with a UART interface:
He is actually responsible for communicating with the local network of your router or creating your own.
Lamp
Now we analyze the lamp itself. In general, unlike the console and the router, it is completely non-separable (but the most interesting). For example, the first stage of disassembly involves cutting with a hot knife or cutting a plastic diffusing dome:
By the way, it is rather thick - almost 3 mm thick:
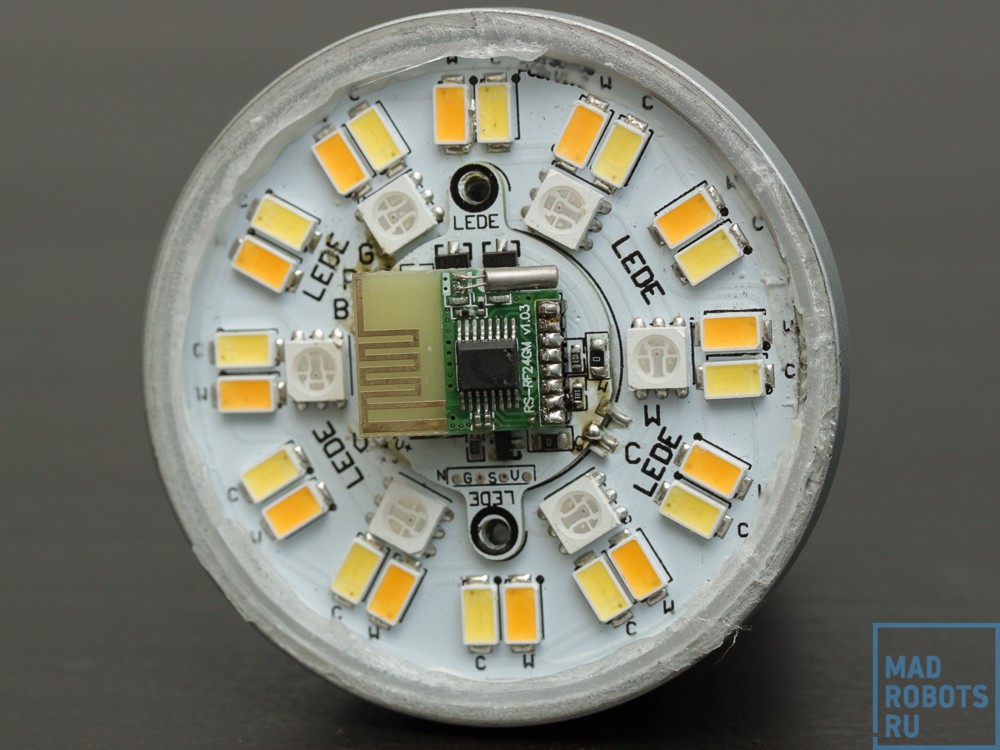
To break a lamp with such plastic is difficult. After trepanning the lamp, we get access to the main board:
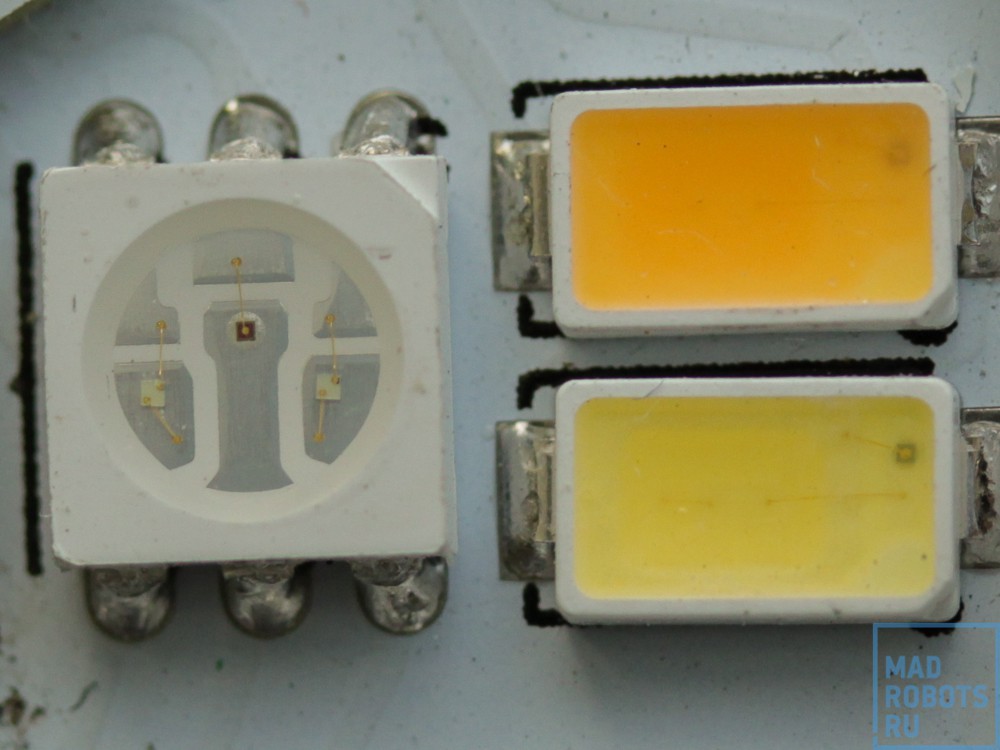
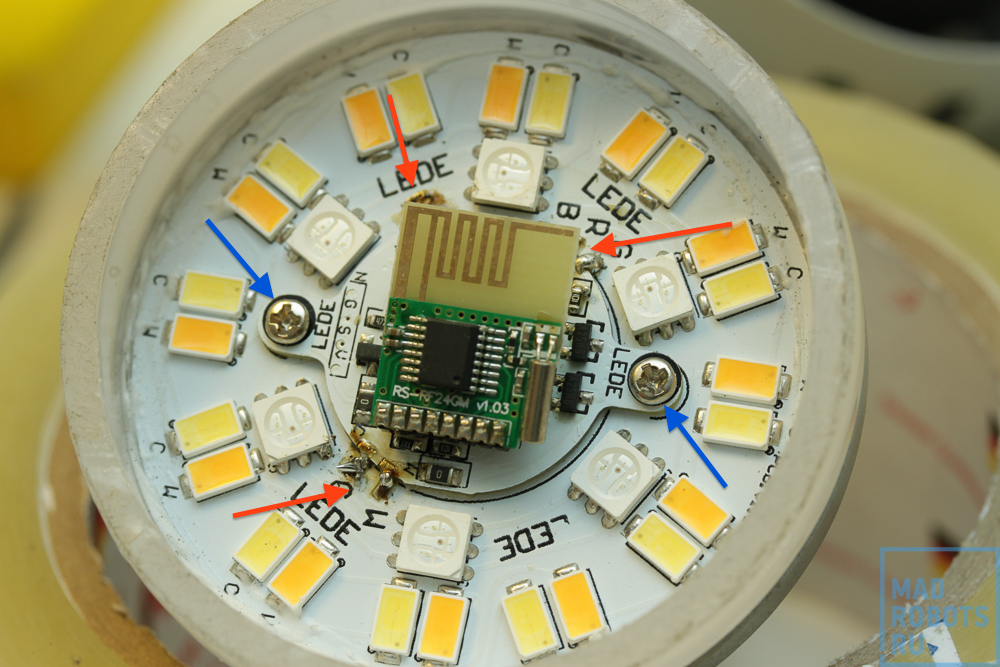
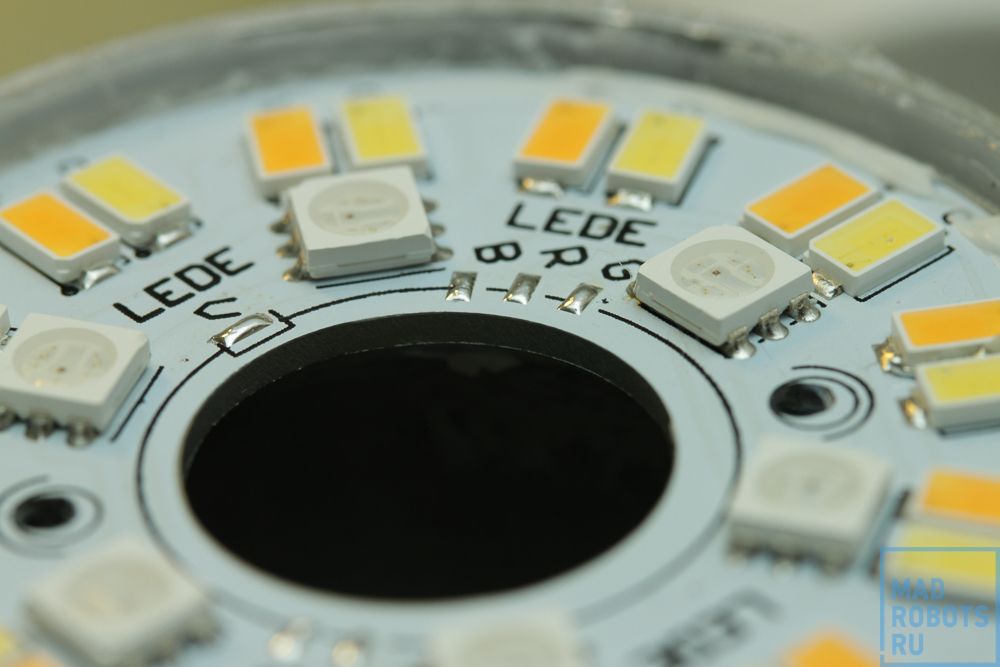
As we can see, 30 LEDs are used for illumination - 24 white LEDs (12 warm LED and 12 cold LEDs) and 6 RGB LEDs. RGB LEDs are responsible for color lighting, and white, respectively, for white.
Moreover, as can be seen on the gif, at the same time, two types of LEDs do not work at full power - even though this would increase the brightness, it would require more cooling and a more powerful power supply. And the brightness would change during temperature control.
The disassembled lamp, by the way, to shoot without a lens is just awful, it turns out like this (by the way, subscribe ).
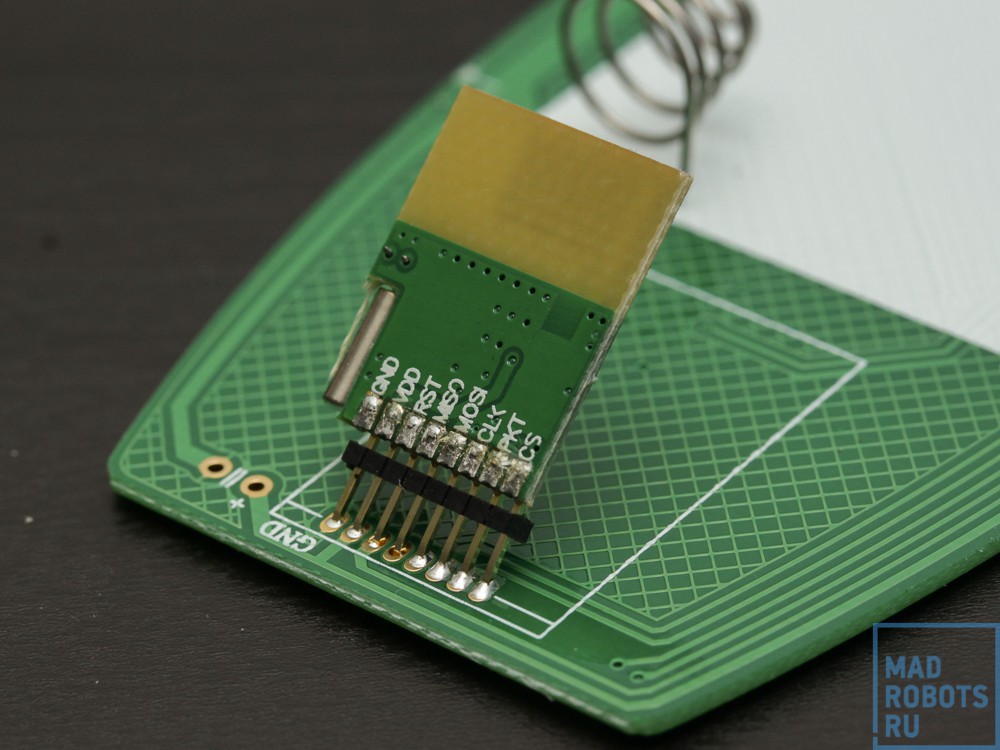
In the center is the radio module, already familiarly completely without marking:
Under it is the controller:
This is STM8 controller STM8S003F3 , completely normal - 16MHz, 8 Kb of memory. The controller communicates with the radio module on the SPI.
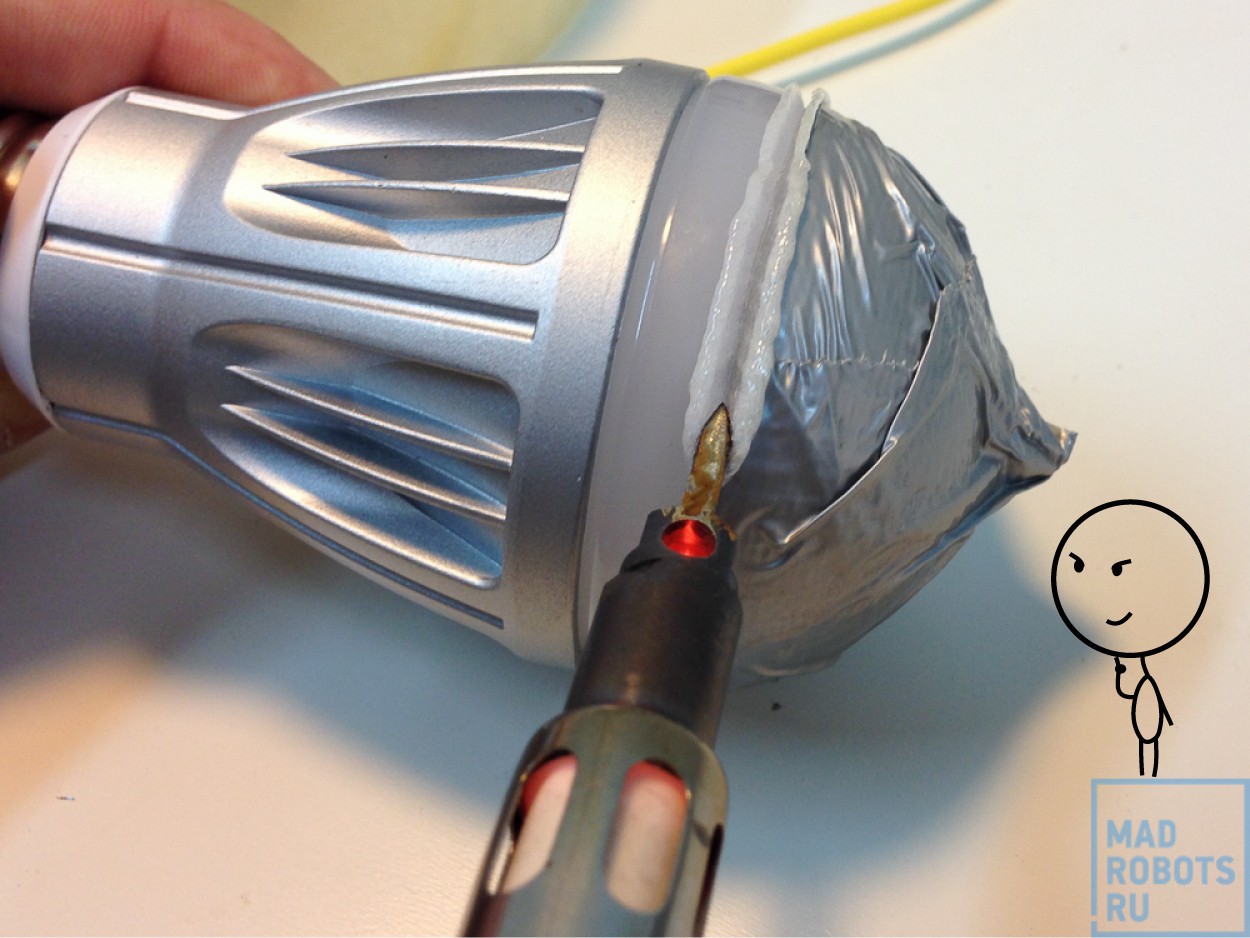
To get to the lamp power supply, you need to cut off the lamp base in a similar way:
And then climb the soldering iron deep and solder the power wires:
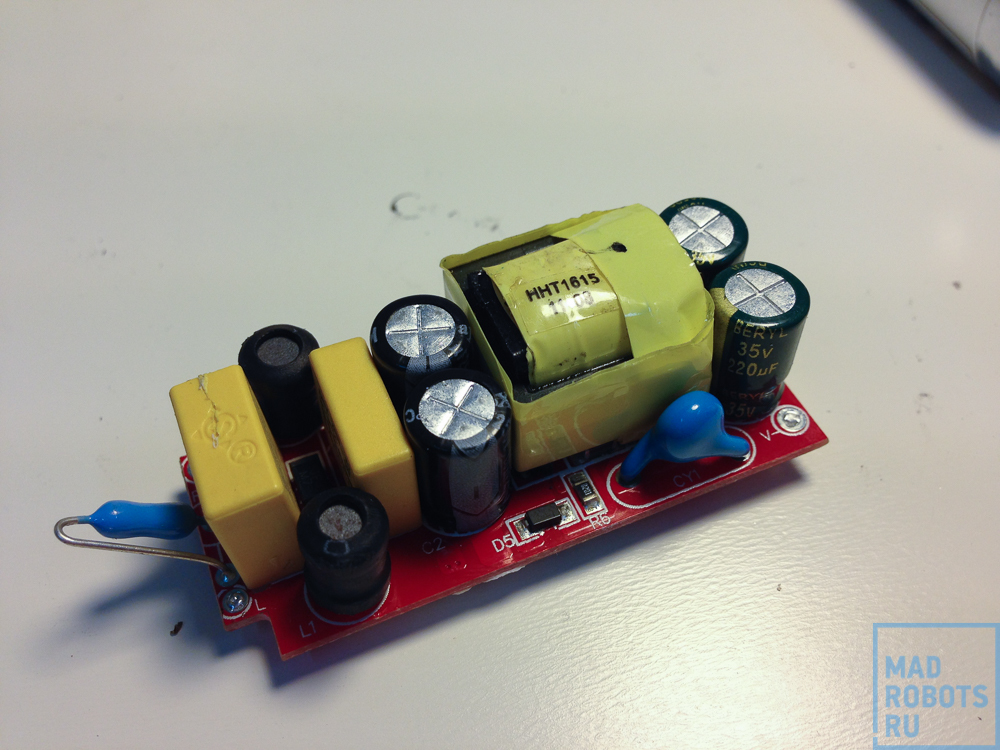
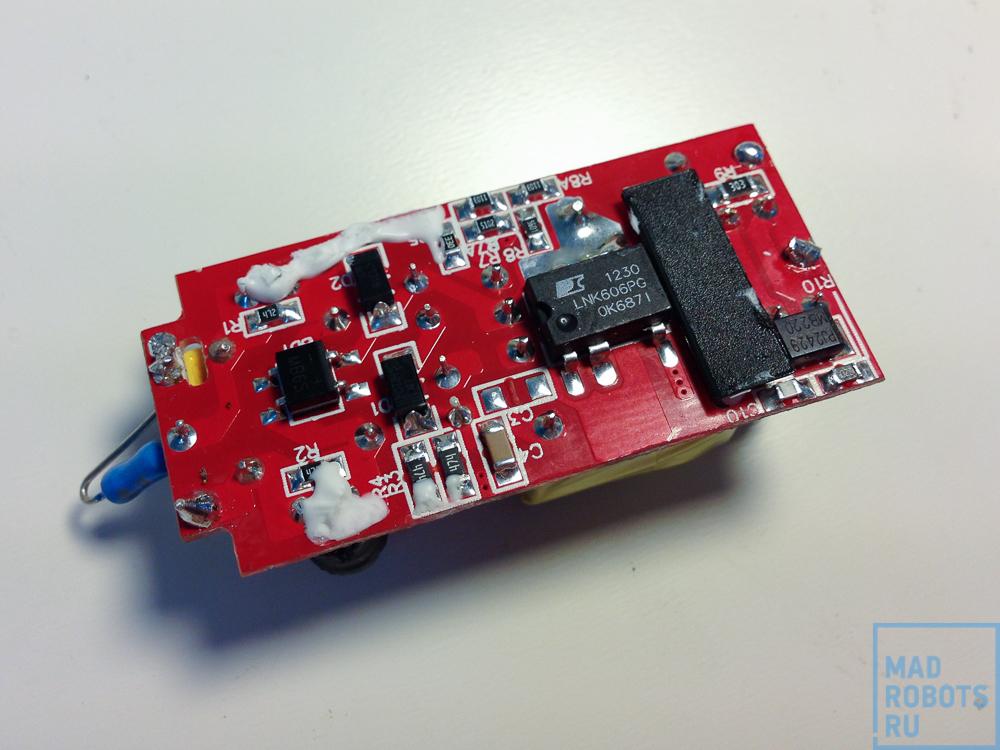
What fell off after that from the light bulb is the power supply:
The power supply is built on a single chip LNK606 , which is quite unusual for Chinese devices.
LNK606 is a LinkSwitch-II series chip designed specifically for the manufacture of power supplies. Due to the fact that they monitor completely all the parameters of the power supply, its scheme is very simple:
At the same time we get protection against short circuits, low network consumption without load, thermal protection and good efficiency.
So, back to the LEDs:
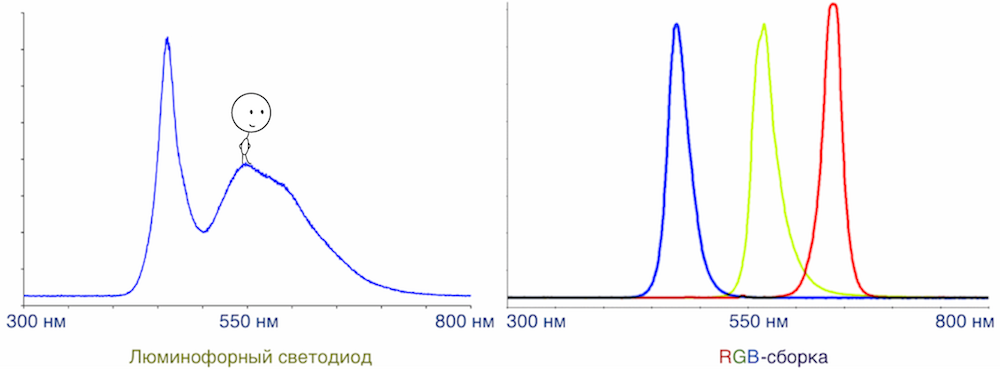
White LEDs are the same, differ only in the type of phosphor. "White" LEDs - in fact, blue or ultraviolet, exactly that vyrviglaznogo shade that shines us right in the eye at night. White makes them yellow substance - phosphor, which absorbs blue light and re-emits it in a different range. Combining different substances in its composition can achieve different shades of white, such as cold or warm, as was done here. A big plus of phosphor LEDs is a smooth spectrum unlike RGB assemblies:
This has a positive effect on the quality of lighting - such LEDs have a higher color rendering index - CRI , despite the fact that they can look at first glance like assemblies - emit about the same white light. But there is a nuance!
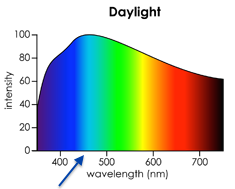
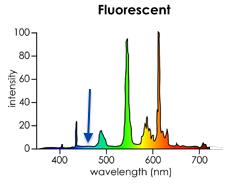
Since the color of an object determines what part of the spectrum reflects its surface, an interesting situation may arise when the spectrum of light incident on the object simply lacks a part that is reflected by the object. For example, we have a blue object that reflects waves with a length of 450 nm. If we shine this object with sunlight, then everything is fine:
The spectrum contains waves of this length and they are successfully reflected by the subject. And if we illuminate this object with a light source, whose spectrum does not look like that of sunlight? It turns out that:
This, however, about fluorescents, but not the essence. A lamp in the spectrum simply lacks some of the waves of this length, although it seems to us to be as white as the sunlight. Since there are no waves in the spectrum, the object has nothing to reflect, it will look dark.
Of course, everything is more complicated in life - almost any surface reflects not only one specific wavelength, almost always capturing the infrared and ultraviolet range, so a blue object most likely will not look black with such lighting. But here you can easily get all sorts of problems with color perception. Therefore, printers never show the result to the client in the workshop, only in the office, only under halogen or incandescent lamps.
In short, phosphor LEDs - this is good, and only they should be used to illuminate the workplace. And that someone did not know?
In general, all normal white LED lamps use phosphor LEDs, and I say this simply to the fact that Marlight can be used to illuminate the workplace, if you are satisfied with its brightness.
However, in the lamp RGB-assembly is still there, but they are used to display all the other colors. Here is one of the three-color LEDs closer, you can see three different crystals and wiring to them:
True, in my opinion, the colors are very concentrated and pure, I would like it more if they could be mixed with white to create different shades.
Another scourge of LED lighting - flicker. The LED, in contrast to the incandescent lamp, does not have thermal inertia, and if we turn on the LED directly into the network, as they do in cheap corn lamps, the LEDs blink 100 times per second, which is well noticed with fast eye movements or objects - a pencil test . There we are talking about monitors, but for lighting it works. Here, for example, looks like a "power supply" in one of the lamps in my house:
Use it to illuminate the premises, of course not. It is in the toilet.
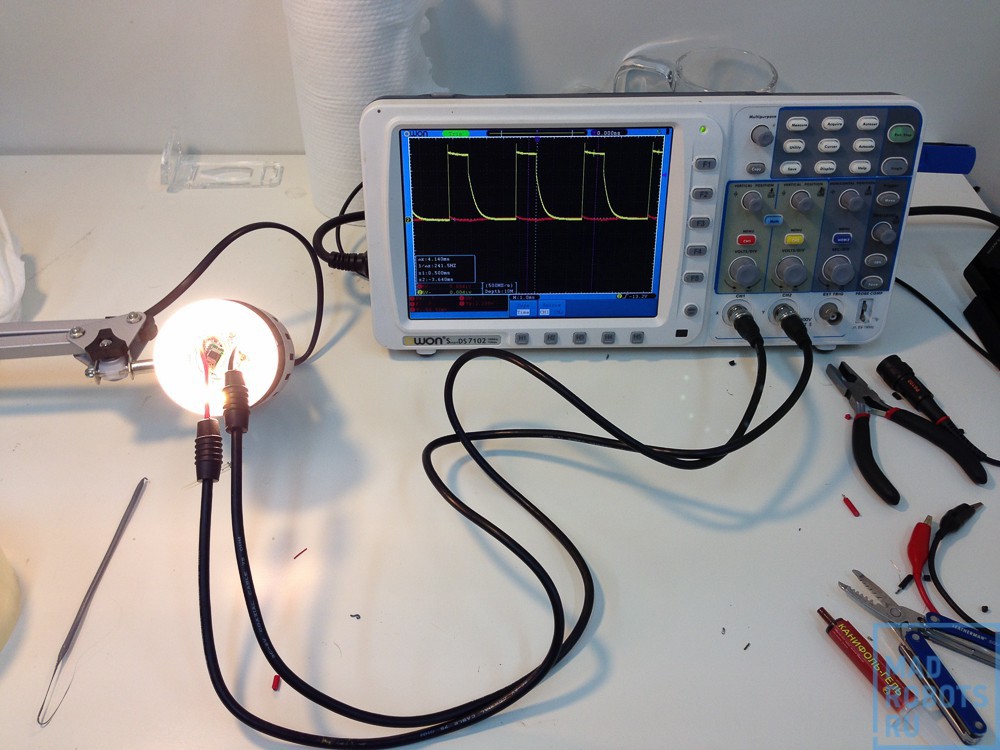
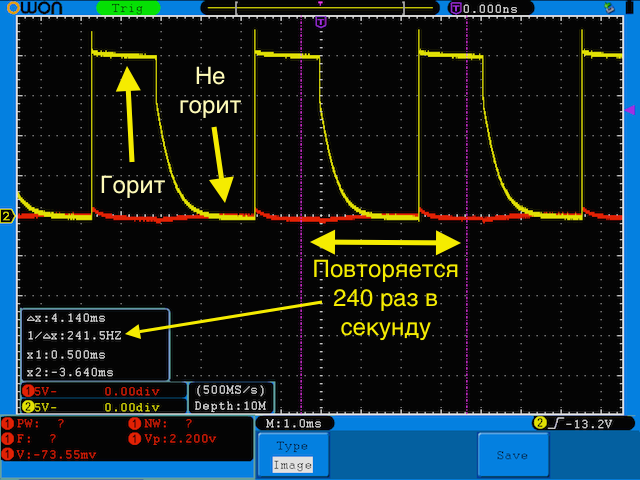
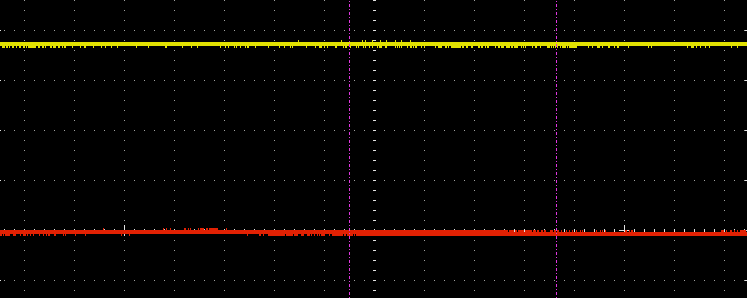
Again, in normal lamps there is no such problem - there, as in marlaite, there is a power supply unit that converts the mains voltage to the right (constant) for the LED, eliminating flicker at all. More precisely, eliminating the flicker at maximum brightness, because the brightness decreases the PWM th, usually low frequency. Since we have disassembled the light bulb, connect an oscilloscope to it and take a look at how the brightness change works here:
Now you can turn on the light bulb and look at what is happening with the oscilloscope probes:
When it is turned on at full brightness, no ripples are expected:
Two channels of the oscilloscope are connected to the channels of warm and cold LEDs. In this case, the "warm" LEDs are lit at full capacity, and the "cold" ones are turned off altogether, which is what we see in the picture.
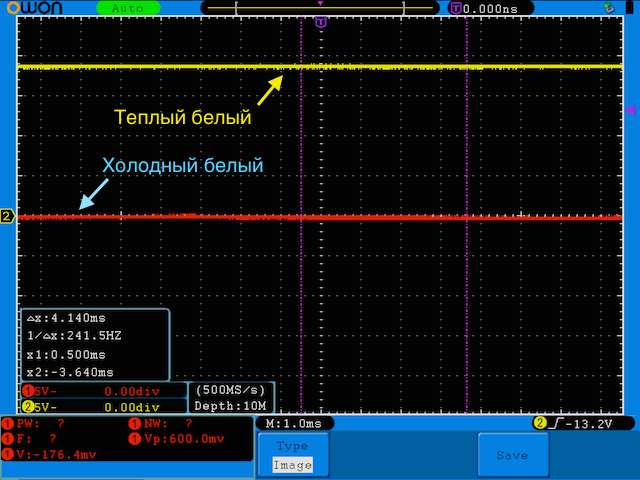
And now reduce the brightness of the button on the remote or in the application:
Now the constant glow of the LED periodically stops, and the human eye perceives it as a decrease in lighting due to its inertia. 240 Hz - the frequency is not very large, but coupled with a good diffuser, the eyes at medium brightness do not particularly interfere.
Here is the change of brightness in the dynamics:
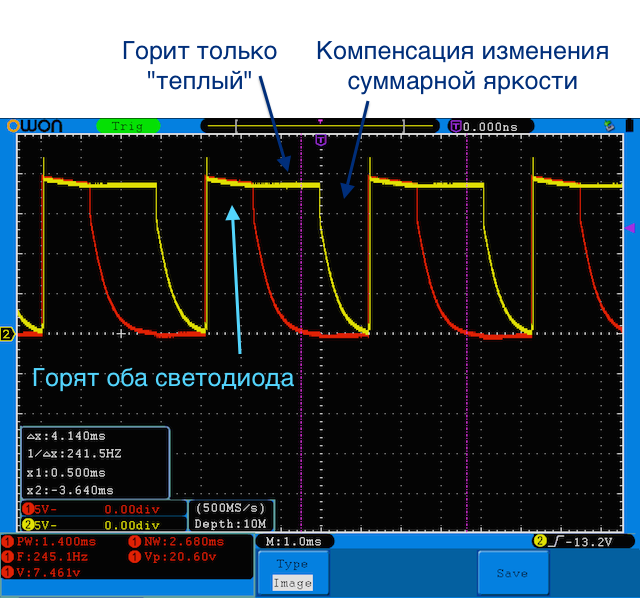
Now let's change not the brightness, but the color temperature:
Obeying the fill plate, protected inside the controller, the “cold” LED turned on at 20% brightness along with white in order to shift the temperature of the light to the cooler one. But at the same time, to avoid changing the brightness (part of the cycle, both LEDs work together), the “warm” at the end of the cycle turned off exactly at the time when the “cold” was turned on, and thus the total brightness of the whole lamp did not change. If you turn on the temperature in the "average" mode, then both LEDs will work the same time, and it will look like this:
And this is how it looks in the form of animation, here the light in the first frame works in the “only warm” mode, then gradually goes to the “10% warm, 90% cold” mode, and then comes back.
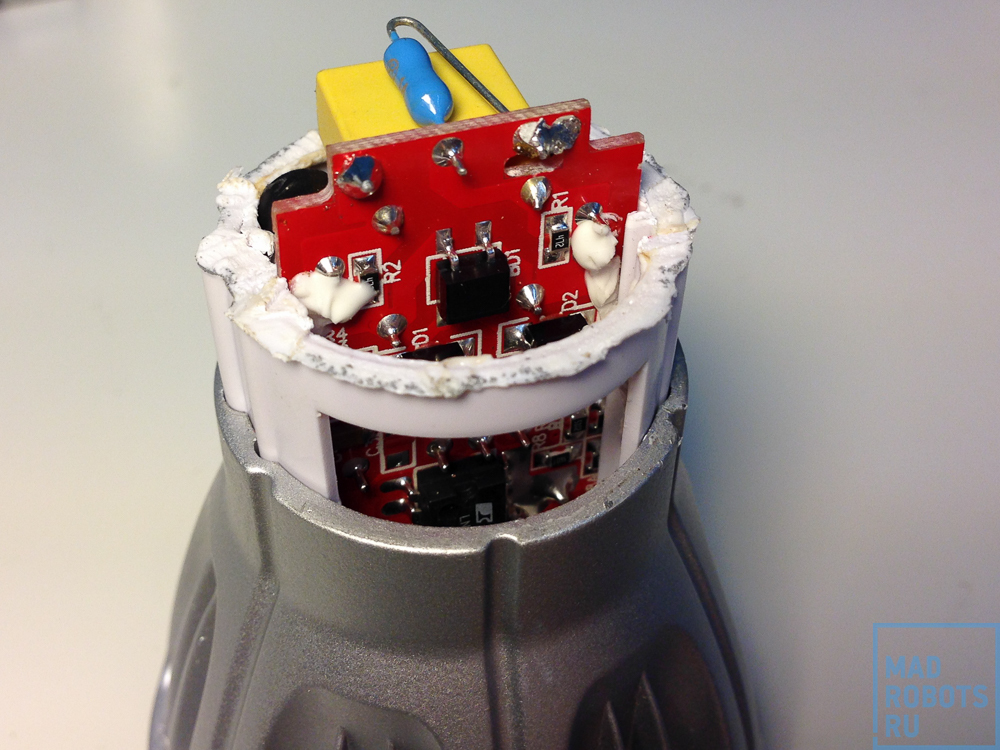
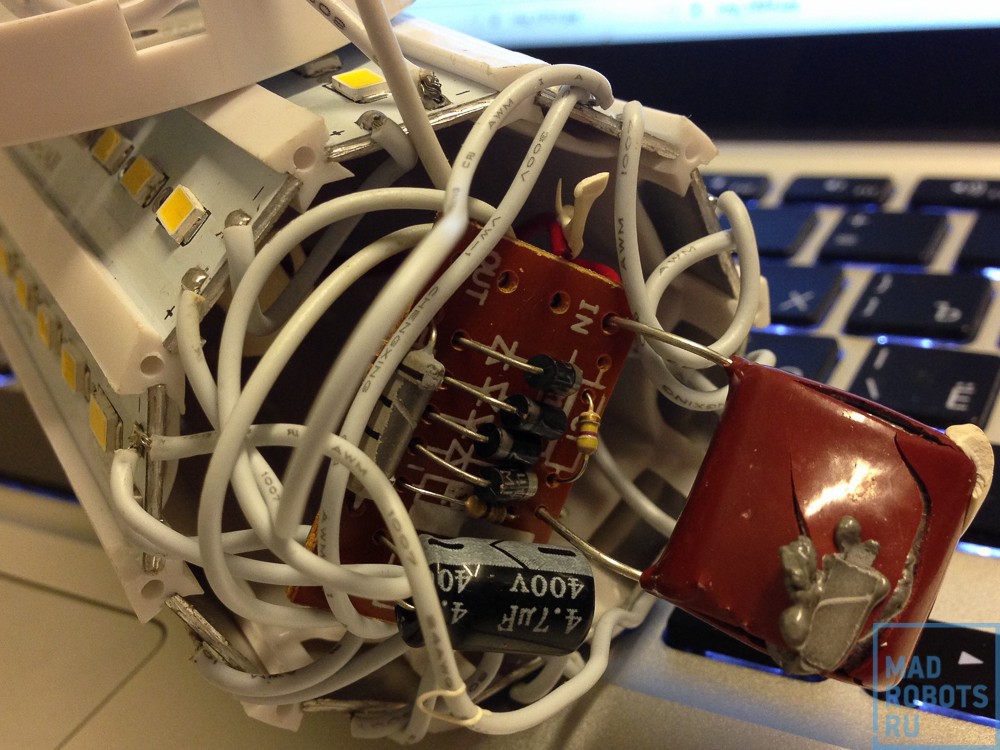
To disassemble what is left of the lamp, you need to unscrew the two screws (blue arrows), and then unsolder the connection points of the processor board to the LED board (red arrows):
The boards are connected with a sandwich for a reason - the bottom board is aluminum, and the top one is made of PCB. This is done in order to remove heat from the LEDs, but at the same time not to experience problems with two-sided installation on an aluminum board. By the way, its thickness is 1.5mm:
Now, if you hook the aluminum board with something curved and pull, it is not without difficulty, but it will be separated from the radiator:
Between the bottom board and the radiator there is a thermal interface layer applied - the same as that used on the heatsinks for the processor.
In the hand there remains such a solid aluminum radiator, which makes up most of the lamp's weight:
Remote controller
With sadness (because this is the last thing that can be disassembled), open the console:
The upper part is the sensory ring:
Similar to the app from ST:
The lower part - the buttons, the membrane for on-off channel, touch for all other functions:
The reverse side is more interesting:
There are two unmarked chips:
And the transmitter module already familiar to us:
Control
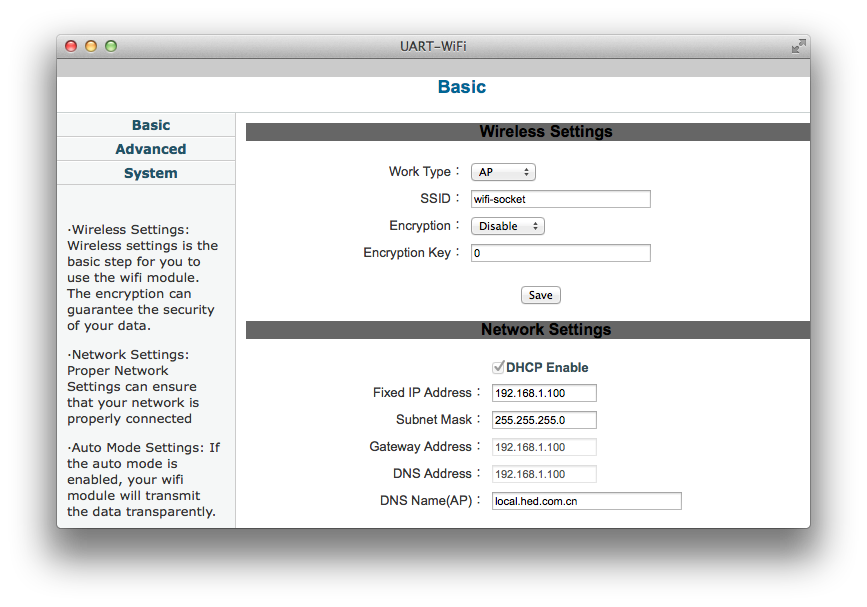
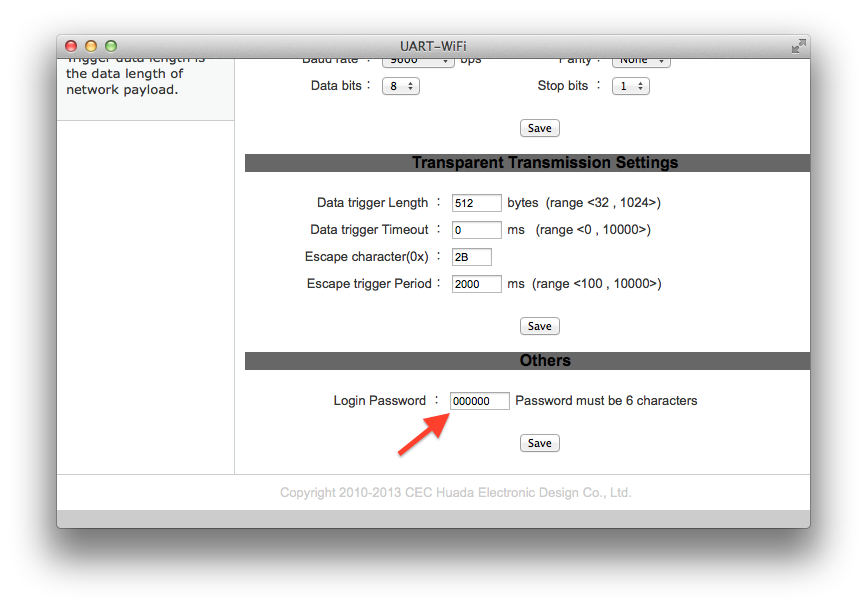
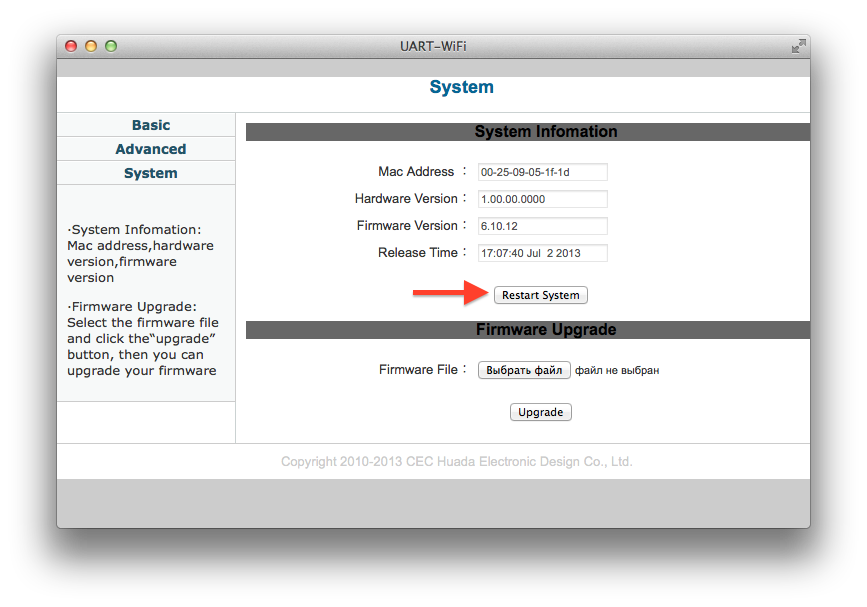
About how to control the lamps with the remote, I have already described above. Now let's talk about what applications can do. To begin with, I will show the web panel of the router - it is quite simple. You can configure the network in it, this is what the settings look like when the connector creates its wifi-socket network without encryption:
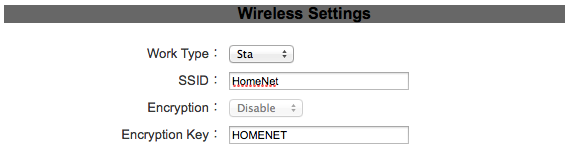
And so the connector connects to the network as a client:
You can also change the login password there:
And reload it:
The remaining settings are not needed by the user and do not need to touch them, because it is fraught with the loss of the router before resetting - they relate to the settings of the TCP <-> UART transmission to the controller, which translates them into commands for the radio module.
Phone application
An application for controlling light bulbs is available for iOS and Android . They are fairly simple in functionality, and in fact duplicate the buttons on the remote control. Here is the iOS app:
There is also a tablet application, but I don’t have it, so I won’t be able to show it. Judging by the monotony of applications, even for different platforms, it will not be any different.
As I said, for the android application is exactly the same, but it looks a little worse - in some places the buttons went.
To get started, they need to specify the IP address and port. Why did I not understand the possibility of setting up the port, although it can be changed in the web interface, but why this is necessary is not clear. And in the Name field, in spite of the “UserName” prompt, it is necessary to enter not the “admin”, as written on the connector, but the name of the router. However, you can also enter admin there, you just have a connector with the name in the admin program.
As I said, the application functionality for the most part duplicates the console, except for the last screen. There are collected presets that can not be reassigned, and some more functionality - a timer, alarm clock and so on.
So we would have lived with simple applications for the phone, if we had not unexpectedly written Efimomax , who bought a light bulb, and then conducted reverse engineering of the communication program of the mobile program and the connector (it was not very difficult) and wrote the implementation in PHP and C # in as a library and a simple application.
Computer application
Efimomax wrote a simple application, we were glad, thrown off in a general chat in Skype and forgot. But this message was seen by our seller in the store on the top crust , and while bored waiting for customers, he wrote down such a beautiful application.
It is functional and works pretty well. You can pick up the application with the source here . Forks and pushrequests are welcome :)
Server application
Written in PHP, the HTML looks like this:
But this is not the most important thing. The most important thing is that the script can transfer parameters from a web page or from the console.
The script itself is quite simple, the main part of it is this function:
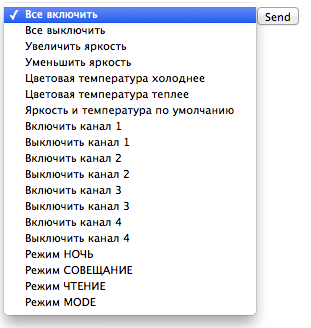
function sendMessage($udp_message) { $message = vsprintf(str_repeat('%c', count($udp_message)), $udp_message); global $server_ip, $server_port, $delay, $debug, $error_value, $ok_value; if ($socket = socket_create(AF_INET, SOCK_DGRAM, SOL_UDP)) { socket_sendto($socket, $message, strlen($message), 0, $server_ip, $server_port); sleep ($delay); socket_close($socket); echo $ok_value; } else { echo $error_value; } } The rest are commands, error handling, and so on.
You can find it in Github , fork and push quest as usual, welcome!
You can use it as usual, passing it the parameters via the address bar:
http://192.168.12.1/marlight.php?command=RGB_MODE_SET_COLOR&r=255&g=10&b=0 So calling it directly from the script inside the system:
MBP-Zaytsev:~ vvzvlad$ php marlight.php command=RGB_MODE_SET_COLOR&r=255&g=10&b=0 Total
Quite an interesting device that is quite suitable for an entry-level smart home. Of course, not without flaws, and requiring some dopilki (read "writing control software"), but quite workable, well done and cool.
Links
The repository on github with source codes for PHP and C # .
Where to buy and how much?
Of course, in our store:
Lamp in the store : 990 rubles
Router in the store : 990 rubles
Remote in the store : 690 rubles
And you can also come to our offline store on the crust and live to see, touch, smell, twist in your hands, and then ask to wrap.
Make an application for your favorite platform - get a set of Marlight
Due to the fact that the application for phones does not look
Conditions:
- The action involves applications for the following platforms:
Android,iOS,Windows Phone,BlackBerry,Windows, console for Linux / OpenWRT / DD-WRT,MacOS. - The application and its source code must be published under the BSD license.
- The kit is transferred to the participant after he demonstrates the first version of the application with the design.
- Design and additional functionality and - at the discretion of the developer.
To participate, please email me at vz@madrobots.ru with the topic “Marlight Promotion”.
Source: https://habr.com/ru/post/230473/
All Articles