NES / Sega / etc emulation in your pocket: Browse / configure EXEQ Ray 2 (JXD S5110b) - firmware, software, management
 In this article I will talk about my experience in operating and setting up the game console on android " EXEQ Ray 2 " (twin JXD S5110b ). At what I will tell you not about how it works as an android device, but only as an emulator of old game consoles - Sega, NES (dandy), SNES, DS, etc. After all, as a portable emulator, I bought it.
Let's quickly go over boring technical specifications:
- Dimensions: 195x87x17 mm, 232 g
- Android 4.1.1 with out-of-box root rights
- Screen 5 ", glossy, TN, 800x480, capacitive touch for 5 touches
- 8 Gb of memory + microSD
- 2-core 1.5 GHz CPU
- Wi-Fi, mini-HDMI, accelerometer, 0.3 MPx camera
- Two analog sticks, two bumpers (shift), D-Pad, 4 buttons, start, select
- Battery: Li-Ion 2200 mAh (3 hours of play)
- Cost: ~ 4200 rubles.
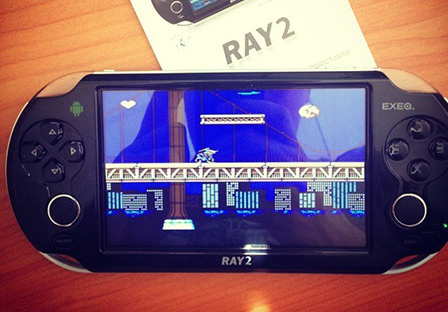
In the video below, I twisted the console in my hands, talked a bit about it and showed how it works:
')
For all who are interested, then I will talk about all the problems that I encountered and tell you how to solve them.
Choice, and general impressions.
If someone is following my articles, he knows that I am not indifferent to old games. And so, I had an overwhelming desire to play the same Dendiv or Segov hits on something tangible and iron. It is necessary, by the way, to say that in my childhood I only had the ZX Spectrum and I played only consoles in consoles, with friends. So at the same time I wanted to catch up.
I, of course, admire the collection of cartridges and consoles in Pixel Devil 'a, but after thinking about it, I realized that this option does not suit me for many reasons. All these consoles just do not connect to the monitor, cartridges need somewhere to get (or mess with hardware-emulator cartridges). In general, I am not ready for this fuss.
That is why I decided to look at the market of portable emulators and, in particular, at the line of EXEQ . They have quite a lot of models, but for a long time I did not think about the choice. Pushed away from the screen. I decided that 7 "is already a bit too much (the console is no longer so portable) and chose a model with a 5" screen, just in case with a 2-core CPU (why not take it if it costs as much as 1-core ) and without 3G, because I don't need it.
Once again I will note - I consider this device exclusively as a platform for emulators. A bit more sophisticated and flexible analog Dingoo A320 . Yes, the device has Android Play Market and you can put android toys. And even there is a built-in mapper that allows you to assign hardkey buttons to touch the screen. But personally, I am not interested.
Yes, it was possible to take a twin from China JXD S5110b for $ 100 or even less. But I did not wait for a month of delivery and risk “stolen by mail” in order to save 1,000 rubles.
So, let's finally about the first impressions.
Screen.
I must say: the screen is bad. The resolution is low, the color rendition gives a cheap blue, on the street everything at once becomes indistinct. But on the other hand, what did you want from the console for 4000 rubles?
Photos to compare the colors of the screen iPad 2 and EXEQ Ray 2:

The resolution is also not too high. Tell me why the resolution, if it is still higher than that of consoles? Here the thing is - the higher the screen resolution, the less soap you will see when you interpolate the picture of the device to your resolution. In this case, it is often necessary to choose between a soap picture with linear interpolation or a broken pixel with interpolation turned off.
Otherwise, approx. Touch responsive, though sometimes inaccurate. On small points you can miss. But this is nagging.
HDMI output is not tested, because At home, there was no mini-HDMI adapter -> HDMI. But judging by the reviews, everything works fine and up to 1080p.
Controls.
I liked everything here. Yes, the buttons rattle a bit, but it's not scary. Pressing clear. The D-Pad cross is made as a single element, not by individual 4 buttons and is controlled very clearly, without false clicks (no comparison with the XBOX 360 gamepad cross, for example).
There are 4 buttons under the right hand. (For some reason, A / B and X / Y are confused by default, but this is fixed, see below). It is a pity, by the way, that it is not 6. As a result, in some games for the Sega Mega Drive you have to run two buttons on the upper bumpers.
Two analog sticks. Especially not used, but work.
Start / Select buttons - great. At the top there is a reset button, which can be pressed with a fingernail (which may be useful in the case of Android). What a pity is that there was no space for the hard buttons "home" and "back" and as a result you sometimes have to call the bottom panel of the android.
Case, sound, battery.
The body is a bit "rattle", but in general - approx. Does not cause disgust, and even the frame under the metal looks good. True, very hot. Especially when charging at the same time as my work (by the way, in this mode, I still spent a little more than I got infected by USB).
The battery sits pretty quickly. It is enough for about 3 hours of play.
The sound ... He is. By the way, despite the fact that behind the 2 groups of holes, inside - one speaker (right). Yes, and for some reason, the console has 2 outputs for headphones.
In general, the stars from the sky is not enough, but does not cause disgust. All is well.
Soft
Let's finally talk about software.
The prefix comes with firmware from EXEQ and a pack of pre-installed emulators and games. All of them are collected in a single application "Game Center X", which looks like this (sorry for the quality of the picture, the photo is not mine):

The idea itself is comfortable. You have a single center, where all the ROMs that you launch from 1 place are collected. And then the emulator itself picks up the selected image and starts the game.
The only problem is that the pre-installed emulators are extremely limited in settings. They all stretch the picture on a full screen while shamelessly spitting it (I never understood people who stretch the 4: 3 signal to their widescreen TV and then admire the flat face). With the setting of controls, too, is not a fountain ...
In general, I wanted to repeat the same experience, but on higher-quality and customizable emulators.
At first I tried the RetroArch multi-platform emulator. The emulator itself is all praise, and the settings there in bulk ... But I did not like it.
Firstly, the design of the Roma library is not very convenient. Even with the delivered VektorGUI, designed to structure this business, it looks like this:

Yes, and with the emulator I had problems. That control fell off, then the emulator started not the chosen ROM, but the game that was in memory before ... In general, I went to look for options further.
The second option, which I found (and on which I have so far) is Gamesome Frontend (by the way, just now, after posting a link to it to Habr, I paid attention to the word “vektor” in the name of the bundle! It turns out that this is the same author)

The emulators themselves are not included in it, but you can connect and configure external ones. Still sorted by platform, everything is configured. By the way, I had a problem with this front-end. After the launch, I had a clean screen and did not want to display the platform. I put it 2 times (the second time after reflashing) and both times there was such nonsense. How to overcome - I do not know. I just turned on and off the platforms, connected emulators, set up paths, restarted the application ... And once again it displayed a list of platforms and it worked.
And here we come to why I reflash the console ...
Flashing
My only wish was to just work. But you understand that everything is so simple with an android? :)
As I mentioned above, the A / B and X / Y keys are initially confused. The simplest option is to perebindit them in the emulator as it should. But this does not solve some problems. For example, in system “B” it works like “back”. And this “B” in place of “A” in all emulators. Those. having made the usual lower button with the confirmation button (A) in the emulator, it will still remain the “back” button in the system. It breaks the brain.
But this was not the cause of the flashing (and for fixing this behavior, flashing is not needed, below I will tell you how).
And the reason was this. We have the right analog stick on the console. Which is not used in games. And so that it does not “disappear”, I wanted to hang on it such functions as entering the emulator menu or rewinding time, for example. And if you want to play with the save, you may want to hang on it, for example, quick save / load. And then I ran into the main problem. In the original firmware from EXEQ (even the latest), all third-party applications (emulators), the right stick is perceived as an analogue of the cross (D-Pad). And nothing to do with it.
And that is why I decided to change.
At first I tried the Skelrom custom firmware. But putting it on top of the native EXEQ, I found a lot of problems. Almost all internal memory immediately fell off and the android didn’t have enough space even to start the clock. Perhaps it could somehow be solved, but I decided to try to install the firmware from the Chinese twin JXD. And the reviews on Skelrom on w3bsit3-dns.com were not the best. People have something constantly buggy.
Firmware from JXD s5110b rose as a native! (The process of flashing is extremely simple - download the archive, unpack it on the microSD and turn on the console while holding the volume up button. Then everything is on its own).
After flashing, the right stick became determined by the emulators as a separate axis and it became possible to bind it, for example, to exit to the menu.
Problem solving.
Now I will list the problems that remain, and how I solved them.
Mixed AB and XY buttons
This problem remained in the firmware from JXD. It is solved quite simply. You need to edit one system file /system/usr/keylayout/Generic.kl . I'm not too strong in Android and options for solving this problem, but personally I put a free RH SSH / SFTP Daemon SHH server for this and connected to my Android PC via SFTP, where I could download / upload files to the device.
So, in this file we will be interested in the binds of the BUTTON_A, BUTTON_B, BUTTON_X and BUTTON_Y keys. Each of them is associated with digital scan codes 304 ... 308. If you are interested in finding out which codes are sent to the keys, you can use the free KeyEvent Display application, or use my picture:
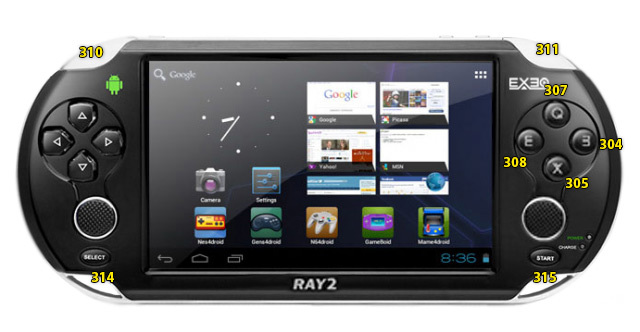
If you need a ready-made solution, here it is:
key 304 BUTTON_B key 305 BUTTON_A key 306 BUTTON_C key 307 BUTTON_Y key 308 BUTTON_X key 309 BUTTON_Z Edit the corresponding piece of the file, upload it back (by the way, for some reason I didn’t have the SFTP overflow and I had to erase and upload the file again. If you do this, don’t forget to set the read permission to it).
The “START”, “A” and “B” buttons work in the system as “home”.
Obviously this is wrong.
I wish that in the system itself you could also be controlled with the help of hardware buttons, and not poke into the touch.
For this is another system file, /system/usr/keychars/Generic.kcm . In it, you can customize the actions of the iron buttons as you want. I did this:
key BUTTON_A { base: fallback ENTER } key BUTTON_B { base: fallback BACK } .... key BUTTON_START { base: fallback ENTER } key BUTTON_SELECT { base: fallback MENU } The “A” and “SELECT” buttons work as confirmation, and the “B” button as “back”. Now in the same Gamesome you can crawl back and forth between categories without touching the screen.
Battery consumption in sleep mode.
This problem is also faced by many. After I installed the firmware from JXD, the device, being turned off, was completely discharged overnight.
The forums advise CPU Adjuster , where it is necessary to create a profile for the event “screen off” and set everything in it to the minimum. I did not like him - somehow he is crooked and uncomfortable. And despite the profiles, emulators began to slow down with him. So I put the CPU Tuner . I also advise setting up similar programs, do not let them reduce the speed of the processor if it is busy at least by 20%. In my experience, the Shogi emulator eats about 25% of the CPU. But if the “smart” tuner tries to drop the frequency, then it is likely to run into unpleasant micro-friezes.
...
At the moment, with problems (I hope) everything ...
Summary of recipes.
So, buying a prefix, I advise you to do the following:
- Download the latest firmware from JXD S5110b (namely “b”!) And flash (unpack it on microSD, run the device with “VOL +” clamped).
- UPD: Install SkelROM over it
- Correct the confusion with the A / B and X / Y buttons, as well as the system binding of the “B” and “Start” buttons (see above).
- Put the CPU Tuner (or SetCPU) and configure the profile for the screen off to prevent battery leakage in sleep mode, as well as adjust the performance profile to work.
- Put the Gamesome Frontend
- Put emulators. My choice: NES.EMU, Snes9xEX +, GBA.EMU, MD.EMU
- For launcher, I stopped at Apex Launcher
Summary.
The console has two main disadvantages:
1. Cheap screen. I would like more resolution, better color reproduction and brighter.
2. Battery for 3 hours of games. Enthusiasts, by the way, are already soldered to more capacious options.
(3). Trifle - the lack of hardkey buttons "back" and "home"
At the same time, there are many advantages:
1. A good price (4000 rubles for the official EXEQ and 3000 rubles for JXD)
2. Convenient form factor
3. Good buttons, two stick
4. Performance is almost enough for a smooth game of NES / SNES / Sega / GBA.
UPDATE
Still, I put Skelrom 1.5 on top of the JXD firmware. He got up well. And the performance has improved significantly, the Sega / SNES stopped slowing down in some places. Apparently, the reason for this is the bad auto-frequency tuning of the CPU, which was originally. And which could not be reconfigured by any CPU tuners, since settings are constantly reset to default.
Source: https://habr.com/ru/post/230459/
All Articles