Structuring, grouping and binding in SVG - elements ,
SVG provides the ability to structure a document by means of special elements that allow you to define and group objects, and also to refer to them in the future. They make it easy to reuse the code, keeping it clean and readable. This article will discuss these elements, as well as their differences and advantages.
The <g> element is used to logically group a set of related graphic elements. This can be compared with the grouping of objects in graphic editors.
The <g> element groups all its contents into a group. As a rule, he is given an identifier by which he will be addressed in the future. Any styles applied to the <g> element will also be applied to all its descendants. This allows you to set styles and transformations, as well as add interactivity and animation to a whole group of objects at once.
')
As an example, we will use a bird drawn in SVG. It consists of several separate figures, described by circles and paths. [For unexplained reasons, the author describes circles in ways instead of using a circle, although it was promised to use circles. Do not ask why. I fixed it. Do not ask why. - Trans .]

Let's say you draw such a bird in Illustrator. If you need to move it from one place to another, the grouping of objects simplifies this task, since it allows you not to move each element separately. Grouping in SVG does roughly the same thing. In the example above, in addition to the general group for the whole bird (id = "bird"), we also identified subgroups that define the head and body separately (id = "body", id = "head").
If you change the fill color of the #body group, the fill of all elements within the group will change. It can be very convenient. [Speech is about elements whose fill color is not explicitly set. For example, in the same #body element #wing has its own color. - Trans .]
Grouping elements can be very useful not only for organizing and structuring a document. It can be of particular benefit if you want to add interactivity to the SVG-graphics or set up some transformations. By grouping the elements, you can move them, scale them, or rotate them all together, keeping their position relative to each other.
So, in the case of a grouped bird, you can scale it with just one line of CSS:
Grouping adds convenience when implementing interactivity. You can hang mouse events on the whole bird and make it react as well. This is much more convenient than doing the same for each element separately.
The <g> element has another important and interesting feature: it can contain <title> and <desc> tags, which allow the image to be processed by Screen Readers [Text playback programs for people with disabilities; I did not find a capacious and adequate translation of the term. - Trans .]; they also make the code more readable for humans. Usage example:
When working with graphics, it is often possible to find a situation where duplicate elements are used. Graphic editors in this case usually use the copy-paste method, which is more convenient than creating an element from scratch.
In SVG, a <use> element implements this functionality. It can be used to reuse both individual elements and groups of elements.
The <use> element accepts x and y coordinates, height (height), width (width) and a link to the source element (xlink: href) as attributes. The reference is the object identifier.
For example, if we want to add another birdie, instead of copying its code, you can use the <use> tag:
Please note that in the xlink: href attribute you can refer to any SVG element, even if it is in an external file. This is very useful for organizing (for example, you can have a file with reusable components) or for caching frequently used files.
Suppose our bird was created in a separate file animals.svg. In this case, you can refer to it as follows:
Please note that links to external SVGs in <use> do not work in most versions of IE (up to IE 11). I recommend to read the article from Chris Coyier , which describes the circumvention of this restriction.
The most attentive readers probably noticed that the coordinates specified by the <use> element are not counted from the origin of the entire SVG image. This is actually an abbreviated form of the transform attribute entry. The following two lines are equivalent:
Simply put, the coordinates of the <use> element are relative to the source element. This behavior is not always optimal and may be a disadvantage.
Another disadvantage of <use> is that the copies will use the same styles as the original element. When applying styles or transformations to the #bird group, these styles and transformations will apply to all its copies.
However, you can still apply an independent transformation to the <use> element. For example, the following line of code allows you to reuse a bird, whose dimensions will be only half the size of the original:
[At the same time, the principle of operation of the coordinate system may seem somewhat unexpected. It also scales. If the source element was positioned 100 pixels from the edge of the image, such a copy would be located 50 pixels from the edge. Asked for x and y, this also applies. Thus, the words about the location of the copy relative to the source element are not entirely correct. - Trans .]
Unlike transformations, copy styles cannot be redefined. Thus, if you want to create an army of birds of different colors, you will not be able to use <use> for this (unless the source element is defined inside <defs> without its styles, but this is in the next section).
The <use> element allows you to reuse an element that is already displayed on the SVG image. If you just want to define an element without displaying it, and then draw it in the right place when it is needed, the <defs> element comes to the rescue.
The <defs> element can be used to store content that will not be displayed during the definition. The content in it is stored in a hidden form and is waiting in the wings when it will be used and displayed by other SVG elements, which makes it ideal, for example, for use in patterns.
Anything can be stored in <defs>, starting with a group of elements, like our bird, and ending with a mask or gradient. This is a template for future use. By itself, it is never displayed, only using its essence.
Below is an example in which the gradient is first defined and then used to fill the rectangle:
[The author made an annoying mistake: the height and width of the rectangle were not indicated. - Trans .]
Defining a linear gradient inside <defs> ensures that it will not suddenly be displayed on its own, only when used anywhere.
In the previous section, two drawbacks of the <use> element were mentioned:
And besides, the original element is displayed by itself.
All of these flaws can be avoided by using <defs>. Not only is the original element not displayed, but also when using an element defined inside <defs>, the position of each instance is set relative to the origin of the coordinate system.
In the following example, we will draw a tree [And forget to think about the binary! - Trans .]. It consists of a trunk and leaves. The leaves are grouped with id = "leaves", and together with the trunk, they belong to a more general group with id = "tree".
At the output, our tree will look something like this:

[Unfortunately, the code was shortened by the author, losing most of the leaves. What is left reminds me of a part of some alien industrial landscape. - Trans .]
If you wrap the #tree group in a <defs> element, the tree will no longer be displayed.
Now the tree serves as a template. We can use it with the <use> element just like any other element. The only difference is that the x and y coordinates are relative to the origin.
As an example, draw a mini-forest.

As you can see, each tree is located relative to the origin, for which in this case the upper left corner of the image is taken. Trees are located independently of each other and the location in the template.
When you reuse elements defined in <defs>, you can apply separate styles for each tree until these styles are defined for the original template. If the tree inside <defs> has its own styles, it will not be possible to override them. Thus, <defs> is perfect for defining the very foundation that will be used and colored when necessary. Using only <use> without <defs>, it would be impossible to achieve such flexibility.
Note that the elements inside <defs> are not displayed, that is, they behave in the same way as the <g> element with the display = "none" property set. However, the descendants of <defs> are always represented in the source tree [Speech on the tree of SVG objects, I suppose. - Trans .], And they can always be referenced by other elements. Thus, the value of the display property of the <defs> element (or its descendants) does not prevent other elements from referring to it, even if this property is set to none.
[Not sure about the understanding of what the author wanted to say in this paragraph. I tried to set display = "none" for the element inside <defs>, and this element was no longer displayed, which seems to be logical. Apparently, talking about the fact that <defs> you can put display = "none", and nothing will change. The following section describes this more clearly. Just in case, add a paragraph in the original. - Trans .]
The <symbol> element is similar to <g>: it also provides the ability to group elements. There are two main differences:
In most cases, <symbol> is appropriate for defining reusable elements (symbols). It still serves as a template for <use>. And with its own viewBox and preserveAspectRatio attributes, it can stretch to the rectangular viewport specified in the <use> element that references it. Note that the <symbol> elements define a new viewport each time it is called by a <use> element.
This is a great feature of the <symbol> element. It allows you to define elements that do not depend on the viewing area in which they fall. They will always be displayed as specified.
But to understand all this magic, you need to know how the viewBox and preserveAspectRatio attributes work. On this topic , Chris Coyier has an article explaining why the <symbol> element is so good, why it is a good choice for implementing icons, and how to use it in general.
I have already written an extensive article about viewport, viewBox and preserveAspectRatio. You can read it: Understanding SVG Coordinate Systems and Transformations (Part 1) - The viewport, viewBox, and preserveAspectRatio .
It should be noted that the display property does not apply to the <symbol> element. Even if you set it different from display = "none", the element will still not be displayed. And at the same time, the <symbol> element can be referenced, even if the display = "none" property is set for it or its descendants.
All of these elements are structural SVG containers that make it easy to reuse elements, while making the code cleaner and clearer. Each of these elements has its own scope of application. Now that you know what each one does and how they differ from each other, you can decide which one to use depending on the situation.
I hope you enjoyed the article and found it useful. Thank you for reading!
Grouping using the <g> element
The <g> element is used to logically group a set of related graphic elements. This can be compared with the grouping of objects in graphic editors.
The <g> element groups all its contents into a group. As a rule, he is given an identifier by which he will be addressed in the future. Any styles applied to the <g> element will also be applied to all its descendants. This allows you to set styles and transformations, as well as add interactivity and animation to a whole group of objects at once.
')
As an example, we will use a bird drawn in SVG. It consists of several separate figures, described by circles and paths. [For unexplained reasons, the author describes circles in ways instead of using a circle, although it was promised to use circles. Do not ask why. I fixed it. Do not ask why. - Trans .]
Bird painting code
Codepen example<svg width="1144.12px" height="400px" viewBox="0 0 572.06 200"> <style> svg{background-color:white;} #wing{fill:#81CCAA;} #body{fill:#B8E4C2;} #pupil{fill:#1F2600;} #beak{fill:#F69C0D;} .eye-ball{fill:#F6FDC4;} </style> <g id="bird"> <g id="body"> <path d="M48.42,78.11c0-17.45,14.14-31.58,31.59-31.58s31.59,14.14,31.59,31.58c0,17.44-14.14,31.59-31.59,31.59S48.42,95.56,48.42,78.11"/> <path d="M109.19,69.88c0,0-8.5-27.33-42.51-18.53c-34.02,8.81-20.65,91.11,45.25,84.73c40.39-3.65,48.59-24.6,48.59-24.6S124.68,106.02,109.19,69.88"/> <path id="wing" d="M105.78,75.09c4.56,0,8.84,1.13,12.62,3.11c0,0,0.01-0.01,0.01-0.01l36.23,12.38c0,0-13.78,30.81-41.96,38.09c-1.51,0.39-2.82,0.59-3.99,0.62c-0.96,0.1-1.92,0.16-2.9,0.16c-15.01,0-27.17-12.17-27.17-27.17C78.61,87.26,90.78,75.09,105.78,75.09"/> </g> <g id="head"> <path id="beak" d="M50.43,68.52c0,0-8.81,2.58-10.93,4.86l9.12,9.87C48.61,83.24,48.76,74.28,50.43,68.52"/> <circle class="eye-ball" cx="72" cy="71.5" r="11"/> <circle id="pupil" cx="72" cy="71.5" r="7"/> <circle class="eye-ball" cx="77" cy="74" r="5"/> </g> </g> </svg> Let's say you draw such a bird in Illustrator. If you need to move it from one place to another, the grouping of objects simplifies this task, since it allows you not to move each element separately. Grouping in SVG does roughly the same thing. In the example above, in addition to the general group for the whole bird (id = "bird"), we also identified subgroups that define the head and body separately (id = "body", id = "head").
If you change the fill color of the #body group, the fill of all elements within the group will change. It can be very convenient. [Speech is about elements whose fill color is not explicitly set. For example, in the same #body element #wing has its own color. - Trans .]
Grouping elements can be very useful not only for organizing and structuring a document. It can be of particular benefit if you want to add interactivity to the SVG-graphics or set up some transformations. By grouping the elements, you can move them, scale them, or rotate them all together, keeping their position relative to each other.
So, in the case of a grouped bird, you can scale it with just one line of CSS:
#bird {transform: scale(2);} Grouping adds convenience when implementing interactivity. You can hang mouse events on the whole bird and make it react as well. This is much more convenient than doing the same for each element separately.
The <g> element has another important and interesting feature: it can contain <title> and <desc> tags, which allow the image to be processed by Screen Readers [Text playback programs for people with disabilities; I did not find a capacious and adequate translation of the term. - Trans .]; they also make the code more readable for humans. Usage example:
<g id="bird"> <title>Bird</title> <desc>An image of a cute little green bird with an orange beak.</desc> <!-- ... --> </g> Reuse items with <use>
When working with graphics, it is often possible to find a situation where duplicate elements are used. Graphic editors in this case usually use the copy-paste method, which is more convenient than creating an element from scratch.
In SVG, a <use> element implements this functionality. It can be used to reuse both individual elements and groups of elements.
The <use> element accepts x and y coordinates, height (height), width (width) and a link to the source element (xlink: href) as attributes. The reference is the object identifier.
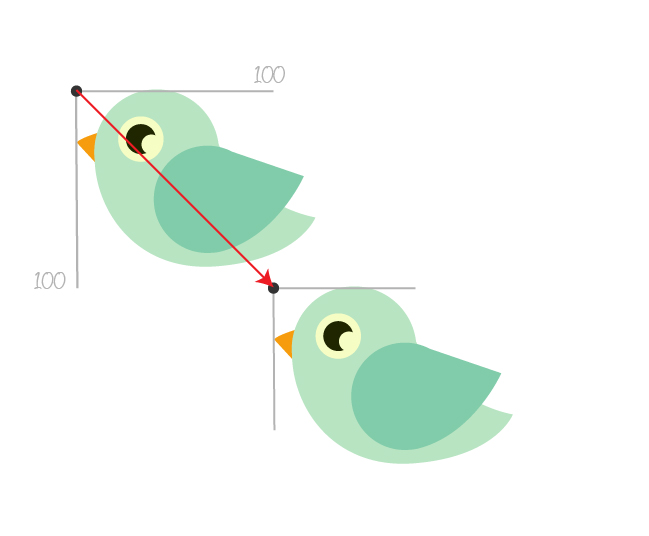
For example, if we want to add another birdie, instead of copying its code, you can use the <use> tag:
<use x="100" y="100" xlink:href="#bird" /> Codepen examplePlease note that in the xlink: href attribute you can refer to any SVG element, even if it is in an external file. This is very useful for organizing (for example, you can have a file with reusable components) or for caching frequently used files.
Suppose our bird was created in a separate file animals.svg. In this case, you can refer to it as follows:
<use x="100" y="100" xlink:href="path/to/animals.svg#bird" /> Please note that links to external SVGs in <use> do not work in most versions of IE (up to IE 11). I recommend to read the article from Chris Coyier , which describes the circumvention of this restriction.
The most attentive readers probably noticed that the coordinates specified by the <use> element are not counted from the origin of the entire SVG image. This is actually an abbreviated form of the transform attribute entry. The following two lines are equivalent:
<use x="100" y="100" xlink:href="#bird" /> <use xlink:href="#bird" transform="translate(100, 100)" /> Simply put, the coordinates of the <use> element are relative to the source element. This behavior is not always optimal and may be a disadvantage.
Another disadvantage of <use> is that the copies will use the same styles as the original element. When applying styles or transformations to the #bird group, these styles and transformations will apply to all its copies.
However, you can still apply an independent transformation to the <use> element. For example, the following line of code allows you to reuse a bird, whose dimensions will be only half the size of the original:
<use x="100" y="100" xlink:href="#bird" transform="scale(0.5)" /> [At the same time, the principle of operation of the coordinate system may seem somewhat unexpected. It also scales. If the source element was positioned 100 pixels from the edge of the image, such a copy would be located 50 pixels from the edge. Asked for x and y, this also applies. Thus, the words about the location of the copy relative to the source element are not entirely correct. - Trans .]
Unlike transformations, copy styles cannot be redefined. Thus, if you want to create an army of birds of different colors, you will not be able to use <use> for this (unless the source element is defined inside <defs> without its styles, but this is in the next section).
The <use> element allows you to reuse an element that is already displayed on the SVG image. If you just want to define an element without displaying it, and then draw it in the right place when it is needed, the <defs> element comes to the rescue.
Reusing stored items with <defs>
The <defs> element can be used to store content that will not be displayed during the definition. The content in it is stored in a hidden form and is waiting in the wings when it will be used and displayed by other SVG elements, which makes it ideal, for example, for use in patterns.
Anything can be stored in <defs>, starting with a group of elements, like our bird, and ending with a mask or gradient. This is a template for future use. By itself, it is never displayed, only using its essence.
Below is an example in which the gradient is first defined and then used to fill the rectangle:
Code drawing a rectangle filled with a gradient
Codepen example <svg> <defs> <linearGradient id="gradient"> <stop offset="0%" style="stop-color: deepPink"></stop> <stop offset="100%" style="stop-color: #009966"></stop> </linearGradient> </defs> <rect width="100" height="100" stroke="#eee" stroke-width="5" fill="url(#gradient)"></rect> </svg> [The author made an annoying mistake: the height and width of the rectangle were not indicated. - Trans .]
Defining a linear gradient inside <defs> ensures that it will not suddenly be displayed on its own, only when used anywhere.
In the previous section, two drawbacks of the <use> element were mentioned:
- The position of the new element is set relative to the original.
- Source element styles cannot be overridden in copies.
And besides, the original element is displayed by itself.
All of these flaws can be avoided by using <defs>. Not only is the original element not displayed, but also when using an element defined inside <defs>, the position of each instance is set relative to the origin of the coordinate system.
In the following example, we will draw a tree [And forget to think about the binary! - Trans .]. It consists of a trunk and leaves. The leaves are grouped with id = "leaves", and together with the trunk, they belong to a more general group with id = "tree".
Part of the tree drawing code
<svg width="500.79px" height="200px" viewBox="0 0 500.79 200"> <style type="text/css"> #leaves{fill:#8CC63F;} #bark{fill:#A27729;} </style> <g id="tree"> <path id="bark" d="M91.33,165.51c0,0,4.18-27.65,1.73-35.82l-18.55-25.03l3.01-2.74l17.45,19.87l1.91-37.6h4.44l1.83,24.53 l15.26-16.35l3.27,4.36l-16.07,19.34c0,0-2.72,0-1.09,19.34c1.63,19.34,3,29.7,3,29.7L91.33,165.51z"/> <g id="leaves"> <path class="leaf" d="M96.97,79.07c0,0-14.92,4.34-23.52-14.05c0,0,19.4-7.98,24.37,11.9c0,0-9.68-3.57-13.07-6.73 C84.75,70.2,91.82,77.99,96.97,79.07z"/> <path class="leaf" d="M74.07,100.91c0,0-15.94-1.51-17.2-22.39c0,0,21.62-0.27,18.83,20.66c0,0-7.92-7.1-9.97-11.41 C65.73,87.77,69.55,97.92,74.07,100.91z"/> <!-- ... --> </g> </g> </svg> At the output, our tree will look something like this:
[Unfortunately, the code was shortened by the author, losing most of the leaves. What is left reminds me of a part of some alien industrial landscape. - Trans .]
If you wrap the #tree group in a <defs> element, the tree will no longer be displayed.
Increasingly cut code
<svg width="500.79px" height="200px" viewBox="0 0 500.79 200"> <style type="text/css"> #leaves{fill:#8CC63F;} #bark{fill:#A27729;} </style> <defs> <g id="tree"> <!-- ... --> </g> </defs> </svg> Now the tree serves as a template. We can use it with the <use> element just like any other element. The only difference is that the x and y coordinates are relative to the origin.
As an example, draw a mini-forest.
<use xlink:href="#tree" x="50" y="100" /> <use xlink:href="#tree" x="200" y="100" /> <use xlink:href="#tree" x="350" y="100" /> As you can see, each tree is located relative to the origin, for which in this case the upper left corner of the image is taken. Trees are located independently of each other and the location in the template.
When you reuse elements defined in <defs>, you can apply separate styles for each tree until these styles are defined for the original template. If the tree inside <defs> has its own styles, it will not be possible to override them. Thus, <defs> is perfect for defining the very foundation that will be used and colored when necessary. Using only <use> without <defs>, it would be impossible to achieve such flexibility.
Note that the elements inside <defs> are not displayed, that is, they behave in the same way as the <g> element with the display = "none" property set. However, the descendants of <defs> are always represented in the source tree [Speech on the tree of SVG objects, I suppose. - Trans .], And they can always be referenced by other elements. Thus, the value of the display property of the <defs> element (or its descendants) does not prevent other elements from referring to it, even if this property is set to none.
[Not sure about the understanding of what the author wanted to say in this paragraph. I tried to set display = "none" for the element inside <defs>, and this element was no longer displayed, which seems to be logical. Apparently, talking about the fact that <defs> you can put display = "none", and nothing will change. The following section describes this more clearly. Just in case, add a paragraph in the original. - Trans .]
Previous paragraph in original
If you want to make it out of the box, you can’t get it. However, it is not possible to referenced by other elements; It is not necessary to prevent those elements from being a subject.
Grouping elements using <symbol>
The <symbol> element is similar to <g>: it also provides the ability to group elements. There are two main differences:
- The <symbol> element is not displayed by itself. This is how it looks like <defs>.
- The <symbol> element can have its own viewBox and preserveAspectRatio attributes. This allows it to fit in the viewport the way you want it, and not as defined by default.
In most cases, <symbol> is appropriate for defining reusable elements (symbols). It still serves as a template for <use>. And with its own viewBox and preserveAspectRatio attributes, it can stretch to the rectangular viewport specified in the <use> element that references it. Note that the <symbol> elements define a new viewport each time it is called by a <use> element.
This is a great feature of the <symbol> element. It allows you to define elements that do not depend on the viewing area in which they fall. They will always be displayed as specified.
But to understand all this magic, you need to know how the viewBox and preserveAspectRatio attributes work. On this topic , Chris Coyier has an article explaining why the <symbol> element is so good, why it is a good choice for implementing icons, and how to use it in general.
I have already written an extensive article about viewport, viewBox and preserveAspectRatio. You can read it: Understanding SVG Coordinate Systems and Transformations (Part 1) - The viewport, viewBox, and preserveAspectRatio .
It should be noted that the display property does not apply to the <symbol> element. Even if you set it different from display = "none", the element will still not be displayed. And at the same time, the <symbol> element can be referenced, even if the display = "none" property is set for it or its descendants.
Conclusion
All of these elements are structural SVG containers that make it easy to reuse elements, while making the code cleaner and clearer. Each of these elements has its own scope of application. Now that you know what each one does and how they differ from each other, you can decide which one to use depending on the situation.
I hope you enjoyed the article and found it useful. Thank you for reading!
From translator
Translation in places is quite free, but not to the detriment of the meaning or content. Everything that does not relate directly to the original, made in the notes. I made small changes to the code in places, but this is either completely uncritical or noted in the notes.
With suggestions, suggestions and comments, as usual, in drugs.
Source: https://habr.com/ru/post/230443/
All Articles