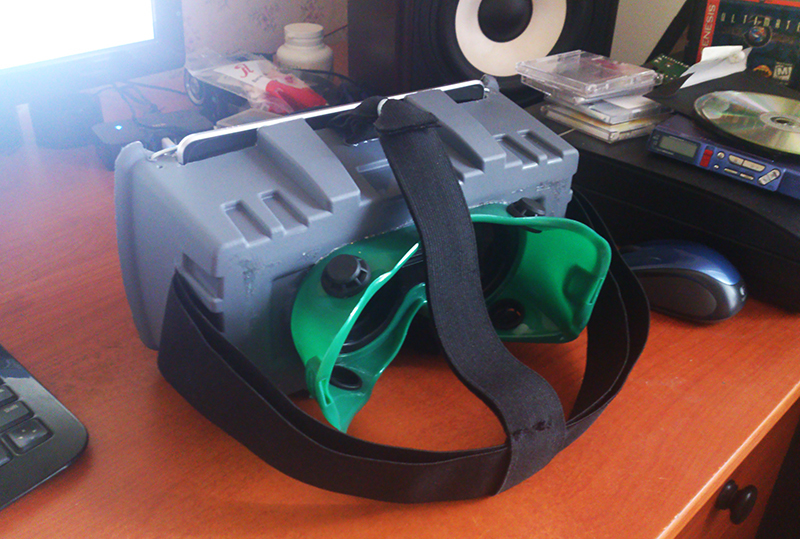
Nvidia + Nexus 7 + two magnifiers + box = VR helmet
Good day! The Internet has already accumulated a sufficient number of articles on assembling DIY VR helmets and habr is no exception . But in most cases, the assembly uses smartphones with relatively small displays, which does not allow for a wide viewing angle . Today we will assemble a helmet based on the Nexus 7, spending only 600 rubles in the nearest hypermarket. Well, because The main slogan of this article is “Less theory, more practice,” enough of those words, let's start!
')
This article is written at the request of users. It is written quickly, on the knee, like the helmet itself. But in it I will try to tell everything from the beginning to the end. Please note, this helmet is not compatible with native Oculus Rift applications, and all the photos were made just for the “story”, but later were used in the article, including do not blame me.
So. The first thing we need to do is buy everything you need. I will consider exactly my case, but nothing prevents you from applying ingenuity and your engineering skills in designing your helmet variant.
My shopping list:
And you will also need:
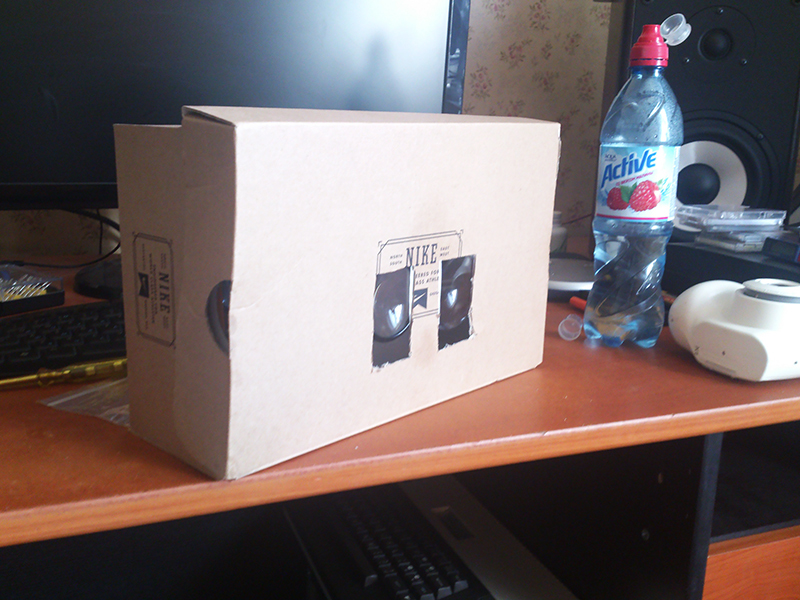
I advise you to measure or take a tablet with you to the store. It will be needed to try it on the box in place and choose the best option. The distance from the lenses will be about 6 cm.
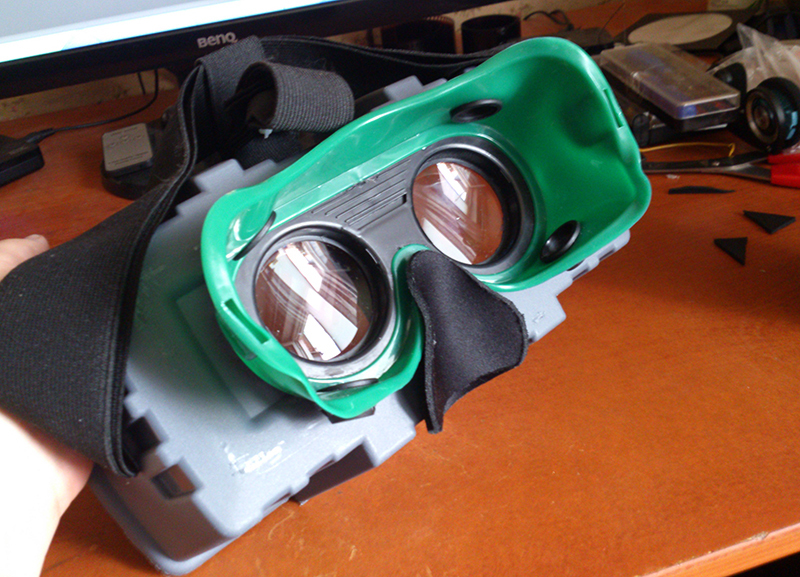
I used ordinary lenses from 5x loops. Oddly enough, they showed the best performance in testing. The distance to the screen in this case is ~ 6-7cm. You can use other lenses. I have tested the glasses with a 6- and 8-fold increase, the viewing angle in this case becomes higher, but it is much more difficult for the eye to focus. In any case, I advise you to immediately test and estimate the desired distance and position of the lenses! I strongly recommend testing already on games with drivers Vireio Perception. We will consider their setup a little lower. Or use native Oculus Rift applications. Demo for Android do not have common standards and most of them are not designed to work on tablets. Using them, you can spend a lot of time selecting the location of the lenses, and then discover that when broadcasting from a PC, the picture is split. The only application that worked well on my tablet is DiveCityCoaster . For tests, I used a regular box. During the experiments, it turned out that the glass holder from the welding mask is also quite suitable for attaching my lenses.
I used a soldering iron with a thin rod for cutting plastic. Depending on the density of the plastic, you can use a file or a knife. When gluing parts, I advise you to sand them, especially with regard to the rubber mask.

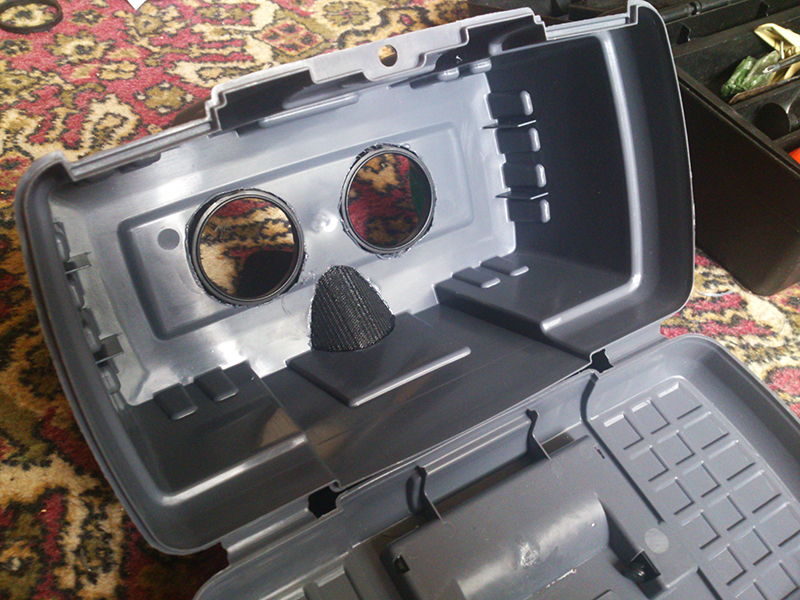
I cut off the lid and top of the box, as they were quite weighty, but you may find the best box option, the presence of the lid may well isolate the insides from bright light. I made the partition inside of dark plastic, which came to hand. It serves as a distance limiter in the lower part, in the upper part the limiter is the box itself. Mount tablet made of needles with curved ends. Height fitted with several layers of mouse pad. The rubber side of it lies up, which does not allow the tablet to slide inside.
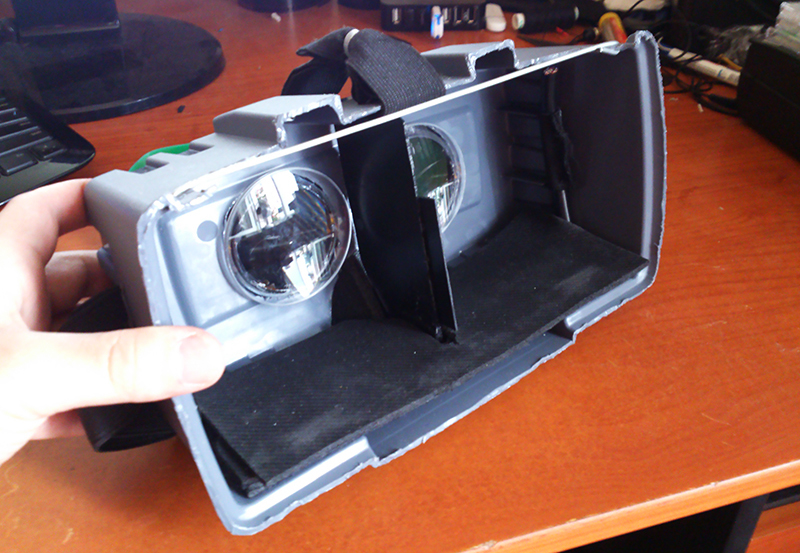
Now fasten the straps. I advise you to make the mount T-shaped, because a helmet with a tablet inside will weigh decently and all its weight will put pressure on your nose bridge. We are testing! Experimental does not complain. That's great!

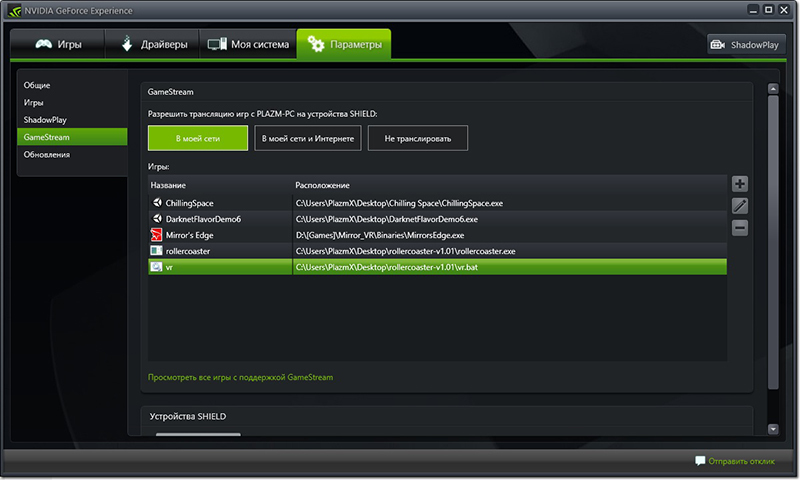
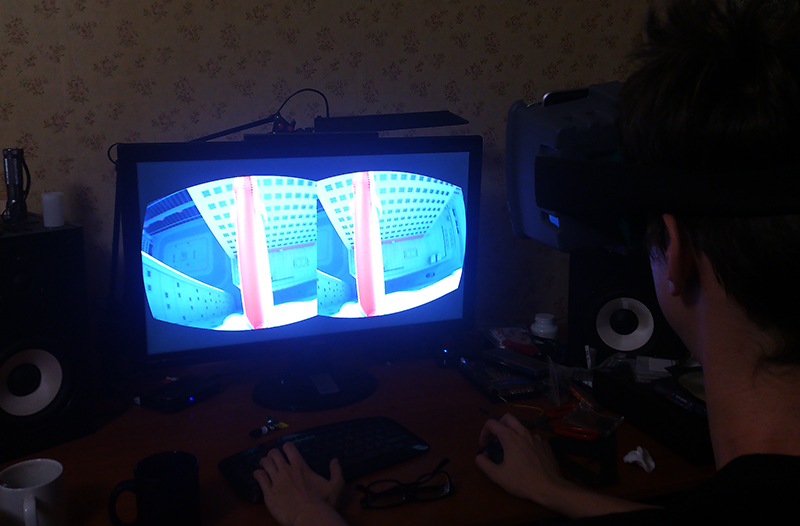
This technology allows you to stream a picture on a tablet with very good quality and practically without delays. For her work will require a video card Nvidia GTX 650 and older. This technology was developed for the console Nvidia Shield, but with the help of the application Limelight you can use almost any tablet or phone. So, install the latest drivers and put a check in the GeForce Experience. Run the application, add the applications we need and enable GameStream in the settings. On the tablet, run Limelight and add a computer by entering its IP address. We select quality of stream in Limelight and we test. I’ll say right away that on an old 802.11n 150Mb router, the 720p quality transmission normally refused to work, which pushed me to the long overdue purchase of a new device. A 300Mb router was purchased, and after installing it, a 1080p broadcast started at 60fps.
FreePIE is very buggy and unpredictable software, but after several hours of war with it, a small script was written and most of the pitfalls were discovered. The points. 1. Be sure to install on the tablet apk the bundled distribution. There are many versions of Android applications that support FreePIE, but none of them worked normally for me. 2. After launching the script inside FreePIE and launching Vireio Perception, in no case transfer focus to the FreePIE window, otherwise it will definitely hang. 3. On the tablet, do not enable Debug mode, when you try to minimize the application in this mode, it will necessarily hang. In normal mode, the application works fine in the background.
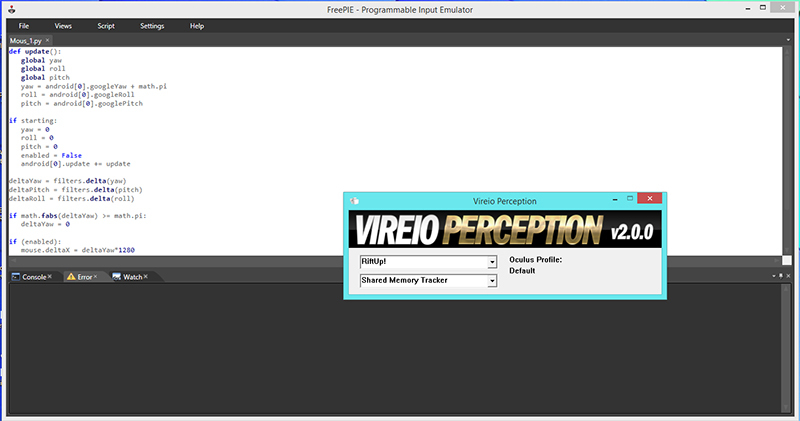
The script that I used. To start tracking you need to press the "Z" key.
We test, if the mouse listens, we take up the last item.
Vireio Perception is not a more stable set of drivers than FreePIE, but it works pretty well. On the main page of the official site of Vireio is a long outdated version, the latest side can be found here .
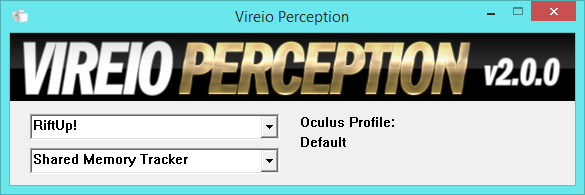
Start and select “RiftUP!”, This driver allows you to adjust the position of the images along the X \ Y axis, adjust its scaling, and most importantly shift it relative to the center. The menu during the game is caused by the keyboard shortcut Ctrl + Q, but I strongly recommend that you read the manual that comes with the software.

After setting you can start playing. Personally, I normally started Mirror's Edge and Portal 2. But Left 4 Dead 2 was hanging during the start. The rest have not tried. The claimed list of supported games is here . All of the above was run on Windows 8.1 64bit. The stability of the software as a whole leaves much to be desired, especially after talking to Oculus Rift.
I tested Oculus Rift and I can say that the quality obtained is not much worse than the original, but the lack of compatibility and persistent problems with drivers make us consider the device only as a means to join the VR era and look forward to Oculus Rift and Project Morpheus .
A small video with a demonstration of the device. Anticipating your question about the inclination of the tablet, I answer, it is inserted so because of the rush, during the game it shifts all the way inside.
I hope this information was helpful to you. I am pleased to answer your questions.
Thanks for attention!
')
0. Preface
This article is written at the request of users. It is written quickly, on the knee, like the helmet itself. But in it I will try to tell everything from the beginning to the end. Please note, this helmet is not compatible with native Oculus Rift applications, and all the photos were made just for the “story”, but later were used in the article, including do not blame me.
1. Go shopping
So. The first thing we need to do is buy everything you need. I will consider exactly my case, but nothing prevents you from applying ingenuity and your engineering skills in designing your helmet variant.
My shopping list:
- 1. Cyanoacrylate, simple superglue. 2pcs = 60rub.
- 2. A box for tools on 11 "= 120 rub.
- 3. Mask for welding = 70 rubles.
- 4. Mouse pads. 2pcs = 80 rubles. (or thin foam rubber)
- 5. Stretching tape. 2 meters = 150 rubles. (It is bought in any sewing shop)
- 6. Magnifying glasses for 5 times, with a diameter of 65mm. 2pcs = 120 rubles.
And you will also need:
- 1. Nexus 7
- 2. Nvidia GTX 650 and up (for GameStream operation)
- 3. Good wifi router
I advise you to measure or take a tablet with you to the store. It will be needed to try it on the box in place and choose the best option. The distance from the lenses will be about 6 cm.
2. We test lenses
I used ordinary lenses from 5x loops. Oddly enough, they showed the best performance in testing. The distance to the screen in this case is ~ 6-7cm. You can use other lenses. I have tested the glasses with a 6- and 8-fold increase, the viewing angle in this case becomes higher, but it is much more difficult for the eye to focus. In any case, I advise you to immediately test and estimate the desired distance and position of the lenses! I strongly recommend testing already on games with drivers Vireio Perception. We will consider their setup a little lower. Or use native Oculus Rift applications. Demo for Android do not have common standards and most of them are not designed to work on tablets. Using them, you can spend a lot of time selecting the location of the lenses, and then discover that when broadcasting from a PC, the picture is split. The only application that worked well on my tablet is DiveCityCoaster . For tests, I used a regular box. During the experiments, it turned out that the glass holder from the welding mask is also quite suitable for attaching my lenses.
3. Build
I used a soldering iron with a thin rod for cutting plastic. Depending on the density of the plastic, you can use a file or a knife. When gluing parts, I advise you to sand them, especially with regard to the rubber mask.
I cut off the lid and top of the box, as they were quite weighty, but you may find the best box option, the presence of the lid may well isolate the insides from bright light. I made the partition inside of dark plastic, which came to hand. It serves as a distance limiter in the lower part, in the upper part the limiter is the box itself. Mount tablet made of needles with curved ends. Height fitted with several layers of mouse pad. The rubber side of it lies up, which does not allow the tablet to slide inside.
Now fasten the straps. I advise you to make the mount T-shaped, because a helmet with a tablet inside will weigh decently and all its weight will put pressure on your nose bridge. We are testing! Experimental does not complain. That's great!
4. Configure GameStream
This technology allows you to stream a picture on a tablet with very good quality and practically without delays. For her work will require a video card Nvidia GTX 650 and older. This technology was developed for the console Nvidia Shield, but with the help of the application Limelight you can use almost any tablet or phone. So, install the latest drivers and put a check in the GeForce Experience. Run the application, add the applications we need and enable GameStream in the settings. On the tablet, run Limelight and add a computer by entering its IP address. We select quality of stream in Limelight and we test. I’ll say right away that on an old 802.11n 150Mb router, the 720p quality transmission normally refused to work, which pushed me to the long overdue purchase of a new device. A 300Mb router was purchased, and after installing it, a 1080p broadcast started at 60fps.
5. FreePIE
FreePIE is very buggy and unpredictable software, but after several hours of war with it, a small script was written and most of the pitfalls were discovered. The points. 1. Be sure to install on the tablet apk the bundled distribution. There are many versions of Android applications that support FreePIE, but none of them worked normally for me. 2. After launching the script inside FreePIE and launching Vireio Perception, in no case transfer focus to the FreePIE window, otherwise it will definitely hang. 3. On the tablet, do not enable Debug mode, when you try to minimize the application in this mode, it will necessarily hang. In normal mode, the application works fine in the background.
The script that I used. To start tracking you need to press the "Z" key.
def update(): global yaw global roll global pitch yaw = android[0].googleYaw + math.pi roll = android[0].googleRoll pitch = android[0].googlePitch if starting: yaw = 0 roll = 0 pitch = 0 enabled = False android[0].update += update deltaYaw = filters.delta(yaw) deltaPitch = filters.delta(pitch) deltaRoll = filters.delta(roll) if math.fabs(deltaYaw) >= math.pi: deltaYaw = 0 if (enabled): mouse.deltaX = deltaYaw*1280 mouse.deltaY = deltaRoll*900 toggle = keyboard.getPressed(Key.Z) if toggle: enabled = not enabled We test, if the mouse listens, we take up the last item.
6. Vireio Perception
Vireio Perception is not a more stable set of drivers than FreePIE, but it works pretty well. On the main page of the official site of Vireio is a long outdated version, the latest side can be found here .
Start and select “RiftUP!”, This driver allows you to adjust the position of the images along the X \ Y axis, adjust its scaling, and most importantly shift it relative to the center. The menu during the game is caused by the keyboard shortcut Ctrl + Q, but I strongly recommend that you read the manual that comes with the software.
7. We are playing!
After setting you can start playing. Personally, I normally started Mirror's Edge and Portal 2. But Left 4 Dead 2 was hanging during the start. The rest have not tried. The claimed list of supported games is here . All of the above was run on Windows 8.1 64bit. The stability of the software as a whole leaves much to be desired, especially after talking to Oculus Rift.
I tested Oculus Rift and I can say that the quality obtained is not much worse than the original, but the lack of compatibility and persistent problems with drivers make us consider the device only as a means to join the VR era and look forward to Oculus Rift and Project Morpheus .
A small video with a demonstration of the device. Anticipating your question about the inclination of the tablet, I answer, it is inserted so because of the rush, during the game it shifts all the way inside.
I hope this information was helpful to you. I am pleased to answer your questions.
Thanks for attention!
Source: https://habr.com/ru/post/229453/
All Articles