SSO using Jasig CAS Server 4.0.0. Part 1
Imagine that you have a web project that consists of two or more parts ( part1.example.com ) and the second part ( part2.example.com ). Now you are faced with the task of doing User Authentication, but so that when a user logs on to any part of a web project once, for example, first, then the second one should already be authenticated.
The process of such user authentication is called Single Sign-On or SSO (Single Sign-On) .
On Habré there is already a similar article Jasig CAS - authentication server , but it is a bit outdated as it uses CAS Server 3. * and in my opinion it is not detailed enough for people who are trying to implement SSO for the first time using Jasig CAS (Central Authentication Service), but the theory is pretty well described there, so I also recommend reviewing it.
Please note that we will configure the Jasig CAS Server which will authenticate the user and give it to web clients. In the future, I plan to write about the client implementation for this server.
Since this tutorial I will explain everything in order.
Create a simple Maven project and add the following dependencies to pom.xml :
')
cas-server-webapp is a standard server that we will later configure for ourselves;
cas-server-support-generic - and this library will allow us to configure the server for ourselves.
And also connect the plugin assembly:
It will allow us to build our project with the context
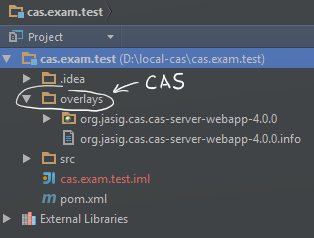
After Maven downloads CAS, you’ll have a new folder in your project that already has the default build of CAS 4.0.0 server.
Now it will be possible to close and launch, but first we need to perform a small Tomcat configuration, so we will deploy it.
I do not want to repeat myself, so I will provide a link to a more detailed description of the material that will be below. Here is a link to the description .
First of all, you need to generate a certificate and register it, for this we will use the standard keytool that is in each JDK.
1. Generate Java Key Store:
2. Now we create a certificate based on the already generated storage:
3. Import the obtained certificate to the storage of trusted certificates:
After that, go to the folder ./apache-tomcat-8.0.9/conf and open the server.xml file for editing. Find the line there:
and after this line, the default is approximately line 83, insert the following xml frahmet:
Please note that I have placed the generated ssoServer.jks repository in the C: / keys / ssoServer.jks folder and then indicated the full path to it.
keyAlias is the alias we specified in the first step of generating the repository.
keystorePass - password to our keystore.
Thus, we configured the HTTPS, which is so necessary for the CAS server.
After that, you can run Tomcat and stitch our project.
After that follow the link: https: // localhost: 8443 / cas / - this is a cas server with a standard configuration.
You should see the following:
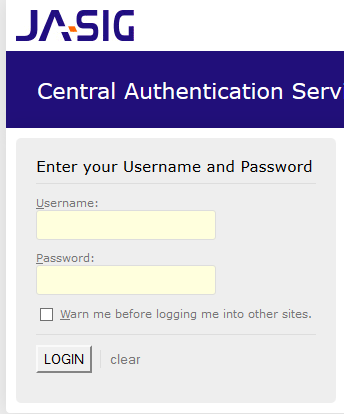
If you have a red strip with a dough, it means that you have done something wrong, and HTTPS is not included.
And in order to verify that the CAS server started up successfully and is working, let's log in. To do this, you need to enter the standard login and password:
Login: casuser
Password: Mellon
After a successful login, you should see:
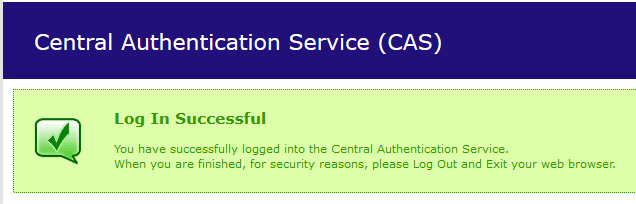
Congratulations to the CAS server we launched. In the next post I will tell you how to customize AuthenticationHandler, namely the ability to get the user from the database or another external system.
Do not judge strictly, this is my first prototype on this subject, and if there are comments, I will be happy to hear. I also constantly improve it and will write about new achievements, of course, if it will be interesting to someone.
Project sources on Github: https://github.com/alexbarchuk/local-cas
Source: https://wiki.jasig.org/display/CASUM/Configuring
The process of such user authentication is called Single Sign-On or SSO (Single Sign-On) .
On Habré there is already a similar article Jasig CAS - authentication server , but it is a bit outdated as it uses CAS Server 3. * and in my opinion it is not detailed enough for people who are trying to implement SSO for the first time using Jasig CAS (Central Authentication Service), but the theory is pretty well described there, so I also recommend reviewing it.
Please note that we will configure the Jasig CAS Server which will authenticate the user and give it to web clients. In the future, I plan to write about the client implementation for this server.
Creating a Maven project and adding dependencies
Since this tutorial I will explain everything in order.
Create a simple Maven project and add the following dependencies to pom.xml :
')
<properties> <cas.version>4.0.0</cas.version> </properties> <dependencies> <dependency> <groupId>org.jasig.cas</groupId> <artifactId>cas-server-webapp</artifactId> <version>${cas.version}</version> <type>war</type> <scope>runtime</scope> </dependency> <dependency> <groupId>org.jasig.cas</groupId> <artifactId>cas-server-support-generic</artifactId> <version>${cas.version}</version> <type>jar</type> </dependency> </dependencies> cas-server-webapp is a standard server that we will later configure for ourselves;
cas-server-support-generic - and this library will allow us to configure the server for ourselves.
And also connect the plugin assembly:
<plugin> <artifactId>maven-war-plugin</artifactId> <configuration> <warName>cas</warName> </configuration> </plugin> It will allow us to build our project with the context
/cas .After Maven downloads CAS, you’ll have a new folder in your project that already has the default build of CAS 4.0.0 server.
Now it will be possible to close and launch, but first we need to perform a small Tomcat configuration, so we will deploy it.
Tomcat configuration and key generation
I do not want to repeat myself, so I will provide a link to a more detailed description of the material that will be below. Here is a link to the description .
First of all, you need to generate a certificate and register it, for this we will use the standard keytool that is in each JDK.
1. Generate Java Key Store:
keytool -genkey -alias casdc -keypass 12345678 -keystore ssoServer.jks -storepass 12345678 -validity 365 2. Now we create a certificate based on the already generated storage:
keytool -export -alias casdc -file casServerPublic.cer -keystore ssoServer.jks -storepass 12345678 3. Import the obtained certificate to the storage of trusted certificates:
keytool -import -alias casdc -file casServerPublic.cer -keypass 12345678 -keystore "C:/Program Files/Java/jdk1.7.0/jre/lib/security/cacerts" -storepass changeit After that, go to the folder ./apache-tomcat-8.0.9/conf and open the server.xml file for editing. Find the line there:
Define a SSL HTTP/1.1 Connector on port 8443and after this line, the default is approximately line 83, insert the following xml frahmet:
<Connector port="8443" protocol="org.apache.coyote.http11.Http11NioProtocol" SSLEnabled="true" maxThreads="150" scheme="https" secure="true" clientAuth="false" sslProtocol="TLS" keyAlias="casdc" keystoreFile="C:/keys/ssoServer.jks" keystorePass="12345678" /> Please note that I have placed the generated ssoServer.jks repository in the C: / keys / ssoServer.jks folder and then indicated the full path to it.
keyAlias is the alias we specified in the first step of generating the repository.
keystorePass - password to our keystore.
Thus, we configured the HTTPS, which is so necessary for the CAS server.
After that, you can run Tomcat and stitch our project.
After that follow the link: https: // localhost: 8443 / cas / - this is a cas server with a standard configuration.
You should see the following:
If you have a red strip with a dough, it means that you have done something wrong, and HTTPS is not included.
And in order to verify that the CAS server started up successfully and is working, let's log in. To do this, you need to enter the standard login and password:
Login: casuser
Password: Mellon
After a successful login, you should see:
Congratulations to the CAS server we launched. In the next post I will tell you how to customize AuthenticationHandler, namely the ability to get the user from the database or another external system.
Do not judge strictly, this is my first prototype on this subject, and if there are comments, I will be happy to hear. I also constantly improve it and will write about new achievements, of course, if it will be interesting to someone.
Project sources on Github: https://github.com/alexbarchuk/local-cas
Source: https://wiki.jasig.org/display/CASUM/Configuring
Source: https://habr.com/ru/post/229375/
All Articles