We broadcast a video stream from an IP camera using WebRTC
The solution to the problem of online broadcasting from an IP camera, generally speaking, does not require the use of WebRTC. The camera itself is a server, has an IP address and can be connected directly to the router in order to distribute video content. So why use WebRTC technology?
')
There are at least two reasons for this:
1. As the number of viewers of the Ethernet broadcast increases, there will increasingly be a lack of channel thickness, and then the resources of the camera itself.
2. As mentioned above, the IP camera is a server. But according to what protocols can she give the video to the desktop browser? Mobile device? Most likely this will be HTTP streaming, where video frames or JPEG images are transmitted via HTTP. HTTP streaming, as we know, is not quite suitable for streaming real-time video, although it has proven itself well in on-demand video, where stream interactivity and delay are not particularly important. In fact, if you watch a movie, delaying a video in a few seconds will not make it worse, unless you watch this movie at the same time as someone else. "Oh no! Jack killed her! - writes Alice in the chat to Bob a spoiler 10 seconds before the tragic denouement ”.
Or it will be RTSP / RTP and H.264, in this case a video player plugin, such as VLC or QuickTime, must be installed in the browser. This plugin will take and play the video, as the player itself. But we need a real browser streaming without installing additional crutches / plug-ins.
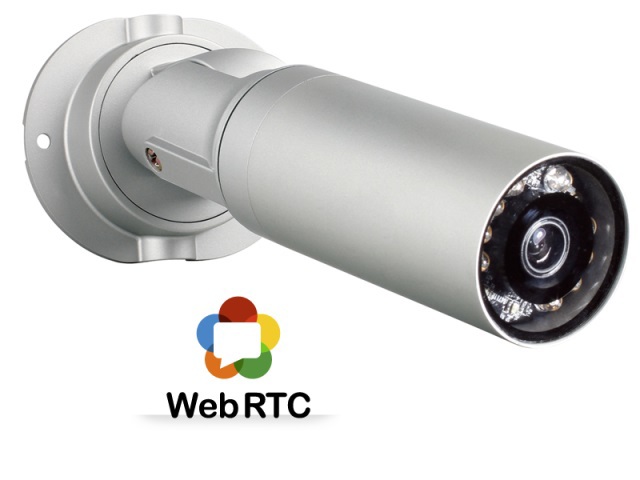
To begin with, take an IP camera to find out what exactly sends this device in the direction of the browser. As the test will be the camera D-Link DCS 7010L:

You can read more about installing and configuring the camera below, but here we just see what it uses for video streaming. When you get into the admin panel of the camera via the web interface, we see something like this (pardonte the landscape):
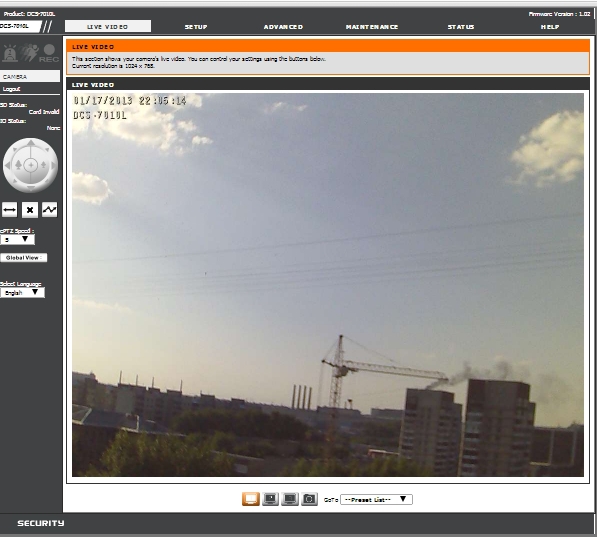
The picture opens in all browsers and evenly podlagivaet about once a second. Considering that both the camera and the laptop on which we are watching the stream are connected to the same router, everything should be smooth and beautiful, but this is not so. It looks like HTTP. Launch Wireshark to confirm your guess:
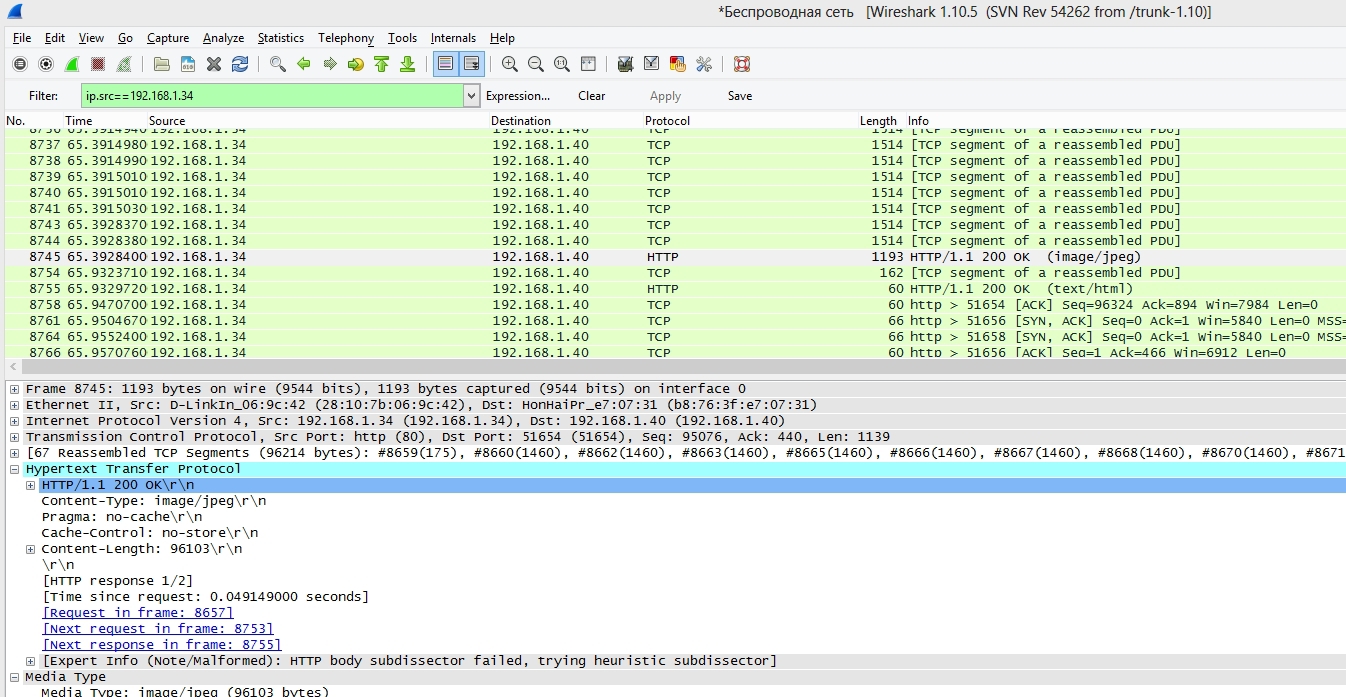
Here we see the sequence of TCP fragments with a length of 1514 bytes

and the final HTTP 200 OK with the received JPEG length:

Next, go to Chrome / Developer Tools / Network and see in real time how GET requests and pictures sent via HTTP flash:

This streaming we do not need. Not smooth, jerks HTTP requests. How many such requests per second will the camera handle? There is reason to believe that at 10 viewers before the camera will safely be bent or begin to terribly fail and issue slides.
If you look at the HTML pages of the camera’s admin panel, you’ll see this interesting code:
RTSP / RTP is just what you need to play a video properly. But will it work in a browser? - Not. But if you install the QuickTime plugin, everything will work. But we are doing a clean browser streaming.
Here you can also mention Flash Player, which can receive an RTMP stream converted from RTSP, RTP, H.264 via a suitable server like Wowza. But Flash Player is also known to be a browser plugin, although it is incomparably more popular than VLC or QuickTime.
In this case, we will test the same RTSP / RTP re-streaming, but a WebRTC-compatible browser will be used as a playback device without any additional browser plug-ins and other crutches. We will set up a relay server that will take the stream from the IP camera and give it to the Internet to an arbitrary number of users using WebRTC-enabled browsers.
As mentioned above, a simple IP camera D-Link DCS-7010L was chosen for testing. The key selection criterion here was device support for the RTSP protocol, since it is for him that our server will take the video stream from the camera.
We connect the camera to the router with the supplied patch cord. After turning on the power and connecting to the router, the camera took the IP address via DHCP, in our case it was 192.168.1.34 (If you go into the settings of the router, you will see that the DCS 7010L device is connected - this is it). It's time to test the camera.
Open the specified IP address in the browser 192.168.1.34 to get into the web-based administrator interface of the camera. By default, there is no password.

As you can see, in the admin panel video from the camera is broadcast regularly. At the same time, periodic jerking is noticeable. This is what we will fix using WebRTC.
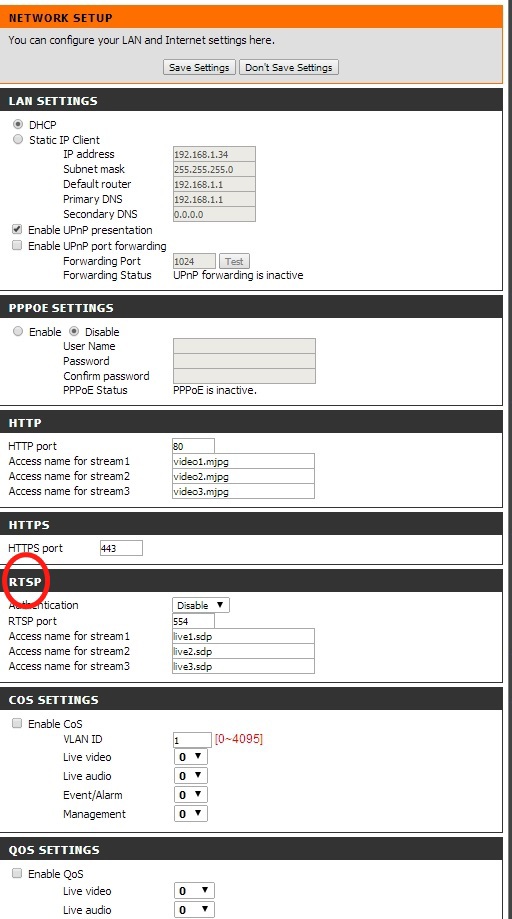
First, in the camera settings, we disable authentication - as part of testing, we will give the stream to anyone who asks. To do this, go to the Setup - Network settings in the web interface of the camera and set the value of the Authentication option to Disable .
In the same place, we check the value of the port of the RTSP protocol, by default it is equal to 554. The format of the transmitted video is determined by the profile used. In the camera, you can specify up to three pieces, we will use the first one, live1.sdp - by default it is configured to use H.264 for video and G.711 for audio. If necessary, you can change the settings in the Setup - Audio and Video section.
Now you can test the camera via RTSP. Open VLC Player (you can use any other RTSP-supporting QuickTime, Windows Media Player, RealPlayer, etc.) and in the Open URL dialog set the RTSP camera address: rtsp: //192.168.1.34/live1.sdp

Well, everything works as it should. The camera regularly plays the video stream in the player via the RTSP protocol.

By the way, the stream plays quite smoothly and without artifacts. We are waiting for the same from WebRTC.
So, the camera is installed, tested with desktop players and ready to be broadcast via the server. Using whatismyip.com, we define the external IP address of the camera. In our case, it was 178.51.142.223. It remains to tell the router that, when accessing via RTSP on port 554, incoming requests are transmitted to the IP camera.
We hammer in the corresponding settings in a router ...

... and check the external IP address and RTSP port using telnet:
telnet 178.51.142.223 554
Making sure that this port is responding, we proceed to install the WebRTC server.
For hosting will be responsible virtual server on Centos 64 bit on Amazon EC2 .
In order not to have performance problems, choose an m3.medium instance with one VCPU:

Yes, yes, there is still Linode and DigitalOcean, but in this case I wanted to make myself amazed.
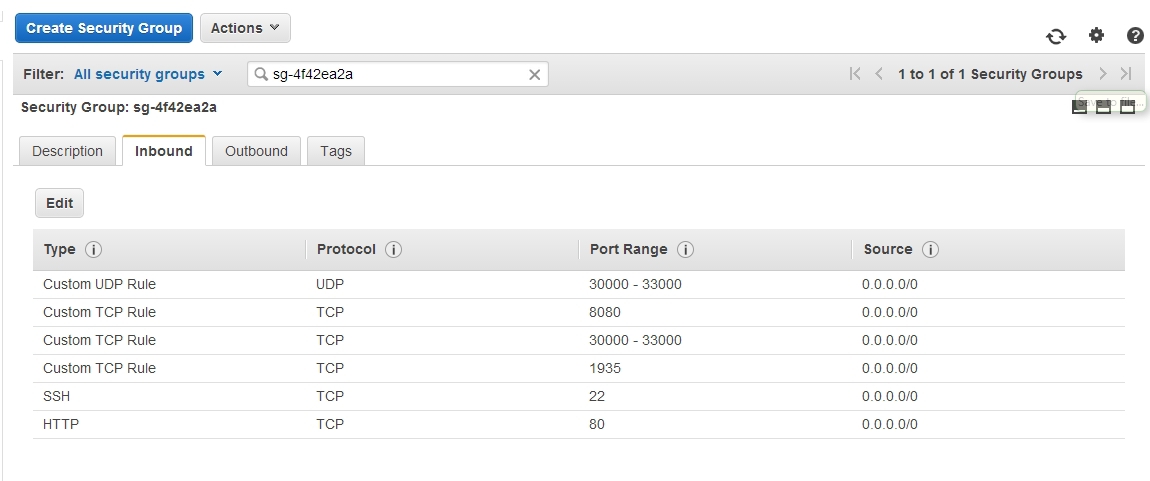
Looking ahead, I'll write that in the Amazon EC2 control panel you need to add a few rules (forward ports), without which the example will not work. These are ports for WebRTC (SRTP, RTCP, ICE) traffic and ports for RTSP / RTP traffic. If you try, the Amazon rules should have something similar for incoming traffic:
With DigitalOcean, by the way, everything will be easier, just open these ports on the firewall or silence the last one. According to the latest operating experience of DO instances, they still give out a static IP address and do not bother with NATs, which means that port forwarding is not needed, as in the case of Amazon.
We will use WebRTC Media & Broadcasting Server from Flashphoner as the server software that broadcasts the RTSP / RTP stream in WebRTC. Streaming server is very similar to Wowza , which can give RTSP / RTP stream to Flash. The only difference is that this stream will be sent to WebRTC, and not to Flash. Those. an honest DTLS will pass between the browser and the server, an SRTP session is established and the stream encoded in VP8 will go to the viewer.
We need SSH access to install.
In theory, instead of point 10, it would be correct to set all the necessary ports and firewall rules, but for testing purposes we decided to simply disable the firewall.
Recall that the structure of our WebRTC broadcast is as follows:
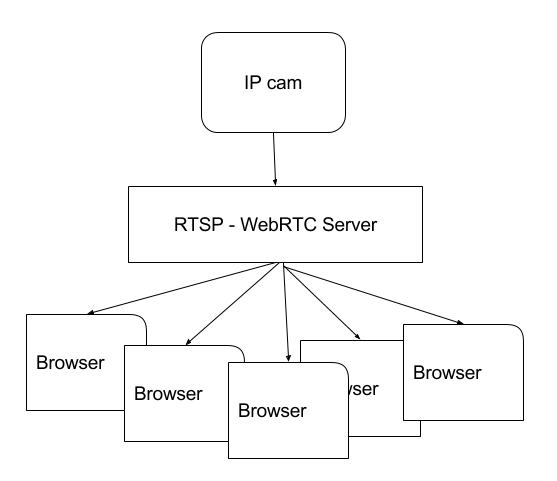
We have already made the installation of the main elements of this diagram, it remains to adjust the interaction arrows.
The connection between the browser and the WebRTC server is provided by the web client that is on the github :. A set of JS, CSS and HTML files is simply thrown into / var / www / html during the installation phase (see paragraph 9 below under the spoiler).
The interaction between the browser and the server is configured in the XML configuration file flashphoner.xml. There you need to enter the IP address of the server so that the web client can connect to the WebRTC server via HTML5 Websockets (point 9 above).
Setting up the server ends here, you can check its operation:
Open the index.html web-client page in a browser (for this, on the same server, Amazon installed Apache with the command yum -y install httpd ):
Here webrtc-ipcam.ddns.net is a free domain obtained through the dynamic DNS server noip.com , which refers to our external IP address. We told the router to redirect RTSP requests to 192.168.1.34 in accordance with the rules of NAT network address translation (see also above).
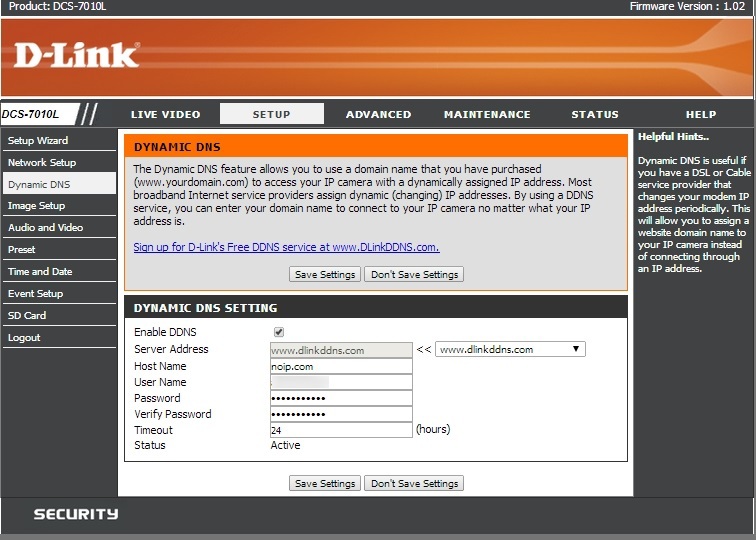
The id = rtsp: //webrtc-ipcam.ddns.net/live1.sdp parameter specifies the URL of the stream to play. The WebRTC server will request the streams from the camera, process them and give it to the browser for playback via WebRTC. Maybe your router supports DDNS. If not, then the IP camera itself has such support:
And so DDNS support looks in the router itself:

Now you can start testing and evaluate the results.
After opening the link, the browser connects to the WebRTC server, which sends the request to the IP camera to receive the video stream. The whole process takes a few seconds.

At this time, the browser connects to the server via webboxes, then the server requests the IP camera via RTSP, receives the H.264 stream via RTP and transcodes it into VP8 / SRTP - which ultimately reproduces the WebRTC browser.

Further, after a short wait, an already familiar picture is displayed.

At the bottom of the video, the URL of the video stream is displayed, which can be copied and opened for viewing from another browser or tab.
Suddenly, we were deceived, and the video from the IP camera is going over HTTP again? We will not idly contemplate the picture, but check that we really get traffic. Of course, we are again launching Wireshark and the debugging console in Chrome. In the Chrome browser console, we can observe the following:

At this time, nothing flashes and can not see any pictures transmitted via HTTP. All we see this time is Websocket frames and most of them are ping / pong types for maintaining a Websocket session. Interesting frames: connect, prepareRtspSession and onReadyToPlay - in this order the connection to the server is established: first connect via Websocket, and then request the stream to play.
This is what chrome shows : // webrtc-internals

According to the readings of the graphs, we have a bitrate from the 1Mbps IP camera. There is also outgoing traffic, most likely these are RTCP and ICE packets. RTT to Amazon server is about 300 milliseconds.
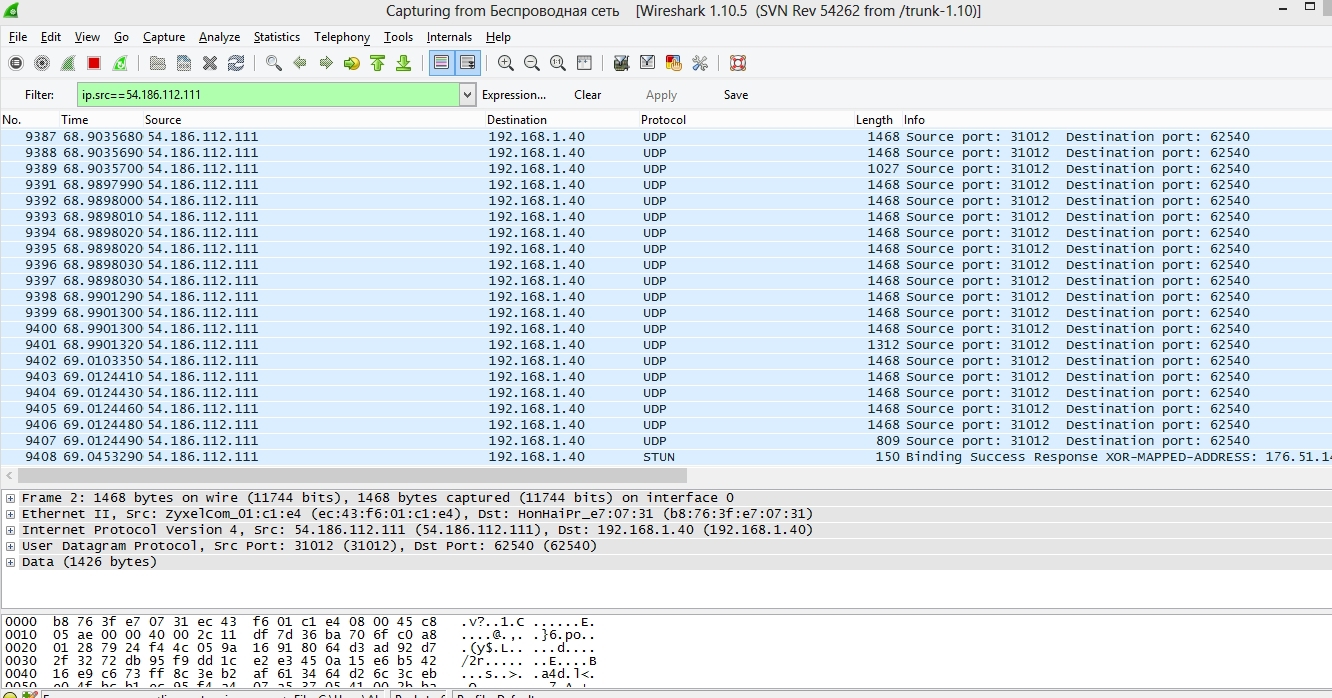
Now let's take a look at Wireshark, there you can clearly see UDP traffic from the server’s IP address. In the picture below there are 1468 byte packets. This is WebRTC. More precisely, SRTP packets carrying VP8 video frames that we can see on the browser screen. In addition, STUN requests skip (the lowest packet in the picture) - this WebRTC ICE carefully checks the connection.
It is also worth noting the relatively low latency (ping to the data center was about 250 ms) video playback. WebRTC works on SRTP / UDP, and this is the fastest way to deliver packets, unlike HTTP, RTMP and other TCP-like streaming methods. Those. the delay seen by the eye should be RTT + browser buffering, decoding and playback time. Visually, in this case it is - the eye almost does not see the delay, it is less than 500 milliseconds.
The next test is to connect other viewers. I managed to open 10 Chrome windows, and each of them showed a picture. At the same time, Chrome itself began to blunt a little. When you open the 11th window on another computer, playback remained smooth.
As you know, WebRTC supports Chrome and Firefox browsers on the Android platform.
Check if our broadcast will be displayed there:
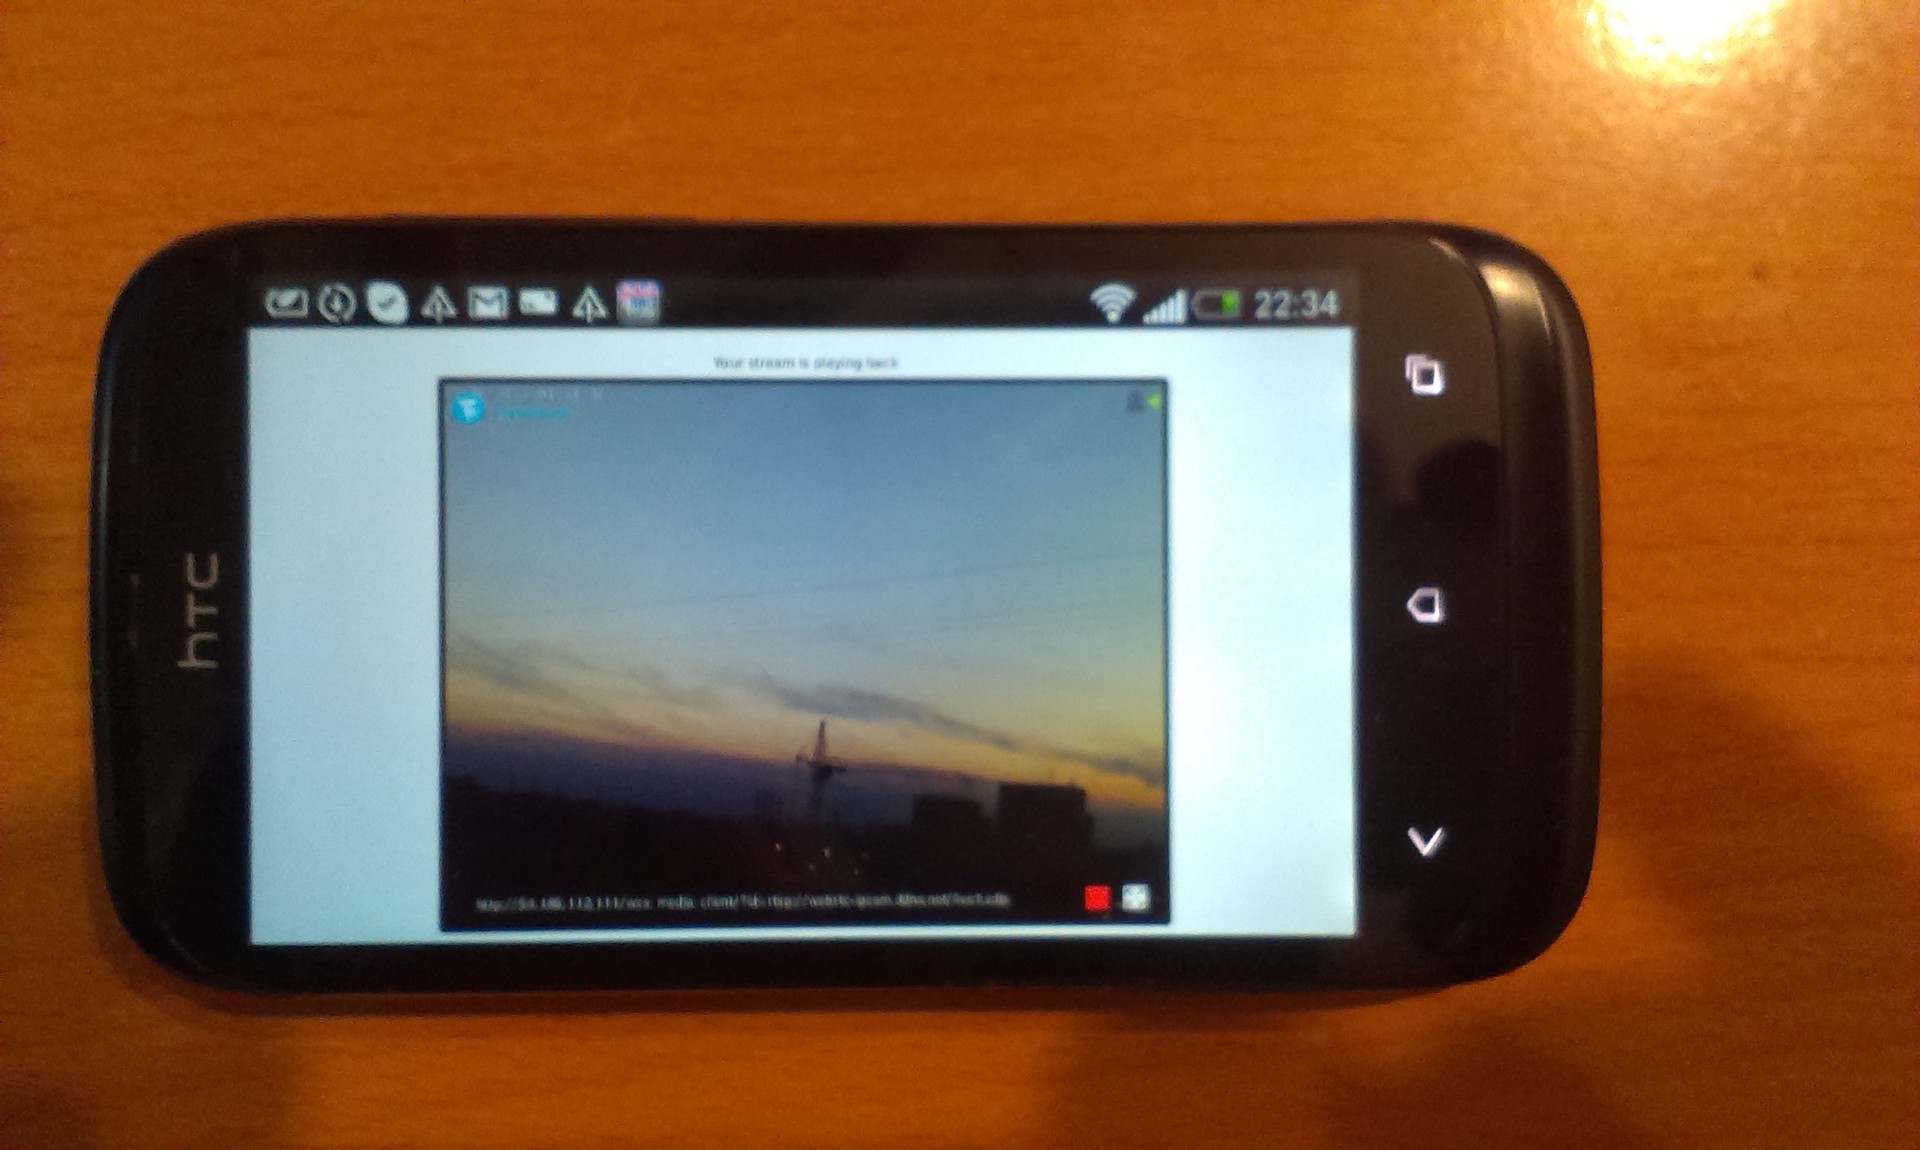
On the HTC phone, in a Firefox browser, the video from the camera is displayed. There are no differences in the smoothness of playback from the desktop.
As a result, we managed to launch WebRTC online broadcasting from an IP camera to several browsers with minimal effort. Neither tambourine dances nor rocket-science were required - only basic knowledge of Linux and the SSH console.
The broadcast quality was at an acceptable level, and the playback delay was invisible to the eye.
Summarizing, we can say that browser WebRTC broadcasts have the right to exist, because in our case, WebRTC is no longer a crutch or plugin, but a real platform for playing video in a browser.
The main brake, perhaps, is the lack of codecs. WebRTC community and vendors should make an effort and enter the H.264 codec into WebRTC. There is nothing to say against VP8, but why abandon the millions of compatible devices and software that work with H.264? Patents, such patents ...
In second place, not full support in browsers. C IE and Safari, for example, the question remains open and there you have to switch to another type of streaming or use a plugin such as webrtc4all.
So in the future, we hope to see more interesting solutions, in which transcoding and stream conversion will not be needed and most browsers will be able to play the streams from various devices directly.
')
There are at least two reasons for this:
1. As the number of viewers of the Ethernet broadcast increases, there will increasingly be a lack of channel thickness, and then the resources of the camera itself.
2. As mentioned above, the IP camera is a server. But according to what protocols can she give the video to the desktop browser? Mobile device? Most likely this will be HTTP streaming, where video frames or JPEG images are transmitted via HTTP. HTTP streaming, as we know, is not quite suitable for streaming real-time video, although it has proven itself well in on-demand video, where stream interactivity and delay are not particularly important. In fact, if you watch a movie, delaying a video in a few seconds will not make it worse, unless you watch this movie at the same time as someone else. "Oh no! Jack killed her! - writes Alice in the chat to Bob a spoiler 10 seconds before the tragic denouement ”.
Or it will be RTSP / RTP and H.264, in this case a video player plugin, such as VLC or QuickTime, must be installed in the browser. This plugin will take and play the video, as the player itself. But we need a real browser streaming without installing additional crutches / plug-ins.
To begin with, take an IP camera to find out what exactly sends this device in the direction of the browser. As the test will be the camera D-Link DCS 7010L:
You can read more about installing and configuring the camera below, but here we just see what it uses for video streaming. When you get into the admin panel of the camera via the web interface, we see something like this (pardonte the landscape):
The picture opens in all browsers and evenly podlagivaet about once a second. Considering that both the camera and the laptop on which we are watching the stream are connected to the same router, everything should be smooth and beautiful, but this is not so. It looks like HTTP. Launch Wireshark to confirm your guess:
Here we see the sequence of TCP fragments with a length of 1514 bytes
and the final HTTP 200 OK with the received JPEG length:
Next, go to Chrome / Developer Tools / Network and see in real time how GET requests and pictures sent via HTTP flash:
This streaming we do not need. Not smooth, jerks HTTP requests. How many such requests per second will the camera handle? There is reason to believe that at 10 viewers before the camera will safely be bent or begin to terribly fail and issue slides.
If you look at the HTML pages of the camera’s admin panel, you’ll see this interesting code:
if(browser_IE) DW('<OBJECT CLASSID="CLSID:'+AxUuid+'" CODEBASE="/VDControl.CAB?'+AxVer+'#version='+AxVer+'" width="0" height="0" ></OBJECT>'); else { if(mpMode == 1) var RTSPName = g_RTSPName1; else if(mpMode == 2) var RTSPName = g_RTSPName2; else if(mpMode == 3) var RTSPName = g_RTSPName3; var o=''; if(g_isIPv6) //because ipv6 not support rtsp. var host = g_netip; else var host = g_host; o+='<object id="qtrtsp_object" width="0" height="0" codebase="http://www.apple.com/qtactivex/qtplugin.cab" '; o+='classid="clsid:02BF25D5-8C17-4B23-BC80-D3488ABDDC6B" type="video/quicktime">'; o+='<param name="src" value="http://'+host+":"+g_Port+'/qt.mov" />'; o+='<param name="autoplay" value="true" />'; o+='<param name="controller" value="false" />'; o+='<param name="qtsrc" value="rtsp://'+host+':'+g_RTSPPort+'/'+RTSPName+'"/>'; o+='</object>'; //alert(o); DW(o); } RTSP / RTP is just what you need to play a video properly. But will it work in a browser? - Not. But if you install the QuickTime plugin, everything will work. But we are doing a clean browser streaming.
Here you can also mention Flash Player, which can receive an RTMP stream converted from RTSP, RTP, H.264 via a suitable server like Wowza. But Flash Player is also known to be a browser plugin, although it is incomparably more popular than VLC or QuickTime.
In this case, we will test the same RTSP / RTP re-streaming, but a WebRTC-compatible browser will be used as a playback device without any additional browser plug-ins and other crutches. We will set up a relay server that will take the stream from the IP camera and give it to the Internet to an arbitrary number of users using WebRTC-enabled browsers.
IP camera connection
As mentioned above, a simple IP camera D-Link DCS-7010L was chosen for testing. The key selection criterion here was device support for the RTSP protocol, since it is for him that our server will take the video stream from the camera.
We connect the camera to the router with the supplied patch cord. After turning on the power and connecting to the router, the camera took the IP address via DHCP, in our case it was 192.168.1.34 (If you go into the settings of the router, you will see that the DCS 7010L device is connected - this is it). It's time to test the camera.
Open the specified IP address in the browser 192.168.1.34 to get into the web-based administrator interface of the camera. By default, there is no password.
As you can see, in the admin panel video from the camera is broadcast regularly. At the same time, periodic jerking is noticeable. This is what we will fix using WebRTC.
Camera setup
First, in the camera settings, we disable authentication - as part of testing, we will give the stream to anyone who asks. To do this, go to the Setup - Network settings in the web interface of the camera and set the value of the Authentication option to Disable .
In the same place, we check the value of the port of the RTSP protocol, by default it is equal to 554. The format of the transmitted video is determined by the profile used. In the camera, you can specify up to three pieces, we will use the first one, live1.sdp - by default it is configured to use H.264 for video and G.711 for audio. If necessary, you can change the settings in the Setup - Audio and Video section.
Now you can test the camera via RTSP. Open VLC Player (you can use any other RTSP-supporting QuickTime, Windows Media Player, RealPlayer, etc.) and in the Open URL dialog set the RTSP camera address: rtsp: //192.168.1.34/live1.sdp
Well, everything works as it should. The camera regularly plays the video stream in the player via the RTSP protocol.
By the way, the stream plays quite smoothly and without artifacts. We are waiting for the same from WebRTC.
Server installation
So, the camera is installed, tested with desktop players and ready to be broadcast via the server. Using whatismyip.com, we define the external IP address of the camera. In our case, it was 178.51.142.223. It remains to tell the router that, when accessing via RTSP on port 554, incoming requests are transmitted to the IP camera.
We hammer in the corresponding settings in a router ...
... and check the external IP address and RTSP port using telnet:
telnet 178.51.142.223 554
Making sure that this port is responding, we proceed to install the WebRTC server.
For hosting will be responsible virtual server on Centos 64 bit on Amazon EC2 .
In order not to have performance problems, choose an m3.medium instance with one VCPU:
Yes, yes, there is still Linode and DigitalOcean, but in this case I wanted to make myself amazed.
Looking ahead, I'll write that in the Amazon EC2 control panel you need to add a few rules (forward ports), without which the example will not work. These are ports for WebRTC (SRTP, RTCP, ICE) traffic and ports for RTSP / RTP traffic. If you try, the Amazon rules should have something similar for incoming traffic:
With DigitalOcean, by the way, everything will be easier, just open these ports on the firewall or silence the last one. According to the latest operating experience of DO instances, they still give out a static IP address and do not bother with NATs, which means that port forwarding is not needed, as in the case of Amazon.
We will use WebRTC Media & Broadcasting Server from Flashphoner as the server software that broadcasts the RTSP / RTP stream in WebRTC. Streaming server is very similar to Wowza , which can give RTSP / RTP stream to Flash. The only difference is that this stream will be sent to WebRTC, and not to Flash. Those. an honest DTLS will pass between the browser and the server, an SRTP session is established and the stream encoded in VP8 will go to the viewer.
We need SSH access to install.
Under the spoiler - a detailed description of the commands executed
1. Download the server installation archive:
$ wget flashphoner.com/downloads/builds/WCS/3.0/x8664/wcs3_video_vp8/FlashphonerMediaServerWebRTC-3.0/FlashphonerMediaServerWebRTC-3.0.868.tar.gz
2. Deployed:
$ tar -xzf FlashphonerMediaServerWebRTC-3.0.868.tar.gz
3. Installed:
$ cd FlashphonerMediaServerWebRTC-3.0.868
$. / install.sh
During the installation, the external IP address of the server was entered: 54.186.112.111 and internal 172.31.20.65 (the one that Private IP).
4. Started the server:
$ service webcallserver start
5. Checked the logs:
$ tail - f /usr/local/FlashphonerWebCallServer/logs/server_logs/flashphoner.log
6. Make sure that the server has started and is ready for operation:
$ ps aux | grep flashphoner
7. Install and run apache:
$ yum install httpd
$ service httpd start
8. Download web-files and place them in the standard Apache folder / var / www / html
cd / var / www / html
$ wget github.com/flashphoner/flashphoner_client/archive/wcs_media_client.zip
$ unzip webrtc_media_client.zip
9. Enter the IP address of the server in the config flashphoner.xml:
10. Stopped the firewall.
$ service iptables stop
In theory, instead of point 10, it would be correct to set all the necessary ports and firewall rules, but for testing purposes we decided to simply disable the firewall.
Server Tuning
Recall that the structure of our WebRTC broadcast is as follows:
We have already made the installation of the main elements of this diagram, it remains to adjust the interaction arrows.
The connection between the browser and the WebRTC server is provided by the web client that is on the github :. A set of JS, CSS and HTML files is simply thrown into / var / www / html during the installation phase (see paragraph 9 below under the spoiler).
The interaction between the browser and the server is configured in the XML configuration file flashphoner.xml. There you need to enter the IP address of the server so that the web client can connect to the WebRTC server via HTML5 Websockets (point 9 above).
Setting up the server ends here, you can check its operation:
Open the index.html web-client page in a browser (for this, on the same server, Amazon installed Apache with the command yum -y install httpd ):
54.186.112.111/wcs_media_client/?id=rtsp://webrtc-ipcam.ddns.net/live1.sdpHere webrtc-ipcam.ddns.net is a free domain obtained through the dynamic DNS server noip.com , which refers to our external IP address. We told the router to redirect RTSP requests to 192.168.1.34 in accordance with the rules of NAT network address translation (see also above).
The id = rtsp: //webrtc-ipcam.ddns.net/live1.sdp parameter specifies the URL of the stream to play. The WebRTC server will request the streams from the camera, process them and give it to the browser for playback via WebRTC. Maybe your router supports DDNS. If not, then the IP camera itself has such support:
And so DDNS support looks in the router itself:
Now you can start testing and evaluate the results.
Testing
After opening the link, the browser connects to the WebRTC server, which sends the request to the IP camera to receive the video stream. The whole process takes a few seconds.
At this time, the browser connects to the server via webboxes, then the server requests the IP camera via RTSP, receives the H.264 stream via RTP and transcodes it into VP8 / SRTP - which ultimately reproduces the WebRTC browser.
Further, after a short wait, an already familiar picture is displayed.
At the bottom of the video, the URL of the video stream is displayed, which can be copied and opened for viewing from another browser or tab.
Make sure that this is really WebRTC.
Suddenly, we were deceived, and the video from the IP camera is going over HTTP again? We will not idly contemplate the picture, but check that we really get traffic. Of course, we are again launching Wireshark and the debugging console in Chrome. In the Chrome browser console, we can observe the following:
At this time, nothing flashes and can not see any pictures transmitted via HTTP. All we see this time is Websocket frames and most of them are ping / pong types for maintaining a Websocket session. Interesting frames: connect, prepareRtspSession and onReadyToPlay - in this order the connection to the server is established: first connect via Websocket, and then request the stream to play.
This is what chrome shows : // webrtc-internals
According to the readings of the graphs, we have a bitrate from the 1Mbps IP camera. There is also outgoing traffic, most likely these are RTCP and ICE packets. RTT to Amazon server is about 300 milliseconds.
Now let's take a look at Wireshark, there you can clearly see UDP traffic from the server’s IP address. In the picture below there are 1468 byte packets. This is WebRTC. More precisely, SRTP packets carrying VP8 video frames that we can see on the browser screen. In addition, STUN requests skip (the lowest packet in the picture) - this WebRTC ICE carefully checks the connection.
It is also worth noting the relatively low latency (ping to the data center was about 250 ms) video playback. WebRTC works on SRTP / UDP, and this is the fastest way to deliver packets, unlike HTTP, RTMP and other TCP-like streaming methods. Those. the delay seen by the eye should be RTT + browser buffering, decoding and playback time. Visually, in this case it is - the eye almost does not see the delay, it is less than 500 milliseconds.
The next test is to connect other viewers. I managed to open 10 Chrome windows, and each of them showed a picture. At the same time, Chrome itself began to blunt a little. When you open the 11th window on another computer, playback remained smooth.
About WebRTC on mobile devices
As you know, WebRTC supports Chrome and Firefox browsers on the Android platform.
Check if our broadcast will be displayed there:
On the HTC phone, in a Firefox browser, the video from the camera is displayed. There are no differences in the smoothness of playback from the desktop.
Conclusion
As a result, we managed to launch WebRTC online broadcasting from an IP camera to several browsers with minimal effort. Neither tambourine dances nor rocket-science were required - only basic knowledge of Linux and the SSH console.
The broadcast quality was at an acceptable level, and the playback delay was invisible to the eye.
Summarizing, we can say that browser WebRTC broadcasts have the right to exist, because in our case, WebRTC is no longer a crutch or plugin, but a real platform for playing video in a browser.
Why don't we see the widespread adoption of WebRTC?
The main brake, perhaps, is the lack of codecs. WebRTC community and vendors should make an effort and enter the H.264 codec into WebRTC. There is nothing to say against VP8, but why abandon the millions of compatible devices and software that work with H.264? Patents, such patents ...
In second place, not full support in browsers. C IE and Safari, for example, the question remains open and there you have to switch to another type of streaming or use a plugin such as webrtc4all.
So in the future, we hope to see more interesting solutions, in which transcoding and stream conversion will not be needed and most browsers will be able to play the streams from various devices directly.
Source: https://habr.com/ru/post/229243/
All Articles