Work with Workflow in Cisco UCS Director

In this post, I will review the process of creating a standard user request to deploy a virtual machine through Workflow (in contrast to the method that was described in the Self-Service post using Cisco UCS Director ). Below, we will get acquainted with the concept of Workflow, see the interface of the Workflow editor and create our first Task.
A workflow, in accordance with the Cisco UCS Director Orchestration Guide, consists of two or more tasks, united by a common execution logic. Workflow determines the order of tasks. In other words, Workflow is a set of interconnected elements that perform a specific set of actions in accordance with a given logic. Moreover, the logic can be determined by the system administrator.
')
Cisco USCD provides the administrator with two key elements for creating and working with workflow:
- Workflow UI designer (graphical user interface for editing, see image below);
- A set of standard (typical) tasks (more than 400).

The Workflow Designer interface is very simple, I would even say primitive. What I personally like very much, because there are no extra elements, usually overloading the working area of the screen.
On the left is the “Available Task” area, where all the built-in typical tasks are grouped. There is also a search bar. The central part of the window is occupied by the working area where the Task'i are located. At the top there are several buttons that allow you to perform a number of actions, including launching the execution of the created Workflow directly from the editor, which is very useful for debugging.
Typical tasks
A typical task is a predefined set of atomic actions grouped in a single object. At the entrance of such a task, you can submit a set of specific resources (including through previously defined policies). At the output, a task can transfer certain information for another task (for example, the parameters of the virtual machine being created). Further in the post I will use two typical tasks to create Workflow, which will determine the user's actions to create a virtual machine.
Tasks communicate with each other in the workspace. For each task, you can determine which task will be performed further in case of its successful execution, as well as in case of unsuccessful one. For this you can use beautiful red and green arrows (JavaScript taxis :-)). Thus, it is possible to determine the logic of the branching of the task, and a fairly clear picture is obtained.
UCSD allows you to display a complete list of all tasks with a detailed description of each of them and a sample code. To do this, in the Policies -> Orchestration -> Workflow menu, select the Task Library command and say Submit. For example, below is a description of the standard VMWare Host Power Action task.

In addition, typical tasks perform the functions of statistics collection and discovery of physical and virtual infrastructure objects, the so-called “Collect Inventory Task”.
Work with Workflow
In order to get to the Workflow section you need to go to the Policies -> Orchestration -> Workflow menu.

All existing workflows are grouped in directories. The UCSD package already includes a set of standard Workflow, for example, in the System directory you can see the following:
- VMWare OVF Deployment;
- VMWare VM Provision;
- VMWare Clone VM.
With Workflow, as with other UCSD objects, you can perform a number of standard operations, such as:
- Editing;
- Export / import and export as a template;
- Cloning;
- Schedule their implementation using a sheduler;
- Lock or unlock.
Deploying (provisioning) a virtual machine using Workflow
Enough theory, let's create our first workflow, with which users can deploy a virtual machine on the self-service portal. To do this, go to the Policies -> Orchestration -> Workflows menu and click on the Add Workflow button. A window appears,
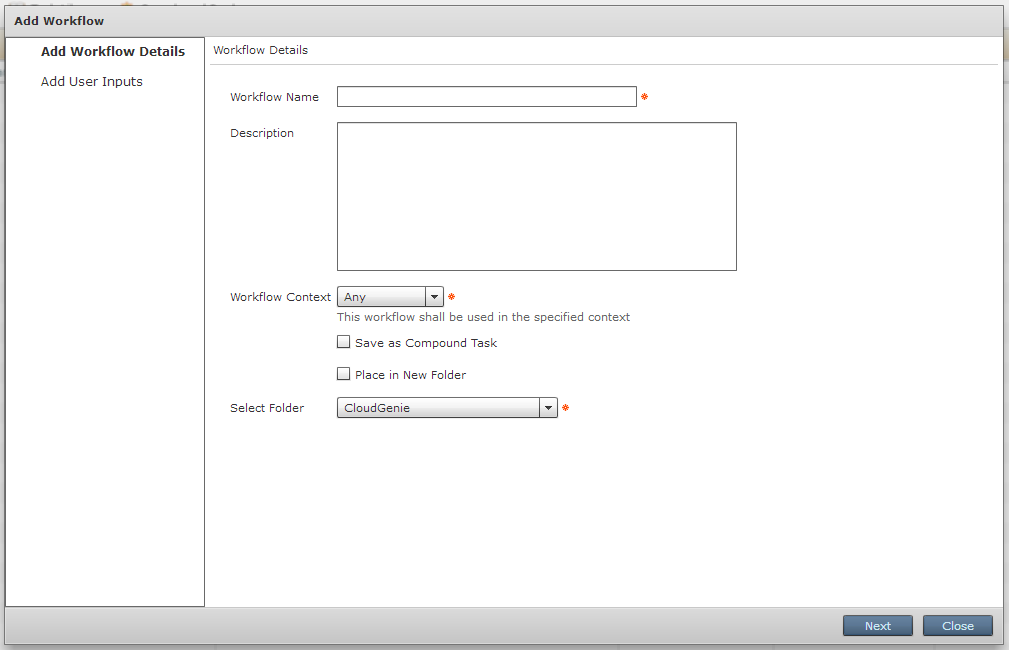
in which you need to specify the unique name of the Workflow - my_first_wf, the execution context (in our case Any) and select the directory in which our Workflow will be saved - IT-GRAD_TEST.

Click Next. Go to the "Add User Inputs" window. Here we can determine what data Workflow will request from the user at the beginning of its execution. In fact, “Workflow User Inputs” is a typical task that will be executed during the work of our Workflow. We will not create any additional tasks yet.
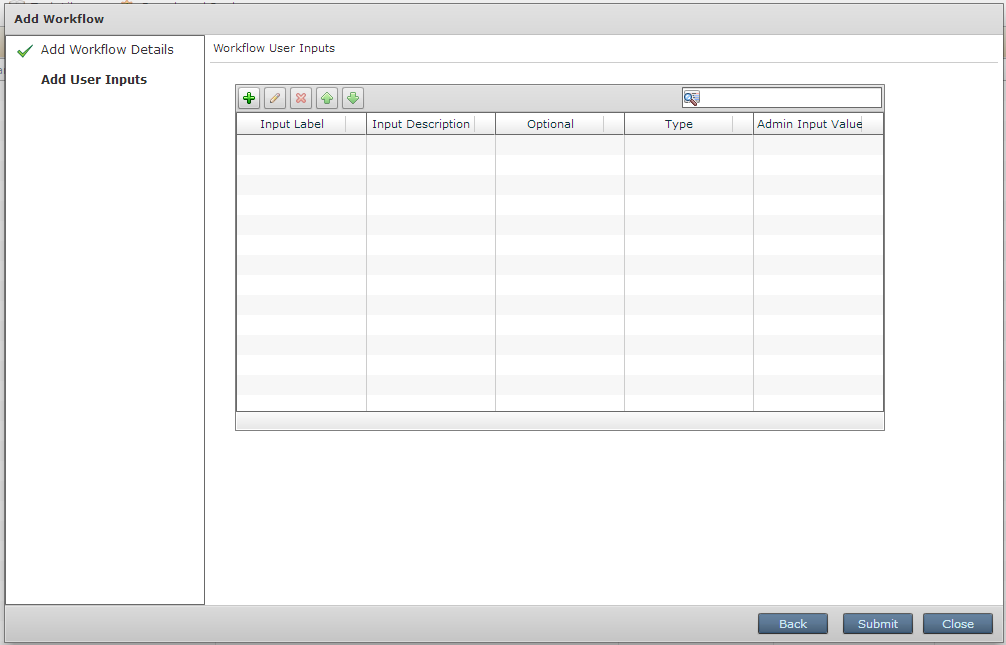
Click Submit. We get in the catalog IT-GRAD_TEST a new Workflow. If you look closely at its status, you can see that the Validation Status = Failed is checked. This is due to the fact that we have not yet defined any tasks.
Go ahead. We edit our WF. You can enter the editor either by double-clicking on Workflow, or selecting it from the list to give the command Edit Workflow, or to give the command Workflow Designer.
Those who will somehow work with the UCSD interface will quickly notice that often the same operation can be performed in several ways.
Open WF Designer
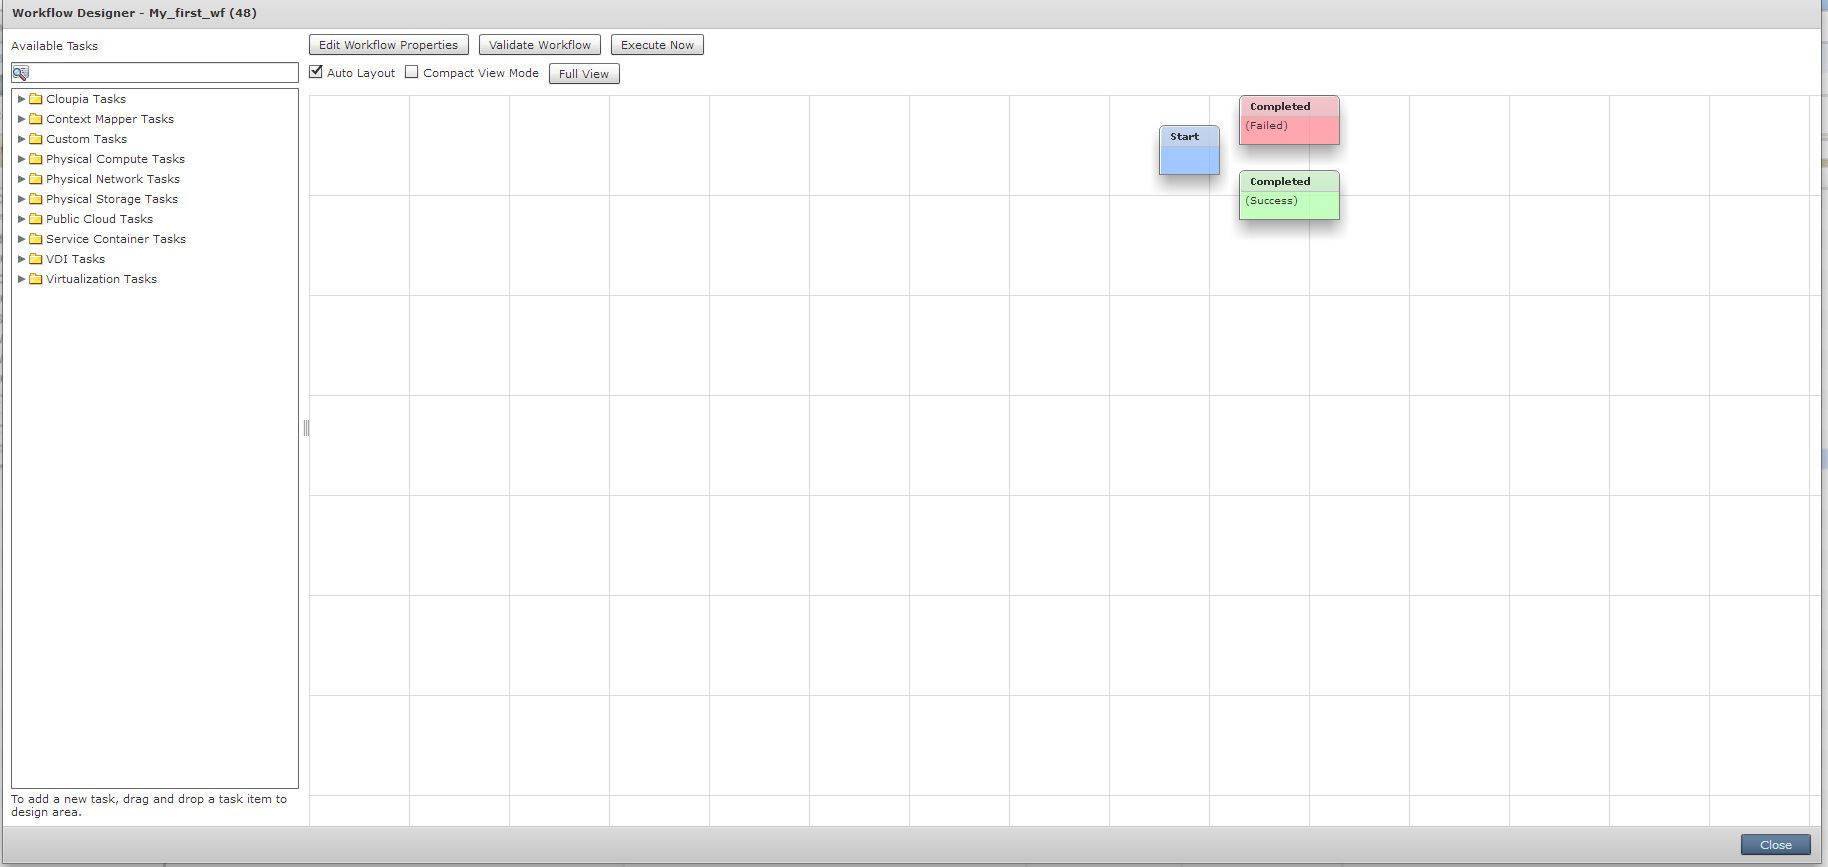
And we define a set of tasks that must be performed when creating a virtual machine. Immediately I will clarify that I will use the typical task.
First of all, we need to determine the composition of the resources created by the VM. This can be done using a standard task - Resource Allocation. To do this, in the search bar, type allocate and at the very bottom we see the task we need

Mouse over dragging task in the working field
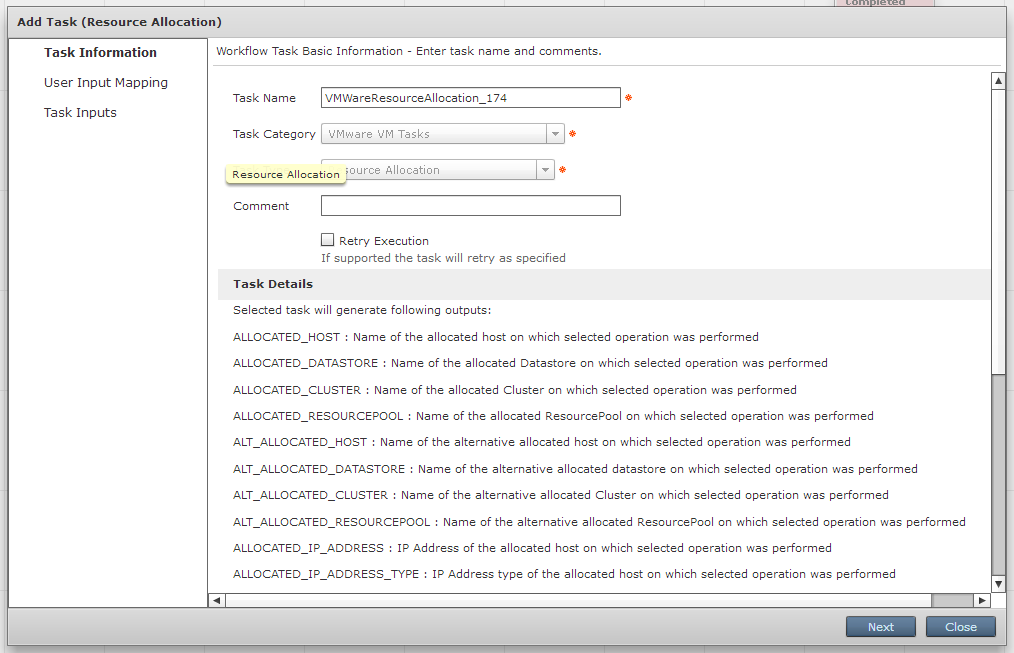
The task setting window appears, where we can define the name of the task. In the Task Details list, the attributes are defined, the values of which will be transferred to the next task after the execution of the current task. The list of these fields is important, since we will have to define all of them (or their part) in our next task.
Click Next

In the window that appears, we can connect the User Input and Task Input Attributes. In Russian, this means that we can specify certain values for the task attributes, which will either be entered by the user, or they will be transferred from the previous task after its execution. For example, we can explicitly indicate exactly how we will deploy the VM Deployment Options virtual machine — based on a Template or based on an existing virtual machine. If we explicitly define the way a virtual machine is deployed, the user will not have to specify it when prompted by the self-service portal (he simply will not have a choice). You also need to understand that those attributes of tasks that are labeled Mandatory, UCSD will require to determine in any case.
Leave everything unchanged and click Next.

In the Task Inputs window, we see that we need to define the VM deployment options, the directory and the vDC in which the created VM will be placed. We set the necessary values and we press on Submit.
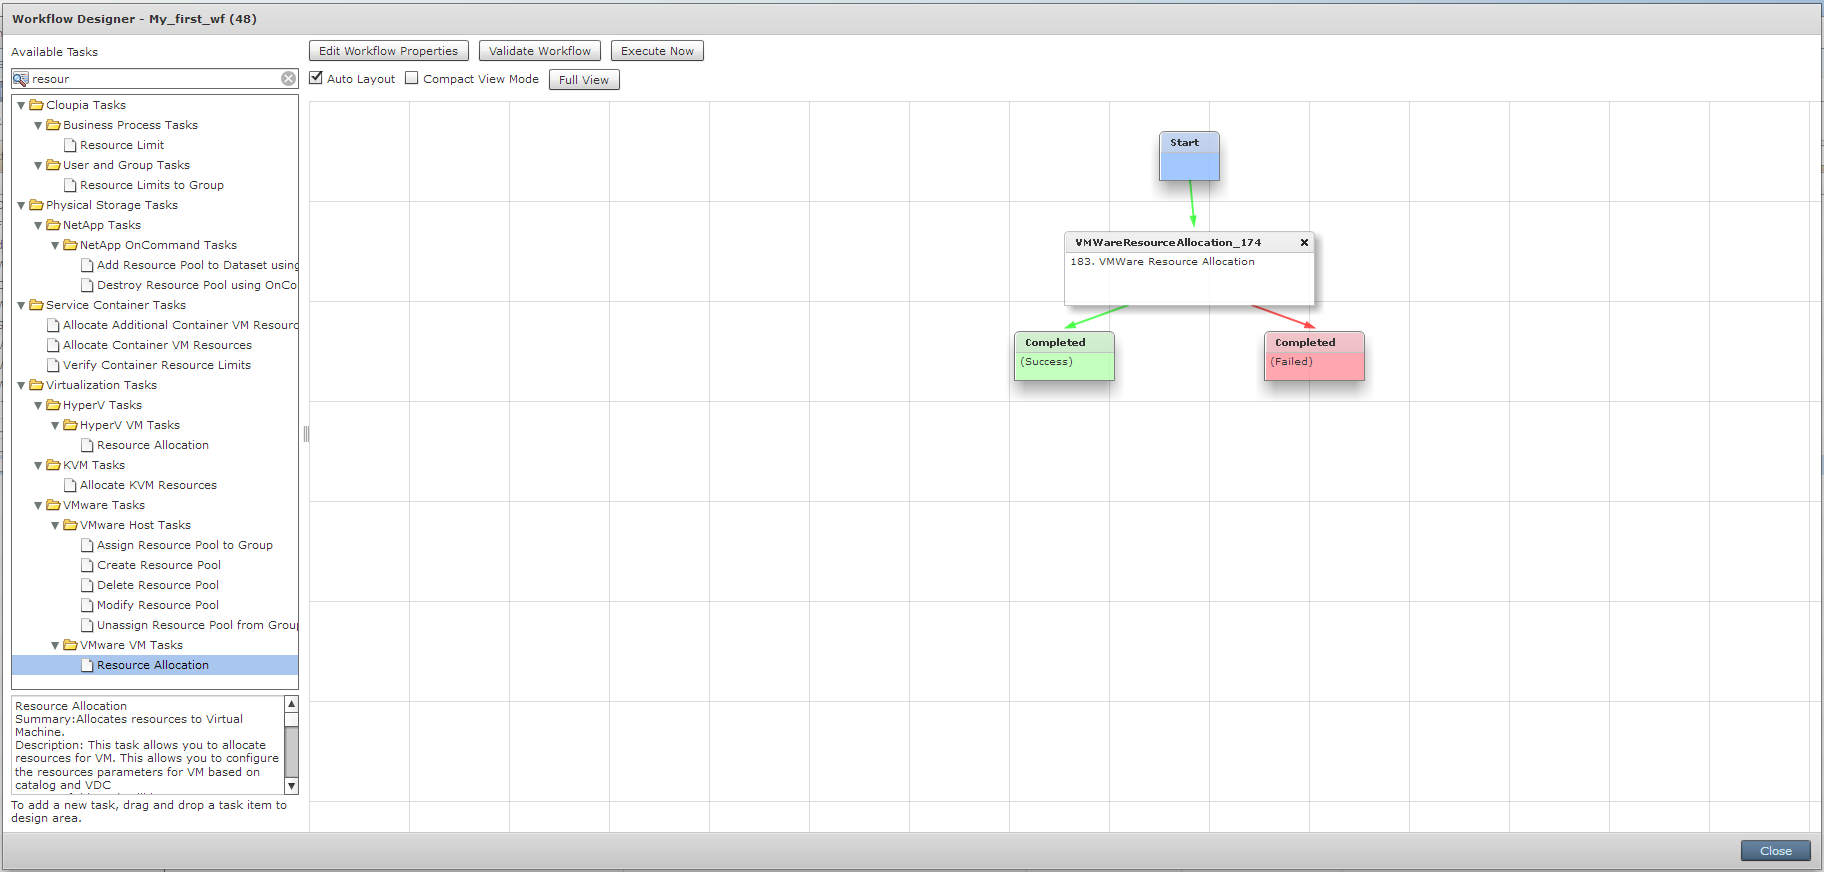
As you can see, our new task machine is defined as a start machine and has two options for completion. We will need to include all subsequent tasks in our Workflow manually.
Now we need to add the following task, which will deploy the virtual user. It is called VM provision.
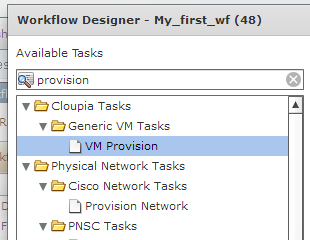
Interestingly, this task is placed in the Cloupia Tasks directory, unlike the previous one. We transfer it to the working field.

Name Taska leave unchanged. Note that the VM Provision task only returns the value of the VM_ID attribute. Click Next.
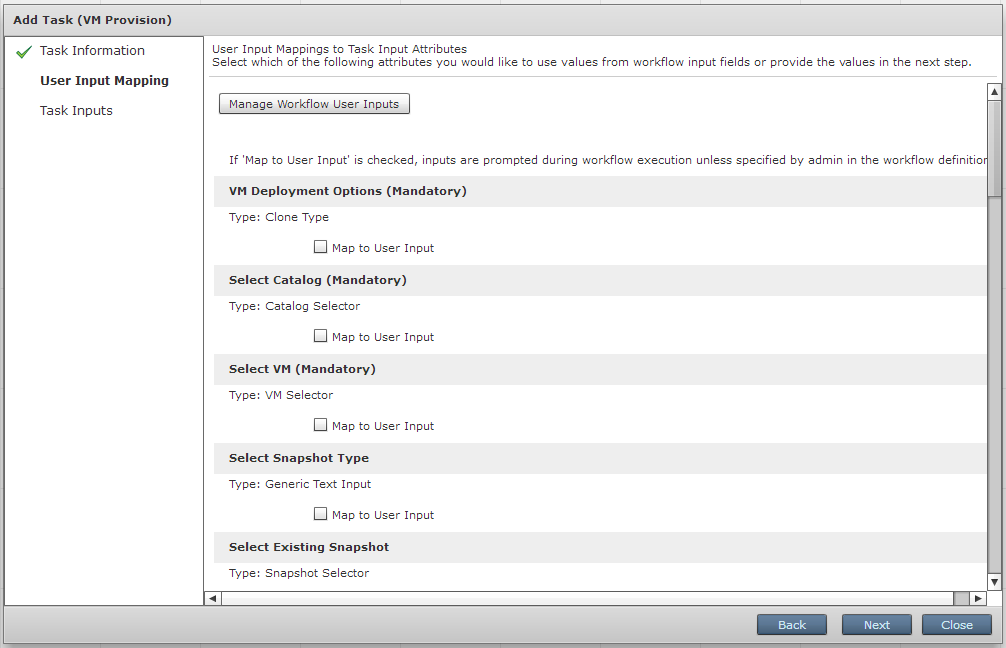
The procedure for setting the User Inputs of this task, I will try to describe in more detail. Remember, I mentioned in the Resource Allocation task description that it outputs a set of attribute values that can be passed to the next task? Now we will do it. For example, let's zapapim the Select Host attribute for the transferred value from the Resource Allocation “ALLOCATED_HOST” value. Do the same for attribute attributes from “Select Datastore” to “Select Additional IPv6 Address”.
It should look something like this:

The attributes for the last three tasks “Number of vCPUs”, “Memory”, “Disk”, which determine the number of virtual processors, the amount of VM memory and the size of the VM disk, respectively, can be left unchanged. You can determine them in the next step. And you can define them through separate User Inputs Workflow. I will demonstrate how this can be done using the Disk Size Selector task.
To define its attribute, click on the Manage Workflow User Inputs button in the upper part of the window and get to the Workflow User Inputs definition window.

Push "+"

Set the label and click on Select

And we get into the window of choice of typical tasks. We drive in the search bar "disk" and select Task Disk Size Selector.
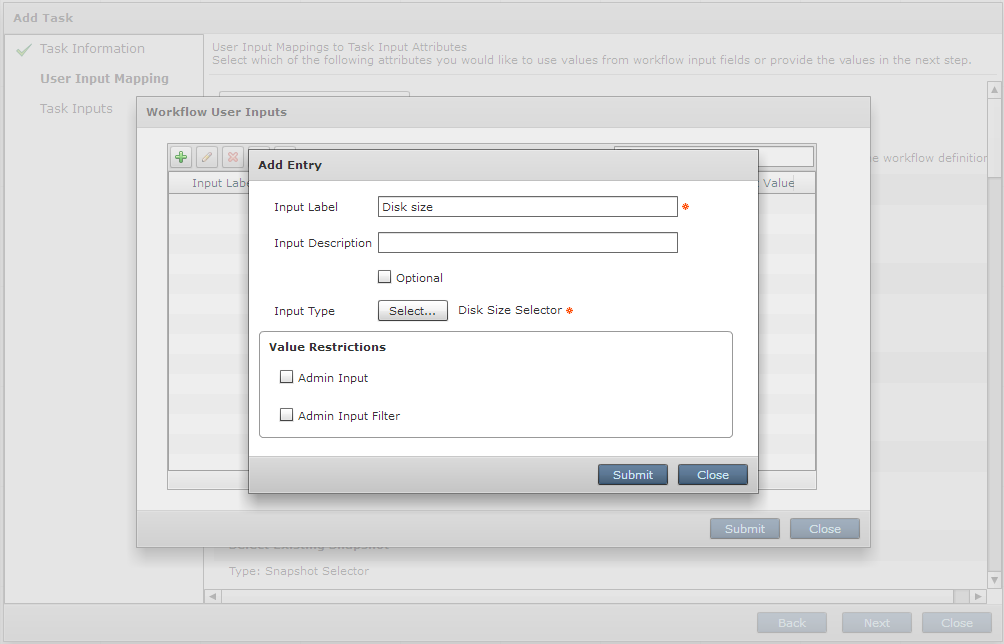
Further we can set restrictions for value of attributes of typical task. To do this, click Admin Input Filter and determine the allowed disk size using a regular expression. In our case, I want to limit the user's choice to 20 GB and 60 GB disks.
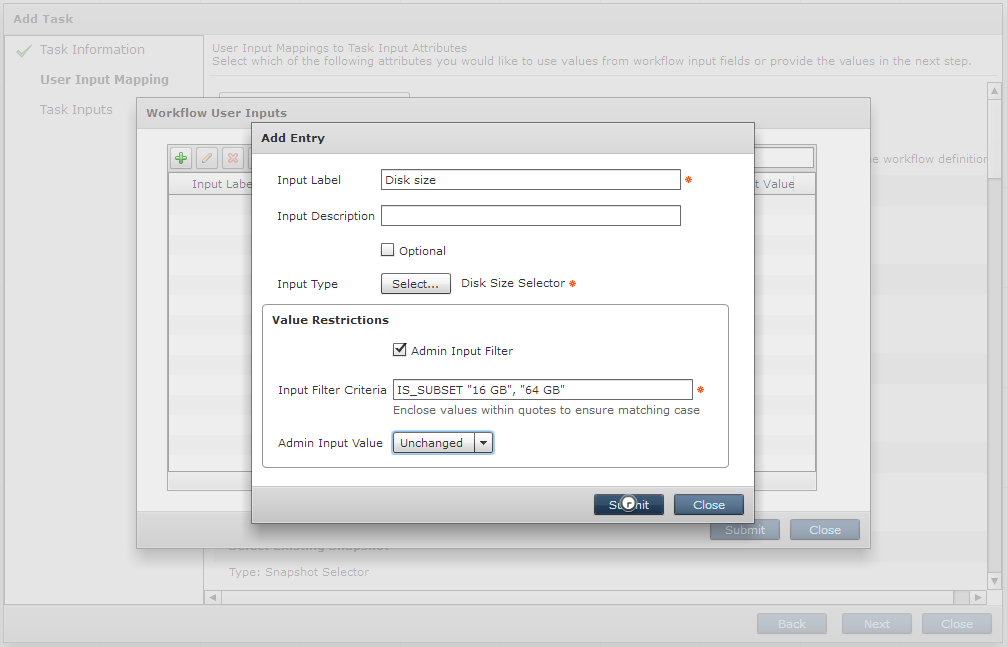
A detailed description of the filter syntax can be found in the Filter Criteria section of the Syntax for Admin Input Filter in the Cisco UCS Director Orchestration Guide.
Click Submit and again get to the User Input Mapping window. For Disk podtaska choose the created Workflow User Inputs “Disk size”. This completes the User Input Mapping settings.
Click Next
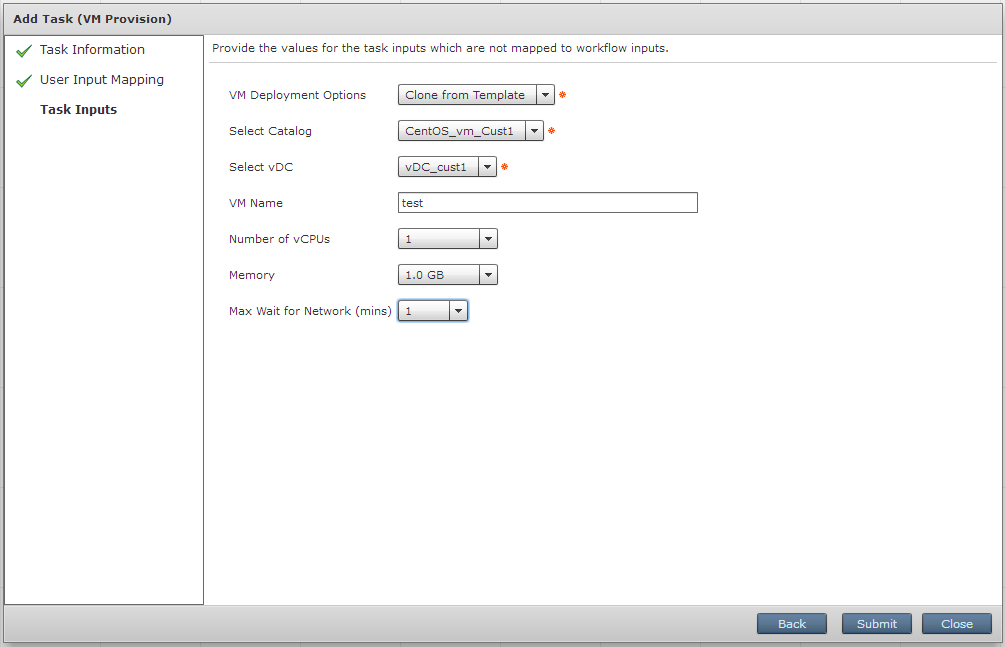
Please note that we again need to specify the VM Deployment Type, select a directory and vDC. In addition, we can set a new virtual machine name and redefine the number of vCPUs and memory.
Click Submit
Now we need to associate the created task with other elements of our Workflow. To do this, we need to hover the mouse on the created task and display the drop-down list for the green field On success. In the drop-down list, select Complete (success). For RescaLe Allocation task, we specify VMProvosoin_175 in the same list. As a result, we obtain the following:
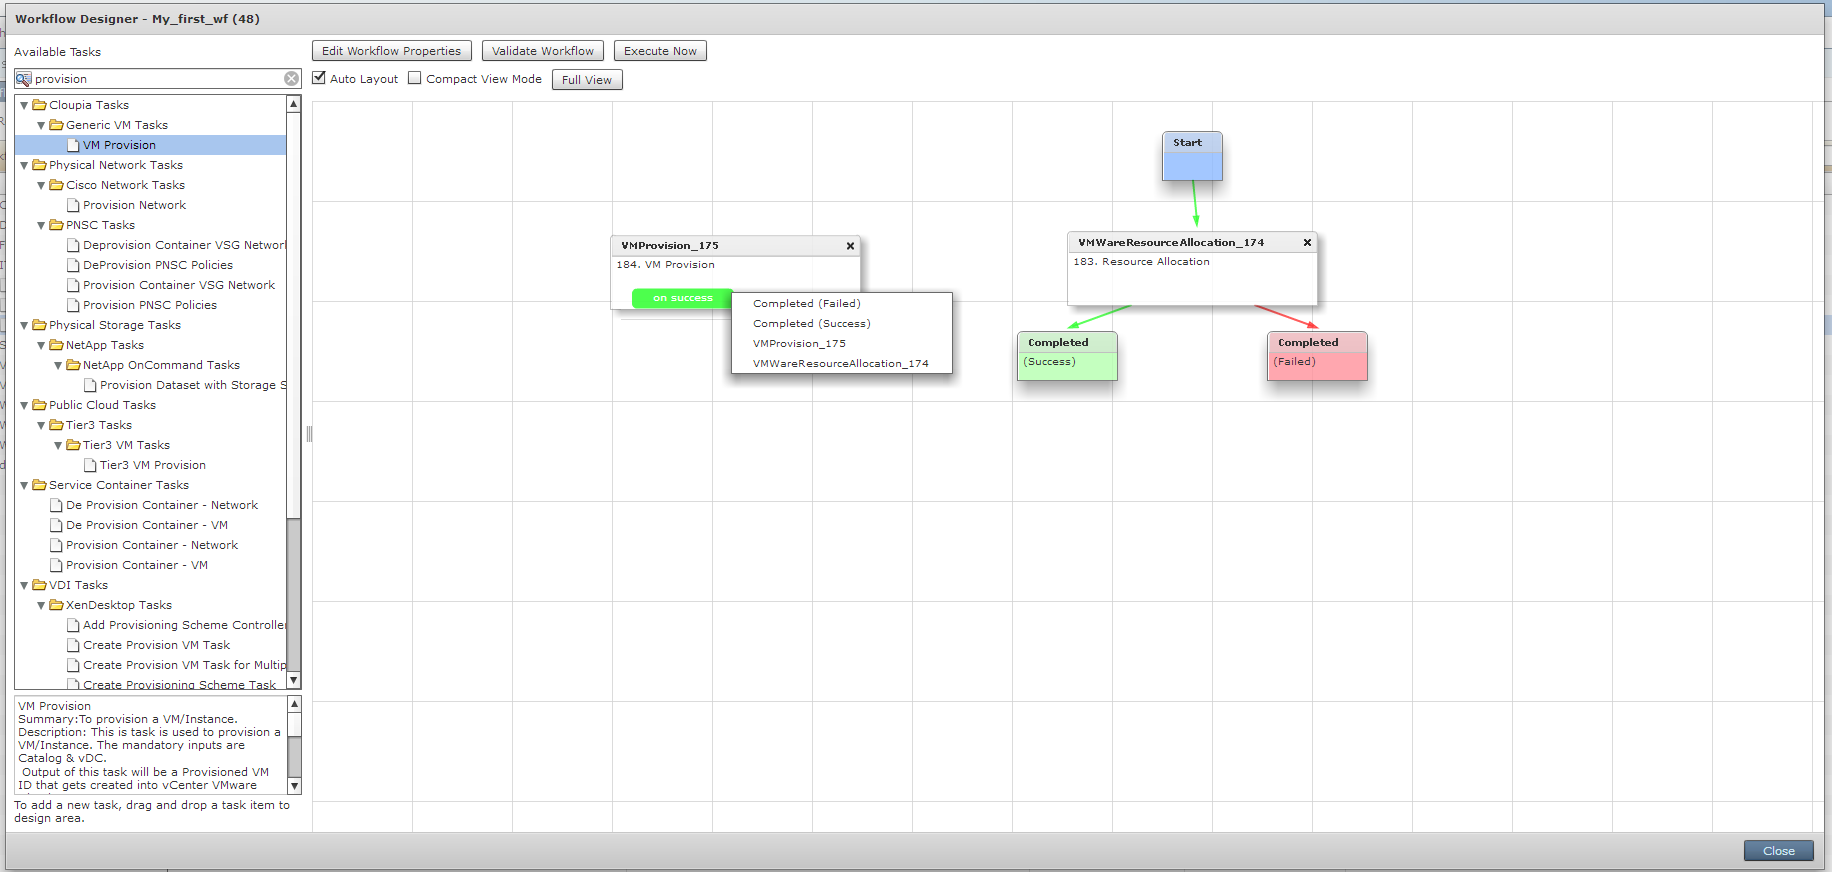
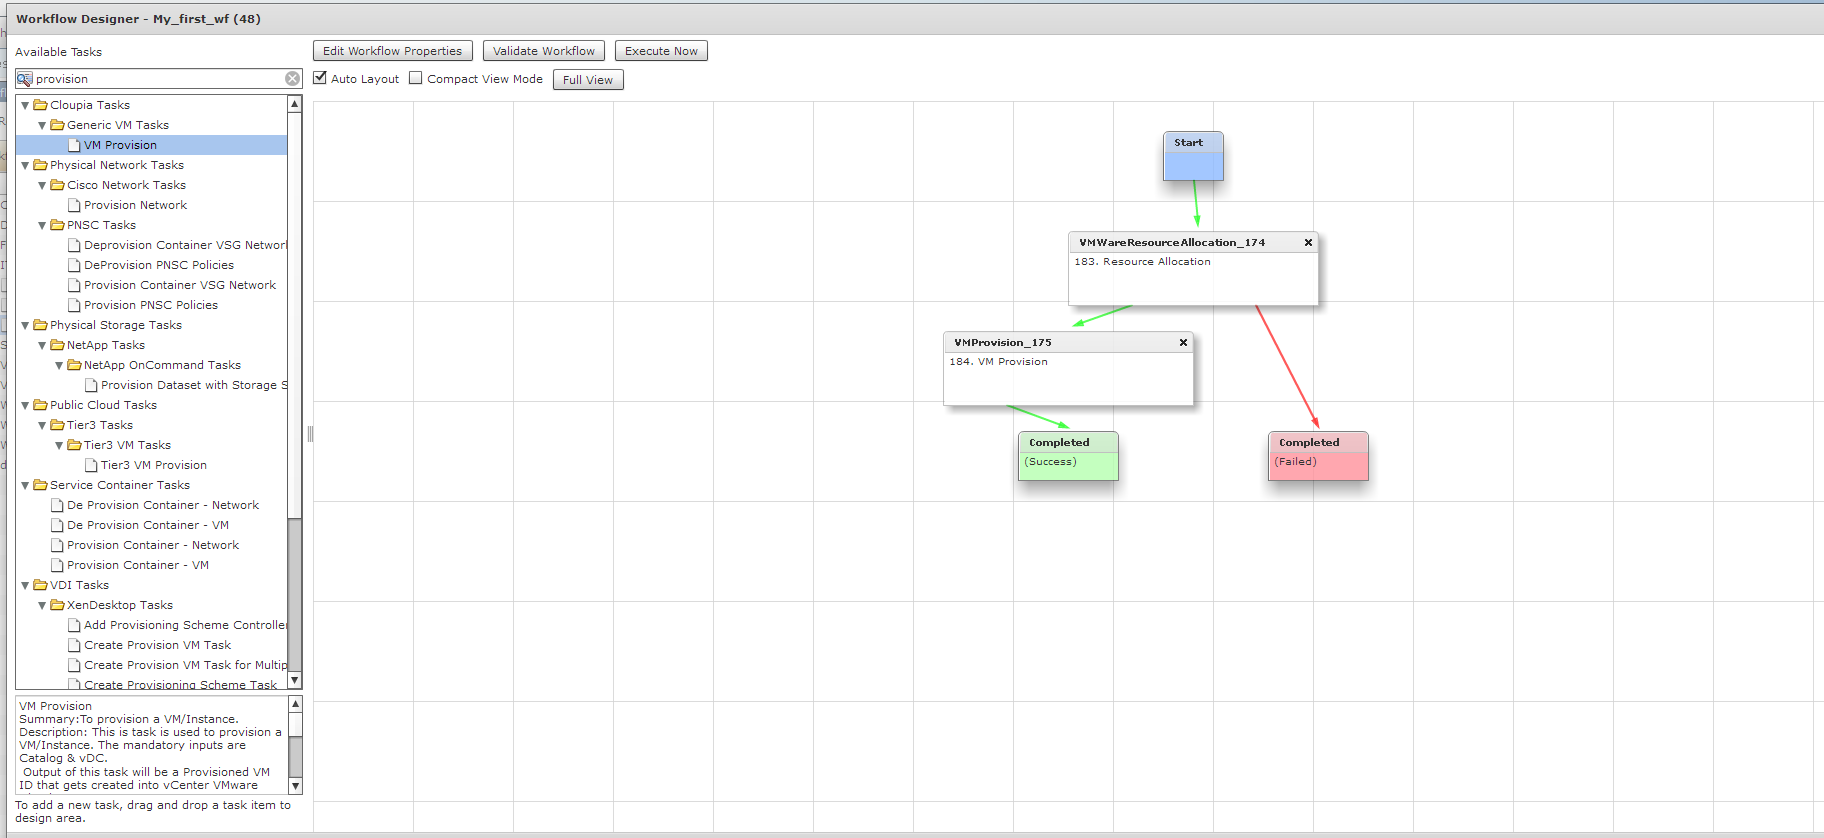
And do not forget to specify what VM Provision TASK should do in case of failure.
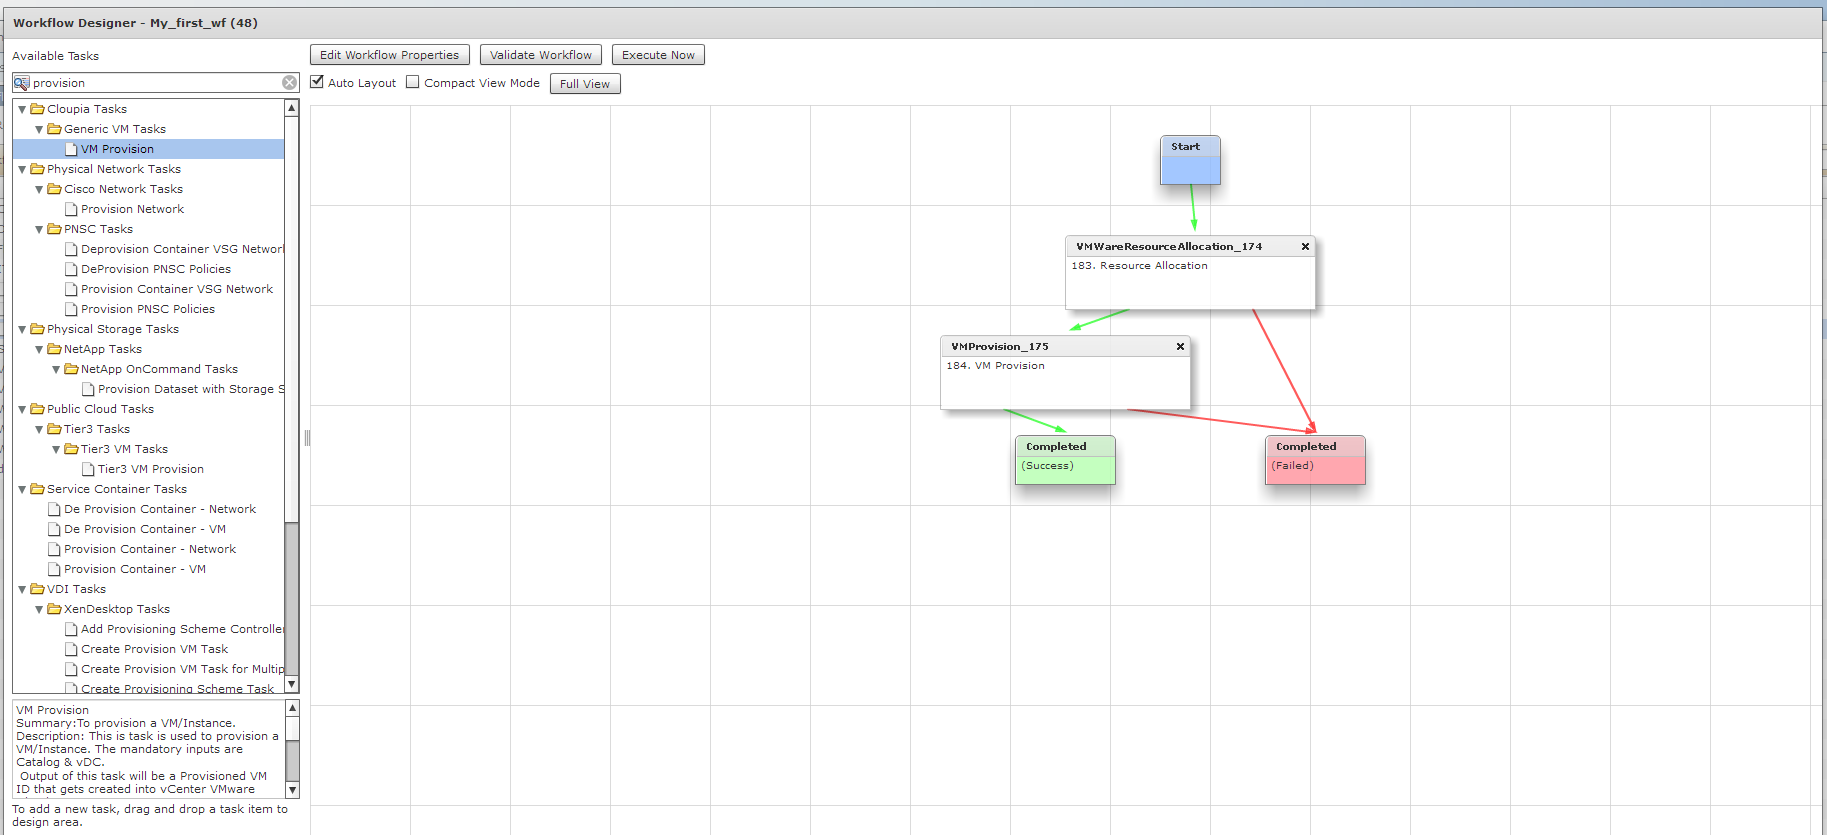
That's all. To be sure, you can click on the Validate Workflow button and, if there are no errors, click Close.
Creating a new directory
As I wrote in the post “Self-Service with Cisco UCS Director: How to give users the opportunity to create virtual servers by themselves”, in order for users to create a virtual machine on the self-service portal, we need a directory. In the above-mentioned post, a catalog of the type Standard was created, now we will create a directory with the Advanced type.
To do this, go to the Policies -> Catalogs menu and give the Add command.
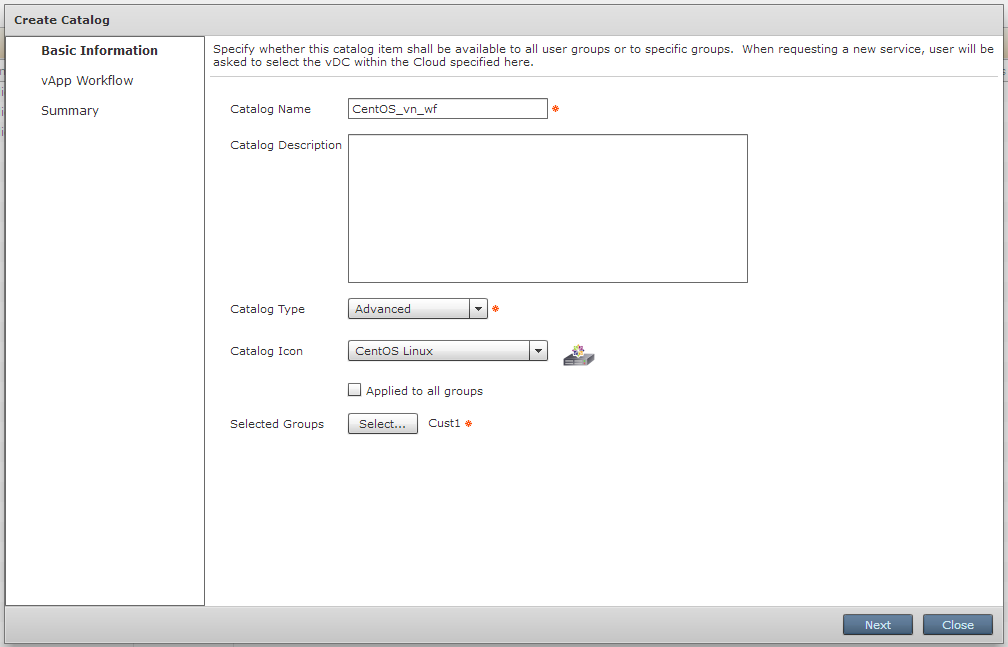
Set the name CentOS_vm_wf, type Advanced for the new catalog and select our favorite group Cust1. Click Next.
In comparison with the catalog in the “Self-service using Cisco UCS Director we created in the post: how to enable users to create virtual servers by themselves”, there are very few settings for the Advanced type directory. In the next window, we will indicate our new Workflow and that's it. To do this, click on the button Select
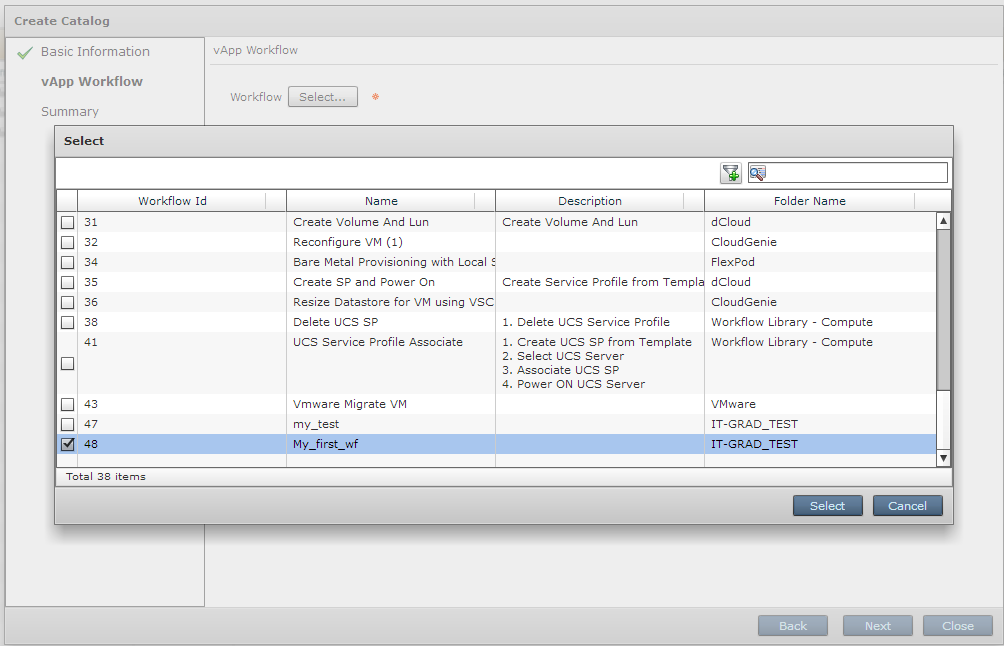
Put a tick in front of our Workflow, again click Select, then Next and Submit. Catalog created.
Request to create a virtual machine
Log in to the self-service portal as a user belonging to the Cust1 group, and launch the process of creating a new VM based on our new catalog.

Remember that the values for such parameters as, for example, the number of vCPUs or the amount of memory we set at the stage of creating Workflow, and the user was given the choice of the size of the VM disk
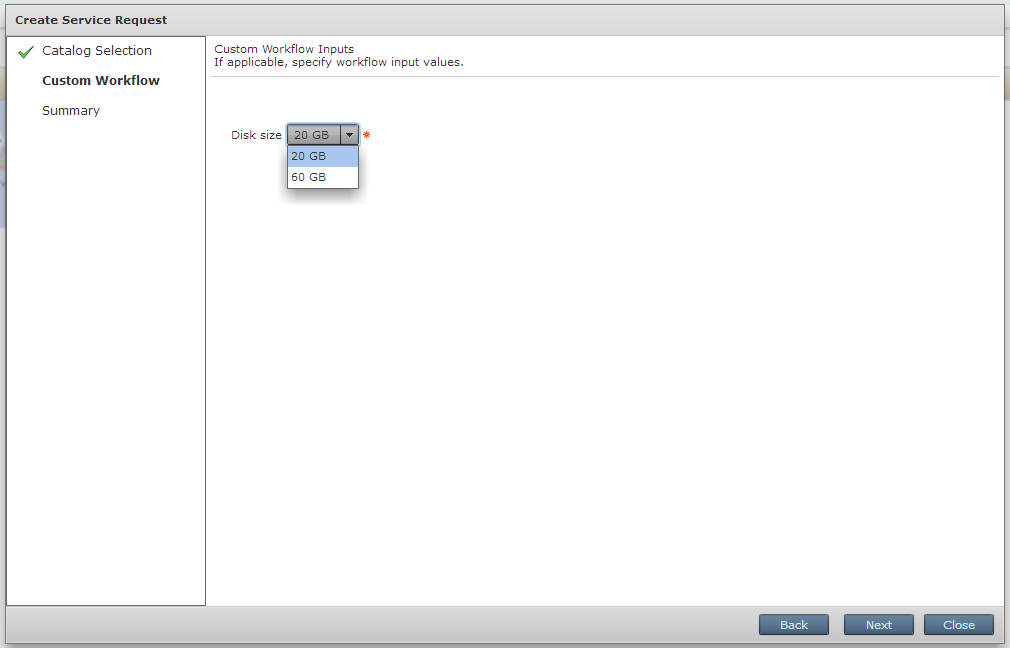
Let's set the size we need and presses Next, then Submit.
Let's look at the progress of our query, as we see the car is already unfolding :-)

That's all. I tried to tell about the most important and interesting functionality of Cisco UCSD as easy and clear as possible.
Source: https://habr.com/ru/post/229081/
All Articles