As part of a course at MIT, I developed an automatic dispenser for patches or in brief about design-thinking
I spent the 2012/2013 school year at the legendary MIT (Massachusetts Institute of Technology), where, among other things, I took a course called Product Design and Development (PDD) . The main goal of the course is to teach a structured approach to product development. The peculiarity of the course is that the class is divided into teams to work on a semester project. Each team consists of 2-3 business students (MIT Sloan School MBA or MBA + engineering), 1-2 designers (from Rhode Island School of Design) and 2-3 engineers from MIT. The so-called design-thinking methodology is used as the base method. There are quite a few descriptions of what this method is about, in this article I will give the basic principles and steps from the PDD course using the example of my team’s course project: automatic patch dispenser.
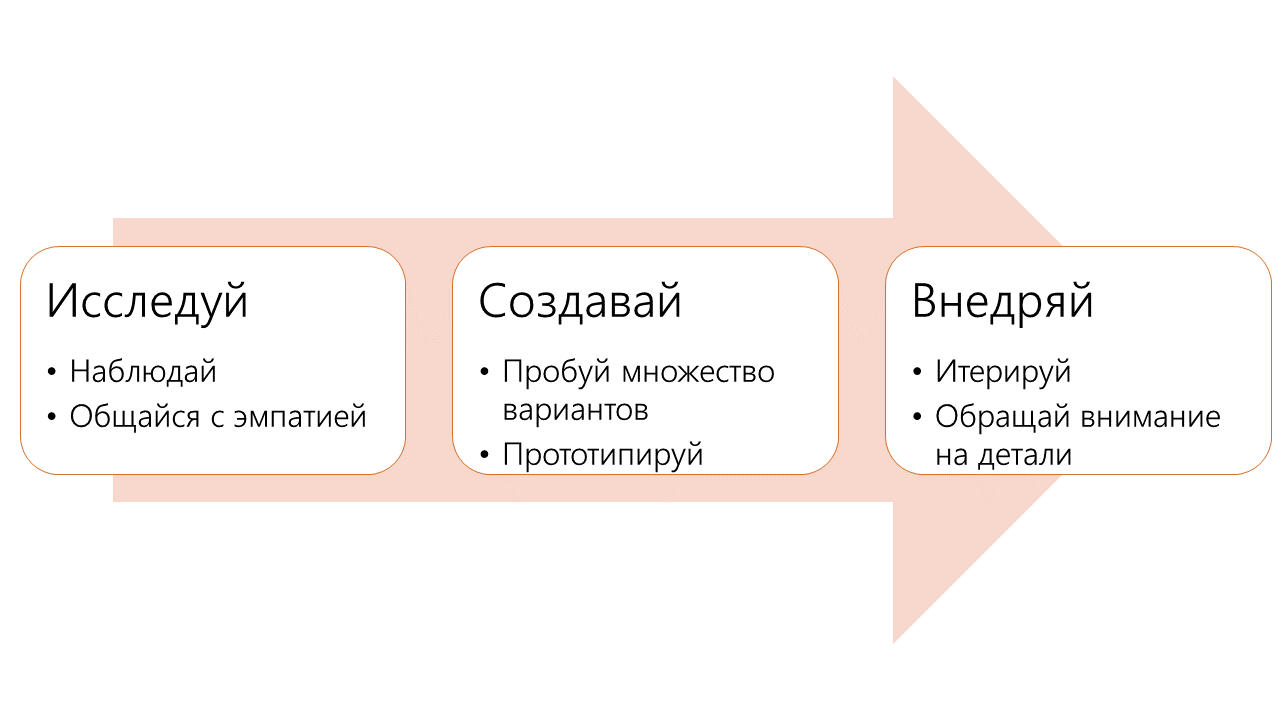
The main goal of DT is to strive to combine user needs with what is technologically possible and makes sense from a business point of view . There are many ways to build the process of creating such a product in detail, as various companies usually have their own internal principles. The basic principles of DT were formulated by Tim Brown (CEO IDEO) in his article “Design Thinking” (Harvard Business Review, 2008) . Here they are, in a slightly reworked format:
It all sounds pretty trite at first glance. But it is simply surprising how often people make completely basic mistakes when creating a product, for example:
This video is very bright and accessible shows the basic principles on the example of the development of a new trolley for a supermarket by IDEO:
')
There is absolutely nothing difficult about DT, at least in theory. In practice, there are many minor difficulties, with which I had to make sure in the process of working on a course project. Below I will give the main steps and results of the work.
Of course, we did not immediately decide that we would make an automatic dispenser of patches. In the beginning was the problem. Moreover, the formulated is extremely simple: “existing patches are inconvenient, since they are difficult to open and apply with one hand, and then there remains a pile of paper waste”. In other words, we decided that we would improve the patches and experience of interaction with them. However, this is not enough. You need to understand who the product will be focused on, what its competitive advantages will be. The mission of the project will be repeatedly supplemented and changed in the process of work, therefore at the beginning it is enough to formulate it very roughly.
The key stage, in some way, the foundation of the work is the identification of user needs. There are many tips and instructions on how to do this better, here’s a brief squeeze of the main ways and ideas:
In our project, we managed to interview all friends and acquaintances, but did not dwell on this. We also went to the donation center for blood donations and watched the doctors put on patches and interviewed the donors. As a result of all this, we received an extensive list (about 90) of user needs, which were grouped into primary and secondary. The real achievement is the identification of a hidden need (which the user himself doesn’t guess), but in this case we were unable to catch this rare and valuable beast. But in the course of the interview, we managed to find out that during the period when people lined up for vaccinations, doctors were so tired of opening patches quickly that they did it in advance. That is, they open up dozens of patches in advance and just leave them on the table! Of course, there is no question of any sterility.
It is also important to divide the people surveyed into groups on social grounds, because, for example, the doctors have some needs, and the patients have completely different needs.
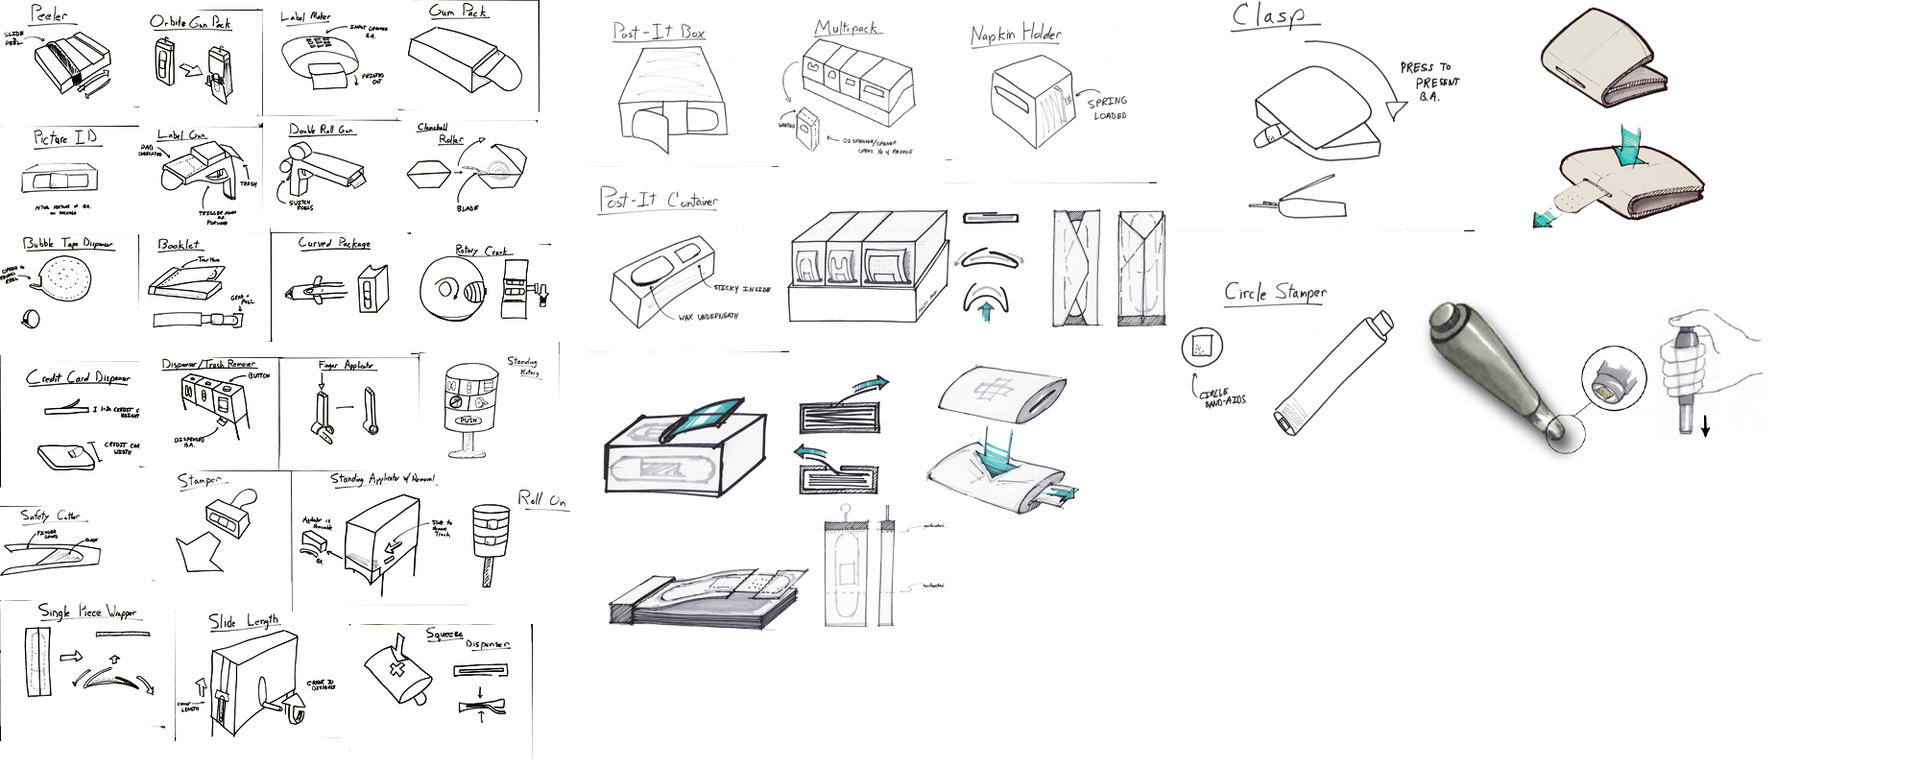
The next step was to first decompose our problem (patch improvement) into several parts:
To meet the needs in each part, we generated a lot of concepts (the image is clickable):
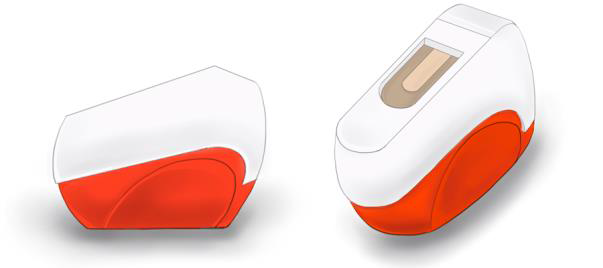
Further we collected several prototypes for the most successful concepts. Building prototypes made it possible to understand how technically viable the concept is and test it in real life. Here are examples of a pair of prototypes:

Based on these prototypes, the main concept was formed, which after several iterations looked like this:
To understand how it was supposed to work, we did a step-by-step storyboard:
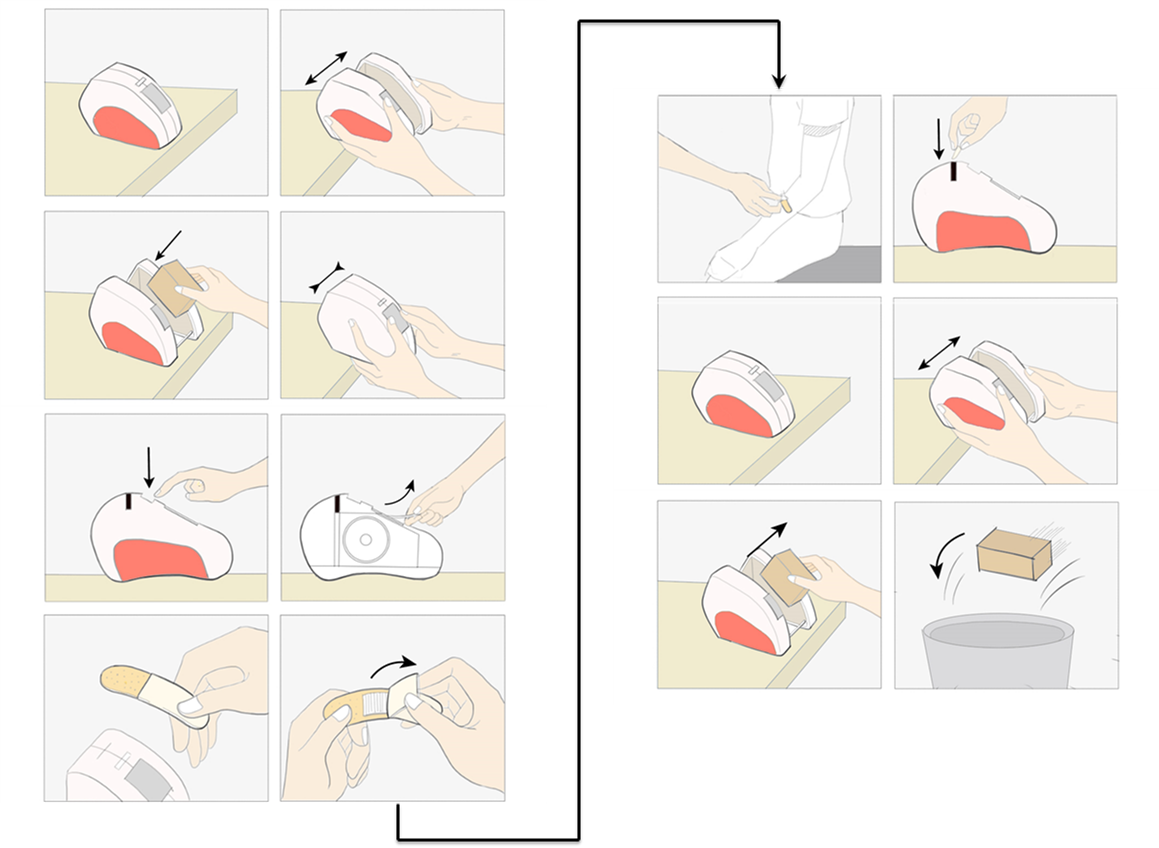
The idea of the product was to save the user from having to open the patches on their own using the device shown above. The patches were in special replaceable cartridges, which we also worked through. Such a device, in theory, allowed the plaster to be applied with one hand and not take care of the mountains of debris remaining on the plaster. How it will work in practice, and whether it will work at all, we had to understand in the next step.
The final stage was the development of the product itself. Requirements for the product were clarified (patch speed, probability of sticking of the patch, device life span, etc.), 3D models were created and development started.
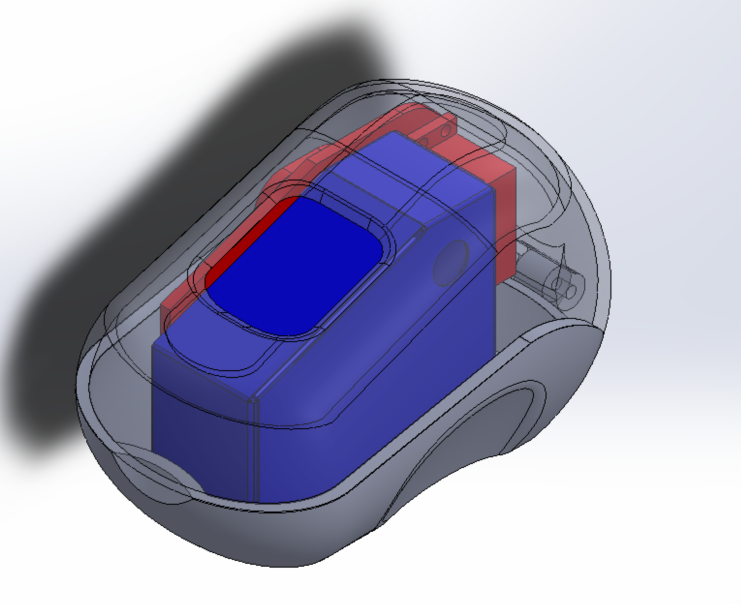
In just a few weeks, we were able to advance from the image to a fully functioning prototype. We also replaced the physical touch button (which is not at all difficult to do, but it looks more impressive) and this is how the product looked and worked:
The main market for him was to be hospitals (we recall the story about doctors and patches opened in advance) and families, often using patches (most often, families with small children). In theory, this device is beautiful and everyone wants it. But theory and practice are different things. Slightly inquiring about the process of introducing such a device to the market, we realized that this is fraught with a lot of difficulties, even the product desired by the market needs an excellent, purposeful team, ready to bring it to this market with sweat and blood. But this is a completely different topic of conversation.
This DT implies many iterations of these steps, up to returning to Step 2 and re-identifying user needs. Unfortunately, we did not have time for a sufficient number of iterations, all that we managed to do was to go through the chain 1 time, completing everything with building and testing our product on users. The fact that in the process of creating a product we communicated with potential users, and the fact that we carried out a business analysis at almost every stage of our work, allowed us to significantly increase the chances of this dispenser for survival in harsh market conditions. However, sometimes even this is not enough, because there are many possible groups of users for which you can create your own version of the product, many options for how to solve certain problems, so even with a high degree of structuredness, this whole process is still a little bit art.
PS Why am I writing about this only a year later? Everything is simple - the action of the so-called provisional patent — the right to top priority patenting — has just recently ended. As a result, we did not issue a patent, therefore, development information can be freely published.
In a few words about Design-thinking (DT)
The main goal of DT is to strive to combine user needs with what is technologically possible and makes sense from a business point of view . There are many ways to build the process of creating such a product in detail, as various companies usually have their own internal principles. The basic principles of DT were formulated by Tim Brown (CEO IDEO) in his article “Design Thinking” (Harvard Business Review, 2008) . Here they are, in a slightly reworked format:
It all sounds pretty trite at first glance. But it is simply surprising how often people make completely basic mistakes when creating a product, for example:
- do not communicate with potential users, do not try to identify their needs
- try to create a complex system right away without going through the prototyping stage
- do not test their creation on users from the early stages, do not go through a chain of iterations
This video is very bright and accessible shows the basic principles on the example of the development of a new trolley for a supermarket by IDEO:
')
There is absolutely nothing difficult about DT, at least in theory. In practice, there are many minor difficulties, with which I had to make sure in the process of working on a course project. Below I will give the main steps and results of the work.
Step 1: Project Mission Statement
Of course, we did not immediately decide that we would make an automatic dispenser of patches. In the beginning was the problem. Moreover, the formulated is extremely simple: “existing patches are inconvenient, since they are difficult to open and apply with one hand, and then there remains a pile of paper waste”. In other words, we decided that we would improve the patches and experience of interaction with them. However, this is not enough. You need to understand who the product will be focused on, what its competitive advantages will be. The mission of the project will be repeatedly supplemented and changed in the process of work, therefore at the beginning it is enough to formulate it very roughly.
Step 2: Identifying User Needs
The key stage, in some way, the foundation of the work is the identification of user needs. There are many tips and instructions on how to do this better, here’s a brief squeeze of the main ways and ideas:
- Interview with users. The main rules of the interview are:
- interlocutor's urge to tell stories
- rejection of closed questions (to which he can answer "yes" or "no")
- refusal of questions leading the interviewee to some kind of answer
- User Monitoring
In our project, we managed to interview all friends and acquaintances, but did not dwell on this. We also went to the donation center for blood donations and watched the doctors put on patches and interviewed the donors. As a result of all this, we received an extensive list (about 90) of user needs, which were grouped into primary and secondary. The real achievement is the identification of a hidden need (which the user himself doesn’t guess), but in this case we were unable to catch this rare and valuable beast. But in the course of the interview, we managed to find out that during the period when people lined up for vaccinations, doctors were so tired of opening patches quickly that they did it in advance. That is, they open up dozens of patches in advance and just leave them on the table! Of course, there is no question of any sterility.
It is also important to divide the people surveyed into groups on social grounds, because, for example, the doctors have some needs, and the patients have completely different needs.
Step 3: Decomposition of the problem, generation of concepts, creation of the simplest prototypes, development of the final concept
The next step was to first decompose our problem (patch improvement) into several parts:
- storage of patches
- applying patches on wounds
- removing the patch from the wound
To meet the needs in each part, we generated a lot of concepts (the image is clickable):
Further we collected several prototypes for the most successful concepts. Building prototypes made it possible to understand how technically viable the concept is and test it in real life. Here are examples of a pair of prototypes:
Based on these prototypes, the main concept was formed, which after several iterations looked like this:
To understand how it was supposed to work, we did a step-by-step storyboard:
The idea of the product was to save the user from having to open the patches on their own using the device shown above. The patches were in special replaceable cartridges, which we also worked through. Such a device, in theory, allowed the plaster to be applied with one hand and not take care of the mountains of debris remaining on the plaster. How it will work in practice, and whether it will work at all, we had to understand in the next step.
Step 4: Product Creation and Testing
The final stage was the development of the product itself. Requirements for the product were clarified (patch speed, probability of sticking of the patch, device life span, etc.), 3D models were created and development started.
In just a few weeks, we were able to advance from the image to a fully functioning prototype. We also replaced the physical touch button (which is not at all difficult to do, but it looks more impressive) and this is how the product looked and worked:
The main market for him was to be hospitals (we recall the story about doctors and patches opened in advance) and families, often using patches (most often, families with small children). In theory, this device is beautiful and everyone wants it. But theory and practice are different things. Slightly inquiring about the process of introducing such a device to the market, we realized that this is fraught with a lot of difficulties, even the product desired by the market needs an excellent, purposeful team, ready to bring it to this market with sweat and blood. But this is a completely different topic of conversation.
Summing up
This DT implies many iterations of these steps, up to returning to Step 2 and re-identifying user needs. Unfortunately, we did not have time for a sufficient number of iterations, all that we managed to do was to go through the chain 1 time, completing everything with building and testing our product on users. The fact that in the process of creating a product we communicated with potential users, and the fact that we carried out a business analysis at almost every stage of our work, allowed us to significantly increase the chances of this dispenser for survival in harsh market conditions. However, sometimes even this is not enough, because there are many possible groups of users for which you can create your own version of the product, many options for how to solve certain problems, so even with a high degree of structuredness, this whole process is still a little bit art.
PS Why am I writing about this only a year later? Everything is simple - the action of the so-called provisional patent — the right to top priority patenting — has just recently ended. As a result, we did not issue a patent, therefore, development information can be freely published.
Source: https://habr.com/ru/post/228847/
All Articles