Live Windows Phone Tiles
For the impatient, the discussion deals with the dynamic generation of background images for live tiles, the creation of transparent tiles for update 8.1 and the localization of application names.
More informative live tile
Developing the next application, it became necessary to display a sufficiently large amount of data directly on the living tile.
Although there are already three standard templates , they were not enough to implement some ideas. Asking Google about the flexibility of text formatting on tiles, it turned out that at the moment this is not possible.
But, as a result of the search for a solution, the original approach of other developers was quite often met - if you cannot display formatted text on a tile, then this text can be shown with a picture. With this approach it is possible to display anything on a tile, arbitrarily with any complexity of the markup.
First of all, you need to know what image sizes we need. Actually, the dimensions in pixels are listed on the website for developers. It is this size that background images will need to be generated on the fly when updating data.
The process of generating the background image itself is not very complicated.
Code example
using System; using System.IO; using System.IO.IsolatedStorage; using System.Windows; using System.Windows.Controls; using System.Windows.Media; using System.Windows.Media.Imaging; namespace Example.Common { public static class TileImage { public static Uri Render( String title, string row1, bool row1Bold, bool row1Italic, string row2, bool row2Bold, bool row2Italic) { var bitmap = new WriteableBitmap(Constants.TileWidth, Constants.TileHeight); var canvas = new Grid { Width = bitmap.PixelWidth, Height = bitmap.PixelHeight }; var background = new Canvas { Height = bitmap.PixelHeight, Width = bitmap.PixelWidth, Background = new SolidColorBrush(Constants.TileBackgroundColor) }; #region title var titleBlock = new TextBlock { Text = title, FontWeight = FontWeights.Bold, TextAlignment = TextAlignment.Left, VerticalAlignment = VerticalAlignment.Stretch, Margin = new Thickness(Constants.TilePadding), TextWrapping = TextWrapping.NoWrap, Foreground = new SolidColorBrush(Constants.TileForegroundColor), FontSize = Constants.TileTitleFontSize, Width = bitmap.PixelWidth - Constants.TilePadding * 2 }; #endregion #region first row var firstRowBlock = new TextBlock { Text = row1, TextAlignment = TextAlignment.Left, VerticalAlignment = VerticalAlignment.Stretch, Margin = new Thickness(Constants.TilePadding, Constants.TilePadding * 2 + Constants.TileTitleFontSize, Constants.TilePadding, Constants.TilePadding), TextWrapping = TextWrapping.NoWrap, Foreground = new SolidColorBrush(Constants.TileForegroundColor), FontSize = Constants.TileTextFontSize, Width = bitmap.PixelWidth - Constants.TilePadding * 2 }; if (row1Bold) { firstRowBlock.FontWeight = FontWeights.Bold; } if (row1Italic) { firstRowBlock.FontStyle = FontStyles.Italic; } #endregion #region second row var secondRowBlock = new TextBlock { Text = row2, TextAlignment = TextAlignment.Left, VerticalAlignment = VerticalAlignment.Stretch, Margin = new Thickness(Constants.TilePadding, Constants.TilePadding * 3 + Constants.TileTitleFontSize + Constants.TileTextFontSize, Constants.TilePadding, Constants.TilePadding), TextWrapping = TextWrapping.Wrap, Foreground = new SolidColorBrush(Constants.TileForegroundColor), FontSize = Constants.TileTextFontSize, Width = bitmap.PixelWidth - Constants.TilePadding * 2 }; if (row2Bold) { secondRowBlock.FontWeight = FontWeights.Bold; } if (row2Italic) { secondRowBlock.FontStyle = FontStyles.Italic; } #endregion canvas.Children.Add(titleBlock); canvas.Children.Add(firstRowBlock); canvas.Children.Add(secondRowBlock); bitmap.Render(background, null); bitmap.Render(canvas, null); bitmap.Invalidate(); using (var imageStream = new IsolatedStorageFileStream(Constants.TilePath, FileMode.Create, Constants.AppStorage)) { bitmap.SaveJpeg(imageStream,bitmap.PixelWidth,bitmap.PixelHeight,0,90); } return new Uri("isostore:" + Constants.TilePath, UriKind.Absolute); } } } Simply put, a canvas is created on which arbitrary elements are thrown at and saved as a JPG file in the local storage.
Now, it’s easy to use a file from your local storage as a background for a tile.
')
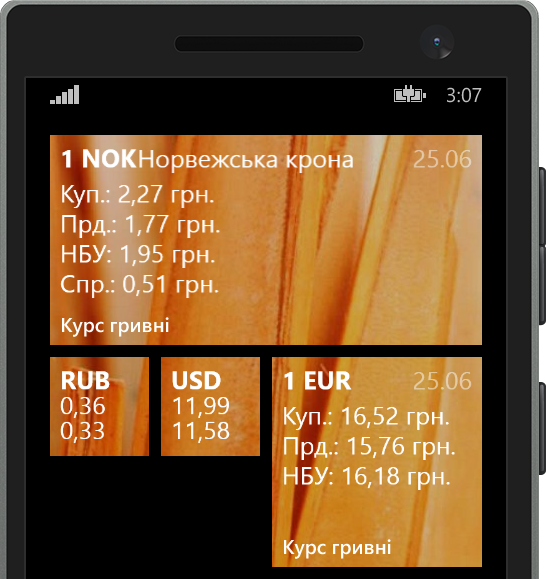
From the example it can be seen that the small tile looks unchanged, but the tile of medium size already uses the generated image:

You can also generate images for other tile sizes. For example, in small you can show the basic information in abbreviated form, in the middle a little more space and you can add more data, well, on the broad one can of course not save money, but you still need to have everything as convenient as possible.
An example of this approach can be seen in the image in the title of the article.
And now transparent!
As many know, soon our Windows Phone will be updated to the new version 8.1. We need to prepare for this.
One of the innovations of the update is the ability to add a background image to the start screen. In order for our tile to comply with new trends and not obscure the background of the desktop, you need to make the background image of the tile transparent.
Here we have a small unpleasant surprise - the image can only be saved in JPG format. Colleagues from Microsoft for some reason decided that this would be enough. Well, you have to reinvent the wheel.
In my work, I am always sure that someone faced such problems before me and, very often, I am right. This case is no exception. On the vast expanses of the Internet, or rather on ToolStack, there was a ready-made library PNGWriter , which allows you to generate PNG.
The use of the library is extremely simple; it simply adds the WritePNG method to the WriteableBitmap class:
var bitmap = new WriteableBitmap(Constants.TileWidth, Constants.TileHeight); bitmap.WritePNG(imageStream); The principle of application remains the same - we save the image in the local storage and use it as a background for the live tile. For WP8.0, the tile will have the theme color, but in the new WP8.1, the background of the start screen will be visible through the tile.
The result will be very interesting. The background will be viewed through the tile, and the parallax effect will appear when scrolling the start screen:

Localization of the application name
For applications that do not have a specific brand or easily recognizable name, localization of the name may be necessary. It is logical that there is no need to translate “Skype” or “WhatsApp”, but functional names, for example, “flashlight”, “camera” should be localized.
The task of localizing the name of the application may seem to be not trivial for an ordinary developer. But the instruction how to do this is written in great detail and, in fact, everything is much simpler.
I do not want to repeat the entire text of the instructions from the Microsoft site . I want to dwell only on small changes that seem to simplify the localization process.
Microsoft recommends creating one project to generate all localized DLLs. It seemed to me a bit dreary to constantly rename, copy the created DLL file. Therefore, I created several projects for each localization that my application will support. And in each project I set up deployment at once to the root of the Windows Phone project.
For this, the path to the folder of the collected DLL file was slightly modified.
For the default locale:

For all other locales (the number in the Target Name corresponds to the locale number):

Now you can safely change the values in the resource tables. Each time you build a Windows Phone project, DLL files with localization will first be assembled and replace the outdated ones in the root of the main project. Thus, we avoid manipulating the transfer of DLL files to manual.
The text of the application name in the phone list will depend on the locale specified in the phone. In my example, it will look like this:


It is also worth noting that when publishing an application to the Marketplace, it became possible to specify alternative names for the application. It would be logical to add all localized names there.
Conclusion
Using such simple approaches, the application will become more convenient and interesting.
Let's hope that Microsoft will continue to develop the development environment and capabilities of the Windows Phone API and in new versions we will not have to reinvent such bikes.
Enjoyable development.
Download the finished project and get acquainted with the code on GitHub:
https://github.com/vbilenko/WPExample01
List of links:
Source: https://habr.com/ru/post/228619/
All Articles