Scanning film using DSLR
Foreword
On the Internet, I found a lot of articles on film scanning with DSLR. They offered very simple or very cumbersome ways, but some issues were not given due attention. In this article, I would like to talk about my thoughts on film scanning, a little deeper into theory, and consider a home-made scanner. In my opinion, I managed to make a fairly simple and inexpensive installation, using which, you can get maximum information from the film and minimize post-processing.
Why do you need?
Scanning the film in the manner described below will allow you to get maximum information from the image, the ability to adjust the exposure, white balance, contrast, etc. When scanning a film in a photo salon, the car automatically selects contrast, white balance, exposure, often making it wrong.
Installation
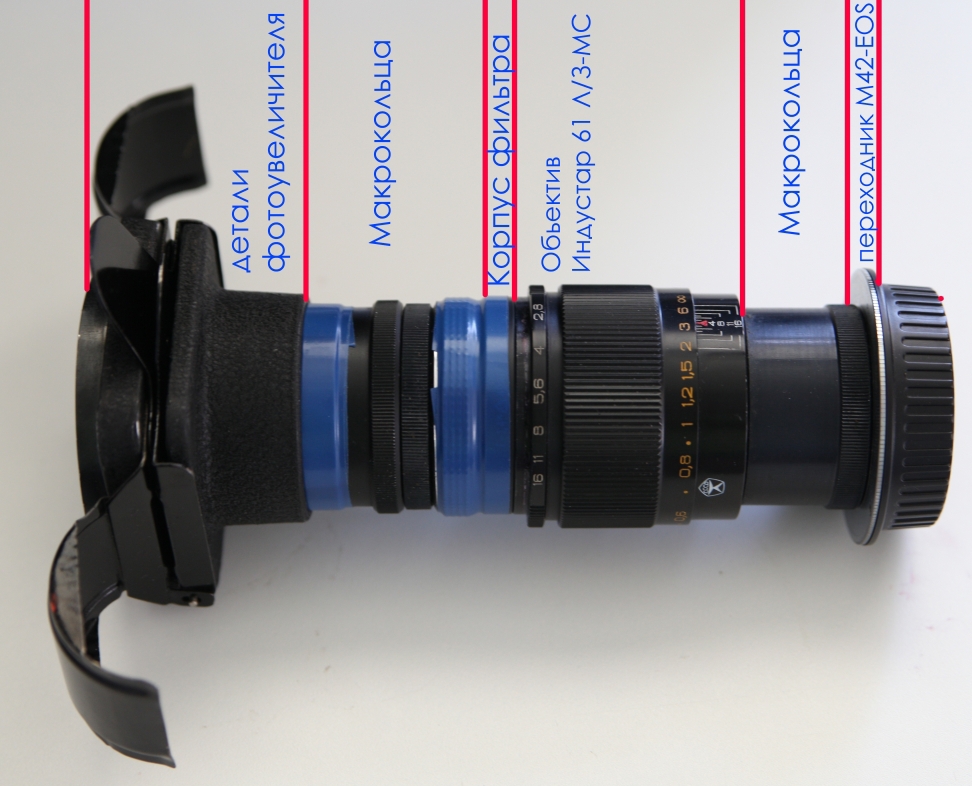
I used the Canon 5d markII as a camera, although you can use any DSLR with interchangeable optics, shooting in RAW. I also needed macrocolts with a total length of about 9 cm, Industar 61 L / 3M-3M lens, an M42-EOS adapter, a 49mm light filter (any suitable), parts of a FED enlarger (you can try another one) and electrical tape.

')
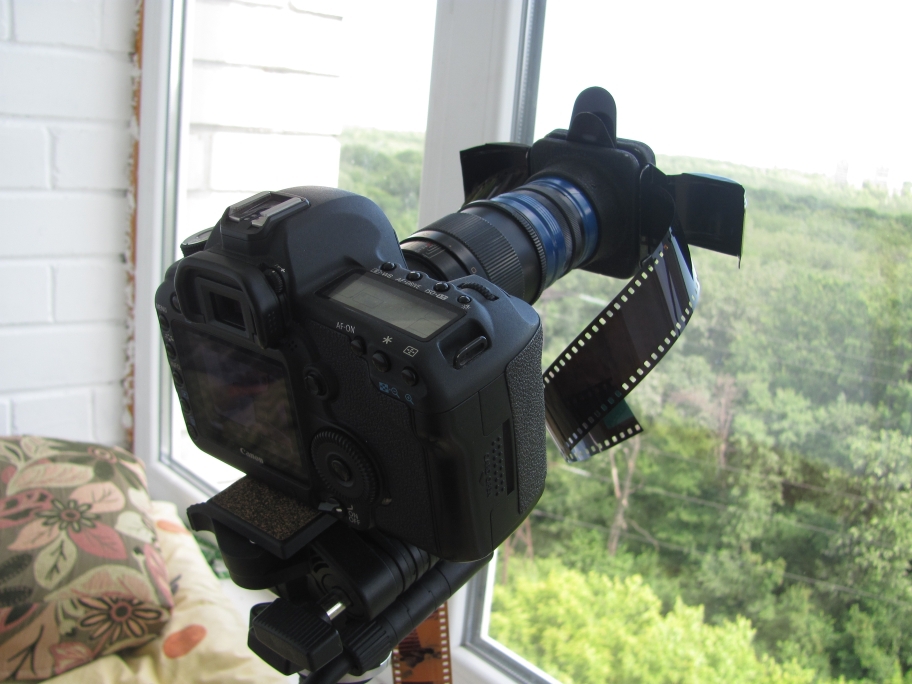
First, we extract the necessary parts from the enlarger. In my case, I used the FED enlarger. We need only a device for pulling the film. Next, we put on macro rings and an adapter to the lens. Then we unscrew the filter glass from the light filter, we use only the body. Screw it on the lens. We insert a macro-ring into the body of the light filter (thread forward) and fasten it with electrical tape. Then we join the free end of the macro-rings with the device for pulling the film from the enlarger. I used the tape for sealing, winding it in 2 layers at the interface. The length of the macro ring is chosen empirically. For cameras with a cropping factor of 1.6, less rings will be needed between the camera and the lens, and more macro rings between the lens and the film. The result was an installation that is worn on the camera just like a lens. In my case, everything is very tight, nothing dangles, for example, it affects whether we will use the remote control in the future, or we can do without it.

Light source
We will need a light source. It must have a high color temperature, and must have an even emission spectrum. Why so? The higher the color temperature of the light source, the more information we will be able to extract from the film in the future and the easier it will be processing. And there is an interesting feature, - for pictures on a film made with artificial "warm" lighting, a very high color temperature of light is not required when digitizing. The high color temperature of the light source during digitization will be needed for pictures with cooler white balance, for example, taken in sunlight during the day. This is due to the white balance of the images themselves on film. So, to achieve the desired white balance when processing the received images, we need a light source with the highest color temperature possible. Therefore, incandescent lamps (2200-2800K) do not suit us, we need a colder color. You can try to turn to fluorescent lamps, there are lamps of color temperature up to 6500K, but there is another problem here - they have a very uneven spectrum with large dips. It is not noticeable to the eye, in the eye there are cones responsible for the perception of red, green, and blue. But they perceive the total intensity of each of the 3 colors, without taking into account the unevenness of the spectrum. The fluorescent lamp has only a few sharp peaks in the spectrum, which our imperfect eye perceives as white light. The same process takes place in a digital camera - the intensity of 3 colors is also perceived, and if their intensity is the same, then we get white. But when light is reflected or transmitted through something, a part of the spectrum is absorbed, and the remaining unabsorbed light is the color. For example, blue paint absorbs light in the blue spectrum less than in others, so it is blue. The absorption spectra are also very uneven. Often the same colors in sunlight and the light of a fluorescent lamp have different shades.

An example of paints illuminated by sunlight and a fluorescent lamp

picture elements in sunlight and fluorescent light
Theoretically, even a paradox is possible that in a white light white paint will be completely black if their spectra do not match, or for example green if they match only in the green part of the center. That is why it is very important to use a light source with a smooth spectrum. Xenon lamp flash also has a not very smooth spectrum, but does not have such strong dips as fluorescent, and has a temperature of about 5500K. A compact disc can be used as the simplest spectroscope; its mirror side not only reflects, but also spreads light into spectral components at a certain angle.

As a result, during the long search, the cloudless day sky was ideal for our case, it has a color temperature of about 12000K and has a fairly even spectrum.

sky spectrum
Another plus is that a diffuse filter is not required. Another very good and obvious option is the sun itself, but a matte filter is needed for diffusion, and it is significantly inferior to the sky in color temperature.

sun spectrum
habrastorage.org/files/5a2/831/8c4/5a28318c44c54b5fb28839d858ba1471.jpg
examples of spectra from the Internet
But unfortunately outside the window is not always clear, and even not always the day. Although film photography is not a case for those who like to hurry. However, there is another option - to adjust your monitor to a specific color temperature. for example, to achieve the same 10000K on the monitor is quite realistic, but the monitor has quite obvious disadvantages - relatively low brightness, and uneven spectrum, uneven spectrum of the monitor can be seen again using a compact disc. For my monitor, I found a spectrum on the Internet.

As you can see, it is not uniform, but does not have strong interruptions.
How to adjust the white balance on the monitor? If there is, turn on the color temperature mode on the monitor and set the highest one, for example 10000K.

In Photoshop create a white background. Next we need a digital camera. I have installed an alternative Magic Lantern firmware, which greatly simplifies the matter. We set the same color temperature as on the monitor in the manual white balance adjustment mode. We direct the camera to the monitor, so that the white background completely covers the frame field on the camera. I immediately see histograms of channels.

You can also use Vectorscope. We immediately see that the intensity of the red color is higher, in order to fix this, go to Curves in Photoshop and lower the red curve a bit.

Now you can see that the intensity of all channels at 10000K is the same.

We take a picture and look again at histograms - all channels are the same.

Now the monitor corresponds to the source 10000K. But still the best source of light - daytime cloudless sky.
Shooting
I will describe the process of shooting. On the digital camera, set the manual mode. Be sure to use RAW. ISO is minimally low, for example 100. White balance is not important to us - it is set in the post-processing of Raw. The aperture on the lens is closed f / 8, to increase the sharpness. The film is charged with a photosensitive layer to the camera, the substrate - to the light source. The film's sensitive layer can be easily identified by scratching the film with a knife. We turn on the Liveview mode, set the shutter speed so that it does not over-light and not darken the image too much (ettr). Use the crop mode to focus. Focus on the grain of the film. We remove. My exposure time when shooting against the sky is 1/2 - 1/20 seconds, and when shooting against a monitor, it can even reach 10 seconds per frame.

Treatment
Lightroom is best used for processing, although the same can be done in adobe camera raw.
To begin with we frame.
Then in the camera calibration tab select camera standart.

In the Tone Curve tab, we invert the RGB curve (you can make a preset).

Add a little bit of contrast in the RGB curves.

Set the white balance. The Tint value most often has to be set between -40 and -25. (If the light source was not high enough color temperature, the white balance slider would have rested on the left edge, and we would not have been able to set the balance)

Remove some red from the shadows and add some red in the highlights.

And then we do the final image setting.


Highres 4388 x 2925
ipic.su/img/img7/fs/IMG_8802.1404320686.jpg
But for example the same picture with a low exposure

as seen in highlights all information is saved
Here are more examples of photos scanned by this method.


List of useful articles on this topic.
ru.wikipedia.org/wiki/%D0%A6%D0%B2%D0%B5%D1%82%D0%BE%D0%B2%D0%B0%D1%8F_%D1 %82% D0%B5%D0 % BC% D0% BF% D0% B5% D1% 80% D0% B0% D1% 82% D1% 83% D1% 80% D0% B0
ru.wikipedia.org/wiki/%D0%94%D0%B8%D1%84%D1%84%D1%83%D0%B7%D0%BD%D0%BE%D0%B5_%D0%B8%D0 % B7% D0% BB% D1% 83% D1% 87% D0% B5% D0% BD% D0% B8% D0% B5_% D0% BD% D0% B5% D0% B1% D0% B0
fuji.itgo.com/str.html
ru.wikipedia.org/wiki/%D0%91%D0%B0%D0%BB%D0%B0%D0%BD%D1%81_%D0%B1%D0%B5%D0%BB%D0%BE%D0 % B3% D0% BE_% D1% 86% D0% B2% D0% B5% D1% 82% D0% B0
ru.wikipedia.org/wiki/%D0%97%D1%80%D0%B5%D0%BD%D0%B8%D0%B5_%D1%87%D0%B5%D0%BB%D0%BE%D0 % B2% D0% B5% D0% BA% D0% B0
ru.wikipedia.org/wiki/%D0%90%D0%B1%D1%81%D0%BE%D0%BB%D1%8E%D1%82%D0%BD%D0%BE_%D1%87%D1 % 91% D1% 80% D0% BD% D0% BE% D0% B5_% D1% 82% D0% B5% D0% BB% D0% BE
ru.wikipedia.org/wiki/%D0%91%D0%B5%D0%BB%D1%8B%D0%B9_%D1%86%D0%B2%D0%B5%D1%82
ru.wikipedia.org/wiki/%D0%9C%D0%B5%D1%82%D0%B0%D0%BC%D0%B5%D1%80%D0%B8%D1%8 % D0% B2% D0% B5% D1% 82% 29
Source: https://habr.com/ru/post/228487/
All Articles