Receive notifications from Zabbix in WhatsApp
There are many ways to get notifications from Zabbix on the net. It seemed to me convenient to receive alerts in WhatsApp - it is cheaper than sms and, in my case, more convenient than mail - to receive notifications, we use a corporate email account, access to which is restricted from the outside, besides, the alert can be lost among other emails .
Setting up is pretty simple. We will need:
1) yowsup and its dependencies:
1.1) python 2.6+
1.2) python-dateutil
1.3) argparse for python <2.7
1.4) libxml2 if yowsup will be used with the old version of the API (--v1 flag)
2) Zabbix server access to the Internet
3) A phone with a SIM card, the number of which will be registered with WhatsApp account
First you need to install dependencies for yowsup.
')
On Debian-like distributions or using the DEB package format, this is done like this:
On RedHat-based distributions or using the RPM package format:
In my case there was no python-argparse package in the repository, I had to download it separately and install it manually. For RHEL 6, this can be done, for example, here .
Installation:
After installing the dependencies, we install yowsup itself. The official project page is located on GitHub . Directly from the Zabbix server, yowsup can be downloaded in this way:
Unpack the archive and go to the directory yowsup-master / src:
Copy the config example to the working config:
There are only four lines:
cc is the country code. A list of codes can be found on the page CountryCode.org . Code of Russia - 7;
phone - the phone number to which the WhatsApp account will be associated. Must begin with country code;
id - this field is required if you want to use an existing WhatsApp account and an old version of the API (launch yowsup with the --v1 flag). If the account was created on a Nokia or Android device, then in the id field you need to write the device's IMEI. If the device is based on iOS, then you need to write the MAC address of the WLAN interface. In new versions of the API, this field is not used, you can leave it blank;
password - WhatsApp password that will be received automatically after registration. In principle, you can pull this password out of an existing account, then it will be possible to use one account on two devices, but I have not tried it.
So, fill in the config fields:
Next, you need to go through the registration procedure, during which the sms with the confirmation code will come to the phone number specified in the config file. In general, problems on this step should arise. Make sure that the Zabbix server has access to the WhatsApp server using the https protocol. If Zabbix is behind the firewall and the security policy does not allow it to open full access to the Internet, you can get a list of addresses by running tcpdump on the server’s network interface and see where yowsup is applying by launching the registration procedure. I will not dwell on this in detail, there are a lot of tcpdump manuals on the network, I can only say that this command came in handy for me (all tcp traffic on the eth0 interface, which does not go within the local network 10.0.0.0/8):
We send a request for registration:
If everything went well, we will receive an SMS with a six-digit confirmation code (for example, 123-456). We send this code to the WhatsApp server:
After that, a password should appear in the password field of our config. This registration procedure is completed, you can try to send a message to another WhatsApp user.
You can send a message with the command
Accept message:
And you can generally chat in chat mode:

This completes the yowsup setup.
To make friends yowsup and Zabbix, you need to write a script to send notifications. Let me remind you that Zabbix takes notification scripts from the directory defined in the AlertScriptsPath variable of the zabbix_server.conf config . In my directory, this directory was located in / usr / local / share / zabbix / alertscripts :
We put there a script (I called it whatsapp ), consisting of literally three lines:
I put the yowsup files in the alertscripts directory - maybe this is not the best solution, but it seemed to me that it would be more convenient to search for configs / scripts if anything happens.
$ 1 $ 2 $ 3 is the value of the Zabbix variables, meaning, respectively, "to whom to send the notification", "subject" and "notification body". We will configure these fields further from the Zabbix interface.
Making the script executable:
We act according to the standard algorithm:
1) Create a notification method
2) Create an action associated with this alert.
3) We connect the notification to users
In the Administration -> Alerts menu (Administration -> Media types), click the Create media type button.

Name (Name): Any at your request
Type (Type): - Script (Script)
Script Name: - Must match the name of the script created in the previous step ( whatsapp in our case)
By default, Zabbix is configured with an action that sends all types of alerts to all administrators:

If you do not have such an action, then you need to create your own. The Settings -> Actions menu (Configuration -> Action) , create a new action with the Create Action button.

On the Action tab, you can define the message format that will be sent to WhatsApp. I left everything by default

The Conditions tab sets the conditions under which the action will be performed. Also left by default.
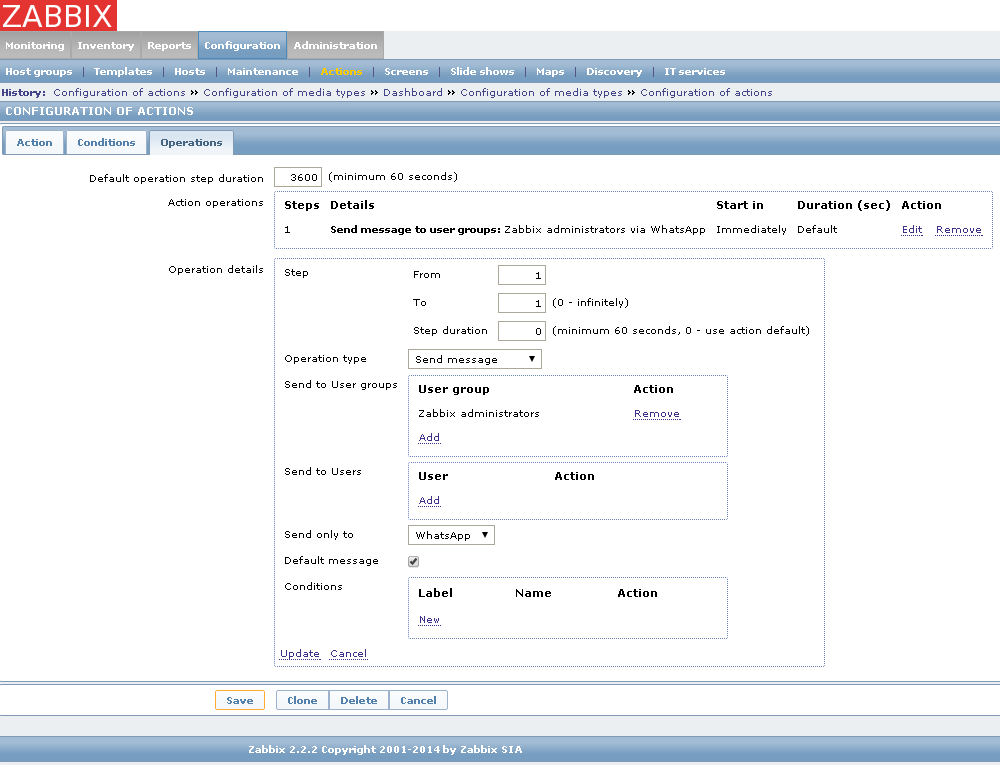
Well, on the Operations tab, we indicate what Zabbix should do: send a message (Send message) to a group of users or to an individual user by the WhatsApp notification method.
Save the settings and proceed to the next step.
Go to the user settings (Administration -> Users or Administration -> Users) , select the desired user and configure the Notification Method (Media) for him :

Alert Type (Type): WhatsApp
Send to (Send to): Phone number with country code (for example, 79123456789)
We select the time when you can send messages and the degree of their criticality. Save the settings.
This completes the setup, but still needs to check that the messages go away and are successfully delivered. You can follow the sending of notifications in the Administration -> Audit menu (Administration -> Audit) by selecting the Actions item:

We see that the notification was successfully sent:
Checking WhatsApp on your smartphone:

Works!
UPDATE: The comments ask why WhatsApp, and not something else, such as sms. The fact is that now our Zabbix generates quite a lot of alerts, including false ones. I tried to fasten a 3G modem to it and send sms from it, but it turned out quite expensive in terms of the cost of paying them. And since almost all colleagues have WhatsApp, I thought that it would be nice to send notifications exactly there, besides, it is free (first year) and does not require installing any applications (in our case). It is clear that this is not the most reliable way - they can change the API, the phone may be without the Internet, the channel between Zabbix and the Internet will fall, etc., but for sending uncritical alerts, IMHO, it can be used to spend less on SMS. If suddenly the shop is closed, we will use something else, for example Pushover or Boxcar, suggested by kemko
Setting up is pretty simple. We will need:
1) yowsup and its dependencies:
1.1) python 2.6+
1.2) python-dateutil
1.3) argparse for python <2.7
1.4) libxml2 if yowsup will be used with the old version of the API (--v1 flag)
2) Zabbix server access to the Internet
3) A phone with a SIM card, the number of which will be registered with WhatsApp account
Step 1: Install the yowsup dependencies
First you need to install dependencies for yowsup.
')
On Debian-like distributions or using the DEB package format, this is done like this:
# aptitude install python python-dateutil python-argparse On RedHat-based distributions or using the RPM package format:
# yum install python python-dateutil python-argparse In my case there was no python-argparse package in the repository, I had to download it separately and install it manually. For RHEL 6, this can be done, for example, here .
Installation:
# rpm -i python-argparse-1.2.1-5.1.noarch.rpm Step 2: Install yowsup
After installing the dependencies, we install yowsup itself. The official project page is located on GitHub . Directly from the Zabbix server, yowsup can be downloaded in this way:
# wget https://github.com/tgalal/yowsup/archive/master.zip Unpack the archive and go to the directory yowsup-master / src:
# unzip master.zip # cd yowsup-master/src Copy the config example to the working config:
# cp config.example yowsup-cli.config There are only four lines:
cc=7 phone= id= password= cc is the country code. A list of codes can be found on the page CountryCode.org . Code of Russia - 7;
phone - the phone number to which the WhatsApp account will be associated. Must begin with country code;
id - this field is required if you want to use an existing WhatsApp account and an old version of the API (launch yowsup with the --v1 flag). If the account was created on a Nokia or Android device, then in the id field you need to write the device's IMEI. If the device is based on iOS, then you need to write the MAC address of the WLAN interface. In new versions of the API, this field is not used, you can leave it blank;
password - WhatsApp password that will be received automatically after registration. In principle, you can pull this password out of an existing account, then it will be possible to use one account on two devices, but I have not tried it.
So, fill in the config fields:
cc=7 phone=79123456789 id= password= Next, you need to go through the registration procedure, during which the sms with the confirmation code will come to the phone number specified in the config file. In general, problems on this step should arise. Make sure that the Zabbix server has access to the WhatsApp server using the https protocol. If Zabbix is behind the firewall and the security policy does not allow it to open full access to the Internet, you can get a list of addresses by running tcpdump on the server’s network interface and see where yowsup is applying by launching the registration procedure. I will not dwell on this in detail, there are a lot of tcpdump manuals on the network, I can only say that this command came in handy for me (all tcp traffic on the eth0 interface, which does not go within the local network 10.0.0.0/8):
# tcpdump -i eth0 -n tcp and not src net 10.0.0.0/8 and dst net 10.0.0.0/8 We send a request for registration:
# ./yowsup-cli -c yowsup-cli.config -r sms If everything went well, we will receive an SMS with a six-digit confirmation code (for example, 123-456). We send this code to the WhatsApp server:
# ./yowsup-cli -c yowsup-cli.config -R 123456 After that, a password should appear in the password field of our config. This registration procedure is completed, you can try to send a message to another WhatsApp user.
You can send a message with the command
# ./yowsup-cli --send 79123456780 "Test message" --wait --config yowsup-cli.config Accept message:
# ./yowsup-cli --listen --autoack --keepalive --config yowsup-cli.config And you can generally chat in chat mode:
# ./yowsup-cli --interactive 79123456780 --wait --autoack --keepalive --config yowsup-cli.config This completes the yowsup setup.
Step 3: Writing an alert sending script
To make friends yowsup and Zabbix, you need to write a script to send notifications. Let me remind you that Zabbix takes notification scripts from the directory defined in the AlertScriptsPath variable of the zabbix_server.conf config . In my directory, this directory was located in / usr / local / share / zabbix / alertscripts :
# cat /usr/local/etc/zabbix_server.conf | grep AlertScriptsPath ### Option: AlertScriptsPath # AlertScriptsPath=/usr/local/share/zabbix/alertscripts We put there a script (I called it whatsapp ), consisting of literally three lines:
#!/bin/bash DIR='/usr/local/share/zabbix/alertscripts/yowsup-master/src/' # yowsup $DIR/yowsup-cli --send $1 "$2 $3" --wait --config $DIR/yowsup-cli.config I put the yowsup files in the alertscripts directory - maybe this is not the best solution, but it seemed to me that it would be more convenient to search for configs / scripts if anything happens.
$ 1 $ 2 $ 3 is the value of the Zabbix variables, meaning, respectively, "to whom to send the notification", "subject" and "notification body". We will configure these fields further from the Zabbix interface.
Making the script executable:
# chmod +x /usr/local/share/zabbix/alertscripts/whatsup Step 4: Configure Zabbix
We act according to the standard algorithm:
1) Create a notification method
2) Create an action associated with this alert.
3) We connect the notification to users
1) Create a notification method
In the Administration -> Alerts menu (Administration -> Media types), click the Create media type button.
Name (Name): Any at your request
Type (Type): - Script (Script)
Script Name: - Must match the name of the script created in the previous step ( whatsapp in our case)
2) Create an action
By default, Zabbix is configured with an action that sends all types of alerts to all administrators:
If you do not have such an action, then you need to create your own. The Settings -> Actions menu (Configuration -> Action) , create a new action with the Create Action button.
On the Action tab, you can define the message format that will be sent to WhatsApp. I left everything by default
The Conditions tab sets the conditions under which the action will be performed. Also left by default.
Well, on the Operations tab, we indicate what Zabbix should do: send a message (Send message) to a group of users or to an individual user by the WhatsApp notification method.
Save the settings and proceed to the next step.
3) We connect the notification to users
Go to the user settings (Administration -> Users or Administration -> Users) , select the desired user and configure the Notification Method (Media) for him :
Alert Type (Type): WhatsApp
Send to (Send to): Phone number with country code (for example, 79123456789)
We select the time when you can send messages and the degree of their criticality. Save the settings.
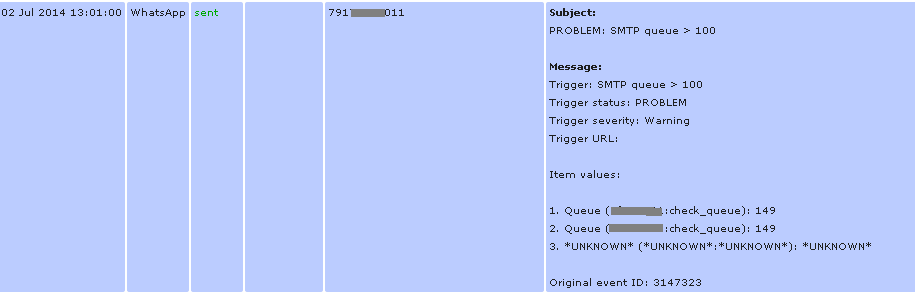
This completes the setup, but still needs to check that the messages go away and are successfully delivered. You can follow the sending of notifications in the Administration -> Audit menu (Administration -> Audit) by selecting the Actions item:
We see that the notification was successfully sent:
Checking WhatsApp on your smartphone:
Works!
UPDATE: The comments ask why WhatsApp, and not something else, such as sms. The fact is that now our Zabbix generates quite a lot of alerts, including false ones. I tried to fasten a 3G modem to it and send sms from it, but it turned out quite expensive in terms of the cost of paying them. And since almost all colleagues have WhatsApp, I thought that it would be nice to send notifications exactly there, besides, it is free (first year) and does not require installing any applications (in our case). It is clear that this is not the most reliable way - they can change the API, the phone may be without the Internet, the channel between Zabbix and the Internet will fall, etc., but for sending uncritical alerts, IMHO, it can be used to spend less on SMS. If suddenly the shop is closed, we will use something else, for example Pushover or Boxcar, suggested by kemko
Source: https://habr.com/ru/post/228405/
All Articles