Creating audio plug-ins, part 13
All posts series:
Part 1. Introduction and setup
Part 2. Learning Code
Part 3. VST and AU
Part 4. Digital Distortion
Part 5. Presets and GUI
Part 6. Signal synthesis
Part 7. Receive MIDI Messages
Part 8. Virtual Keyboard
Part 9. Envelopes
Part 10. Refinement GUI
Part 11. Filter
Part 12. Low-frequency oscillator
Part 13. Redesign
Part 14. Polyphony 1
Part 15. Polyphony 2
Part 16. Antialiasing
We have already created all the components of a classical subtractive synthesizer, and now, having a clear understanding of the structure, we will redesign.
Our plugin will be a polyphonic synthesizer called SpaceBass (Kasmicisky Bass):
')
The plug-in will have two oscillators, the sound of which can be mixed using a knob. Turn all the way to the left - only the first oscillator will sound, and the second will sound to the right. Position in the middle will give us the sounds of both oscillators in equal proportion. The “pitch mod” knob adjusts the modulation level of the corresponding oscillator with a low-frequency oscillator. We have already figured out the volume and filter envelopes. The “LFO amount” knob appeared in the filter section. She regulates how the LFO affects the cutoff frequency.
Even at this stage it looks good. Let's evaluate the progress. Here is what we have already done:
Here is a list of what remains to be done:
As you can see, most have already been done!
The plan is this: first, let's take a look at how graphic design is done in Photoshop. Then the main part is polyphony, it will slightly change the structure of the plug-in. Add modulation of tone at the end.
We will break down these tasks into three posts. This one will be about the design, the other two will be about polyphony, since this is a rather laborious part.
The handle is a slightly modified Boss-like Knob by Lesley Sanford . I just made it smaller, lengthened the notch and changed the shadow a little. The modified version can be downloaded from here . I made a new keyboard using this guide .
I will not go into the details of where to get photoshop and how to draw all this in it, but we will look at the structure of the layers and the general principles of work. Download archived TIF , unpack and open in Photoshop or in GIMP. I tried to leave the structure intact, so that you can dig into it and understand how it is done. If you want to change the text, you will need a couple of fonts: Tusj for the logo and Avenir 85 Heavy for signatures. Unfortunately, the second is no longer free, but you can use Helvetica, for example, instead. Download and install fonts in your system.
Studying the structure of layers in Photoshop, you can see that most of the objects are vector shapes and smart objects . I highly recommend using smart objects in the following cases:
The first item refers to knobs and waveform switches. They appear in several places and their copies look identical. Select the Move tool (by pressing V ) and, while holding Cmd on a Mac or Ctrl on Windows, click on the waveform switch. In the layers palette, the layer named Shapes will be highlighted. Double-click on the thumbnail to open the smart object. It will become clear that waveforms are vector objects:
The advantage of vector objects is that they can be rotated, scaled and modified in every way as much as possible without loss . So if, for example, we need a new version of the interface for screens with a large pixel density, we will only need to scale these pictures. Yes, we would have to export a handle from JKnobMan, but since all the handles are the same smart object, it will be very easy to replace them.
Let's dissect the Keyboard layer group. Inside you can find four octaves. Octave is also a smart object, all changes made over one octave will affect others. Open, for example, Octave 4 and take a look at the palette:
All black keys point to one smart object, and white too. Double-click any black key in the layers palette. It will become clear that it consists of three vector forms:

Imagine now that we would like to smooth out the corners of the black keys a bit. If we had riveted copies, we would have to rake it all now. But with this approach, it all comes down to editing a single key.
Using Photoshop, adhere to several principles:
A couple of useful points for creating your virtual keyboard:
Another small hint: in the logo of our syntony, the letter S occurs three times. The letters in this font have an irregular texture, so three absolutely identical letters S look completely unnatural. To make the logo look better, use an additional layer with a mask, with which you can slightly change the texture of the same letters in several places.
Interface components must be exported as separate .png to refer to them from the plugin code. You can export manually or download the following six files:
As usual, we will copy the Synthesis project with the help of the good old super-useful script duplicate. Launch it from the IPlugExamples folder:
If you have not followed the development in previous posts, you can download the project , unzip it, and then run the
Copy all six pictures into the project's resource folder and delete knob_small.png , which we no longer need.
Since we use the same file names, we only need to slightly change resource.h . Delete
The interface has become a bit bigger:
You need to edit another resource file, SpaceBass.rc :
Now let's change the
Change the order of the sections
Now let's proceed directly to the GUI code. Let's start with SpaceBass.h . Add a couple of
Thus, we do not overwhelm the designer with interface code. While we are there, remove the
Now in SpaceBass.cpp before
This parameter determines the accuracy with which the user can rotate the interface knob. It is used in each pen, so it is a good idea to create one constant here instead of writing specific values on each separate line with handle parameters.
The new version of our plugin now has more options. Edit
And
Instead of stamping calls to
Create the following
It stores the name of the parameter, the coordinates of the control in the plug-in window and the default / minimum / maximum values (if the parameter is of type
Below we create a data structure that (almost) stores parameter data. For each parameter we need one
Insert real values below this line. Note that the
Massive gizmo. Similar syntax with curly brackets
The old school approach would be to write this:
This would have to be done for each parameter!
The “classic” approach to composite literals for
Very concise, but error prone. If you add something to the beginning of the
We added two member
Everything is transparent, is not it? Instead of piling up
Let's write
We iterate over all parameters. First we get the necessary properties from the data structure that we just created, then with the help of
For some pens, it is better to specify non-linear behavior. For example, it is better to change the cutoff frequency logarithmically, due to the mathematical relationship between the notes in octaves and their frequencies. Add the corresponding
Finally, for each parameter, you need to call
With the internal parameters finished, now add controls for them. This is done in the body of
Then the keyboard:
The only thing that has changed in the keyboard is the number of octaves (now only four) and
Next, upload images of knobs and switches:
As usual, here we simply load .png and tell the system how many frames in each of them.
The main part - by iterating over all parameters to create the corresponding controls:
Here we first learn the properties for the current parameter, then use the
Finally, remove the
Launch the plugin and admire the new interface in all its glory! True, the sound does not work yet - we will do this next time. We have to make a synthesizer polyphonic!
The code can be downloaded from here .
Original post .
Part 1. Introduction and setup
Part 2. Learning Code
Part 3. VST and AU
Part 4. Digital Distortion
Part 5. Presets and GUI
Part 6. Signal synthesis
Part 7. Receive MIDI Messages
Part 8. Virtual Keyboard
Part 9. Envelopes
Part 10. Refinement GUI
Part 11. Filter
Part 12. Low-frequency oscillator
Part 13. Redesign
Part 14. Polyphony 1
Part 15. Polyphony 2
Part 16. Antialiasing
We have already created all the components of a classical subtractive synthesizer, and now, having a clear understanding of the structure, we will redesign.
Our plugin will be a polyphonic synthesizer called SpaceBass (Kasmicisky Bass):
')
The plug-in will have two oscillators, the sound of which can be mixed using a knob. Turn all the way to the left - only the first oscillator will sound, and the second will sound to the right. Position in the middle will give us the sounds of both oscillators in equal proportion. The “pitch mod” knob adjusts the modulation level of the corresponding oscillator with a low-frequency oscillator. We have already figured out the volume and filter envelopes. The “LFO amount” knob appeared in the filter section. She regulates how the LFO affects the cutoff frequency.
Even at this stage it looks good. Let's evaluate the progress. Here is what we have already done:
- MIDI receiver
- Virtual keyboard
- Oscillator
- Volume Envelope
- Multiple mode filter
- Envelope filter
- Lfo
Here is a list of what remains to be done:
- New design
- Polyphony
- Mixing Oscillator Sounds (Easy)
- Oscillator tone modulation
As you can see, most have already been done!
The plan is this: first, let's take a look at how graphic design is done in Photoshop. Then the main part is polyphony, it will slightly change the structure of the plug-in. Add modulation of tone at the end.
We will break down these tasks into three posts. This one will be about the design, the other two will be about polyphony, since this is a rather laborious part.
New design
The handle is a slightly modified Boss-like Knob by Lesley Sanford . I just made it smaller, lengthened the notch and changed the shadow a little. The modified version can be downloaded from here . I made a new keyboard using this guide .
I will not go into the details of where to get photoshop and how to draw all this in it, but we will look at the structure of the layers and the general principles of work. Download archived TIF , unpack and open in Photoshop or in GIMP. I tried to leave the structure intact, so that you can dig into it and understand how it is done. If you want to change the text, you will need a couple of fonts: Tusj for the logo and Avenir 85 Heavy for signatures. Unfortunately, the second is no longer free, but you can use Helvetica, for example, instead. Download and install fonts in your system.
Smart objects and vector shapes
Studying the structure of layers in Photoshop, you can see that most of the objects are vector shapes and smart objects . I highly recommend using smart objects in the following cases:
- When the same component is needed in several places
- If you want to apply any effect to a group of objects (and use a version of Photoshop younger than CS6)
- You want to rotate an object without losing information, with the ability to rotate it back
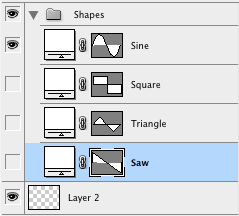
The first item refers to knobs and waveform switches. They appear in several places and their copies look identical. Select the Move tool (by pressing V ) and, while holding Cmd on a Mac or Ctrl on Windows, click on the waveform switch. In the layers palette, the layer named Shapes will be highlighted. Double-click on the thumbnail to open the smart object. It will become clear that waveforms are vector objects:
The advantage of vector objects is that they can be rotated, scaled and modified in every way as much as possible without loss . So if, for example, we need a new version of the interface for screens with a large pixel density, we will only need to scale these pictures. Yes, we would have to export a handle from JKnobMan, but since all the handles are the same smart object, it will be very easy to replace them.
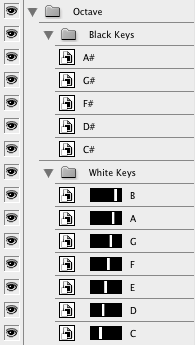
Let's dissect the Keyboard layer group. Inside you can find four octaves. Octave is also a smart object, all changes made over one octave will affect others. Open, for example, Octave 4 and take a look at the palette:
All black keys point to one smart object, and white too. Double-click any black key in the layers palette. It will become clear that it consists of three vector forms:
Imagine now that we would like to smooth out the corners of the black keys a bit. If we had riveted copies, we would have to rake it all now. But with this approach, it all comes down to editing a single key.
Using Photoshop, adhere to several principles:
- Wherever possible, work non-destructively. Use smart filters , do not scale raster objects, avoid rasterizing layers. When you rasterize something, all the information about the original structure of the object is lost . If you still have to rasterize, first make a backup copy of the vector form to return to it if necessary.
- Avoid copying with smart objects. Before you copy something, ask yourself: will you change the copy? If not, then you need not a stupid copy, but a smart object.
- Use the Pen tool to edit objects such as, for example, rectangles with rounded corners. This tool will save places such as rounding.
A couple of useful points for creating your virtual keyboard:
- When drawing non-pressed keys, remember that when pressed, they should usually look darker. If the black button is literally black in the unpressed state, it will be difficult to portray it “more pressed”.
- All white keys are the same width as black.
- When pressed, Do and Fa (C and F), as well as Mi and C (E and B), are the same image. Make sure that the sharps of the first and the second of the second have the same displacement, otherwise layers and gaps will appear.
- When drawing keystrokes, do not use translucent overlays. Use layers with masks so that each key pressed changes only its own image area. Such effects as shadows and external glow using
IKeyboardControlwill not work correctly. - The highest key for
IKeyboardControlis Up. So you need a white key with no black on top. If you work non-destructively, it is not difficult.
Another small hint: in the logo of our syntony, the letter S occurs three times. The letters in this font have an irregular texture, so three absolutely identical letters S look completely unnatural. To make the logo look better, use an additional layer with a mask, with which you can slightly change the texture of the same letters in several places.
Export graphics
Interface components must be exported as separate .png to refer to them from the plugin code. You can export manually or download the following six files:
- The background image contains static parts and a virtual keyboard, on which all keys are in the unstressed mode.
- Waveform Switches and Filter Modes
- A pen
- Six pressed white keys for
IKeyboardControl - And one black
GUI implementation
As usual, we will copy the Synthesis project with the help of the good old super-useful script duplicate. Launch it from the IPlugExamples folder:
cd ~/plugin-development/wdl-ol/IPlugExamples/./duplicate.py Synthesis/ SpaceBass YourNameIf you have not followed the development in previous posts, you can download the project , unzip it, and then run the
duplicate script.Copy all six pictures into the project's resource folder and delete knob_small.png , which we no longer need.
Since we use the same file names, we only need to slightly change resource.h . Delete
KNOB_SMALL_ID and KNOB_SMALL_FN . The file header should look like this: // Unique IDs for each image resource. #define BG_ID 101 #define WHITE_KEY_ID 102 #define BLACK_KEY_ID 103 #define WAVEFORM_ID 104 #define KNOB_ID 105 #define FILTERMODE_ID 106 // Image resource locations for this plug. #define BG_FN "resources/img/bg.png" #define WHITE_KEY_FN "resources/img/whitekey.png" #define BLACK_KEY_FN "resources/img/blackkey.png" #define WAVEFORM_FN "resources/img/waveform.png" #define KNOB_FN "resources/img/knob.png" #define FILTERMODE_FN "resources/img/filtermode.png" The interface has become a bit bigger:
// GUI default dimensions #define GUI_WIDTH 571 #define GUI_HEIGHT 500 You need to edit another resource file, SpaceBass.rc :
#include "resource.h" BG_ID PNG BG_FN WHITE_KEY_ID PNG WHITE_KEY_FN BLACK_KEY_ID PNG BLACK_KEY_FN WAVEFORM_ID PNG WAVEFORM_FN KNOB_ID PNG KNOB_FN FILTERMODE_ID PNG FILTERMODE_FN Now let's change the
Oscillator class a bit. Let's enum OscillatorMode inside the class so that it can be accessed from the outside as Oscillator::OscillatorMode . We did the same in Filter and EnvelopeGenerator , and we will do it here, “for symmetry”.Change the order of the sections
public and private to make the public go first. And move the enum OscillatorMode up to this section: class Oscillator { public: enum OscillatorMode { OSCILLATOR_MODE_SINE = 0, OSCILLATOR_MODE_SAW, OSCILLATOR_MODE_SQUARE, OSCILLATOR_MODE_TRIANGLE, kNumOscillatorModes }; void setMode(OscillatorMode mode); void setFrequency(double frequency); void setSampleRate(double sampleRate); void generate(double* buffer, int nFrames); inline void setMuted(bool muted) { isMuted = muted; } double nextSample(); Oscillator() : mOscillatorMode(OSCILLATOR_MODE_SINE), mPI(2*acos(0.0)), twoPI(2 * mPI), isMuted(true), mFrequency(440.0), mPhase(0.0), mSampleRate(44100.0) { updateIncrement(); }; private: OscillatorMode mOscillatorMode; const double mPI; const double twoPI; bool isMuted; double mFrequency; double mPhase; double mSampleRate; double mPhaseIncrement; void updateIncrement(); }; Now let's proceed directly to the GUI code. Let's start with SpaceBass.h . Add a couple of
private functions: void CreateParams(); void CreateGraphics(); Thus, we do not overwhelm the designer with interface code. While we are there, remove the
double mFrequency we don’t double mFrequency .Now in SpaceBass.cpp before
enum EParams add a constant: const double parameterStep = 0.001; This parameter determines the accuracy with which the user can rotate the interface knob. It is used in each pen, so it is a good idea to create one constant here instead of writing specific values on each separate line with handle parameters.
The new version of our plugin now has more options. Edit
EParams : enum EParams { // Oscillator Section: mOsc1Waveform = 0, mOsc1PitchMod, mOsc2Waveform, mOsc2PitchMod, mOscMix, // Filter Section: mFilterMode, mFilterCutoff, mFilterResonance, mFilterLfoAmount, mFilterEnvAmount, // LFO: mLFOWaveform, mLFOFrequency, // Volume Envelope: mVolumeEnvAttack, mVolumeEnvDecay, mVolumeEnvSustain, mVolumeEnvRelease, // Filter Envelope: mFilterEnvAttack, mFilterEnvDecay, mFilterEnvSustain, mFilterEnvRelease, kNumParams }; And
ELayout too, ELayout layout of the virtual keyboard has changed: enum ELayout { kWidth = GUI_WIDTH, kHeight = GUI_HEIGHT, kKeybX = 62, kKeybY = 425 }; All parameters in one place
Instead of stamping calls to
InitDouble() and new IKnobMultiControl , it is better to create a special data structure for storing information about the GUI.Create the following
struct under EParams : typedef struct { const char* name; const int x; const int y; const double defaultVal; const double minVal; const double maxVal; } parameterProperties_struct; It stores the name of the parameter, the coordinates of the control in the plug-in window and the default / minimum / maximum values (if the parameter is of type
double ). For the switches, we will not need the default/min/maxVal . Because of static typing, this would be superfluous.Below we create a data structure that (almost) stores parameter data. For each parameter we need one
parameterProperties_struct , which means we need an array of size kNumParams : const parameterProperties_struct parameterProperties[kNumParams] = Insert real values below this line. Note that the
default/min/maxVals remain uninitialized for parameters of type enum , such as Filter Mode : { {.name="Osc 1 Waveform", .x=30, .y=75}, {.name="Osc 1 Pitch Mod", .x=69, .y=61, .defaultVal=0.0, .minVal=0.0, .maxVal=1.0}, {.name="Osc 2 Waveform", .x=203, .y=75}, {.name="Osc 2 Pitch Mod", .x=242, .y=61, .defaultVal=0.0, .minVal=0.0, .maxVal=1.0}, {.name="Osc Mix", .x=130, .y=61, .defaultVal=0.5, .minVal=0.0, .maxVal=1.0}, {.name="Filter Mode", .x=30, .y=188}, {.name="Filter Cutoff", .x=69, .y=174, .defaultVal=0.99, .minVal=0.0, .maxVal=0.99}, {.name="Filter Resonance", .x=124, .y=174, .defaultVal=0.0, .minVal=0.0, .maxVal=1.0}, {.name="Filter LFO Amount", .x=179, .y=174, .defaultVal=0.0, .minVal=0.0, .maxVal=1.0}, {.name="Filter Envelope Amount", .x=234, .y=174, .defaultVal=0.0, .minVal=-1.0, .maxVal=1.0}, {.name="LFO Waveform", .x=30, .y=298}, {.name="LFO Frequency", .x=69, .y=284, .defaultVal=6.0, .minVal=0.01, .maxVal=30.0}, {.name="Volume Env Attack", .x=323, .y=61, .defaultVal=0.01, .minVal=0.01, .maxVal=10.0}, {.name="Volume Env Decay", .x=378, .y=61, .defaultVal=0.5, .minVal=0.01, .maxVal=15.0}, {.name="Volume Env Sustain", .x=433, .y=61, .defaultVal=0.1, .minVal=0.001, .maxVal=1.0}, {.name="Volume Env Release", .x=488, .y=61, .defaultVal=1.0, .minVal=0.01, .maxVal=15.0}, {.name="Filter Env Attack", .x=323, .y=174, .defaultVal=0.01, .minVal=0.01, .maxVal=10.0}, {.name="Filter Env Decay", .x=378, .y=174, .defaultVal=0.5, .minVal=0.01, .maxVal=15.0}, {.name="Filter Env Sustain", .x=433, .y=174, .defaultVal=0.1, .minVal=0.001, .maxVal=1.0}, {.name="Filter Env Release", .x=488, .y=174, .defaultVal=1.0, .minVal=0.01, .maxVal=15.0} }; Massive gizmo. Similar syntax with curly brackets
{} is a relatively new technique in C / C ++, which is called “ composite literals ”. The basic idea is that you can initialize structures and arrays in this way. The external brackets initialize the parameterProperties[] array, they contain a comma-separated list of compound literals, each of which initializes one parameterProperties_struct . Let's break it down using the first literal as an example: {.name="Osc 1 Waveform", .x=30, .y=75} The old school approach would be to write this:
parameterProperties_struct* osc1Waveform_prop = parameterProperties[mOsc1Waveform]; osc1Waveform_prop->name = "Osc 1 Waveform"; osc1Waveform_prop->x = 30; osc1Waveform_prop->y = 75; This would have to be done for each parameter!
The “classic” approach to composite literals for
struct is: {"Osc 1 Waveform", 30, 75} Very concise, but error prone. If you add something to the beginning of the
struct or change the order of the elements, problems will arise. It is better to use designated initializers , although you will have to type more. This monstrous phrase simply means that you can access the elements of a struct using the syntax .membername= . In the final form, this is a bit like JSON or hashes in Ruby : {.name="Osc 1 Waveform", .x=30, .y=75} Creating parameters
We added two member
CreateParams , CreateGraphics and CreateGraphics . Now the constructor looks very simple: SpaceBass::SpaceBass(IPlugInstanceInfo instanceInfo) : IPLUG_CTOR(kNumParams, kNumPrograms, instanceInfo), lastVirtualKeyboardNoteNumber(virtualKeyboardMinimumNoteNumber - 1) { TRACE; CreateParams(); CreateGraphics(); CreatePresets(); mMIDIReceiver.noteOn.Connect(this, &SpaceBass::onNoteOn); mMIDIReceiver.noteOff.Connect(this, &SpaceBass::onNoteOff); mEnvelopeGenerator.beganEnvelopeCycle.Connect(this, &SpaceBass::onBeganEnvelopeCycle); mEnvelopeGenerator.finishedEnvelopeCycle.Connect(this, &SpaceBass::onFinishedEnvelopeCycle); } Everything is transparent, is not it? Instead of piling up
GetParam() and pGraphics here, we took it all out.Let's write
CreateParams ! void SpaceBass::CreateParams() { for (int i = 0; i < kNumParams; i++) { IParam* param = GetParam(i); const parameterProperties_struct& properties = parameterProperties[i]; switch (i) { // Enum Parameters: case mOsc1Waveform: case mOsc2Waveform: param->InitEnum(properties.name, Oscillator::OSCILLATOR_MODE_SAW, Oscillator::kNumOscillatorModes); // For VST3: param->SetDisplayText(0, properties.name); break; case mLFOWaveform: param->InitEnum(properties.name, Oscillator::OSCILLATOR_MODE_TRIANGLE, Oscillator::kNumOscillatorModes); // For VST3: param->SetDisplayText(0, properties.name); break; case mFilterMode: param->InitEnum(properties.name, Filter::FILTER_MODE_LOWPASS, Filter::kNumFilterModes); break; // Double Parameters: default: param->InitDouble(properties.name, properties.defaultVal, properties.minVal, properties.maxVal, parameterStep); break; } } We iterate over all parameters. First we get the necessary properties from the data structure that we just created, then with the help of
switch initialize different enum . For the LFO, the default waveform is triangular, simply because it is the one that is most often used. Please note that for all sixteen pens we use only one expression!For some pens, it is better to specify non-linear behavior. For example, it is better to change the cutoff frequency logarithmically, due to the mathematical relationship between the notes in octaves and their frequencies. Add the corresponding
SetShape calls to the end of CreateParams : GetParam(mFilterCutoff)->SetShape(2); GetParam(mVolumeEnvAttack)->SetShape(3); GetParam(mFilterEnvAttack)->SetShape(3); GetParam(mVolumeEnvDecay)->SetShape(3); GetParam(mFilterEnvDecay)->SetShape(3); GetParam(mVolumeEnvSustain)->SetShape(2); GetParam(mFilterEnvSustain)->SetShape(2); GetParam(mVolumeEnvRelease)->SetShape(3); GetParam(mFilterEnvRelease)->SetShape(3); Finally, for each parameter, you need to call
OnParamChange , so that when you first call the plug-in, the internal variables have the correct values: for (int i = 0; i < kNumParams; i++) { OnParamChange(i); } } With the internal parameters finished, now add controls for them. This is done in the body of
CreateGraphics . First, add a background image: void SpaceBass::CreateGraphics() { IGraphics* pGraphics = MakeGraphics(this, kWidth, kHeight); pGraphics->AttachBackground(BG_ID, BG_FN); Then the keyboard:
IBitmap whiteKeyImage = pGraphics->LoadIBitmap(WHITE_KEY_ID, WHITE_KEY_FN, 6); IBitmap blackKeyImage = pGraphics->LoadIBitmap(BLACK_KEY_ID, BLACK_KEY_FN); // C# D# F# G# A# int keyCoordinates[12] = { 0, 10, 17, 30, 35, 52, 61, 68, 79, 85, 97, 102 }; mVirtualKeyboard = new IKeyboardControl(this, kKeybX, kKeybY, virtualKeyboardMinimumNoteNumber, /* octaves: */ 4, &whiteKeyImage, &blackKeyImage, keyCoordinates); pGraphics->AttachControl(mVirtualKeyboard); The only thing that has changed in the keyboard is the number of octaves (now only four) and
keyCoordinates . New keys are wider, so you need to adjust the step between them so that keystrokes appear on adequate coordinates.Next, upload images of knobs and switches:
IBitmap waveformBitmap = pGraphics->LoadIBitmap(WAVEFORM_ID, WAVEFORM_FN, 4); IBitmap filterModeBitmap = pGraphics->LoadIBitmap(FILTERMODE_ID, FILTERMODE_FN, 3); IBitmap knobBitmap = pGraphics->LoadIBitmap(KNOB_ID, KNOB_FN, 64); As usual, here we simply load .png and tell the system how many frames in each of them.
The main part - by iterating over all parameters to create the corresponding controls:
for (int i = 0; i < kNumParams; i++) { const parameterProperties_struct& properties = parameterProperties[i]; IControl* control; IBitmap* graphic; switch (i) { // Switches: case mOsc1Waveform: case mOsc2Waveform: case mLFOWaveform: graphic = &waveformBitmap; control = new ISwitchControl(this, properties.x, properties.y, i, graphic); break; case mFilterMode: graphic = &filterModeBitmap; control = new ISwitchControl(this, properties.x, properties.y, i, graphic); break; // Knobs: default: graphic = &knobBitmap; control = new IKnobMultiControl(this, properties.x, properties.y, i, graphic); break; } pGraphics->AttachControl(control); } Here we first learn the properties for the current parameter, then use the
switch for specific cases. Also, instead of waveform.png , filtermode.png is used for the mFilterMode parameter. Again, default is the code for the handle, because the handle is most often found among controls.AttachGraphics function body with the AttachGraphics call: AttachGraphics(pGraphics); } Finally, remove the
switch from OnParamChange() in SpaceBass.cpp . We will rewrite it next time.Done!
Launch the plugin and admire the new interface in all its glory! True, the sound does not work yet - we will do this next time. We have to make a synthesizer polyphonic!
The code can be downloaded from here .
Original post .
Source: https://habr.com/ru/post/228267/
All Articles