Atari 800XL: We look, we sort, we include
Surely many readers of Habr grew up on the computers of the ZX Spectrum and the BK-0010/0011, or at least came across them in the distant 90s. For many, these PCs have become the starting point for the IT world. But, like many other things, eight-bit home computers came to our country much later than the rest of the civilized world, and not in full. There, this era began almost 10 years earlier, at the end of the 70s, when the Atari 400/800, Commodore PET and, of course, the Apple II came out. Home computers began to receive mass distribution in the early 80s. In 1982, the famous ZX Spectrum 48 and the equally famous Commodore 64 saw the light, the Atari 800XL was released in 1983, and in 1984 the first Macintosh appeared on store shelves. Like most home computers at the time, the Atari 800XL was based on a 6502C processor with a frequency of 1.79 MHz, had 64K of memory, was able to run games from tapes, pop 5.25 "diskettes, walk on the screen 61440 multi-colored pixels and a lot more. About I am going to talk to this wonderful piece of metal today, however, not only to talk!
As I already wrote, the heart of the Atari 800XL is a 6502C processor operating at 1.79 MHz in the NTSC version and 1.77 MHz in the PAL version of the computer, respectively. But inside it was far from the only chip. The POKEY chip, which works with input-output devices and is responsible for the sound subsystem, and the chips responsible for the video subsystem, called ANTIC and GTIA, came to the aid of the 6502. The ANTIC chip in conjunction with the GTIA made it possible to significantly save the RAM for displaying the image on the screen. A total of 64KB of RAM was soldered on the board. Of these 64 KB, only 37,902 bytes are available to the user. The remaining volume was occupied by the BASIC interpreter. By default, during system boot, the contents of the ROM chip with the BASIC image are rewritten into RAM. Interpreter loading could be prevented by pressing the Optio button while turning on. For obvious reasons, this operation required the majority of games and applications. I will not bore you with large volumes of text, t.ch. We will consider everything in more detail when we receive visual information.
')
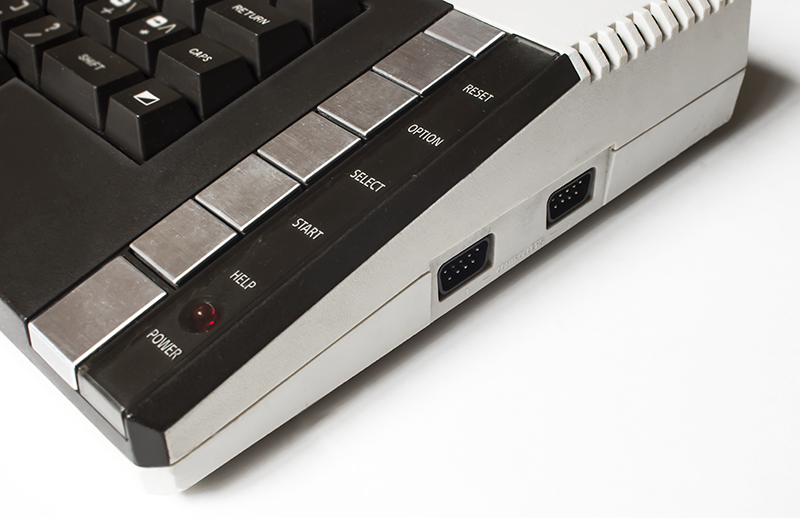
As you can see, the computer is a small monoblock, on the upper face of which is a QWERTY keyboard, a slot for cartridges. To the right of the main keyboard are the Reset, Option, Select, Start, Help keys and the power indicator next to it. The Reset key is used for the so-called Warm Reset, but if “everything is bad” and you need a complete reset, you will have to reach for the power switch on the back edge.
The keyboard is made on the basis of hybrid mechanical-capacitive switches. When pressed, the spring is compressed, which causes a change in capacity and triggers. The keys have a very soft and silent move. Now this type of keyboards is called Topre.
Rear panel. On it are the main ports of the device. On the left is the port SIO (Serial Input / Output). In my opinion, this is one of the most remarkable things in Atari 8-bit computers: this standard allowed us to sequentially connect more than 10 devices to a computer without any problems. Atari SIO was developed by engineer Joe Dekair (interesting fact: Joe also participated in the development and has some patents on the USB standard). Next, under the plug, there is a parallel port. It was used to install extensions. Such as the Atari 1090XL Expansion System chassis, memory expansion and some other modules. Closer to him, we look at the disassembly of the device. Next comes the A / V port, there is nothing unusual here. A little further - RF plug. Next to it, you can see the sealed opening of the switch of TV channels, it is present only in the NTSC version. Next - the power connector and the power switch.
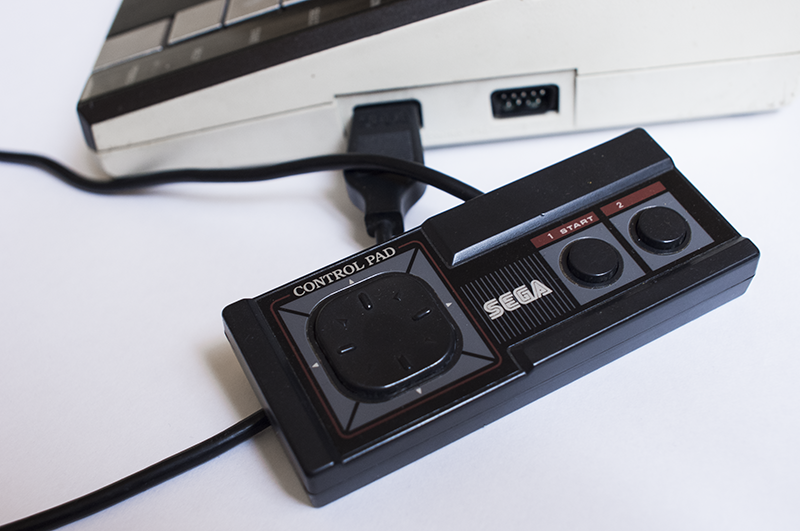
On the right side are the ports of joysticks. I could not find a native joystick, but as many know, the joysticks from the Sega Master System and the Sega Megadrive use the Atari standard. T.ch. the two-button joystick from Sega Master System was very helpful.
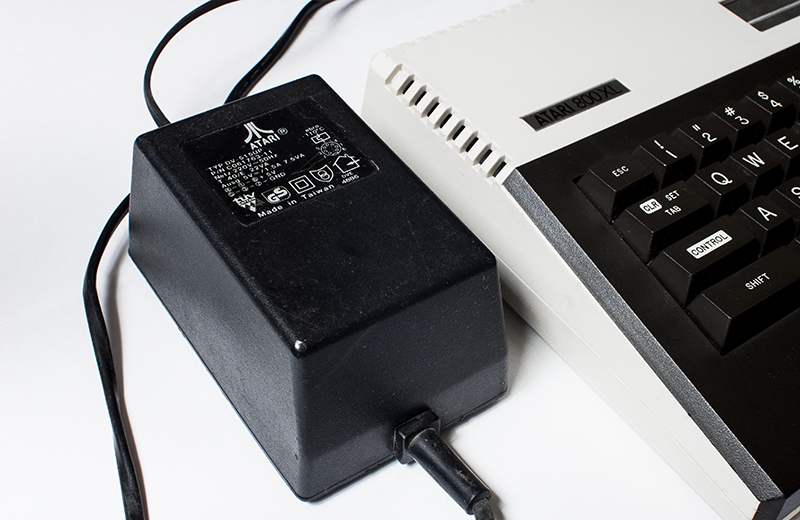
The computer is powered by a weighty power supply with a voltage of 5V at 1.5A.
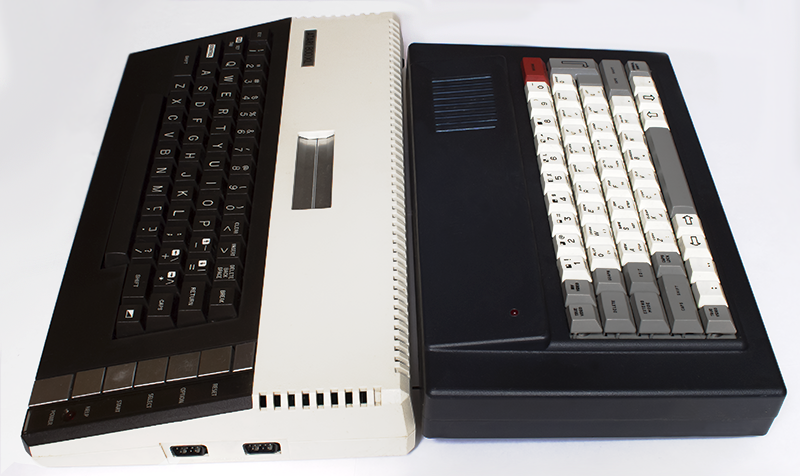
And now a small comparison with the ZX Spectrum local spill. As you can see, the dimensions of the devices are almost identical.
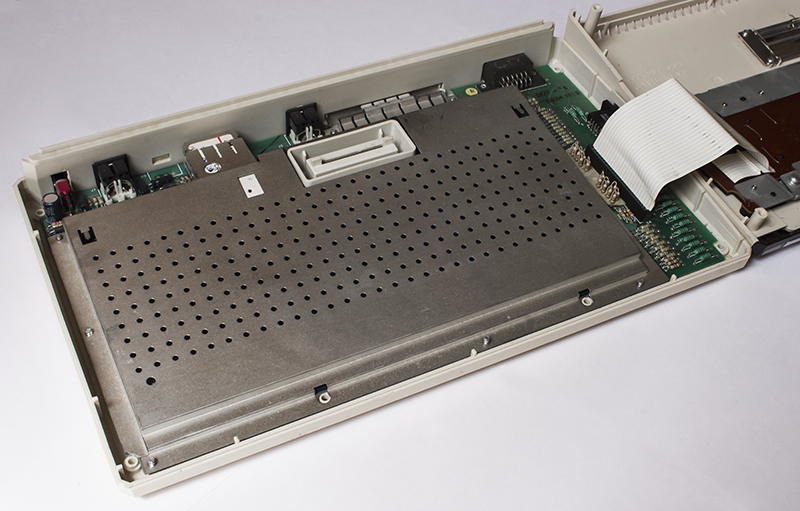
We unscrew the 6 screws and the first thing we see is a massive screen covering almost the entire board. Metal bolted straight to the board with screws. On the right is the port of the keyboard cable.
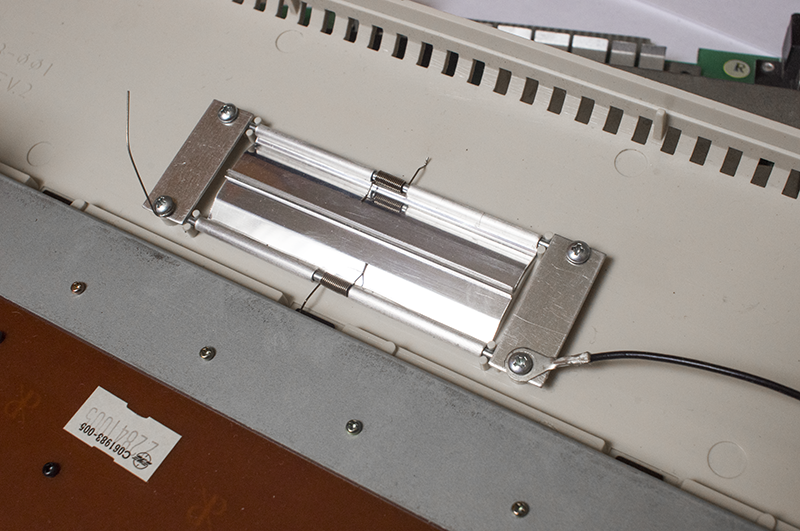
Surprisingly, the cartridge flap is also a screen. Nowadays you will not see this.
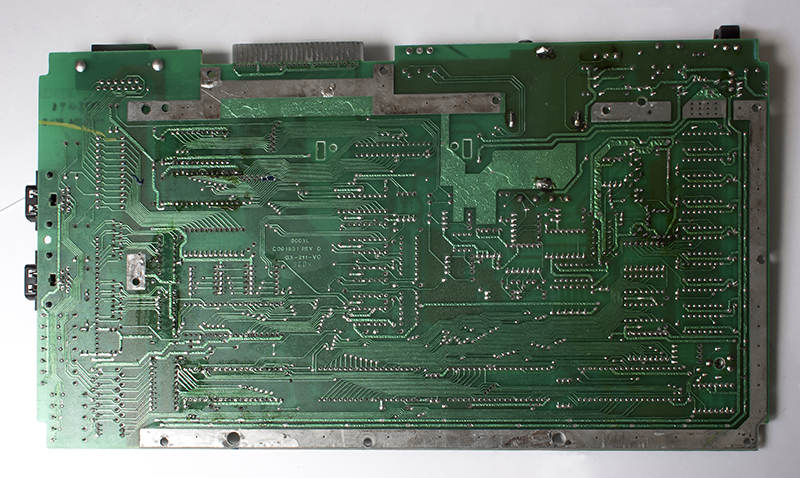
Turning over the board, we see a no less massive screen. Turn off and him.

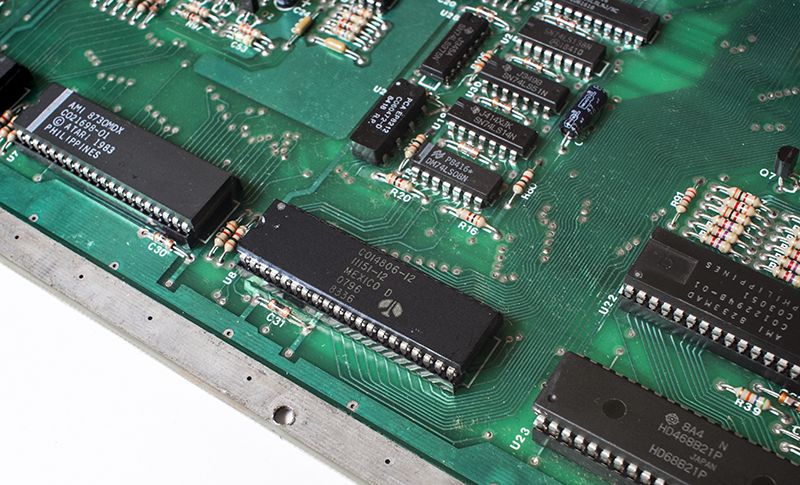
Unscrewing the top screen, we see all the most interesting. All chips at a glance.
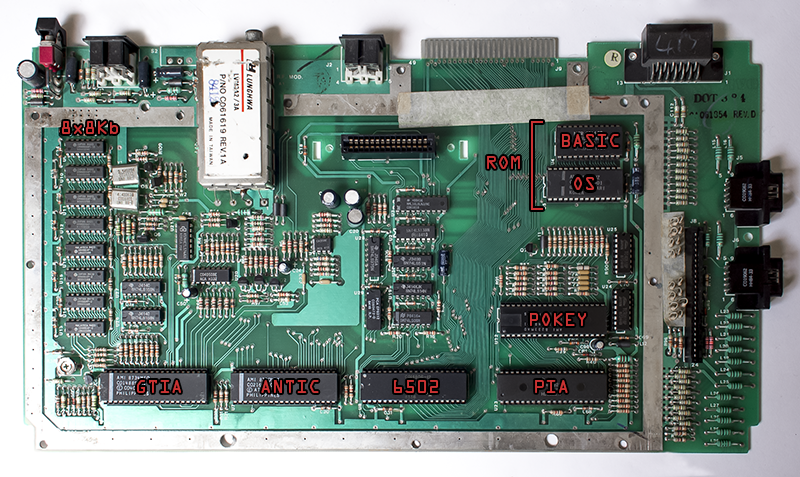
For the convenience and satisfaction of readers' curiosity, all the chips were signed by me, but for even more curious ones there is also an original photo in high resolution . The architecture of 8-bit Atari computers is very different from the ZX Spectrum, in which all functions are assigned to the Z80. For this reason, copying Atari computers was extremely difficult, which led to the lack of popularity in our country, like many other foreign computers.
Take a closer look at the chips.


First of all, having found the pinout of the video port, Istuck bare wires into the port and ran to the nearest radio parts store, bought a DIN connector, soldered the plug for A / V wires with the usual tulips on the other end, connected the whole thing to the tuner and enjoyed the blue screen with the READY inscription on it. The blinking cursor clearly beckoned to type a couple of lines of code on BASIC on the keyboard, which I did. Immediately a little surprised at the process of editing the code, namely: display the listing of the program, move the cursor to the right place and edit. For clarity, imagine how you after entering the command ls or dir move the cursor to the list of files and right there you rename them. A new line in the code is added, oddly enough, with the insert key.
Having played enough with BASIC, I loaded 800XL into test mode, which, as I said, is also sewn into its ROM memory. This software is nothing particularly interesting, you can check the operation of the keyboard, audio subsystem, check the integrity of the ROM and RAM memory. The last procedure takes quite a long time - more than 10 minutes. All tests our veteran safely passed.
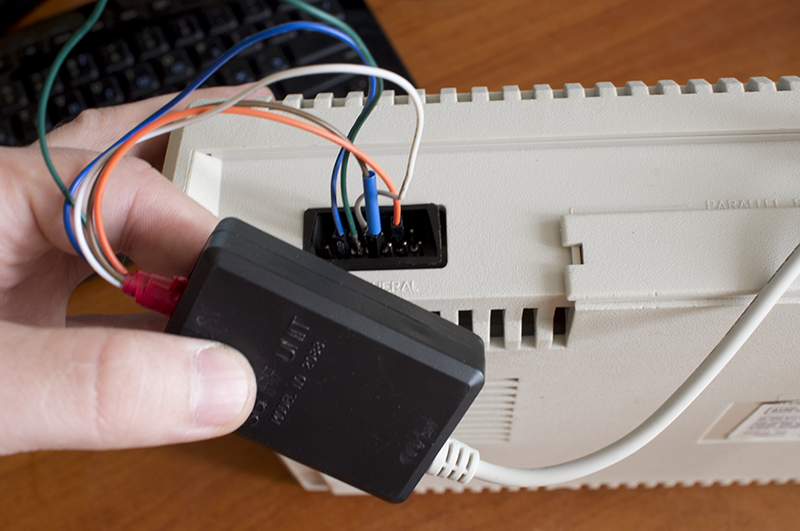
My next goal was the so-called SIO2PC adapter, which allows you to connect SIO to the computer’s COM port and emulate up to 15 devices. This makes it possible to connect a pair of virtual drives to our Atari and load any possible images into them, read / write. You can even print text on a printer and emulate a cassette drive! Interesting? So, I was extremely impatient to run at least some disk OS on 800XL and live to enjoy the masterpieces of the demostsena.
The adapter itself is a simple converter of logical levels COM-> UART. I used the MAX232 microcircuit that I got to hand, the circuit is quite simple, it is easily soldered on the breadboard. But I had problems with the wire, it had a wrong wiring, and did not have a wire for the ninth pin (Ring Indicator), which is used for matching devices.
For convenience, it was decided to cut one end by soldering the necessary wires straight to the board, and at the other end to solder the unnecessary and solder to the RI output. The SIO plug itself is completely non-standard and it will not be possible to buy something suitable at the radio store, so it was decided to use simple pin connectors.
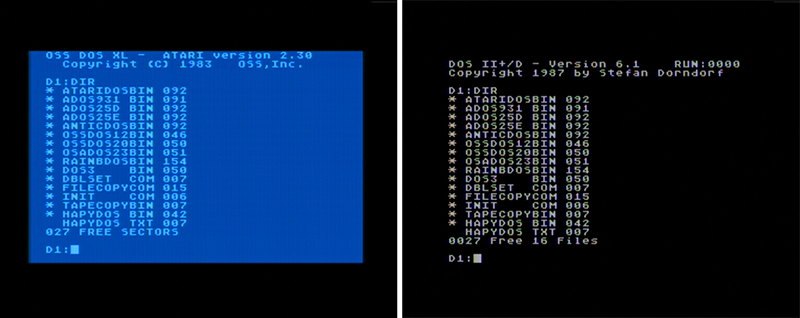
After a simple setup of software for device emulation, our hardware started up with the image of a floppy disk downloaded from the network. A menu appeared on the screen with the choice of loading several OSs at once. In my opinion, the most convenient, oddly enough, was something called Happy Computer II + / D. I will not go into details, the various versions of any DOSs for 8-bit Atari PCs are just a sea. I can only say that together with the disk manager, device drivers are also loaded into RAM. Many disk operating systems are loaded with support for only 2 input-output devices (which is quite logical), but managers such as Happy Computer and Sparta DOS support up to 12 disk devices, which turned out to be extremely convenient in my case. In general, all of them are very similar to the usual MS DOS, with the exception of the native Atari DOS 2-2.5, where the commands are presented as a menu.
And of course the game! And there are a lot of them for Atari 8-bit computers. The largest archive of games I found was more than 6,700 of those. In general, the quality of many games are not far from the Atari 2600 with its angular graphics, but there are samples that deserve attention. For example, I was very impressed with the game Encounter. Pseudo-3D and dynamic gameplay dragged me into the game for almost an hour. In the game we need to manage a kind of tank-spacecraft and exterminate the alien guests, although you can fantasize what your heart desires.
And where without demoscene? It is very voluminous on Atari, hundreds of demos are made with great graphics and music. From the 6502 processor and the POKEY chip, the programmers pulled out all the juices. Several demoscenes were recorded by me right from the iron and are in the section below, I highly recommend to look at them. Also on pouet.net presents a huge number of different demos of different degrees of coolness. Direct link to the section of the site will be below.
Atari 8-bit family Eng Wiki
Atari section on zx-pk.ru
Atari XL / XE section on pouet.net
Large archive of applications and games on rutracker
Customized Altirra emulator + floppy disk images and applications described in the article
ASM MADS Cross Compiler
Cross-compiler Effectus
AspeQt Device Emulator (SIO2PC)
Thanks for attention! I hope it was interesting.
0. Theory
As I already wrote, the heart of the Atari 800XL is a 6502C processor operating at 1.79 MHz in the NTSC version and 1.77 MHz in the PAL version of the computer, respectively. But inside it was far from the only chip. The POKEY chip, which works with input-output devices and is responsible for the sound subsystem, and the chips responsible for the video subsystem, called ANTIC and GTIA, came to the aid of the 6502. The ANTIC chip in conjunction with the GTIA made it possible to significantly save the RAM for displaying the image on the screen. A total of 64KB of RAM was soldered on the board. Of these 64 KB, only 37,902 bytes are available to the user. The remaining volume was occupied by the BASIC interpreter. By default, during system boot, the contents of the ROM chip with the BASIC image are rewritten into RAM. Interpreter loading could be prevented by pressing the Optio button while turning on. For obvious reasons, this operation required the majority of games and applications. I will not bore you with large volumes of text, t.ch. We will consider everything in more detail when we receive visual information.
')
1. We look
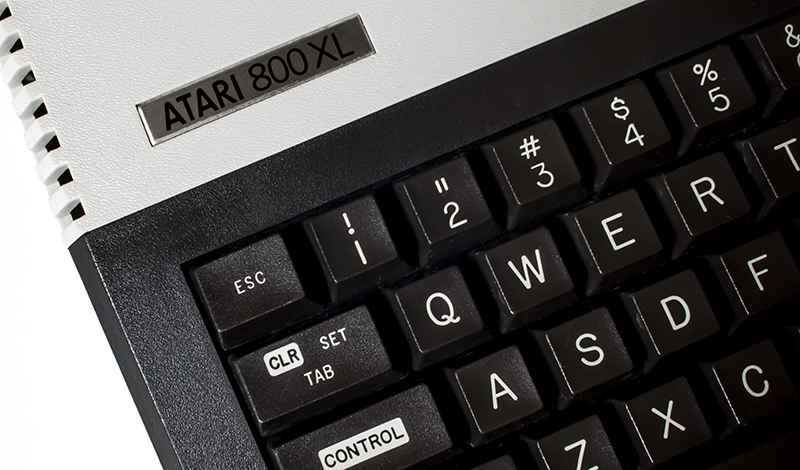
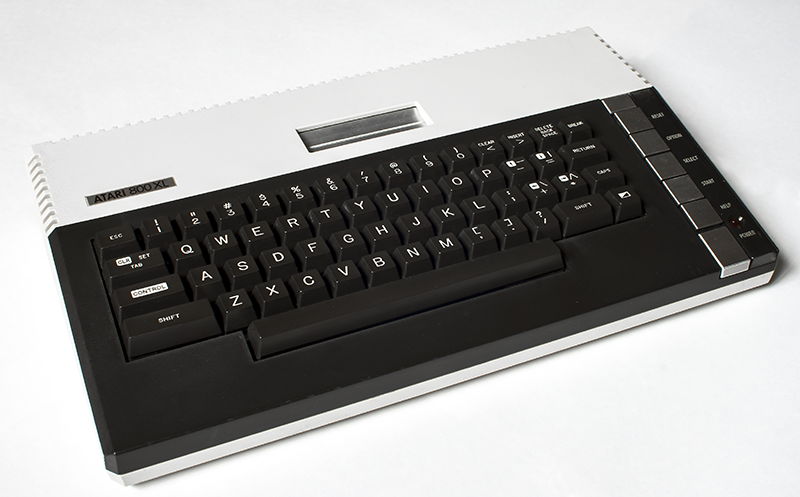
As you can see, the computer is a small monoblock, on the upper face of which is a QWERTY keyboard, a slot for cartridges. To the right of the main keyboard are the Reset, Option, Select, Start, Help keys and the power indicator next to it. The Reset key is used for the so-called Warm Reset, but if “everything is bad” and you need a complete reset, you will have to reach for the power switch on the back edge.
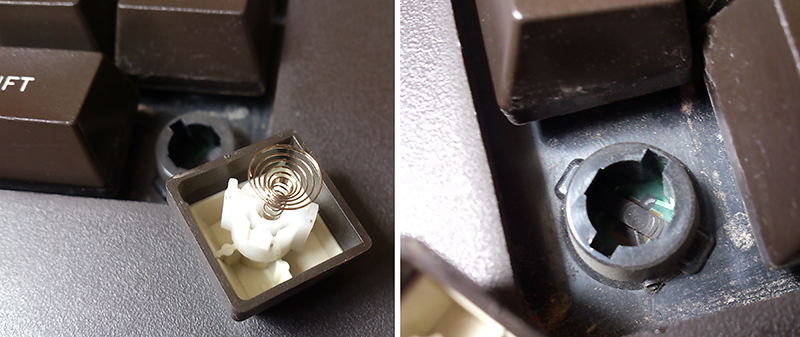
The keyboard is made on the basis of hybrid mechanical-capacitive switches. When pressed, the spring is compressed, which causes a change in capacity and triggers. The keys have a very soft and silent move. Now this type of keyboards is called Topre.
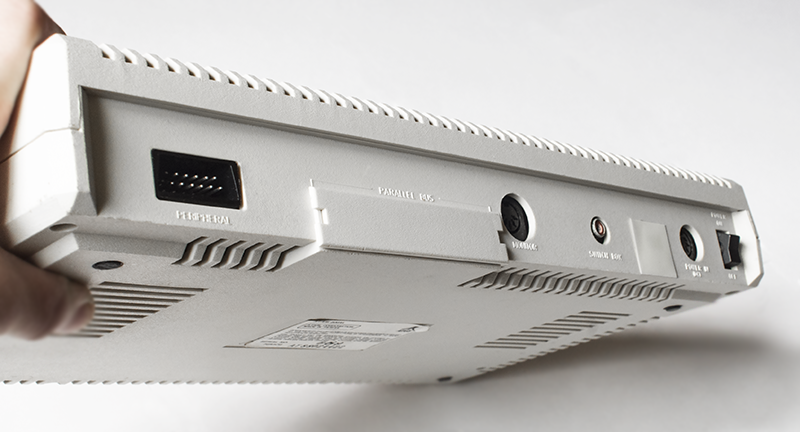
Rear panel. On it are the main ports of the device. On the left is the port SIO (Serial Input / Output). In my opinion, this is one of the most remarkable things in Atari 8-bit computers: this standard allowed us to sequentially connect more than 10 devices to a computer without any problems. Atari SIO was developed by engineer Joe Dekair (interesting fact: Joe also participated in the development and has some patents on the USB standard). Next, under the plug, there is a parallel port. It was used to install extensions. Such as the Atari 1090XL Expansion System chassis, memory expansion and some other modules. Closer to him, we look at the disassembly of the device. Next comes the A / V port, there is nothing unusual here. A little further - RF plug. Next to it, you can see the sealed opening of the switch of TV channels, it is present only in the NTSC version. Next - the power connector and the power switch.
On the right side are the ports of joysticks. I could not find a native joystick, but as many know, the joysticks from the Sega Master System and the Sega Megadrive use the Atari standard. T.ch. the two-button joystick from Sega Master System was very helpful.
The computer is powered by a weighty power supply with a voltage of 5V at 1.5A.
And now a small comparison with the ZX Spectrum local spill. As you can see, the dimensions of the devices are almost identical.
2. We disassemble
We unscrew the 6 screws and the first thing we see is a massive screen covering almost the entire board. Metal bolted straight to the board with screws. On the right is the port of the keyboard cable.
Surprisingly, the cartridge flap is also a screen. Nowadays you will not see this.
Turning over the board, we see a no less massive screen. Turn off and him.
Unscrewing the top screen, we see all the most interesting. All chips at a glance.
For the convenience and satisfaction of readers' curiosity, all the chips were signed by me, but for even more curious ones there is also an original photo in high resolution . The architecture of 8-bit Atari computers is very different from the ZX Spectrum, in which all functions are assigned to the Z80. For this reason, copying Atari computers was extremely difficult, which led to the lack of popularity in our country, like many other foreign computers.
Take a closer look at the chips.
3. Run
First of all, having found the pinout of the video port, I
BASIC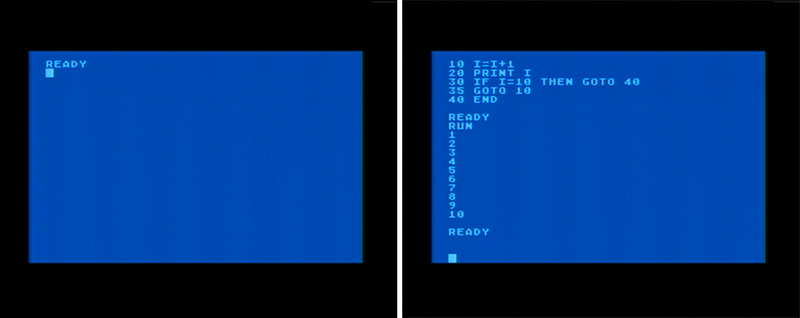
Having played enough with BASIC, I loaded 800XL into test mode, which, as I said, is also sewn into its ROM memory. This software is nothing particularly interesting, you can check the operation of the keyboard, audio subsystem, check the integrity of the ROM and RAM memory. The last procedure takes quite a long time - more than 10 minutes. All tests our veteran safely passed.
SELF TEST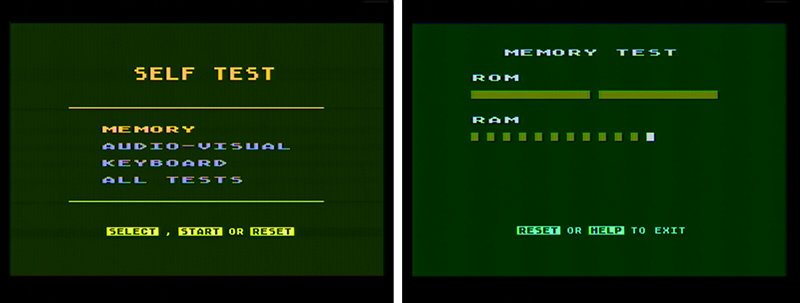
My next goal was the so-called SIO2PC adapter, which allows you to connect SIO to the computer’s COM port and emulate up to 15 devices. This makes it possible to connect a pair of virtual drives to our Atari and load any possible images into them, read / write. You can even print text on a printer and emulate a cassette drive! Interesting? So, I was extremely impatient to run at least some disk OS on 800XL and live to enjoy the masterpieces of the demostsena.
The adapter itself is a simple converter of logical levels COM-> UART. I used the MAX232 microcircuit that I got to hand, the circuit is quite simple, it is easily soldered on the breadboard. But I had problems with the wire, it had a wrong wiring, and did not have a wire for the ninth pin (Ring Indicator), which is used for matching devices.
SIO and DIN board during soldering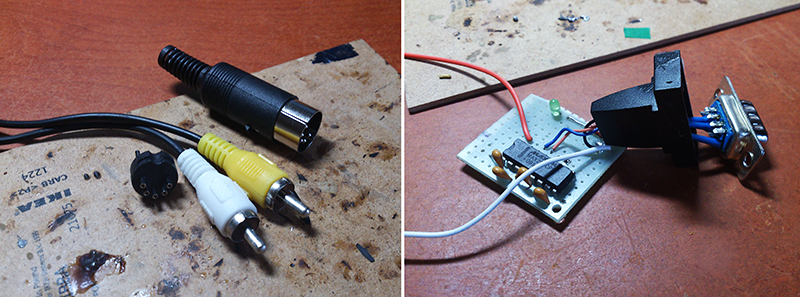
For convenience, it was decided to cut one end by soldering the necessary wires straight to the board, and at the other end to solder the unnecessary and solder to the RI output. The SIO plug itself is completely non-standard and it will not be possible to buy something suitable at the radio store, so it was decided to use simple pin connectors.
After a simple setup of software for device emulation, our hardware started up with the image of a floppy disk downloaded from the network. A menu appeared on the screen with the choice of loading several OSs at once. In my opinion, the most convenient, oddly enough, was something called Happy Computer II + / D. I will not go into details, the various versions of any DOSs for 8-bit Atari PCs are just a sea. I can only say that together with the disk manager, device drivers are also loaded into RAM. Many disk operating systems are loaded with support for only 2 input-output devices (which is quite logical), but managers such as Happy Computer and Sparta DOS support up to 12 disk devices, which turned out to be extremely convenient in my case. In general, all of them are very similar to the usual MS DOS, with the exception of the native Atari DOS 2-2.5, where the commands are presented as a menu.
Disk OS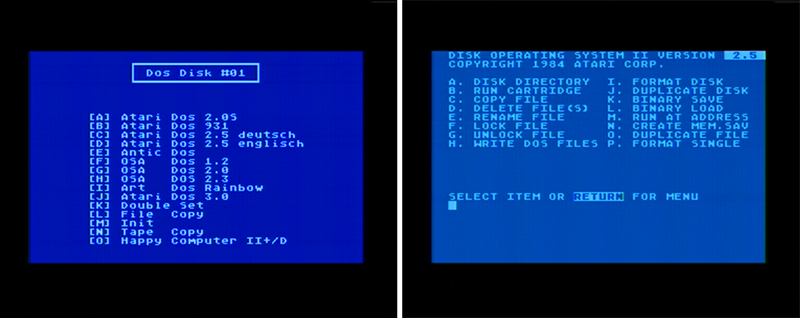
And of course the game! And there are a lot of them for Atari 8-bit computers. The largest archive of games I found was more than 6,700 of those. In general, the quality of many games are not far from the Atari 2600 with its angular graphics, but there are samples that deserve attention. For example, I was very impressed with the game Encounter. Pseudo-3D and dynamic gameplay dragged me into the game for almost an hour. In the game we need to manage a kind of tank-spacecraft and exterminate the alien guests, although you can fantasize what your heart desires.
Zerro and Encounter Games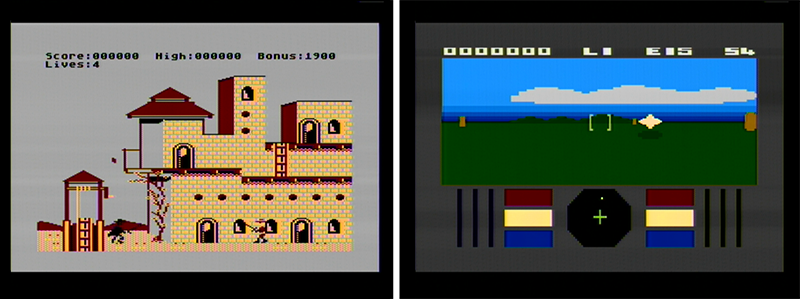
And where without demoscene? It is very voluminous on Atari, hundreds of demos are made with great graphics and music. From the 6502 processor and the POKEY chip, the programmers pulled out all the juices. Several demoscenes were recorded by me right from the iron and are in the section below, I highly recommend to look at them. Also on pouet.net presents a huge number of different demos of different degrees of coolness. Direct link to the section of the site will be below.
4.Video
Atari 8-bit power
* This demo is made by Atari itself. It was on display in stores on display cases.
* This demo is made by Atari itself. It was on display in stores on display cases.
Dos os
Encounter
RGBA Demo
5.Links
Atari 8-bit family Eng Wiki
Atari section on zx-pk.ru
Atari XL / XE section on pouet.net
Large archive of applications and games on rutracker
Customized Altirra emulator + floppy disk images and applications described in the article
ASM MADS Cross Compiler
Cross-compiler Effectus
AspeQt Device Emulator (SIO2PC)
Thanks for attention! I hope it was interesting.
Source: https://habr.com/ru/post/228221/
All Articles