The work of the Haar cascade in OpenCV in pictures: theory and practice

In the last article, we described in detail the number recognition algorithm ( link ), which consists in obtaining a textual representation on a previously prepared image containing a frame with a number + small indents for easy recognition. We only casually mentioned that the Viola-Jones method was used to isolate the areas where the numbers are contained. This method has already been described on habr ( link , link , link , link ). Today we will illustrate visually how it works and touch upon previously unresolved aspects + as a bonus, we will show how to prepare the cut pictures with numbers on the iOS platform for the subsequent receipt of a textual representation of the number.
Viola-Jones Method
Usually each method has a basis, then without which this method could not exist in principle, and all the rest is built on this basis. In the Viola-Jones method, this foundation is composed of Haar primitives, which are a breakdown of a given rectangular area into sets of different types of rectangular subregions:

In the original version of the Viola-Jones algorithm, only primitives without turns were used, and to calculate the sign value, the sum of the pixel brightness of one subregion was subtracted from the sum of the brightness of another subregion [1]. In the development of the method, primitives with a slope of 45 degrees and asymmetrical configurations were proposed. Also, instead of calculating the usual difference, it was proposed to assign a specific weight to each subregion and calculate the characteristic values as the weighted sum of the pixels of different types of regions [2]:

')
Why did the Haar primitives form the basis of the method? The main reason was an attempt to get away from the pixel representation while preserving the speed of computing the attribute. Of the values of a pair of pixels, it is difficult to make any meaningful information for classification, while the two cascade of the system for face recognition, which has a quite meaningful interpretation, is built from two signs of Haar [1]:

The complexity of calculating the feature as well as obtaining the pixel value remains O (1): the value of each subregion can be calculated by combining 4 values of the integral representation (Summed Area Table - SAT), which in turn can be built in advance once for the entire image as O (n ), where n is the number of pixels in the image, using the formula [2]:


This allowed us to create a fast object search algorithm, which has been a success for more than a decade. But back to our features. To determine class membership in each cascade, be the sum of the values of the weak classifiers of this cascade. Each weak classifier produces two values, depending on whether the value of the attribute belonging to this classifier is greater or less than the specified threshold. At the end, the sum of the values of the weak classifiers is compared with the cascade threshold and the decision is made whether the object is found or not by this cascade. Well, enough of the theory, let's move on to practice!
We have already given a link to the XML of our license plate classifier, which can be found in the opencv project wizard ( link ). Let's look at his first cascade:
<maxWeakCount>6</maxWeakCount> <stageThreshold>-1.3110191822052002e+000</stageThreshold> <weakClassifiers> <_> <internalNodes> 0 -1 193 1.0079263709485531e-002</internalNodes> <leafValues> -8.1339186429977417e-001 5.0277775526046753e-001</leafValues></_> <_> <internalNodes> 0 -1 94 -2.2060684859752655e-002</internalNodes> <leafValues> 7.9418992996215820e-001 -5.0896102190017700e-001</leafValues></_> <_> <internalNodes> 0 -1 18 -4.8777908086776733e-002</internalNodes> <leafValues> 7.1656656265258789e-001 -4.1640335321426392e-001</leafValues></_> <_> <internalNodes> 0 -1 35 1.0387318208813667e-002</internalNodes> <leafValues> 3.7618312239646912e-001 -8.5504144430160522e-001</leafValues></_> <_> <internalNodes> 0 -1 191 -9.4083719886839390e-004</internalNodes> <leafValues> 4.2658549547195435e-001 -5.7729166746139526e-001</leafValues></_> <_> <internalNodes> 0 -1 48 -8.2391249015927315e-003</internalNodes> <leafValues> 8.2346975803375244e-001 -3.7503159046173096e-001</leafValues></_></weakClassifiers> At first glance it seems that there are a lot of incomprehensible numbers and strange information, but in fact everything is simple: weakClassifiers - a set of weak classifiers, on the basis of which it is decided whether an object is in the image or not, internalNodes and leafValues are the parameters of a particular weak classifier. Deciphering internalNodes from left to right: in our case, the first two values are not used, the third is the feature number in the common feature table (it is located further in the XML file under the features tag), the fourth is the threshold value of the weak classifier. Since we use a classifier based on single-level decision trees ( decision stump ), if the value of the Haar attribute is less than the threshold of the weak classifier (the fourth value in internalNodes), the first leafValues value is chosen, if the second value is greater. Now let's draw the reaction of some classifiers of the first cascade:


In fact, all these signs are to some extent the most common border detectors. Based on this basis, a decision is made whether the cascade recognizes an object in the image or not.
The second important point in the Viola-Jones method is the use of a cascade model or a degenerate decision tree: at each node of the tree, using a cascade, a decision is made whether the image contains an object or not. If the object is not contained, the algorithm finishes its work, if it can be contained, then we proceed to the next node. Training is designed in such a way that at the initial levels with the lowest cost to throw away most of the windows that can not contain the object. In the case of face recognition, the first level contains only 2 weak classifiers, in the case of license plate recognition, it is 6 (considering that the latter contain up to 15). Well, for clarity, as the number recognition by level:
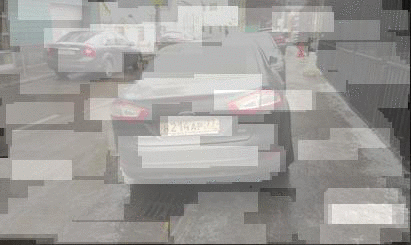
A more saturated tone shows the weight of the window relative to the level. The drawing was made on the basis of modified code of the opencv project from the 2.4 branch (the level statistics was added).
Implementation of recognition on the iOS platform


With the addition of opencv to a project, there are usually no problems, especially since there is a ready-made framework for iOS that supports all existing architectures (including a simulator). The function for finding objects is the same as in the project for Android ( link ):
detectMultiScale class cv::CascadeClassifier , it remains only to prepare the data for the input. Suppose we have a UIImage on which we need to find all the numbers. For the cascade, we need to do several things: first, shrink the image to 800px on the larger side (the larger the image, the more scales need to be considered, the number of windows that need to be viewed during the search also depends on the image size) from it a black and white analogue (the method operates only with brightness, in theory, this stage can be skipped, opencv can do it for us, but we will do it at the same time, and so we perform image manipulations), thirdly, to get binary data for transmission opencv. All these three things can be done in one move, by drawing our image with the correct parameters into context, like this: + (unsigned char *)planar8RawDataFromImage:(UIImage *)image size:(CGSize)size { const NSUInteger kBitsPerPixel = 8; CGColorSpaceRef colorSpace = CGColorSpaceCreateDeviceGray(); NSUInteger elementsCount = (NSUInteger)size.width * (NSUInteger)size.height; unsigned char *rawData = (unsigned char *)calloc(elementsCount, 1); NSUInteger bytesPerRow = (NSUInteger)size.width; CGContextRef context = CGBitmapContextCreate(rawData, size.width, size.height, kBitsPerPixel, bytesPerRow, colorSpace, kCGImageAlphaNone); CGColorSpaceRelease(colorSpace); UIGraphicsPushContext(context); CGContextTranslateCTM(context, 0.0f, size.height); CGContextScaleCTM(context, 1.0f, -1.0f); [image drawInRect:CGRectMake(0.0f, 0.0f, size.width, size.height)]; UIGraphicsPopContext(); CGContextRelease(context); return rawData; } Now you can safely create
cv::Mat from this buffer and pass it to the function by recognition. Next, we recalculate the position of the objects found in relation to the original image and cut out: CGSize imageSize = image.size; @autoreleasepool { for (std::vector<cv::Rect>::iterator it = plates.begin(); it != plates.end(); it++) { CGRect rectToCropFrom = CGRectMake(it->x * imageSize.width / imageSizeForCascade.width, it->y * imageSize.height / imageSizeForCascade.height, it->width * imageSize.width / imageSizeForCascade.width, it->height * imageSize.height / imageSizeForCascade.height); CGRect enlargedRect = [self enlargeRect:rectToCropFrom ratio:{.width = 1.2f, .height = 1.3f} constraints:{.left = 0.0f, .top = 0.0f, .right = imageSize.width, .bottom = imageSize.height}]; UIImage *croppedImage = [self cropImageFromImage:image withRect:enlargedRect]; [plateImages addObject:croppedImage]; } } If desired, the
RVPlateNumberExtractor class can be remade and used in any other project that requires the recognition of any other objects, not just numbers.Just in case I wanted to note that if you want to immediately open the recorded image from the disk through
imread , then iOS may have problems, because when photographing, iOS always records the image in the same orientation and adds rotation information to the EXIF, and opencv EXIF does not process when reading. You can get rid of this again by drawing to the context.Afterword
The entire source code of our fresh iOS application can be found on GitHub: link
There you can find a lot of useful things, for example, the already mentioned
RVPlateNumberExtractor class for cutting out numbers from a full-fledged image of pictures with numbers, as well as RVPlateNumber with a very simple interface that you can safely take into your projects if you need a number recognition service You will find there is something interesting for yourself. We also do not mind if someone wants to sip new functionality into the application or make a beautiful design!Application in the AppStore: link
At the request of workers, we also updated the android application : added a selection of saved numbers to send.
Bibliography
- P. Viola and M. Jones. Robust real-time face detection. IJCV 57 (2), 2004
- Lienhart R., Kuranov E., Pisarevsky V.: Empirical analysis of the cascades of boosted classifiers for rapid object detection. In: PRS 2003, pp. 297-304 (2003)
Source: https://habr.com/ru/post/228195/
All Articles