Office 365 Cloud Business Apps
In the previous section, we looked at creating apps for SharePoint Online using the built-in NAPA tool. In this article we will give a brief overview of another simple method - the O365 Cloud Business App project (also known as LightSwitch for SharePoint).
The LightSwitch development project, which appeared 3 years ago as part of Visual Studio, is aimed at quickly creating relatively simple applications using a predetermined scheme, which is a fairly common approach when programming most common business tasks. First, data sources are defined (SQL Server Express is used as the default source, although data can be taken from many places, including, for example, SQL Azure or the same SharePoint). The business logic for handling data is written using WCF and the Entity Framework. Graphic designers of entities, relationships between them, up to the visual design of requests, are widely used. In the next step, screen forms are designed to display the data. Initially, the client side was focused on Silverlight, regardless of whether the thick or browser (read IE) client version was developed. Starting from VS2012, LightSwitch supports HTML5 / JavaScript client-side development, including the client for the Windows 8 Modern UI. Also, C # and VB.NET are supported as a customization language for business logic, although, as they say in beautiful glossy flyers, LightSwitch is focused on solving tasks without writing any code manually, including non-professional users. by programmers. In the leaflets, of course, they write the truth. You just need to understand that in real life, life is not so glossy, and there are enough roughnesses in it, and on the contrary, miracles happen very little. In an amicable way, you still have to write the code. The value of LightSwitch is that, first, the code, as a rule, is required, really, a little, because it assumes the basic infrastructure binding and docking of components; secondly, for simple projects, it allows you to save effort by concentrating on the overall picture and business issues, which usually tends to slip away when you get stuck in coding.
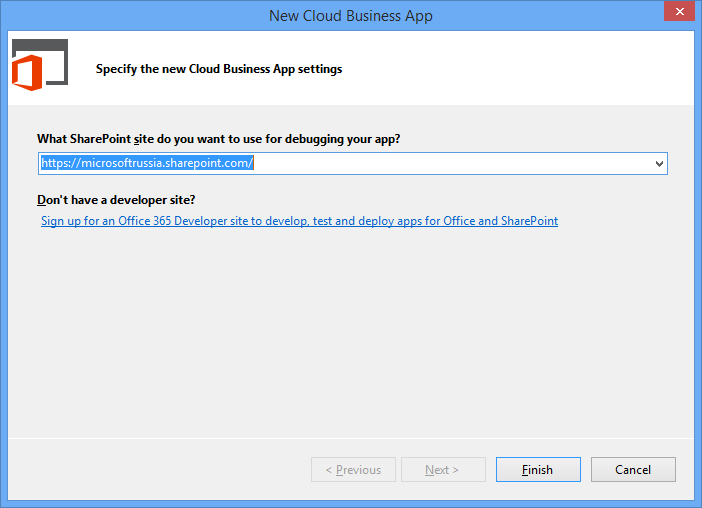
O365 Cloud Business App - the same LightSwitch, but applied to SharePoint. By its nature, this is a typical App for SharePoint (a new type of application, which appeared in SPS 2013, for more details, see the previous article ), where the client part is the LightSwitch HTML5 Client, and the business logic will be concentrated in the SharePoint components. Let's create a new project in Visual Studio: open templates for Visual C # (or Visual Basic), open the Office / SharePoint group, see three project templates in it: App for Office 2013, App for SharePoint 2013 and Cloud Business App, and click on it . You will immediately be prompted to specify a SharePoint site. In the course of the previous exercises, we created the Office365 Developer site, and I will point it out:
Pic1
')
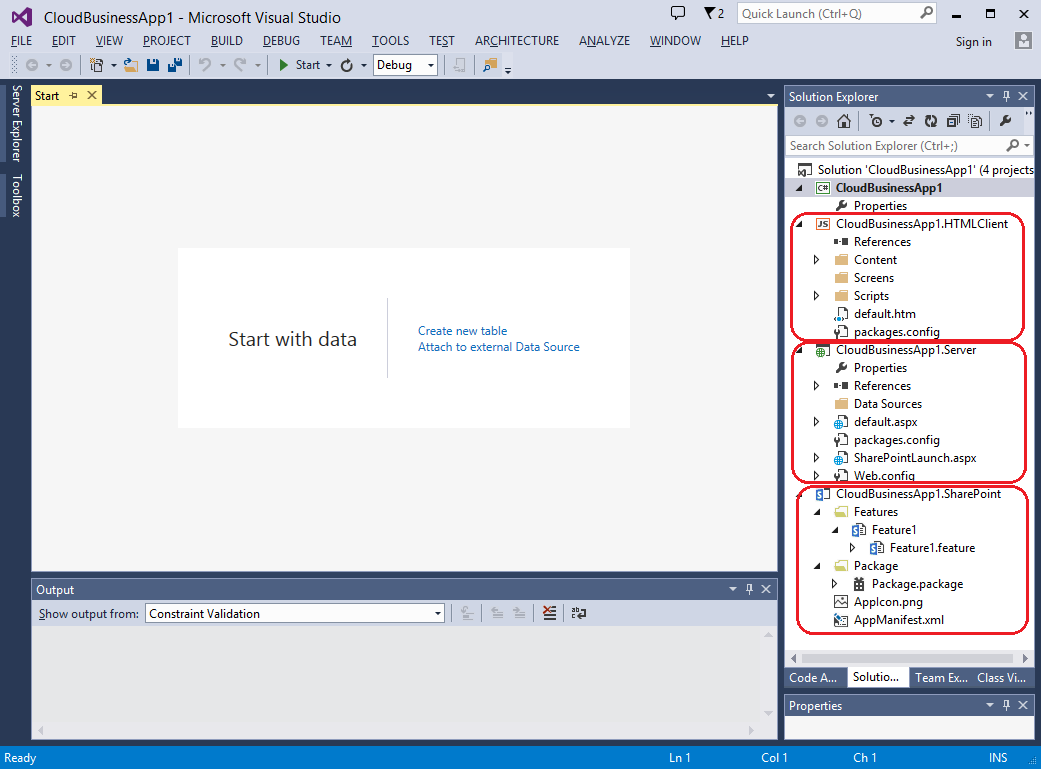
An empty project opens in which you can immediately see three characteristic blanks corresponding to the three levels of the LightSwitch application. In general, a typical business application, I would say. These are the data level (2), the business logic level (3) and the display level (1). Tsiferki - this is how they go to Solution Explorer. There is also a 0th project, which is a common manifesto for any App for SharePoint.
Pic2
Please note that, unlike App for SharePoint, we were not asked where we want to be hosted. The Cloud Business App is always created as povider-hosted. Open the manifest to verify this.
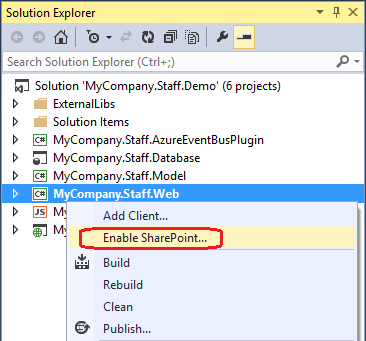
Consider how to integrate an existing solution into O365, and also add some SharePoint functionality to it. I have some conditional application that symbolizes the work of the support center, where each employee has a list of incidents that he leads, each with its own status. At the moment, this is a regular LightSwitch application without any SharePoint functionality. What was the matter? Add SharePoint integration to it:
Pic.3
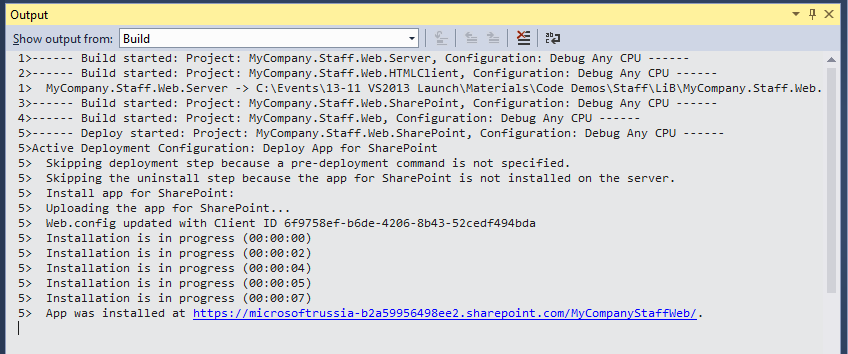
We start the decision. It is successfully installed on SharePoint:
Pic.4
And indeed, now you can see it on our portal:
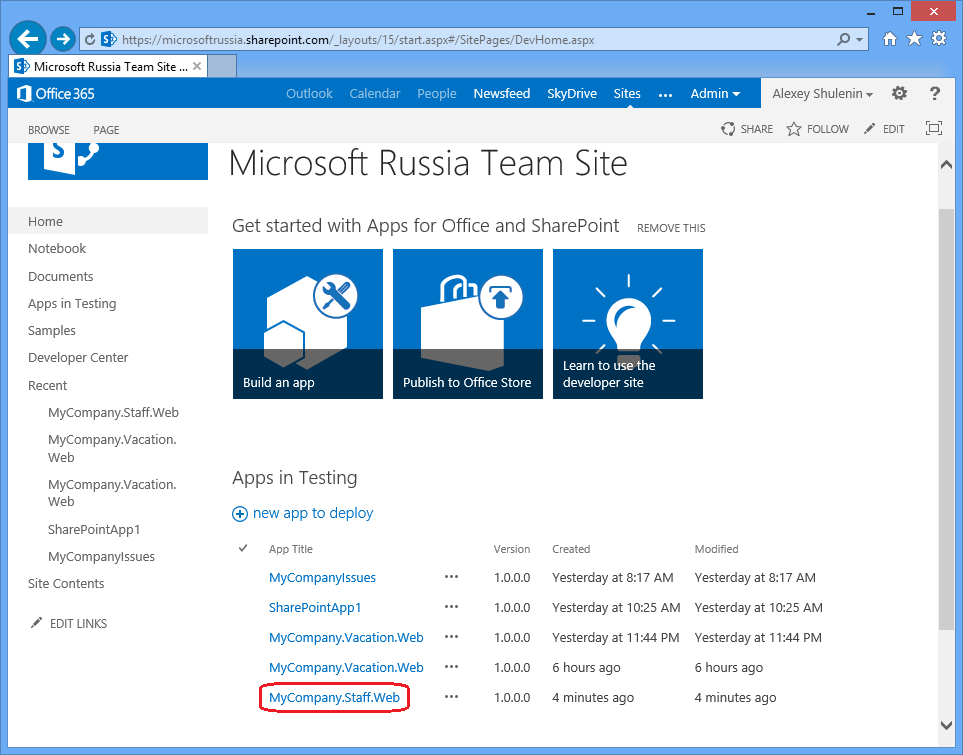
Pic.5
The application uses its own database, inherited from the original LightSwitch project. To mark the achieved integration with SharePoint, let's add a data source list. Now there will be little text and even less code, but many pictures, because the Cloud Business App, as we remember, allows an inexperienced user in programming to achieve a meaningful business application by minimal coding. Add a new SharePoint data source to the server component of the application:

Pic.6
We say that SharePoint will be the same and specify the desired list among the artifacts. We started this list in the previous section, when we created the NAPA application.

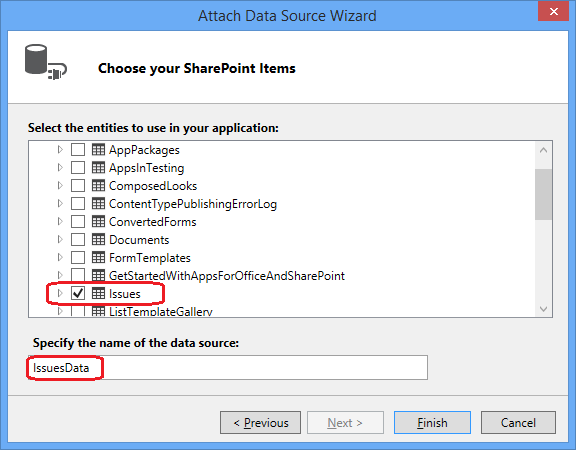
Fig.7
I forgot to say that our application uses SharePoint authentication to control access, as can be seen in the properties of a web project. It turned on automatically when we deactivated it for SharePoint (Figure 3).
So, employees are stored in a DB on a SQL Server, incidents - in the SharePoint list. Create a link between two data sources to bind incidents to an employee. The key field for the connection is the employee's email address, which, of course, is wrong from the point of view of relational theory, but will come down as an illustration of the idea.

Fig.8
Now you need to change the UI to show incidents. We go to the client project of the solution and slightly modify the ViewEmployeeDetails screen form by adding to it a display of data from the Issues source related to the current employee based on the link constructed above.
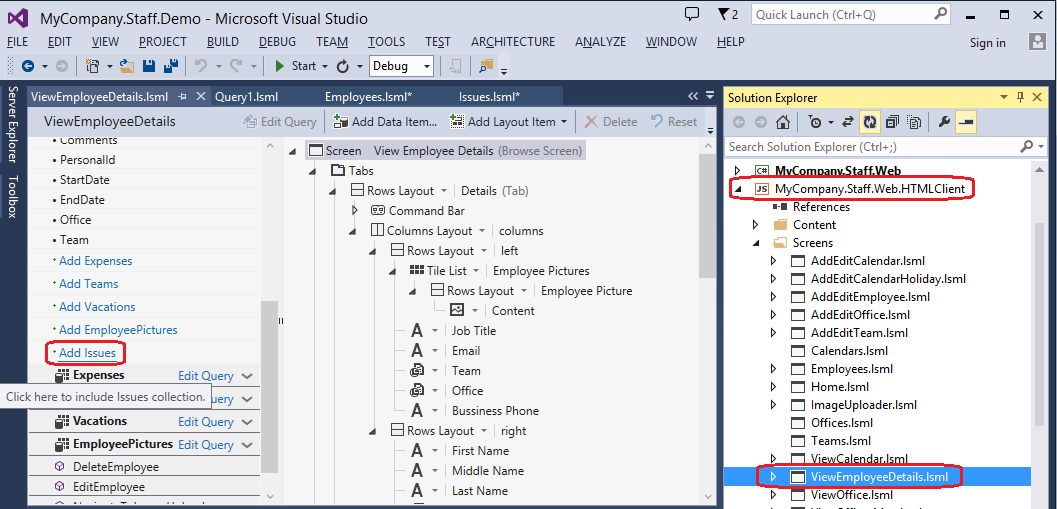
Fig.9
Add a new group's Layout to Tabs:
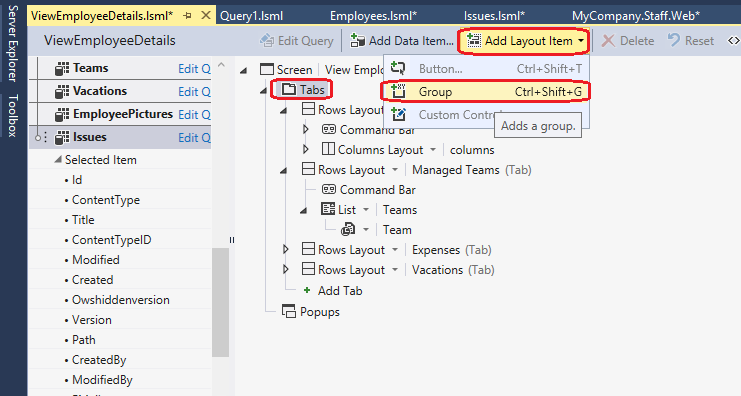
Pic.10
Add Issues to a new group:
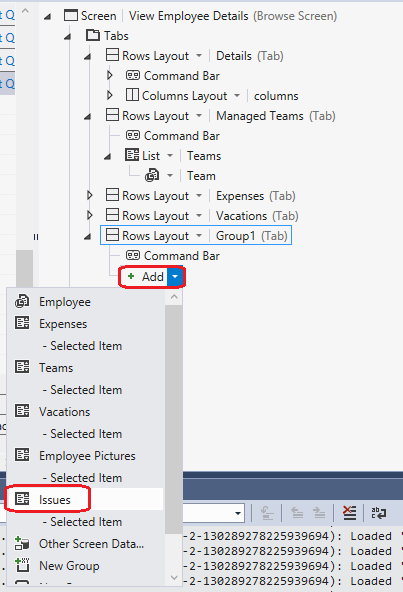
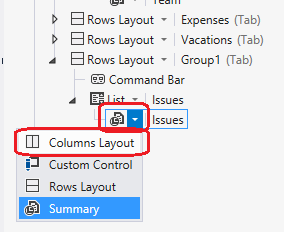
Figure 11
Then select the Columns Layout and delete the extra fields:
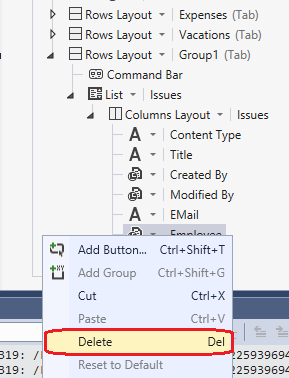
Fig.12
Add a new screen to edit incidents. You can see that in the properties of the List node (F4), as an action, when pressed it now stands None.
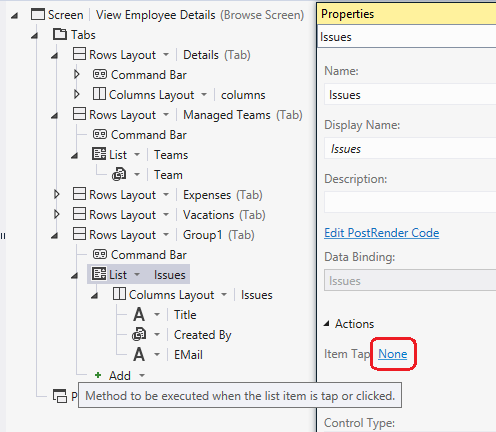
Fig.13
Click on None and select Choose an Executing Method = Issues -> editSelected, Navigate To = (New Screen ...)
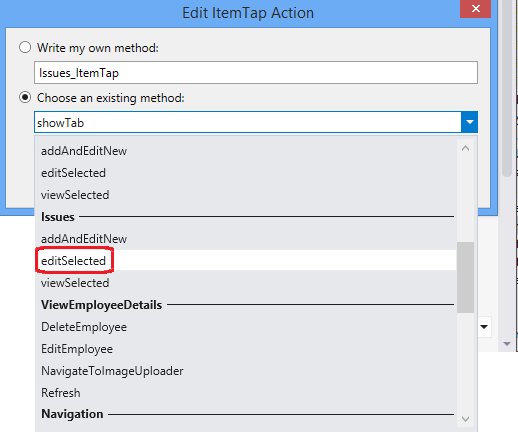
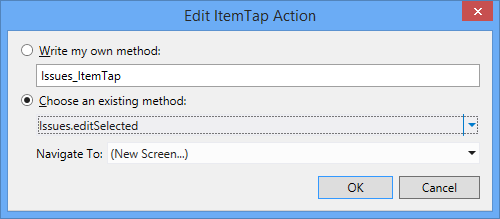
Fig.14
Edit the screen, removing the extra fields:
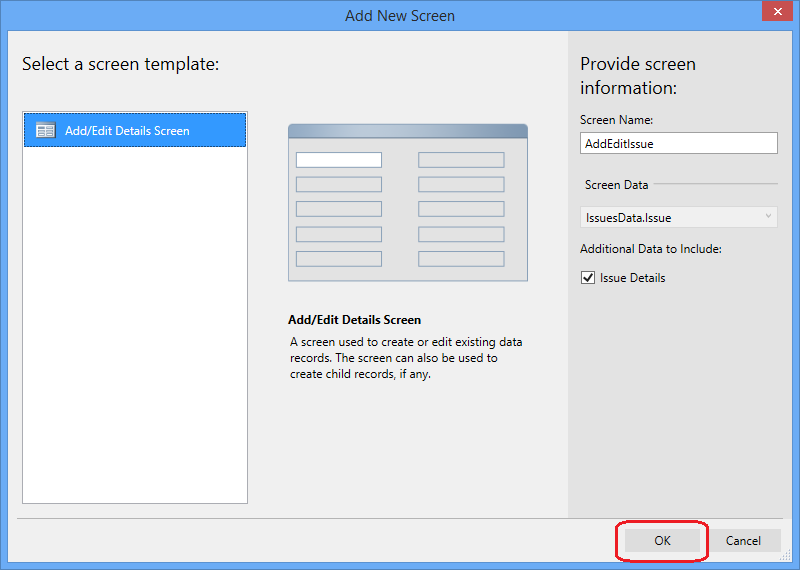

Fig.15
Run the application. We see that the new Tab-group is now displayed on the form. We fall into it and get a list of incidents, followed by the selected employee, as we filled it in Figure 8 of the previous article . A somewhat peculiar list of incidents, but in general, I hope, is understandable.
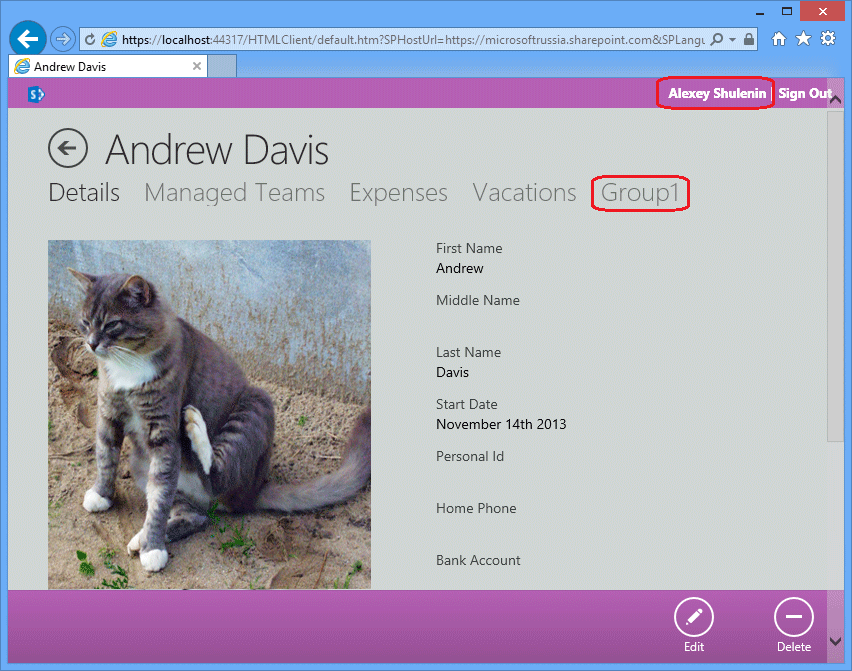
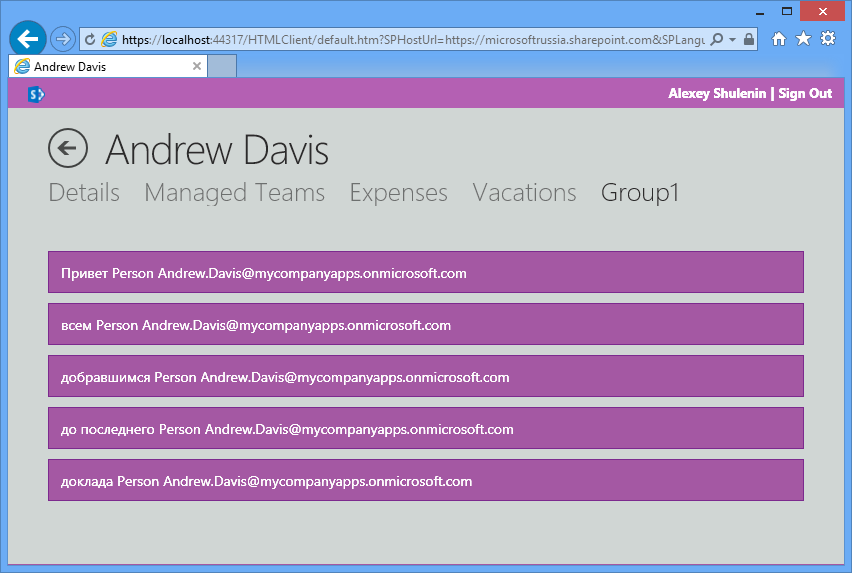
Figure 16
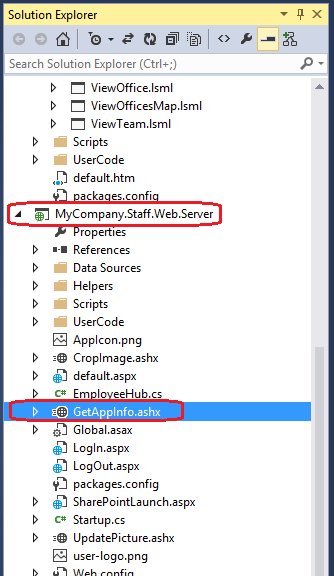
I tried to fulfill the advertising slogan and do without a single line of code. In fact, coming up formally, the custom code was present even in this simple solution, for example, to display the current user name in the top line:
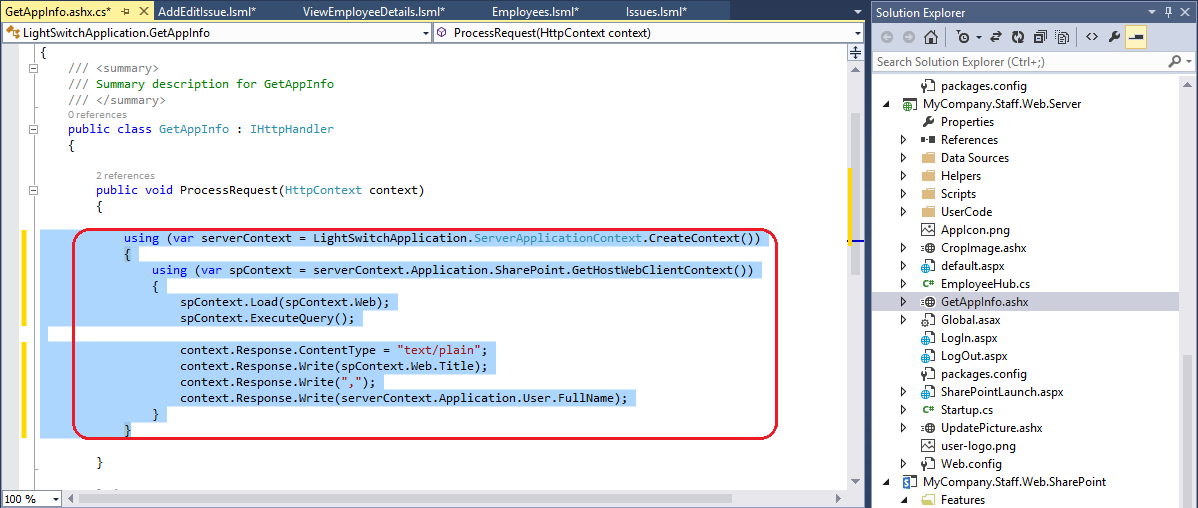
Pic.17
However, the minimum coding, as you understand, does not negate the convenience of the O365 Cloud Business App as a tool for the rapid development of typical simple business applications using portal technologies.
The LightSwitch development project, which appeared 3 years ago as part of Visual Studio, is aimed at quickly creating relatively simple applications using a predetermined scheme, which is a fairly common approach when programming most common business tasks. First, data sources are defined (SQL Server Express is used as the default source, although data can be taken from many places, including, for example, SQL Azure or the same SharePoint). The business logic for handling data is written using WCF and the Entity Framework. Graphic designers of entities, relationships between them, up to the visual design of requests, are widely used. In the next step, screen forms are designed to display the data. Initially, the client side was focused on Silverlight, regardless of whether the thick or browser (read IE) client version was developed. Starting from VS2012, LightSwitch supports HTML5 / JavaScript client-side development, including the client for the Windows 8 Modern UI. Also, C # and VB.NET are supported as a customization language for business logic, although, as they say in beautiful glossy flyers, LightSwitch is focused on solving tasks without writing any code manually, including non-professional users. by programmers. In the leaflets, of course, they write the truth. You just need to understand that in real life, life is not so glossy, and there are enough roughnesses in it, and on the contrary, miracles happen very little. In an amicable way, you still have to write the code. The value of LightSwitch is that, first, the code, as a rule, is required, really, a little, because it assumes the basic infrastructure binding and docking of components; secondly, for simple projects, it allows you to save effort by concentrating on the overall picture and business issues, which usually tends to slip away when you get stuck in coding.
O365 Cloud Business App - the same LightSwitch, but applied to SharePoint. By its nature, this is a typical App for SharePoint (a new type of application, which appeared in SPS 2013, for more details, see the previous article ), where the client part is the LightSwitch HTML5 Client, and the business logic will be concentrated in the SharePoint components. Let's create a new project in Visual Studio: open templates for Visual C # (or Visual Basic), open the Office / SharePoint group, see three project templates in it: App for Office 2013, App for SharePoint 2013 and Cloud Business App, and click on it . You will immediately be prompted to specify a SharePoint site. In the course of the previous exercises, we created the Office365 Developer site, and I will point it out:
Pic1
')
An empty project opens in which you can immediately see three characteristic blanks corresponding to the three levels of the LightSwitch application. In general, a typical business application, I would say. These are the data level (2), the business logic level (3) and the display level (1). Tsiferki - this is how they go to Solution Explorer. There is also a 0th project, which is a common manifesto for any App for SharePoint.
Pic2
Please note that, unlike App for SharePoint, we were not asked where we want to be hosted. The Cloud Business App is always created as povider-hosted. Open the manifest to verify this.
Consider how to integrate an existing solution into O365, and also add some SharePoint functionality to it. I have some conditional application that symbolizes the work of the support center, where each employee has a list of incidents that he leads, each with its own status. At the moment, this is a regular LightSwitch application without any SharePoint functionality. What was the matter? Add SharePoint integration to it:
Pic.3
We start the decision. It is successfully installed on SharePoint:
Pic.4
And indeed, now you can see it on our portal:
Pic.5
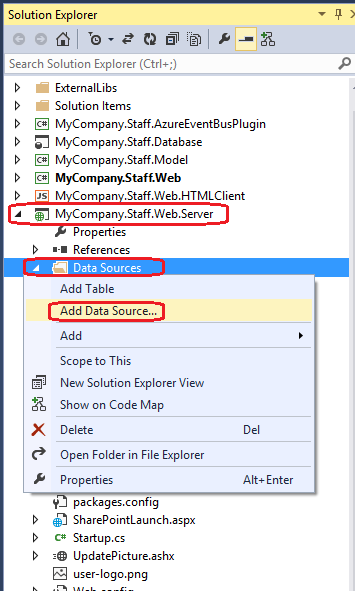
The application uses its own database, inherited from the original LightSwitch project. To mark the achieved integration with SharePoint, let's add a data source list. Now there will be little text and even less code, but many pictures, because the Cloud Business App, as we remember, allows an inexperienced user in programming to achieve a meaningful business application by minimal coding. Add a new SharePoint data source to the server component of the application:
Pic.6
We say that SharePoint will be the same and specify the desired list among the artifacts. We started this list in the previous section, when we created the NAPA application.
Fig.7
I forgot to say that our application uses SharePoint authentication to control access, as can be seen in the properties of a web project. It turned on automatically when we deactivated it for SharePoint (Figure 3).
So, employees are stored in a DB on a SQL Server, incidents - in the SharePoint list. Create a link between two data sources to bind incidents to an employee. The key field for the connection is the employee's email address, which, of course, is wrong from the point of view of relational theory, but will come down as an illustration of the idea.
Fig.8
Now you need to change the UI to show incidents. We go to the client project of the solution and slightly modify the ViewEmployeeDetails screen form by adding to it a display of data from the Issues source related to the current employee based on the link constructed above.
Fig.9
Add a new group's Layout to Tabs:
Pic.10
Add Issues to a new group:
Figure 11
Then select the Columns Layout and delete the extra fields:
Fig.12
Add a new screen to edit incidents. You can see that in the properties of the List node (F4), as an action, when pressed it now stands None.
Fig.13
Click on None and select Choose an Executing Method = Issues -> editSelected, Navigate To = (New Screen ...)
Fig.14
Edit the screen, removing the extra fields:
Fig.15
Run the application. We see that the new Tab-group is now displayed on the form. We fall into it and get a list of incidents, followed by the selected employee, as we filled it in Figure 8 of the previous article . A somewhat peculiar list of incidents, but in general, I hope, is understandable.
Figure 16
I tried to fulfill the advertising slogan and do without a single line of code. In fact, coming up formally, the custom code was present even in this simple solution, for example, to display the current user name in the top line:
Pic.17
However, the minimum coding, as you understand, does not negate the convenience of the O365 Cloud Business App as a tool for the rapid development of typical simple business applications using portal technologies.
Source: https://habr.com/ru/post/228149/
All Articles