Develop mobile javascript MVC applications with Framework7, RequireJS and Handlebars
 Recently, I was faced with the task of developing an IPhone and Android application. I had no previous development experience under iOS, and I wanted to write once and run it on both platforms. Accordingly, Javascript and PhoneGap were selected.
And if I decided on the language relatively quickly, then there were many more questions.
I wanted to do that the application would repeat the IOS7 interface as much as possible and it was similar to native in speed. At the same time, on the one hand, there was no desire to use "monsters", like dojo or jquery mobile. on the other hand, I wanted to get a convenient modular MVC structure of the application.
As a result, in the final of my personal comparison came out:
- Ionic framework: http://ionicframework.com/
- Framework7: http://www.idangero.us/framework7/
Ionik first liked the documentation, simple examples, and the familiar code structure of AngularJs. But after the first attempts to create an application came disappointment. Launched a simple application on the Iphone5 braked. When you click on the buttons or navigation was visually noticeable delay between pressing and triggering. On the similarity of 300ms delay when clicking. But according to the creators of their framework, the framework contains its own implementation of the fastclick library ... Strange. Also, even in a simple application, there were sometimes noticeable slowdowns in the animation. In the end, after a couple of days of reading the documentation and test cases, I realized that I had to look for something else.
')
Then I went back to Framework7. I launched test applications, looked at the components in the kitchen sink, and initially experienced the wow effect. On the iPhone, everything works quickly, beautifully and is very similar to native. At the same time I ran into two rather big disadvantages:
- At that time there was almost no documentation. Now it is already there, quite detailed ( http://www.idangero.us/framework7/docs/ ).
- In all examples, the code was in one file sheet in jquery-like format. At the same time there was no modularity, loading templates from individual files, etc.
In general, I pulled up my theoretical knowledge, looked at various articles and examples and was able to solve for myself the task of combining Framework7 and the modular MVC approach for creating mobile applications. I used RequireJs for the implementation of asynchronous module loading, Handlebars for templates.
Accordingly, I created a couple of educational examples and now I want to share them with the community. I hope they will be useful, both for novice developers and more experienced ones, who still do not know about this framework.
Getting started
For work we need the following libraries:
- Framework7
- Handlebars - required for templates
- RequireJS - asynchronous module loading
- Additional plugins for RequireJs for loading templates:
- And I also want to introduce you to a wonderful library of icons - ionicons http://ionicons.com/
Project structure

Let's create the following structure of the project files (we will leave the index.html and app.js files empty for now)
To simplify your life - you can download the archive with the structure at this link:
Dropbox
(The first versions of the index.html and app.js files are already filled in this archive)
I also immediately give a link to the source code on Github - there is the latest version along with a step-by-step history of edits - the creation of this test application:
https://github.com/philipshurpik/Framework7-MVC-base
Let's create the simplest index.html file in which we include all the necessary libraries:
<!DOCTYPE html> <html class="with-statusbar-overlay"> <head> <meta charset="utf-8"> <meta name="viewport" content="width=device-width, initial-scale=1, maximum-scale=1, minimum-scale=1, user-scalable=no, minimal-ui"> <meta name="apple-mobile-web-app-capable" content="yes"> <meta name="apple-mobile-web-app-status-bar-style" content="black-translucent"> <title>F7 Contacts MVC</title> <link rel="stylesheet" href="lib/css/framework7.css"> <link rel="stylesheet" href="lib/css/ionicons.css"> <link rel="stylesheet" href="css/app.css"> </head> <body> <div class="statusbar-overlay"></div> <div class="views"> <div class="view view-main navbar-fixed"> <div class="navbar"> <div class="navbar-inner"> <div class="left"></div> <div class="center" style="left:22px">Contacts</div> <div class="right"> <a href="contact.html" class="link icon-only"><i class="icon icon-plus">+</i></a> </div> </div> </div> <div class="pages"> <div data-page="list" class="page"> <div class="page-content"> <div class="list-block contacts-list"> <ul> <a href="contact.html" class="item-link item-content"> <div class="item-media"><i class="icon ion-ios7-person"></i></div> <div class="item-inner"> <div class="item-title">Andrey Smirnov</div> </div> </a> <a href="contact.html?id={{id}}" class="item-link item-content"> <div class="item-media"><i class="icon ion-ios7-person"></i></div> <div class="item-inner"> <div class="item-title">Olga Kot</div> </div> </a> </ul> </div> </div> </div> </div> </div> </div> </body> </html> <script type="text/javascript" src="lib/framework7.js"></script> <script type="text/javascript" src="app.js"></script> Also in the app.js file we place the application initialization:
var f7 = new Framework7({ modalTitle: 'F7-MVC-Base', animateNavBackIcon: true }); var mainView = f7.addView('.view-main', { dynamicNavbar: true }); Run and get the following image:
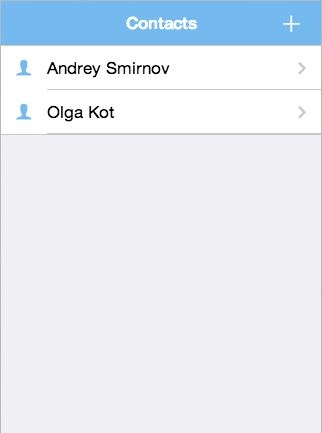
Here it is. We have the first page and there is even something more on it than the hello-world.
Yes, if someone does not know. In Devtools Chrome, next to the console, there is an Emulation tab, where you can select the device you need and see how the app will look like on the screen of this device.
We connect RequireJs and Handlebars, we load contacts
Now we need to dynamically load contacts (for example, from localstorage) and display them in the list.
To do this, change our files:
1. index.html
Let's replace the direct connection of our app.js file to the connection Require.Js
<script data-main="app" src="lib/require.js"></script> The data-main attribute points to the entry point to the application (this is our app.js file) &You can also delete what is inside the ul tags — the interior of the list will be generated using a template.
2. app.js
Rewrite our file in the RequireJs module:
define('app', ['js/list/listController'], function(listController) { var f7 = new Framework7({ modalTitle: 'F7-MVC-Base', animateNavBackIcon: true }); var mainView = f7.addView('.view-main', { dynamicNavbar: true }); listController.init(); return { f7: f7, mainView: mainView }; }); All the same, only wrapped in the module + added the download of our first controller, which is not yet available.
Main page: controller, view, element template
Now we need to create a controller for the main page, its presentation, as well as the handlebars template.
I propose to name and place the files as follows:
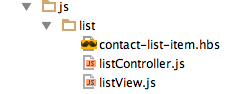
Yes, such a grouping - by functionality - seems to me much more convenient in projects than placing views, models, controllers in different directories.
Create a simple controller for the list. And in it we immediately initialize our localstorage with several contact objects:
File: js / list / listController.js
define(["js/list/listView"], function(ListView) { function init() { var contacts = loadContacts(); ListView.render({ model: contacts }); } function loadContacts() { var f7Base = localStorage.getItem("f7Base"); var contacts = f7Base ? JSON.parse(f7Base) : tempInitializeStorage(); return contacts; } function tempInitializeStorage() { var contacts = [ {id: "1", firstName: "Alex", lastName: "Black", phone: "+380501234567" }, {id: "2", firstName: "Kate", lastName: "White", phone: "+380507654321" } ]; localStorage.setItem("f7Base", JSON.stringify(contacts)); return JSON.parse(localStorage.getItem("f7Base")); } return { init: init }; }); Now we also need to add a view that will be responsible for rendering our data (which we transmit when it is initialized) using the template.
File: js / list / listView.js
define(['hbs!js/list/contact-list-item'], function(template) { var $ = Framework7.$; function render(params) { $('.contacts-list ul').html(template(params.model)); } return { render: render }; }); And also the code of our simple template:
File: js / list / contact-list-item.hbs
{{#.}} <a href="contact.html?id={{id}}" class="item-link item-content"> <div class="item-media"><i class="icon ion-ios7-person"></i></div> <div class="item-inner"> <div class="item-title">{{firstName}} {{lastName}}</div> </div> </a> {{/.}} We start - and we get - everything is the same, but modular and much more expandable.
Now we need to add a page to view and edit the contact.
Navigation between pages in Framework7
Each page is placed in a separate html file.
The page is contained within a div c class = ”page”
<div class="page" data-page="list"> The data-page attribute defines a unique page name that we will need in the future for routing.
All visual elements of the page must be placed inside:
<div class="page-content"> <div class="page"> Navigation between pages is carried out or by clicking on the html link:
<a href="about.html">Go to About page</a> From js code: app.mainView.loadPage('about.html'); Navigation back (along with animation) is similar:
Or by adding the class back to the link:
<a href="index.html" class="back"> Go back to home page </a> Or from js code: app.mainView.goBack(); When switching between pages, Framework7 generates events to which you can subscribe:
PageBeforeInit, PageInit, PageBeforeAnimation, PageAfterAnimation, PageBeforeRemove
Full information about the pages and events here:
http://www.idangero.us/framework7/docs/pages.html
http://www.idangero.us/framework7/docs/ linking-pages.html
Create router.js
We use the event that occurs after inserting a new page into the DOM - PageBeforeInit.
Create a simple router (file router.js) and put it in the js folder, where we subscribe to the occurrence of the pageBeforeInit event:
define(function() { var $ = Framework7.$; function init() { $(document).on('pageBeforeInit', function (e) { var page = e.detail.page; load(page.name, page.query); }); } function load(controllerName, query) { require(['js/' + controllerName + '/'+ controllerName + 'Controller'], function(controller) { controller.init(query); }); } return { init: init, load: load }; }); When an event triggers, we use Require to load the controller module we need and initialize it, passing the request parameters with which the page was opened to it.
We will also remake the app.js module, add the router initialization to it and remove the controller connection and initialization:
define('app', ['js/router'], function(Router) { Router.init(); var f7 = new Framework7({ modalTitle: 'F7-MVC-Base', animateNavBackIcon: true }); var mainView = f7.addView('.view-main', { dynamicNavbar: true }); return { f7: f7, mainView: mainView, router: router }; }); Now when you first load the application, after inserting the main page into the DOM, the pageBeforeInit event handler will trigger.
At the same time, its e.detail.page.name property will be equal to the list, that is, what was specified here in the data-page property: The corresponding controller will be launched accordingly.
Contact Edit Page
Next you need to create a page to add and edit a contact.
Add the contact.html file to the root of the html project (if you downloaded the file structure from the archive, then it should already be there)
The corresponding links to contact.html have already been added earlier in the navbar of the main page and in the template elements of the contact list.
<div class="navbar"> <div class="navbar-inner"> <div class="left sliding"> <a href="#" class="back link"> <i class="icon icon-back-white"></i> <span>Back</span> </a> </div> <div class="center contacts-header"></div> <div class="right contact-save-link"> <a href="#" class="link"> <span>Save</span> </a> </div> </div> </div> <div class="pages"> <div data-page="contact" class="page contact-page"> </div> </div> Now when you click on the list item or the add button - the router tries to load the js / contact / contactController file.
Accordingly, we need to create it, the page view, as well as the page content template. Like this:

Contents of the contactController.js file:
define(["app","js/contact/contactView"], function(app, ContactView) { var state = {isNew: false}; var contact = null; function init(query){ if (query && query.id) { var contacts = JSON.parse(localStorage.getItem("f7Base")); for (var i = 0; i< contacts.length; i++) { if (contacts[i].id === query.id) { contact = contacts[i]; state.isNew = false; break; } } } else { contact = { id: Math.floor((Math.random() * 100000) + 5).toString()}; state.isNew = true; } ContactView.render({ model: contact, state: state }); } return { init: init }; }); If the page is in edit mode (the query contains the contact id value, then we get it from localStorage.
If not, create a new one. So far, for simplicity, we do not use models, so our contact is just an object.
Also, the viewView.js view page:
define(['hbs!js/contact/contact'], function(viewTemplate) { var $ = Framework7.$; function render(params) { $('.contact-page').html(viewTemplate({ model: params.model })); $('.contacts-header').text(params.state.isNew ? "New contact" : "Contact"); } return { render: render } }); And the contact.hbs template:
<div class="page-content"> <form id="contactEdit" class="list-block"> <ul> <input name="id" type="hidden" value="{{model.id}}"> <li> <div class="item-content"> <div class="item-media"><i class="icon ion-ios7-football-outline"></i></div> <div class="item-inner"> <div class="item-input"> <input name="firstName" type="text" placeholder="First name" value="{{model.firstName}}"> </div> </div> </div> </li> <li> <div class="item-content"> <div class="item-media"><i class="icon ion-ios7-football-outline"></i></div> <div class="item-inner"> <div class="item-input"> <input name="lastName" type="text" placeholder="Last name" value="{{model.lastName}}"> </div> </div> </div> </li> <li> <div class="item-content"> <div class="item-media"><i class="icon ion-ios7-telephone-outline"></i></div> <div class="item-inner"> <div class="item-input"> <input name="phone" type="tel" placeholder="Phone" value="{{model.phone}}"> </div> </div> </div> </li> </ul> </form> </div> Well then. Now we can open our page for adding or editing a contact:

It remains to add the ability to save and delete contacts.
Start by saving.
Saving contacts
To begin, add a button handler to save.
Of course, you can do it immediately directly in the controller like this:
$('.contact-save-link').on('click', function() { // some code here }); But doing so is not good, and it is better to separate work from the DOM and work with data and models.
Therefore, we divide the event processing subscription and the processing itself.
In the controller we will make an array of bindings:
var bindings = [{ element: '.contact-save-link', event: 'click', handler: saveContact }]; Pass this array as one of the properties of the params object into the view.
And add a handler function:
function saveContact() { // some code here } And in the view, add a subscription to events on this configuration - the bindEvents function:
function bindEvents(bindings) { for (var i in bindings) { $(bindings[i].element).on(bindings[i].event, bindings[i].handler); } } And calling it from the render function:
bindEvents(params.bindings); Now you need to get the data value entered in the form:
We do this in the saveContact function:
function saveContact() { var contacts = JSON.parse(localStorage.getItem("f7Base")) var newContact = app.f7.formToJSON('#contactEdit'); if (state.isNew) { contacts.push(newContact) } else { for (var i = 0; i< contacts.length; i++) { if (contacts[i].id === newContact.id) { contacts[i] = newContact; break; } } } localStorage.setItem("f7Base", JSON.stringify(contacts)); app.router.load('list'); app.mainView.goBack(); } We also store the received data immediately in localStorage.
The last two lines are responsible for returning to the previous page (list), as well as reloading data in a listController.
Now everything works with us!
Creating a model:
But to operate with all the data in the controller is not very good. In addition, it is sometimes necessary to add special functions — for example, data validation.
Therefore we will make a model in the js / contactModel.js file
For one thing, add to it the function of validation, as well as setting values from another object.
define(['app'],function(app) { function Contact(values) { values = values || {}; this.id = values['id'] || Math.floor((Math.random() * 100000) + 5).toString(); this.firstName = values['firstName'] || ''; this.lastName = values['lastName'] || ''; this.phone = values['phone'] || ''; } Contact.prototype.setValues = function(formInput) { for(var field in formInput){ if (this[field] !== undefined) { this[field] = formInput[field]; } } }; Contact.prototype.validate = function() { var result = true; if (!this.firstName && !this.lastName) { result = false; } return result; }; return Contact; }); Note that functions are added not to the object itself, but to its prototype. Accordingly, when transferring or saving an object in JSON, only its properties are transferred, without functions.
Now connect the model to contactController:
Add to the list of dependencies:
define(["app","js/contact/contactView", "js/contactModel"], function(app, ContactView, Contact) Let's change the assignment and creation of a contact in the init function accordingly:
contact = new Contact(contacts[i]); and
contact = new Contact(); And we modify the save function by adding the launch of model validation:
function saveContact() { var formInput = app.f7.formToJSON('#contactEdit'); contact.setValues(formInput); if (!contact.validate()) { app.f7.alert("First name and last name are empty"); return; } var contacts = JSON.parse(localStorage.getItem("f7Base")); if (state.isNew) { contacts.push(contact); } else { for (var i = 0; i< contacts.length; i++) { if (contacts[i].id === contact.id) { contacts[i] = contact; break; } } } localStorage.setItem("f7Base", JSON.stringify(contacts)); app.mainView.goBack(); app.router.load('list'); } The save is done.
Swipe to delete
It remains to add a delete from the list of contacts.
We do this with the Swipe To Delete gesture in the list.
Modify the markup of the template elements:
{{#.}} <li id="{{id}}" class="swipeout"> <a href="contact.html?id={{id}}" class="item-link item-content swipeout-content"> <div class="item-media"><i class="icon ion-ios7-person"></i></div> <div class="item-inner"> <div class="item-title">{{firstName}} {{lastName}}</div> </div> </a> <div class="swipeout-actions"> <div class="swipeout-actions-inner"> <a href="#" class="swipeout-delete">Delete</a> </div> </div> </li> {{/.}} Add to the listController event subscription:
var bindings = [{ element: '.swipeout', event: 'deleted', handler: itemDeleted }]; And then we will do it by analogy with a subscription in contacts - we will transfer it to the submission and there we will subscribe in the bindEvents (bindings) function
And also add a delete event handler:
function itemDeleted(e) { var id = e.srcElement.id; var contacts = JSON.parse(localStorage.getItem("f7Base")); for (var i = 0; i < contacts.length; i++) { if (contacts[i].id === id) { contacts.splice(i, 1); } } localStorage.setItem("f7Base", JSON.stringify(contacts)); } We look at the result:


Conclusion
We have completed a very simple mobile MVC application using Framework7.
And Framework7 itself, in conjunction with Phonegap, allows you to create beautiful native-like applications primarily for iOS. What can be useful for developers who are new to ObjectiveC.
In this case, we immediately get a cross-platform application that works perfectly and smoothly on Android 4.4 (and most likely should also work on the next versions).
For normal support of inexpensive Android devices on previous versions of Android, it is enough to turn off the animation between the pages in order to get an acceptable UI speed as well.
Sources of the project along with a consistent history of edits are available here:
https://github.com/philipshurpik/Framework7-MVC-base
I also made an advanced training example of the contacts application, which has more features and uses more features of Framework7. It added the left pull-down menu bar, popup editing, search bar, etc.
Its source is here:
https://github.com/philipshurpik/Framework7-Contacts7-MVC
Here are the screenshots (with cats):

I hope these examples will be useful to you.
I myself studied on similar ones, so I decided to create this article.
I will be glad to answer questions.
P.S. The author of the given framework vladimirkharlampidi is not yet available on the habr, but if the habrovchan is interested in this topic, I think he will also be happy to accept the invite and join the discussion.
P.P.S. I also did a little research on the speed of work on Android, especially on older versions and uploaded to the repository in app.css the hacks for optimizing css animations. Perhaps some of them will be included in future versions of the framework. Well, maybe someone will be useful for their applications.
Source: https://habr.com/ru/post/227853/
All Articles