Configuring OpenVPN in the Mikrotik / Ubuntu bundle
In any company where there is more than one office, sooner or later there is a need to merge these same offices. Many providers offer such services, but they will ask for money for it, and who knows what is going on there on the side of the provider? Therefore, we will do everything ourselves, and consider the option of combining using Mikrotik RB750, Ubuntu and OpenVPN.
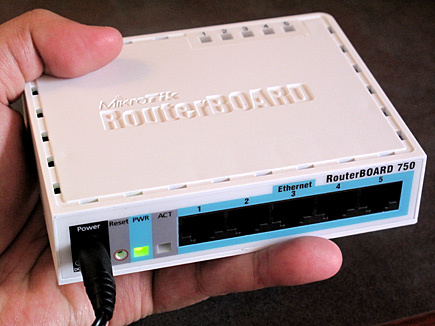
The point is native support, ease of setup, more stable behavior, low (by comparison) pings and many other nice features that the RB750 provides. Third-party firmware like tomato or dd-wrt were excluded from consideration, because there were (and still are) doubts about their stability. Asus WL-520GU was also tested, but pings were 20-30 ms higher.
')
On the server in the central office, is Ubuntu. Installing openvpn on it looks like this.
All the nuances of the settings were contained in the openvpn configuration file on the server; as a result, it turned out to be like this (commented only on essential points, the description of the rest of the config parameters is in mana, internet, example configs, etc.):
I will describe the setting from the very beginning, including the organization of the switch, the setting of addresses, routes, DHCP and so on.
Go to the web interface of the router, download winbox.
We launch winbox (it is possible to connect both via IP and MAC), open the new terminal, and write the following (achtung, reset the configuration of the router):
Connect to the second port of the mikrotik, run the same winbox, and on the request that appears, click
We organize a switch on ports 2-5, port 1 will act as a WAN port.
For this, for all interfaces 3-5 we specify the ether2 master port:

In the IP-> Adresses menu, assign an ip lan interface
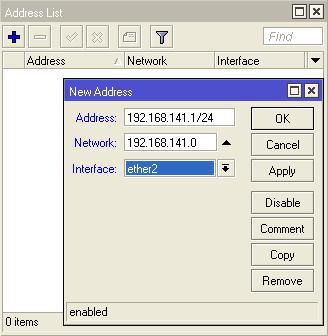
Add a gate to go to the Internet in the menu IP-> Routes (in this particular case, the gate is a DSL modem with the address 10.100.0.1)

Note that 10.100.0.0 is the addressing between the router and the DSL modem through which it goes to the Internet, and 10.0.141.0 is the VPN network.
You can configure the DNS here IP-> DNS, and DHCP in the menu IP-> DHCP Server-> DHCP setup, specifying the parameters of the pool.
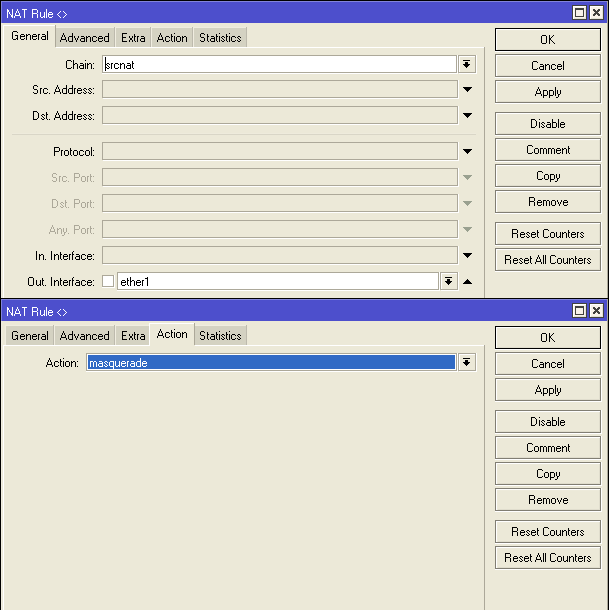
All of our internal subnet push for NAT, for this we set up masquerading.
Go IP-> Firewall-> NAT and add a rule by analogy:
It remains to copy the root certificate (ca.crt) and the client certificate and key (client1.crt, client1.key), which we generated during the server installation / configuration process. On the microtic we select the Files menu, and we see a window with the file system of the router. This is where you need to put our keys, it works drag-n-drop.
In order for the router to know if it has certificates, you need to import them via System-> Certifates, add ca.crt, client1.crt, client1.key, the client key will automatically become “Decrypted”.
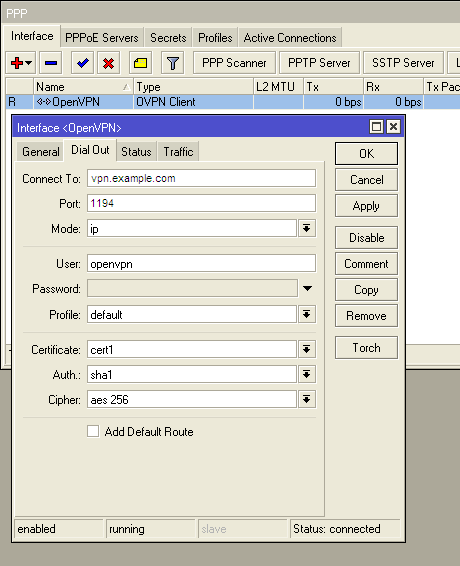
Directly, the OpenVPN connection is created in the Interfaces menu, when you click on the red plus you will see the OVPN Client in the drop-down list.
On the Dial Out tab, we indicate the address of our server, port, client certificate and types of encryption.
As a result, we have quite a secure VPN, with minimal costs for equipment and communication services, which can be organized within a couple of minutes.
Why Mikrotik?
The point is native support, ease of setup, more stable behavior, low (by comparison) pings and many other nice features that the RB750 provides. Third-party firmware like tomato or dd-wrt were excluded from consideration, because there were (and still are) doubts about their stability. Asus WL-520GU was also tested, but pings were 20-30 ms higher.
')
So let's go.
On the server in the central office, is Ubuntu. Installing openvpn on it looks like this.
$ sudo su # apt-get update # apt-get upgrade # apt-get install openvpn # cp -R /usr/share/doc/openvpn/examples/easy-rsa/ /etc/openvpn # cd /etc/openvpn/easy-rsa/2.0 # ln -s openssl-1.0.0.cnf openssl.cnf # source vars # ./clean-all ca.crt ca.key # ./build-ca server.crt server.key # ./build-key-server server client1.crt client1.key # ./build-key client1 # ./build-dh # cd keys # mkdir /etc/openvpn/.keys && /etc/openvpn/.ccd # cp ca.crt ca.key dh1024.pem server.crt server.key /etc/openvpn/keys # cp /usr/share/doc/openvpn/examples/sample-config-files/server.conf.gz /etc/openvpn/ # cd /etc/openvpn # gunzip -d /etc/openvpn/server.conf.gz # nano /etc/sysctl.conf : # Enable packet forwarding net.ipv4.ip_forward=1 All the nuances of the settings were contained in the openvpn configuration file on the server; as a result, it turned out to be like this (commented only on essential points, the description of the rest of the config parameters is in mana, internet, example configs, etc.):
port 1194 # Mikrotik UDP proto tcp dev tun ca .keys/ca.crt cert .keys/server.crt key .keys/server.key # This file should be kept secret dh .keys/dh1024.pem server 10.0.141.0 255.255.255.0 client-config-dir .ccd client-to-client keepalive 10 120 tun-mtu 1500 mssfix 1450 cipher AES-256-CBC # AES auth sha1 # ;comp-lzo user nobody group nogroup # keepalive persist-key # persist-tun status /var/log/openvpn-status.log log /var/log/openvpn.log verb 3 mute 10 /etc/openvpn/.ccd/client1
# mikrotik (192) openvpn (10) iroute 192.168.141.0 255.255.255.0 10.0.141.2 # ifconfig-push 10.0.141.2 10.0.141.1 Now mikrotik
I will describe the setting from the very beginning, including the organization of the switch, the setting of addresses, routes, DHCP and so on.
Go to the web interface of the router, download winbox.
We launch winbox (it is possible to connect both via IP and MAC), open the new terminal, and write the following (achtung, reset the configuration of the router):
system reset-configurationConnect to the second port of the mikrotik, run the same winbox, and on the request that appears, click
remove configWe organize a switch on ports 2-5, port 1 will act as a WAN port.
For this, for all interfaces 3-5 we specify the ether2 master port:
In the IP-> Adresses menu, assign an ip lan interface
Add a gate to go to the Internet in the menu IP-> Routes (in this particular case, the gate is a DSL modem with the address 10.100.0.1)
Note that 10.100.0.0 is the addressing between the router and the DSL modem through which it goes to the Internet, and 10.0.141.0 is the VPN network.
You can configure the DNS here IP-> DNS, and DHCP in the menu IP-> DHCP Server-> DHCP setup, specifying the parameters of the pool.
All of our internal subnet push for NAT, for this we set up masquerading.
Go IP-> Firewall-> NAT and add a rule by analogy:
Happiness is near
It remains to copy the root certificate (ca.crt) and the client certificate and key (client1.crt, client1.key), which we generated during the server installation / configuration process. On the microtic we select the Files menu, and we see a window with the file system of the router. This is where you need to put our keys, it works drag-n-drop.
In order for the router to know if it has certificates, you need to import them via System-> Certifates, add ca.crt, client1.crt, client1.key, the client key will automatically become “Decrypted”.
Directly, the OpenVPN connection is created in the Interfaces menu, when you click on the red plus you will see the OVPN Client in the drop-down list.
On the Dial Out tab, we indicate the address of our server, port, client certificate and types of encryption.
Total.
As a result, we have quite a secure VPN, with minimal costs for equipment and communication services, which can be organized within a couple of minutes.
Source: https://habr.com/ru/post/227767/
All Articles