User parameters and metrics in Universal Analytics
The ability to use "custom parameters and indicators" came along with the new version of Google Analytics. If earlier, in the already classic version of Google Analytics, we were given the opportunity to manipulate 5 user variables, now in Universal Analytics we can use up to 20 user parameters and indicators.
For the convenience of working with the material, I divided it into blocks:
What are user parameters and indicators?
If explained in simple terms, the parameters describe the characteristics of some object, for example, it can be a title or a URL of a page.
')
User indicators convey values, such as: the notional value of a website page in points.
For what purposes can the custom parameters and Universal Analytics indicators be used?
This is far from an exhaustive list of possible options for using parameters and indicators that you can create yourself.
Restrictions on the use of custom parameters and indicators .
In the classic version of Google Analytics, you can use 5 user variables, in the version of Universal Analytics - up to 20 user parameters and indicators. If you are a Premium user, you can create up to 200 of your own parameters and indicators.
Note: 20 and 200 is the total number of parameters and indicators. That is, you can create 15 parameters and 5 indicators (20 in total), but not 20 parameters and 20 indicators (40 in total).
The limit is set for each resource.
Create custom parameters and indicators.
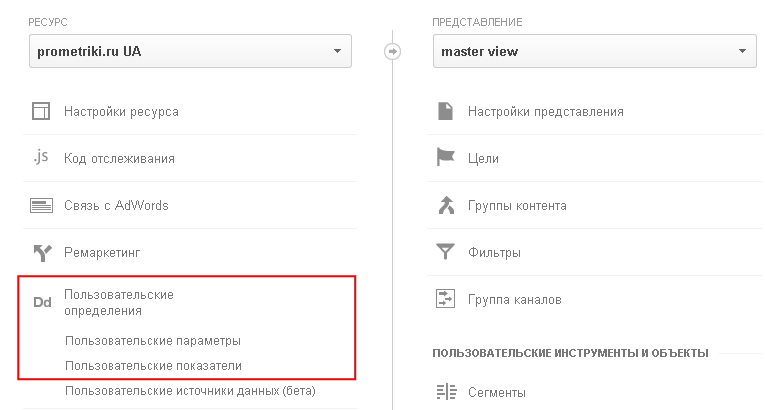
In order to create a custom parameter or indicator, go to the administrator mode, select the required (among the available) resources, and then in the menu find the “Custom definitions” item:
Then choose the desired value: a parameter or indicator (depending on what you are going to create). After selecting, a page will open on which all parameters or indicators previously created for the resource will be displayed:

Available Options and Indicators Universal Analytics
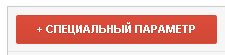
To create a new record, click on the red button at the top of the table:
A form will appear in which you need to fill in the “Name” field (it will be used in reports), and also indicate the scope of the parameter or indicator:

Creating Google Analytic s parameter
If you are not familiar with the scope of the parameters and indicators, I recommend reading the official documentation (in English).
If you find it difficult to understand the principle of how hits, sessions and user level work, then I will try to cover this topic a little.
In Google Analytics, everything is based on hits. A single page view, an event on a website, a transaction, a social action, and so on are all called hits . For clarity, let's call it "your step."
A session is a set of hits that are executed until the session is terminated, that is, until 30 minutes of user inactivity has passed (the default time). Up to this point, the session is considered active. For clarity, these are your steps (hits) from the first step (hit) to the final (hit). After 30 minutes, you took a step (hit): the second path began (new, second session).
The user level is all hits and sessions of one user: these are all your steps (hits) and paths (sessions) for the time you can move.
How the values set for parameters and indicators at various levels behave is quite informatively displayed in the illustrations in the official documentation. I advise you to deal with this, so that later there will be no questions: “Why are some values“ wiped out ”?”
Set user parameter and metric values.
After you have created the parameters and indicators you need, they need to start assigning values. This can be done in various ways:
Let's look at each of these options.
After you create a new parameter or indicator in the “Control Panel”, you will be offered a code to be placed on the website or in the application:
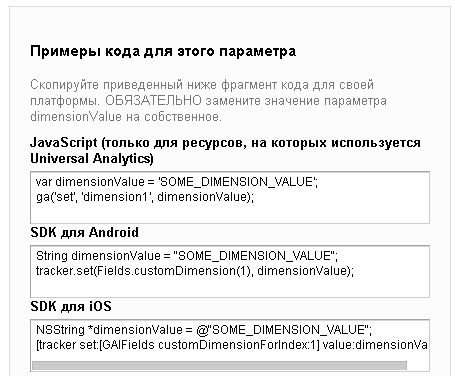
Sample code to set the parameter value
This is the first way to set the value (via the tracking code). It can also be implemented using two slightly different methods .
Option 1 . Setting the value of a custom parameter or indicator when sending data about a hit (page view, event, etc.). Example of implementation:
Option 2. Setting the value of a custom parameter or indicator using the method
set. Example of implementation:
1 // set value
2 ga ('set', 'dimension5', 'custom data');
In the second variant, the value is set for all hits that will be called after setting the value. For example, you set the desired value, and then the page view data is sent to the pages, and then the action is recorded. In this case, the values of the parameter or indicator will be transmitted for viewing the page and for the event.
If the first option is used, the values are transmitted only for the hit where they are listed.
A common mistake is to use the second option with setting the value via set (after calling the send method). Remember: setting any value via set must be done before calling send .
Proper use:
1 // set value
2 ga ('set', 'dimension5', 'custom data');
3
4 // send event data
5 ga ('send', 'event', 'category', 'action');
Incorrect use:
1 // send event data
2 ga ('send', 'event', 'category', 'action');
3
4 // set value
5 ga ('set', 'dimension5', 'custom data');
The next way is to transfer data using Google Tag Manager. This method should be used in the event that Google Analytics was implemented on the site using Google Tag Manager.
In order to indicate that when activating a tag, the values of a custom parameter or indicator should be transferred, when setting up a tag, click on the “Additional settings” block, then find the “Special parameters” or “Special indicators” lines and click on the desired one. About the following will be displayed :

Creating parameters and metrics in Google Tag Manager
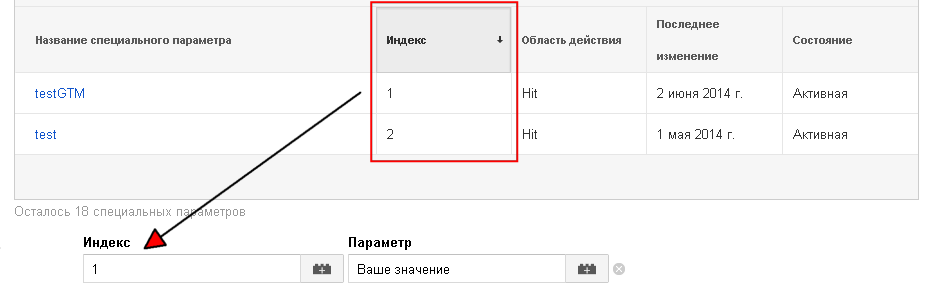
Next, press the desired button to create a parameter or indicator, specify the index and value:

Parameter setting example in Google Tag Manager
Where does the value for the "Index" field come from? It is assigned when creating a parameter or indicator in the control panel:
An example of creating in Google Tag Manager
As a parameter value, you can use a constant value that is entered in the corresponding field. In addition, you can specify the value of any available macro:
Parameter value from macro
After the settings have been made, the values will be transmitted each time the tag is activated.
The third way to transfer values is to use the Measurement Protocol or the Google Analytics Data Transfer Protocol.
If you are not familiar with this opportunity, then I recommend to get acquainted with it in this material .
I will briefly dwell on this opportunity, since There should be no difficulties when using it (if something does not work out, go back to the description and principle of operation of the protocol itself).
To indicate that the request contains parameters and measures, use additional parameters named cdN and / or cmN , where N is the index assigned when creating the parameter or indicator.
An example of a Measurement Protocol request sent using jQuery when you click on a button with id = buttonId:
1 $ ('# buttonId'). Click (function () {
2 $ .post (
3 " www.google-analytics.com/collect ",
4 {
5 v: '1',
6 tid: 'UA-xxxxx-1',
7 cid: '12xx916x95.13x6127xx4',
eight
9 t: 'event',
10 ec: 'Verify event',
11 ea: 'Virtual',
12
13 cd1: 'Parameter value',
14 cm2: 3, // value of the indicator
15 }
16 onAjaxSuccess
17 )
18 });
Pay attention to the line with cd1 and cm1 values : they transfer the values for the parameter with index 1 and the indicator with index 2.
You should also be aware that there is a limit to the parameter value of 150 bytes ( documentation ).
After the necessary parameters and indicators have been created, the values are transferred for them: you can start working with the collected data.
Work with user parameters and indicators in Google Analytics reports.
You have done a great job of creating and configuring parameters and indicators, organized the transfer of the necessary values, but it will be useless if no one can work with the obtained data. There are no problems with this in Google Analytics. Your information is available both in standard reports and in custom reports.
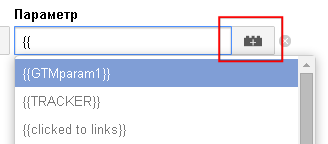
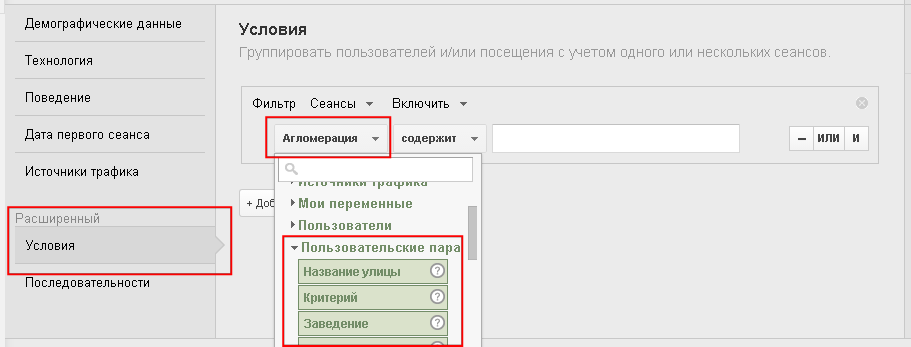
Work with standard reports.
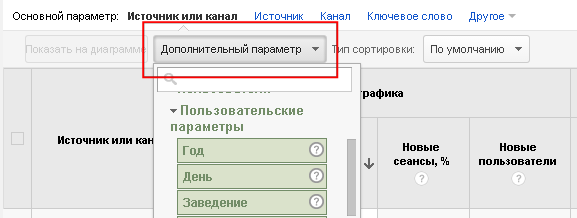
Use in extended segments:
Use in custom reports:
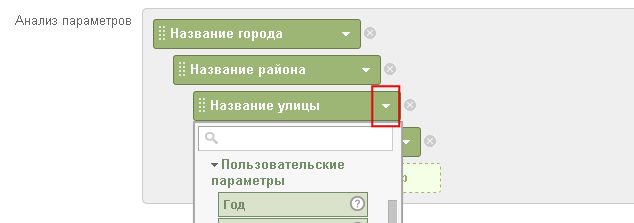
Use in Custom Analytics Reports
For the convenience of working with the material, I divided it into blocks:
- 1. What are user parameters and indicators?
- 2. For what purposes can custom parameters and Universal Analytics indicators be used?
- 3. Restrictions on the use of user parameters and indicators.
- 4. Create custom parameters and indicators.
- 5. Setting the values of user parameters and indicators.
- 6. Work with user parameters and indicators in Google Analytics reports.
What are user parameters and indicators?
If explained in simple terms, the parameters describe the characteristics of some object, for example, it can be a title or a URL of a page.
')
User indicators convey values, such as: the notional value of a website page in points.
For what purposes can the custom parameters and Universal Analytics indicators be used?
- • You can use them to send information to Google Analytics that is not in standard reports;
- • User parameters and metrics are used in Google Analytics features such as data expansion and import of cost data.
- • they allow you to tag visitors, and then analyze the behavior of various user groups, for example, those who are registered on the site and those who have not undergone this procedure.
This is far from an exhaustive list of possible options for using parameters and indicators that you can create yourself.
Restrictions on the use of custom parameters and indicators .
In the classic version of Google Analytics, you can use 5 user variables, in the version of Universal Analytics - up to 20 user parameters and indicators. If you are a Premium user, you can create up to 200 of your own parameters and indicators.
Note: 20 and 200 is the total number of parameters and indicators. That is, you can create 15 parameters and 5 indicators (20 in total), but not 20 parameters and 20 indicators (40 in total).
The limit is set for each resource.
Create custom parameters and indicators.
In order to create a custom parameter or indicator, go to the administrator mode, select the required (among the available) resources, and then in the menu find the “Custom definitions” item:
Then choose the desired value: a parameter or indicator (depending on what you are going to create). After selecting, a page will open on which all parameters or indicators previously created for the resource will be displayed:
Available Options and Indicators Universal Analytics
To create a new record, click on the red button at the top of the table:
A form will appear in which you need to fill in the “Name” field (it will be used in reports), and also indicate the scope of the parameter or indicator:
Creating Google Analytic s parameter
If you are not familiar with the scope of the parameters and indicators, I recommend reading the official documentation (in English).
If you find it difficult to understand the principle of how hits, sessions and user level work, then I will try to cover this topic a little.
In Google Analytics, everything is based on hits. A single page view, an event on a website, a transaction, a social action, and so on are all called hits . For clarity, let's call it "your step."
A session is a set of hits that are executed until the session is terminated, that is, until 30 minutes of user inactivity has passed (the default time). Up to this point, the session is considered active. For clarity, these are your steps (hits) from the first step (hit) to the final (hit). After 30 minutes, you took a step (hit): the second path began (new, second session).
The user level is all hits and sessions of one user: these are all your steps (hits) and paths (sessions) for the time you can move.
How the values set for parameters and indicators at various levels behave is quite informatively displayed in the illustrations in the official documentation. I advise you to deal with this, so that later there will be no questions: “Why are some values“ wiped out ”?”
Set user parameter and metric values.
After you have created the parameters and indicators you need, they need to start assigning values. This can be done in various ways:
- • via tracking code;
- • using Google Tag Manager;
- • using the Measurement Protocol.
Let's look at each of these options.
After you create a new parameter or indicator in the “Control Panel”, you will be offered a code to be placed on the website or in the application:
Sample code to set the parameter value
This is the first way to set the value (via the tracking code). It can also be implemented using two slightly different methods .
Option 1 . Setting the value of a custom parameter or indicator when sending data about a hit (page view, event, etc.). Example of implementation:
// ga('send', 'pageview', { 'dimension15': 'My Custom Dimension' }); // ga('send', 'event', 'category', 'action', { 'metric18': 8000 }); Option 2. Setting the value of a custom parameter or indicator using the method
set. Example of implementation:
1 // set value
2 ga ('set', 'dimension5', 'custom data');
In the second variant, the value is set for all hits that will be called after setting the value. For example, you set the desired value, and then the page view data is sent to the pages, and then the action is recorded. In this case, the values of the parameter or indicator will be transmitted for viewing the page and for the event.
If the first option is used, the values are transmitted only for the hit where they are listed.
A common mistake is to use the second option with setting the value via set (after calling the send method). Remember: setting any value via set must be done before calling send .
Proper use:
1 // set value
2 ga ('set', 'dimension5', 'custom data');
3
4 // send event data
5 ga ('send', 'event', 'category', 'action');
Incorrect use:
1 // send event data
2 ga ('send', 'event', 'category', 'action');
3
4 // set value
5 ga ('set', 'dimension5', 'custom data');
The next way is to transfer data using Google Tag Manager. This method should be used in the event that Google Analytics was implemented on the site using Google Tag Manager.
In order to indicate that when activating a tag, the values of a custom parameter or indicator should be transferred, when setting up a tag, click on the “Additional settings” block, then find the “Special parameters” or “Special indicators” lines and click on the desired one. About the following will be displayed :
Creating parameters and metrics in Google Tag Manager
Next, press the desired button to create a parameter or indicator, specify the index and value:
Parameter setting example in Google Tag Manager
Where does the value for the "Index" field come from? It is assigned when creating a parameter or indicator in the control panel:
An example of creating in Google Tag Manager
As a parameter value, you can use a constant value that is entered in the corresponding field. In addition, you can specify the value of any available macro:
Parameter value from macro
After the settings have been made, the values will be transmitted each time the tag is activated.
The third way to transfer values is to use the Measurement Protocol or the Google Analytics Data Transfer Protocol.
If you are not familiar with this opportunity, then I recommend to get acquainted with it in this material .
I will briefly dwell on this opportunity, since There should be no difficulties when using it (if something does not work out, go back to the description and principle of operation of the protocol itself).
To indicate that the request contains parameters and measures, use additional parameters named cdN and / or cmN , where N is the index assigned when creating the parameter or indicator.
An example of a Measurement Protocol request sent using jQuery when you click on a button with id = buttonId:
1 $ ('# buttonId'). Click (function () {
2 $ .post (
3 " www.google-analytics.com/collect ",
4 {
5 v: '1',
6 tid: 'UA-xxxxx-1',
7 cid: '12xx916x95.13x6127xx4',
eight
9 t: 'event',
10 ec: 'Verify event',
11 ea: 'Virtual',
12
13 cd1: 'Parameter value',
14 cm2: 3, // value of the indicator
15 }
16 onAjaxSuccess
17 )
18 });
Pay attention to the line with cd1 and cm1 values : they transfer the values for the parameter with index 1 and the indicator with index 2.
You should also be aware that there is a limit to the parameter value of 150 bytes ( documentation ).
After the necessary parameters and indicators have been created, the values are transferred for them: you can start working with the collected data.
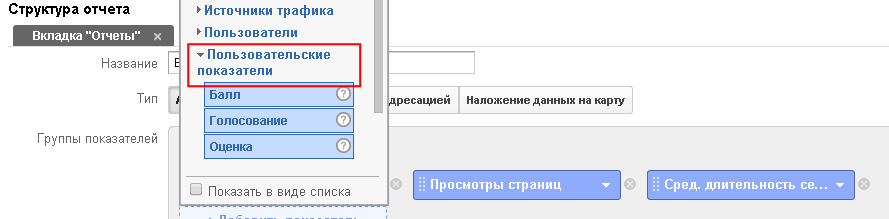
Work with user parameters and indicators in Google Analytics reports.
You have done a great job of creating and configuring parameters and indicators, organized the transfer of the necessary values, but it will be useless if no one can work with the obtained data. There are no problems with this in Google Analytics. Your information is available both in standard reports and in custom reports.
Work with standard reports.
Use in extended segments:
Use in custom reports:
Use in Custom Analytics Reports
Source: https://habr.com/ru/post/227001/
All Articles