IT guy on vacation: a little practice of amateur astrophotography
Seeing the previous post "IT-guy on vacation: gadgets to the telescope," he decided to slightly reveal the topic of astrophotography using a telescope and SLR cameras. I am an absolute amateur in this matter, but I suppose my humble experience may be interesting.
I revived my interest in astronomy about 9-10 years ago, when available telescopes from Synta and Celestron began to appear on store shelves. The first telescope for me was the Synta Skywatcher 70/900 refractor on the equatorial mount EQ2 with a motor in right ascension. Looking at some of the night Moscow sky from the window of the apartment and having experienced absolutely childish delight while observing Jupiter and his companions, it was decided to capture all this. I didn’t like the idea of filming a soap box, putting it to the eyepiece, and I moved towards shooting in the direct focus of the telescope — that is, when the camera was installed instead of the eyepiece. Camera options for lower quality planetary shooting at that time were few - Meade LPI, Celestron NexImage and Philips webcam. The cost of the camera from Meade was significantly higher than the last two and, as a result, I took the camera from Celestron. Unlike Phillips, it was not necessary to redo it for attachment to a standard eyepiece assembly of the amateur telescope (1.25 ”).
The process of planetary shooting is quite simple - a video was recorded, which was then processed in the Registax program.
Further developments were standard for the novice amateur astronomer - I wanted a larger telescope. As a result, on the DR, I presented myself with an 8 ”(200mm) Newton Celestron C8-N reflector on the CG-5 equatorial mount with motors along both axes.
')
Based on the characteristics (diameter of the main mirror 200mm and focal length 1000mm), the main directivity of the C8-N are deep space objects (the so-called “deepscale”). On the webcam, which, in fact, is a Celestron NexImage, it is difficult to shoot deepscay. Here we need long exposures and a large matrix. At that time, the first available digital SLR camera Canon EOS 300D was already at my disposal. It remained a small matter - to buy an adapter ring from the Canon EOS bayonet to T thread. Barlow's lens with a T-adapter was purchased immediately with a telescope (the lens itself can be unscrewed). The shooting process looked like this - the subject was located, an eyepiece was shot and a camera was inserted in its place. Focusing was done through the camera's viewfinder, the shutter was released from the remote, the shutter speed was controlled manually (bulb mode). Thus, I managed to take shots with a shutter speed of up to 1 minute. On longer exposures, the picture was spoiled by not perfect tracking of the target by the mount, the polar axis of the mount is not always well-adjusted, and the weight limit of all the equipment for this mount.
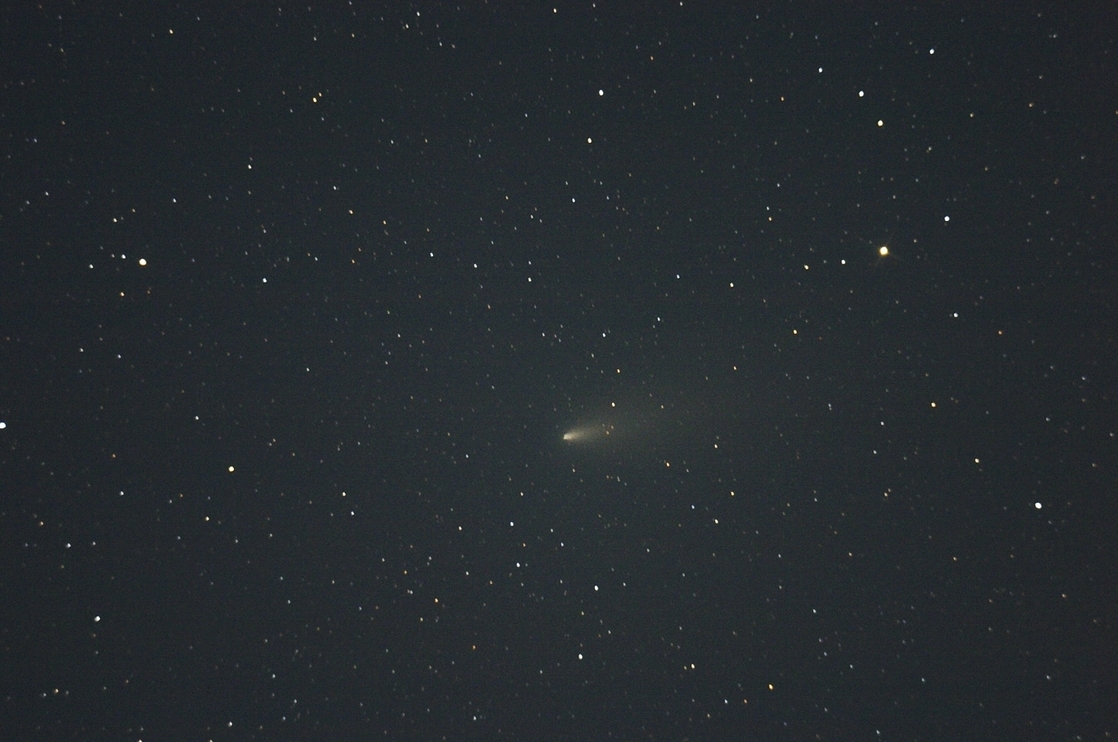
Comet Schwassmann-Wachmann 73P component B. Shooting 13.05.2006. Single frame. Canon EOS 300D in direct focus with the Celestron C8-N telescope. ISO 400. Exposure 30 sec. Without guiding.
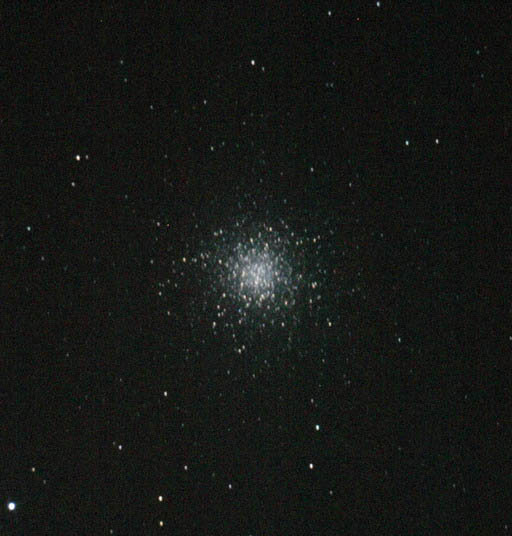
M13 star cluster in the constellation Hercules.
Filmed on a Canon EOS 300D + 2x barlow in the direct focus of the Celestron C8-N telescope. Single frame. ISO 400, shutter speed - 58 sec. Without guiding.
Also, on occasion, I replaced the Celestron NexImage planetary camera with a Meade LPI. The camera from Meade has one slight advantage over Celestron - the complete Meade Autostar software. The program on the fly adds up the frames received from the camera and you can observe the quality of the resulting final image in real time.
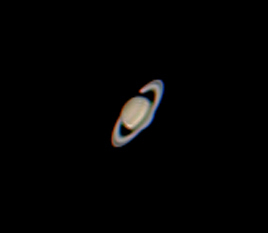
Saturn.
Filmed on Meade LPI + 2x barlow in the direct focus of the Celestron C8-N telescope. ~ 120 frames from ~ 800 frames
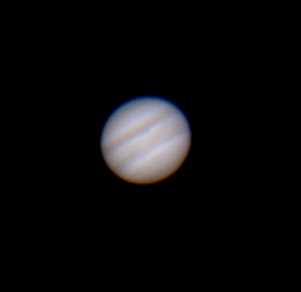
Jupiter.
Filmed on Meade LPI + 2x barlow in the direct focus of the Celestron C8-N telescope. Amount ~ 200 frames from ~ 1000
As you know, appetite comes with eating. It was decided to replace the mount with a more lifting and computer-guided - Synta EQ-6 SynScan. At the same time, I purchased a small telescope for guiding (a Deepsky 80/400 refractor), a guide QHY-5 black-and-white camera, and made a platform for installing two telescopes on a single mount. I think that from this moment it is worthwhile to paint the process of shooting in more detail:
Guiding allows you to compensate for most of the standard problems of mechanics and electronics mount. In the simplest case, for shooting with guiding, a mount with the ability to connect to a computer, two telescopes and two cameras is necessary. A camera for shooting is installed on the main telescope and a second small telescope guide with a camera is installed parallel to it. Mount and guide camera are connected to the computer. After that, we are aiming at the object of shooting, we find in the telescope guide the brightest star in the field of view and set up in a special program (Guidemaster, PHDGuide, etc.) tracking of this star. As a result, the program will track the offset of this star and send commands to the mount, correcting the inaccuracy of the polar axis settings and the work of the mount motors. As a result, we get the opportunity to use very long exposures, up to several hours.

Filmed on a Canon EOS 30D in the direct focus of the Celestron C8-N telescope on the EQ-6 SynScan mount. Single frame. ISO 400, shutter speed - 508 sec. With guiding.
To date, I stopped at the following set for the photo:
Tele scope Celestron C8-N, Mount Celestron CG-5 Advanced GT, Guiding telescope DeepSky DT80 / 400
Camera Guide QHY5, Lunar-Planetary Meade LPI Camera, Canon EOS 500D Camera
There are other ways to shoot Deepscale objects. For example, shooting using specialized cameras such as SBIG, FLI, etc. with wheels of filters and time of shooting of one object about several nights. But, in my opinion, this is not amateur, but professional shooting. Yes, and for the discovery of the potential of such cameras need a completely different equipment that is not comparable in price and quality with affordable amateur telescopes.
And, in conclusion, I should note that, despite the efforts of our Chinese friends and the general development of technology, astrophoto still remains a very expensive hobby.
The beginning of the way
I revived my interest in astronomy about 9-10 years ago, when available telescopes from Synta and Celestron began to appear on store shelves. The first telescope for me was the Synta Skywatcher 70/900 refractor on the equatorial mount EQ2 with a motor in right ascension. Looking at some of the night Moscow sky from the window of the apartment and having experienced absolutely childish delight while observing Jupiter and his companions, it was decided to capture all this. I didn’t like the idea of filming a soap box, putting it to the eyepiece, and I moved towards shooting in the direct focus of the telescope — that is, when the camera was installed instead of the eyepiece. Camera options for lower quality planetary shooting at that time were few - Meade LPI, Celestron NexImage and Philips webcam. The cost of the camera from Meade was significantly higher than the last two and, as a result, I took the camera from Celestron. Unlike Phillips, it was not necessary to redo it for attachment to a standard eyepiece assembly of the amateur telescope (1.25 ”).
The process of planetary shooting is quite simple - a video was recorded, which was then processed in the Registax program.
Further developments were standard for the novice amateur astronomer - I wanted a larger telescope. As a result, on the DR, I presented myself with an 8 ”(200mm) Newton Celestron C8-N reflector on the CG-5 equatorial mount with motors along both axes.
')
Main caliber
Based on the characteristics (diameter of the main mirror 200mm and focal length 1000mm), the main directivity of the C8-N are deep space objects (the so-called “deepscale”). On the webcam, which, in fact, is a Celestron NexImage, it is difficult to shoot deepscay. Here we need long exposures and a large matrix. At that time, the first available digital SLR camera Canon EOS 300D was already at my disposal. It remained a small matter - to buy an adapter ring from the Canon EOS bayonet to T thread. Barlow's lens with a T-adapter was purchased immediately with a telescope (the lens itself can be unscrewed). The shooting process looked like this - the subject was located, an eyepiece was shot and a camera was inserted in its place. Focusing was done through the camera's viewfinder, the shutter was released from the remote, the shutter speed was controlled manually (bulb mode). Thus, I managed to take shots with a shutter speed of up to 1 minute. On longer exposures, the picture was spoiled by not perfect tracking of the target by the mount, the polar axis of the mount is not always well-adjusted, and the weight limit of all the equipment for this mount.
Example of shooting in direct focus:
Comet Schwassmann-Wachmann 73P component B. Shooting 13.05.2006. Single frame. Canon EOS 300D in direct focus with the Celestron C8-N telescope. ISO 400. Exposure 30 sec. Without guiding.
M13 star cluster in the constellation Hercules.
Filmed on a Canon EOS 300D + 2x barlow in the direct focus of the Celestron C8-N telescope. Single frame. ISO 400, shutter speed - 58 sec. Without guiding.
Also, on occasion, I replaced the Celestron NexImage planetary camera with a Meade LPI. The camera from Meade has one slight advantage over Celestron - the complete Meade Autostar software. The program on the fly adds up the frames received from the camera and you can observe the quality of the resulting final image in real time.
Examples of shooting on Meade LPI in direct focus:
Saturn.
Filmed on Meade LPI + 2x barlow in the direct focus of the Celestron C8-N telescope. ~ 120 frames from ~ 800 frames
Jupiter.
Filmed on Meade LPI + 2x barlow in the direct focus of the Celestron C8-N telescope. Amount ~ 200 frames from ~ 1000
As you know, appetite comes with eating. It was decided to replace the mount with a more lifting and computer-guided - Synta EQ-6 SynScan. At the same time, I purchased a small telescope for guiding (a Deepsky 80/400 refractor), a guide QHY-5 black-and-white camera, and made a platform for installing two telescopes on a single mount. I think that from this moment it is worthwhile to paint the process of shooting in more detail:
Guiding allows you to compensate for most of the standard problems of mechanics and electronics mount. In the simplest case, for shooting with guiding, a mount with the ability to connect to a computer, two telescopes and two cameras is necessary. A camera for shooting is installed on the main telescope and a second small telescope guide with a camera is installed parallel to it. Mount and guide camera are connected to the computer. After that, we are aiming at the object of shooting, we find in the telescope guide the brightest star in the field of view and set up in a special program (Guidemaster, PHDGuide, etc.) tracking of this star. As a result, the program will track the offset of this star and send commands to the mount, correcting the inaccuracy of the polar axis settings and the work of the mount motors. As a result, we get the opportunity to use very long exposures, up to several hours.
An example of shooting the galaxy M51 "Whirlpool":
Filmed on a Canon EOS 30D in the direct focus of the Celestron C8-N telescope on the EQ-6 SynScan mount. Single frame. ISO 400, shutter speed - 508 sec. With guiding.
To date, I stopped at the following set for the photo:
Tele scope Celestron C8-N, Mount Celestron CG-5 Advanced GT, Guiding telescope DeepSky DT80 / 400
Camera Guide QHY5, Lunar-Planetary Meade LPI Camera, Canon EOS 500D Camera
PS
There are other ways to shoot Deepscale objects. For example, shooting using specialized cameras such as SBIG, FLI, etc. with wheels of filters and time of shooting of one object about several nights. But, in my opinion, this is not amateur, but professional shooting. Yes, and for the discovery of the potential of such cameras need a completely different equipment that is not comparable in price and quality with affordable amateur telescopes.
And, in conclusion, I should note that, despite the efforts of our Chinese friends and the general development of technology, astrophoto still remains a very expensive hobby.
Source: https://habr.com/ru/post/226943/
All Articles